You can save the missed details by slicing 3D model with -0.1/-0.2 print expansion in the slicer setting. This will make your model slightly thinner then original. So when you spray - the paint thickness will compensate the model thickness you reduced in slicer - resulting in final painted model being close to original thickness, without details lost from paint.
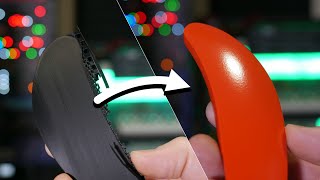
I did print the skull at a layered height of 0.3 which mean detail was lost in the first place. 0.1 would have been better and taken less time to smooth but I needed an extreme layer height to show how much this method can work.
With what I like to print I can see this being very useful. I love a smooth and shiny look to things that are very simple in shape. Though I think this would never work well on things with more features than a scull.
I think this method would be great on large items. The small ones lose many details in the process. Great idea though! I think I’ll try out on some busts I printed
Just FYI you don't need to heat acetone to smooth with it, you can just give it a large surface to evaporate area such as lining a jar with paper towels. Works great, slightly slower but much safer.
alternatively, instead of mixing spraypaint and varnish, would be to use an automotive filling primer. most prop and costume builders use it for their 3D prints, as it's designed to fill in tiny cracks and scratches. i find i use 2-3 coats of filler primer, 2-3 coats of the paint i intend to use, and then 1-2 coats of whatever clearcoat i plan to use, and it removes almost all layer lines.
I’m going to try this I’m going to a con and I really don’t have time and I’ve been watching many videos to see what would be the best method your advice is probably the best
Lots of critics, but it’s a great solution for certain cases. Not all cases, but where it’s suitable, it’s perfect! Ideally, build yourself a small spray hood/booth with a strong exhaust fan and filters.
Love it. I don't do this a lot, but I switched from bing videos to youtube just so i could subscribe to this guy. I am definitely using this tactic on my future prints!
@@99Plastics melting is caused by heat converting to speed in molecules of a solid, when they speed up enough that the motion overcomes the attractions so that the molecules can move past each other as a liquid, it changes state, dissolving is cause by chemical reactions breaking down the bonds in molecules of a solid so that it moves like a liquid looking for bonds to connect to try and return to a solid. it's a chemical reaction, not a mechanical reaction like melting.
I think that for some art pieces it can be brush coated by an acrylic paint. It's not expensive and is pretty sticky (and waterproof). Well the downside is that it can be scrub out by nails or something sharp if you'll do it often.
A thin layer of thin cyanoacrelate brushed over areas that either printed thin, need reenforcing, or smoothing out then lightly dusted with baking soda works more than wonders for me.
I've tried acetone followed by primer and vice-versa, but I followed the instructions like a good boy and allowed the first spray to dry a bit before applying the second. I wasn't totally satisfied with how well that method worked, but the results from your method look spectacular, so I'll have to give it a try! Thanks for sharing!
Thank you souch for this video. I started sanding a good hour and made little progress. I thought to myself "there has to be another way" so thank you again for sharing.
You should consider doing this outside or in a non-finished part of the house. I tried this in an appartment outdoor locker a couple years ago and my roomate's freezer which we kept there ended up with a sweet pearlescent green and white paint. It was awesome but i'm looking at your patio door and vinyl floor and I don't think you want that. Paint smoke always finds its way and really far sometimes :P
If you have ever had clear perspex with a scratches on it you can sand till it becomes cloudy then flame to polish it. You can do the same to pla use light flame polishing takes some practice since its easy to melt or crush the PLA but if you can do it you will get a smooth finish and you can manipulate the surface if the print by using using something smooth to smooth out the print.
First printer should be in today. Ender 3. Very excited to tryout some of the different stuff I've seen on your channel and your fellow 3d printing UA-camr's channels. Thanks for sharing all your content. Invaluable to a self teacher/student.
For abs, you could probably use a cool mist humidifier for Acetone with 3 small slow moving fans within the sides of a bucket across from each other on a 45 degree angle to keep the spread even and have it set on a timed plugin for consistent results.
You cna actually easily smooth PLA with some Acetone Fumes. Basically, you put a cup or box with acetone soaked in a paper towel on the inside over the print, and you leave it for about 45 minutes and let the fumes soak in, then you remove it and let it dry, it smooths very nicely.
KILLZ primer does the same but for a fraction of the price it also comes in a spray can. I had the same issue with smoothing out foam models. Its a thick coating which will smooth out any small details but ultimately give you a smooth surface in one or two coats. You'll have to paint over it at the end of course as it is only sold in white.
You can use diluted acetone to soften the surface of the PLA to make sanding faster. Additionally if you have to wait a who day you might as well be printing with thinner layers, it's not going to add a whole day on for most of the models people make, and you will get finer details.
Polymer chemist here - Melting is a process that happen then heating things, thus applying acetone to ABS doesn't melt it, it lubricates the polymer chains, increasing the their ability to move, thus making it easier to deform the plastic. AND as many already pointed out. The sovlents in the spraypaint and urethane is way more toxic to humans and animals, than the acetone. It should only be used in a well ventilated enviroment as Im sure is already stated one the can. Using the fan spreads the fumes even more. If you care for your cat, dont spray right next to it. This is a prime example of a DIYr who just do stuff without doesn't sit down aquire the knowledge needed for doing it right. That said, very nice results you got with the skull. Maybe try and wait long between the coats
Perfect video, if I want to preserve details, I can make the same steps like in scale models, 1)primer 2)rescue the details with specific tools 3)paint Awesome video thanks
If your going that route, just get a sandable primer. It’s purpose is to fill holes and gaps (minor holes and gaps, it’s not bondo. Lol.) you will retain a lot more over all detail in your piece.
Why do people always moan that detail is lost? @ 2:11 Look at the difference. Which skull would you rather have? This is an example of what you can achieve. He used a 0.3mm layer height to show how effective it is. He did an extreme version of the technique. If you want to keep certain details like the teeth, then don't spray too heavy in these areas. People need to use imagination and stop thinking like robots who are programmed every step of the way.
Thank you so much for understanding. This low res model with horrible line heights can be smoothed so that means even a higher detailed model can be smoothed too.
@@3DSage No probs. Just hate to see when people take the time to help out others with their knowledge for free, with no thanks, only to be rubbished on a slight thing. People like you are what makes YT a great source of ideas for makers. I'm taking away some knowledge from this video even if I don't apply it, so thank you for it.
Except the printed skull looks like pretty bad before even the paint. You could get waaaaaaaaaay better print quality with .16mm layer height, match the multiples of your nozzle diameter with all the other settings (ie use the "magic numbers") change the orientation on the bed so it's not printing flat, angling the print, elevating it and using supports, better PLA than the monoprice stuff, Using more top layers/adaptive layers to lessen the voxelization of the top. If you're trying to get something to look better why not set yourself up from the beginning instead of coating it in paint? Or just save yourself the trouble and buy a spray bottle, IPA and polymaker polysmooth filament.
Is even making a 2:50 video demonstrating something a crime these days? Okay, people who make 20 minute long videos about something that can be explained in 5 minutes, yes that is annoying. But less than 3 minutes?? What are you crying about
Very useful, the only issue is on detailed prints , coating with paint subtracts a measure of detail with each coat. Still extremely useful when it’s necessary
It's better to use a primer, or better yet, filler primer (or just load up the primer real thick, and don't worry about runs) then sand it down. There really is no getting round sanding PLA but with primer loaded up, the time it takes is worth it. After sanding black PLA with white primer it should look like a high contrast black and white stripe print, but then just paint over it and it will be nice and smooth.
Theres also a product called liquid green stuff you can find at game stores that sell things like miniature paints that works in much the same way, but comes in a brush on form.
I've had pretty good luck using one of the fine point heat guns you use for soldering surface mount devices. If you keep it moving you get a smooth glossy surface on the pla.
@@sunnydoom2726 The heat gun I have for surface mount parts has a nozzle that is about 1/8 in. diameter. Once I got the hang of it, it worked pretty well, but I can't stress enough the importance of keeping it moving.
I use gesso mixed with acrylic paint at a ratio 1:1 or 2 acrylic 1 gesso and then paint a few coats over the model after a round of sanding... (probably it ll work pretty well without sanding) the layer lines get covered and disappear depending on your skills and quality of gesso and acrylic then you can sand it for a final smooth surface. Also you can paint it after that. However each coat of gesso needs around a day to dry. Details remain almost the same depending on how big the model is of course. Give it a try, my first ones were not that great but after some practice you ll see great results. Good luck
Hey. Great video and idea. I tried it but it’s not very helpful for the prints I do- statues. For square and round items it is fine but for details like a skull or figure, it fills in the detailed lines that I desire and in general the end result isn’t desirable BUT, I will say this is a great idea instead of bondo and other similar applications.
Thanks for sharing this! Is it possible to spray the polyeurathane first, let it dry then apply spray paint or is it critical to have them mix during curing/drying? Have you tried this?
People complain about the loss of fine details, but remember that not all 3D prints have such fine details. For prints with no fine details, like speaker boxes, this should work very well.
PLEASE explain to me why people don't just blow it lightly with a heat gun? Am I missing something? I want to buy one and I want to use PLA but I'm confused.
PLA isn't actually biodegradable, at least not how people think. It requires extremely specific conditions and microorganisms to compost PLA that are extremely rare in nature, if you buried a PLA print in your compost pile it would still be there 2000 years from now. There were recycling plants that compost PLA, but they pop up and shut down frequently as it's not lucrative. Just FYI.
Good idea, but new technology is available. Note about PLA, new information came out in 2020 indicating that it's not actually that biodegradable. It will biodegrade if you place it in a commercial composter at 140F, but it will not biodegrade in your garden. Second note: in 2019, Prusa introduced a feature where you can change the layer height in the print at various stages. This allows you to print the sections with vertical walls at 0.3mm layer heights and the sections with near horizontal curves at 0.1mm layer heights in the same print.
"without any harsh chemicals" WTF?! Exactly what is it you think is in the paint? The primary solvent in enamel, lacquer, and urethane is acetone. The very same as used in acetone vapor baths used to smooth ABS. Other solvents as well, and worse. Please read the MSDS sheets (available online) for the products you're using before declaring them "without any harsh chemicals." FFS.
@@ericperkins3078 Acetone is an extremely common chemical, and extremely harsh. Just because you use bleach everyday doesn't mean it's not harsh and even toxic. So yeah, saying these things that use acetone as a base are safer than acetone is a bold face. Btw i literally have 3 gallons of acetone in my house (not even bought for 3d stuff) and zero paint or varnish.
Pla is not biodegradable, it is compostable and the definition of compostable is that for a good result you need to have a controlated enviorment and industrial too, with conditions like 60 °C and a lot of oxigen.
Hmm... Mixing an acrylic enamel and oil based polyurethane in the same coat seems like an odd approach. Why not just do 2 coats of acrylic enamel or 1 coat of primer and 1 coat of acrylic enamel?
I agree. Of All of the questions in these comments, seems only you and I are wondering about oil vs. acrylic polyus. My educated opinion(although new to 3d printing) both should do the job. Acrylic polyurethane will have longer drying times and cost more than the oil based, but definitely is a more “environmentally friendly” choice. I usually choose oil based because of my lack of patience and it’s nearly half the price.
so I have a print that is one color on the top and another on the bottom of a single piece. is there a way to hand paint the smaller part and still use your technique?
Interesting. There may be a few options but I feel like I would try to use painters tape on one side then remove and apply it to the other side. One side at a time i guess. But you could hand paint it after too
Here is your answer!!! *Chemicaly Smoothing PLA* "Generally these days I start by brushing on some Dichloromethane (DCM, or methylene chloride). This stuff is really very nasty and I do this work either in a fume hood or outside with a fan blowing away from me. I use a respirator with chemical filters, PVA gloves and full eye glasses. Do not use this chemical unless you’ve taken the proper safety precautions! However I found no other solvent even remotely as good at smoothing as Dichloromethane. Apparentl Tetrahydrofuran (THF) is ok, though I’ve not tried it. Acetone is completely useless, as PLA is completely insoluble in Acetone. Due to the nastiness of Dichloromethane I’ve never attempted doing vapor smoothing, but the simple cold brush on works surprisingly great. Sometimes I do two “coats”. With each coat the Dichloromethane dissolves the surface layer of the PLA and the resolidifies, running into the cracks. It also conveniently seals any tiny holes in the print where print layers have failed to fuse properly. Another method is to spray on many coats of a lacquer, e.g. shellac. This has some problems though during burnout and can leave undesirable carbon residues in the mold which can be tricky to remove. With higher burnout temperatures though this has been less of a problem." mtyka.github.io/art/2016/12/11/lostpla-casting-glass.html
So after buying paint and poly, a few days of dry time the final product is ready? Get sand paper and sand it smooth, clean and paint it.. I could have this same piece done in one day.
Maybe try a shellac based primer like Zinnser BIN. It's fine resin particles in an alcohol base. shake well before applying and apply in a well ventilated space. It cures really quickly as the alcohol evaporates and can be used to build fast. I use it as a hard base coat on hvlp painted cabinetry.
🎉There is a possibility!!! I am a biochemist and I was bord in the lab, so I tried different chemicals on my PLA prints 😅 Acetonitrile vapor works perfectly on PLA.
Acetone can be used with no heat at all. It's known as the cold vapor smoothing. Two with all that paint you're killing your details. I'm a person who loves the detail on 3d prints. I can see this working better on LARGE prints.
Depends on the PLA being used. I thought the same but been proven wrong. You have to dip the PLA print into the acetone and it will smooth it out. I think you have to leave it in for about 20 to 30 minutes but you have to keep your eyes on it. ua-cam.com/video/HEnz8CWxyjc/v-deo.html UPDATE: Less then 10 to 20 minutes. You should do it about a minute and take it out and see and let it dry. Continue to do this untill you get the results your looking for. It will leave a white film on it but if your going to prime it I guess it wouldn't matter.
What I didn't stress enough in the video is that I printed the skull at a layer height of 0.3 which means detail was lost during printing. A height 0.1 would have been better and taken less time to smooth but I needed an extreme layer height to show how much this method can do!
It is possible to smooth PLA with acetone though you do need to heat it up a lot more then normal as your using the acetone as a thermal conveyor. Here is my setup: acetone, 1.5 liter glass beker, a heated magnetic stirrer, a stir-bar, long wire hook for the model and PPE mask (plus ventilation if possible). I fill the beker a with about 2cm's of acetone I then add the stir bar and turn on the heat till it gets to a low boil, at this time you should watch the sides of the glass beker for the condensation line that will move up the beker till it gets to the edge now your ready. Attach your model to the wire hook and dip it below that line, you will see the model "wet" itself. Hold it there for 5 seconds then remove, repeat if necessary. I never have to do more then 15 seconds total for a glassy smooth surface. Place the model somewhere to dry afterwards.
Interesting approach that may work well integrating into my current workflow. Just curious as to how well this compares to filler primer with no sanding?


cool to know but it should be noted that the skull now has lips instead of teeth
Indeed
This made me laugh
Your correct. Maybe we have to make certain areas more pronounced, deeper, so smoothing will not vanquish it
perhaps you could cover the skull with some painters tape before spraying and do so in such areas
😂
You can save the missed details by slicing 3D model with -0.1/-0.2 print expansion in the slicer setting. This will make your model slightly thinner then original. So when you spray - the paint thickness will compensate the model thickness you reduced in slicer - resulting in final painted model being close to original thickness, without details lost from paint.
How will this help losing details?
@@jorisr4717 i think it might sink details a bit in order to allow for material expansion to compensate for
Are these settings in cura slicer too?
I couldn't read which kind of paint you used from the can image. Was is an enamel or acrylic?
interesting concept but i noticed all of the fine details of the skull were lost in the process. ie the teeth.
I did print the skull at a layered height of 0.3 which mean detail was lost in the first place. 0.1 would have been better and taken less time to smooth but I needed an extreme layer height to show how much this method can work.
I think that sandpaper and filler primer is still a better faster option.
It would be nice if there was a quick way to edit the file to be printed with sharper/more pronounced fine details in anticipation of smoothing.
Well that'S the part he kinda forgot to mention, the negatives :D
also how do you do bigger prints ? Tight Tolerances? Moving Parts?
“No harsh chemicals” as you spray paint inside lol
and damn polyurethane
As im breathing muratic acid
@@chroot1838 not much LOL
"How to remove all details from your print"
turns everything into goop
With what I like to print I can see this being very useful. I love a smooth and shiny look to things that are very simple in shape. Though I think this would never work well on things with more features than a scull.
That’s not the point. You can cover the holes or whatever you want
I use 3D printer for custom boxes for electronic devices, so it's perfect solution for me.
Yeah exactly, that skull lost most of its teeth
I think this method would be great on large items. The small ones lose many details in the process. Great idea though! I think I’ll try out on some busts I printed
100% i thought the same thing
Just FYI you don't need to heat acetone to smooth with it, you can just give it a large surface to evaporate area such as lining a jar with paper towels. Works great, slightly slower but much safer.
cool mist humidifier. I made a another post here to help create consistency and full coverage with this concept
And you loose less detail
Respirator for Polyurethane unless you've already had kids..
Sterling77
Oh yeah? Well maybe I don't want kids! 😋
He has already had kids, but he wanted to sterilize his cat 😂
@@tin2001 Don't want kids? Then have the kids do it without breathing protection.
You could also do it in a well-ventilated area!
LMAOO
alternatively, instead of mixing spraypaint and varnish, would be to use an automotive filling primer. most prop and costume builders use it for their 3D prints, as it's designed to fill in tiny cracks and scratches. i find i use 2-3 coats of filler primer, 2-3 coats of the paint i intend to use, and then 1-2 coats of whatever clearcoat i plan to use, and it removes almost all layer lines.
I’m going to try this I’m going to a con and I really don’t have time and I’ve been watching many videos to see what would be the best method your advice is probably the best
Lots of critics, but it’s a great solution for certain cases. Not all cases, but where it’s suitable, it’s perfect! Ideally, build yourself a small spray hood/booth with a strong exhaust fan and filters.
Thank you for the kind comment! :)
More commonly a lot of people just use filler primer.
Love it. I don't do this a lot, but I switched from bing videos to youtube just so i could subscribe to this guy. I am definitely using this tactic on my future prints!
"Can produce a melted 'look' "
Dude. It doesnt look melted, it is melted.
No, it's dissolved, not melted, which isn't the same.
DaToNyOyO That was referring to using acetone for vapor polishing of ABS.
@@GRBtutorials It's a melt my dude not a dissolve.
@@99Plastics melting is caused by heat converting to speed in molecules of a solid, when they speed up enough that the motion overcomes the attractions so that the molecules can move past each other as a liquid, it changes state, dissolving is cause by chemical reactions breaking down the bonds in molecules of a solid so that it moves like a liquid looking for bonds to connect to try and return to a solid.
it's a chemical reaction, not a mechanical reaction like melting.
@@GRBtutorials same looking after affects so really doesn't matter lol
Great video Sage!! Definitely want to try this soon :D
Awesome!! Thanks Evan and Katelyn! Do try it and share your results! :) I hope it works well for you.
Did y'all try it???
I think that for some art pieces it can be brush coated by an acrylic paint. It's not expensive and is pretty sticky (and waterproof). Well the downside is that it can be scrub out by nails or something sharp if you'll do it often.
Interesting technique, the biggest drawback I see is that you lose details, and for tight tolerance joins you might have issues.
The loss of fidelity is a drawback of all smoothing options.
I ended up using 2-part epoxy crafting resin, gives a very smooth finish and cures quickly if UV resin.
I take a few minutes to X-acto the details in deeper before spraying. Helps to not lose the sharp creases and tiny details.
Actually, sandable primer is much easier to work with.
Thanks for making this video! I just tried it and it smoothed my whole print!
Awesome!!! I'm glad to hear positive results. I'm glad it worked for you!
did it affedct the weight?
That skull went from mean looking to a smiley face.
A thin layer of thin cyanoacrelate brushed over areas that either printed thin, need reenforcing, or smoothing out then lightly dusted with baking soda works more than wonders for me.
So basically XTC 3D but much easier to apply and at a fraction of the cost, I'll have to try this, thanks for the tip!!
I've tried acetone followed by primer and vice-versa, but I followed the instructions like a good boy and allowed the first spray to dry a bit before applying the second. I wasn't totally satisfied with how well that method worked, but the results from your method look spectacular, so I'll have to give it a try! Thanks for sharing!
Thank you souch for this video. I started sanding a good hour and made little progress. I thought to myself "there has to be another way" so thank you again for sharing.
You should consider doing this outside or in a non-finished part of the house. I tried this in an appartment outdoor locker a couple years ago and my roomate's freezer which we kept there ended up with a sweet pearlescent green and white paint. It was awesome but i'm looking at your patio door and vinyl floor and I don't think you want that. Paint smoke always finds its way and really far sometimes :P
If you have ever had clear perspex with a scratches on it you can sand till it becomes cloudy then flame to polish it. You can do the same to pla use light flame polishing takes some practice since its easy to melt or crush the PLA but if you can do it you will get a smooth finish and you can manipulate the surface if the print by using using something smooth to smooth out the print.
First printer should be in today. Ender 3. Very excited to tryout some of the different stuff I've seen on your channel and your fellow 3d printing UA-camr's channels. Thanks for sharing all your content. Invaluable to a self teacher/student.
I'm glad you told me that! Thank you for saying that and good luck and have fun with your printer! I think 3D printing is a great educational tool
For abs, you could probably use a cool mist humidifier for Acetone with 3 small slow moving fans within the sides of a bucket across from each other on a 45 degree angle to keep the spread even and have it set on a timed plugin for consistent results.
I sometimes dip my prints in non toxic epoxy resin. Does remove fine detail, but looks cool and makes it super smooth
I know this comment is from a while ago, but what epoxy resin did you use?
@@john_blues envirotex lite
@@pjz7088 Thanks!
It's not the cat's fault though. Great info, thanks
You cna actually easily smooth PLA with some Acetone Fumes. Basically, you put a cup or box with acetone soaked in a paper towel on the inside over the print, and you leave it for about 45 minutes and let the fumes soak in, then you remove it and let it dry, it smooths very nicely.
KILLZ primer does the same but for a fraction of the price it also comes in a spray can. I had the same issue with smoothing out foam models. Its a thick coating which will smooth out any small details but ultimately give you a smooth surface in one or two coats. You'll have to paint over it at the end of course as it is only sold in white.
You can use diluted acetone to soften the surface of the PLA to make sanding faster. Additionally if you have to wait a who day you might as well be printing with thinner layers, it's not going to add a whole day on for most of the models people make, and you will get finer details.
Polymer chemist here - Melting is a process that happen then heating things, thus applying acetone to ABS doesn't melt it, it lubricates the polymer chains, increasing the their ability to move, thus making it easier to deform the plastic. AND as many already pointed out. The sovlents in the spraypaint and urethane is way more toxic to humans and animals, than the acetone. It should only be used in a well ventilated enviroment as Im sure is already stated one the can. Using the fan spreads the fumes even more. If you care for your cat, dont spray right next to it. This is a prime example of a DIYr who just do stuff without doesn't sit down aquire the knowledge needed for doing it right. That said, very nice results you got with the skull. Maybe try and wait long between the coats
dear god why is this channel not more popular
Perfect video, if I want to preserve details, I can make the same steps like in scale models,
1)primer
2)rescue the details with specific tools
3)paint
Awesome video thanks
2k high build filler primer also works very well 👍. Ive had no negative results yet with any 2k industrial car paints 👍
If your going that route, just get a sandable primer. It’s purpose is to fill holes and gaps (minor holes and gaps, it’s not bondo. Lol.) you will retain a lot more over all detail in your piece.
Good trick. I've done similar. I use the fast drying primer and about three coats before I put my final color and clear. Same basic effect
First off what is your layer height? I would recommend 0.12 layer height as that gave me awesome results so I didn't have to smoot my prints as much
Why do people always moan that detail is lost?
@ 2:11 Look at the difference. Which skull would you rather have?
This is an example of what you can achieve. He used a 0.3mm layer height to show how effective it is. He did an extreme version of the technique. If you want to keep certain details like the teeth, then don't spray too heavy in these areas. People need to use imagination and stop thinking like robots who are programmed every step of the way.
Thank you so much for understanding. This low res model with horrible line heights can be smoothed so that means even a higher detailed model can be smoothed too.
@@3DSage No probs. Just hate to see when people take the time to help out others with their knowledge for free, with no thanks, only to be rubbished on a slight thing. People like you are what makes YT a great source of ideas for makers. I'm taking away some knowledge from this video even if I don't apply it, so thank you for it.
@@ArcanePath360 You are a good person and thank you so much for your comment. It made my day.
You can also use finer line heigts on only some layers if there are details you really need to keep.
Except the printed skull looks like pretty bad before even the paint.
You could get waaaaaaaaaay better print quality with .16mm layer height, match the multiples of your nozzle diameter with all the other settings (ie use the "magic numbers") change the orientation on the bed so it's not printing flat, angling the print, elevating it and using supports, better PLA than the monoprice stuff, Using more top layers/adaptive layers to lessen the voxelization of the top. If you're trying to get something to look better why not set yourself up from the beginning instead of coating it in paint?
Or just save yourself the trouble and buy a spray bottle, IPA and polymaker polysmooth filament.
I'll save you guys 3 minutes:
Paint it.
@Lithus17 no he was doing tl;dr
Is even making a 2:50 video demonstrating something a crime these days? Okay, people who make 20 minute long videos about something that can be explained in 5 minutes, yes that is annoying. But less than 3 minutes?? What are you crying about
@@lijkenkist1 The video should mention "paint" in the headline for people that have no interest is painting their parts.
@@lazlo342 That was not the point of this comment. Only the duration
@@lijkenkist1 I was aware of the of your comment.
You got balls spraying that stuff inside lol
Very useful, the only issue is on detailed prints , coating with paint subtracts a measure of detail with each coat. Still extremely useful when it’s necessary
You can use clear laquer to fill in the lines
It's better to use a primer, or better yet, filler primer (or just load up the primer real thick, and don't worry about runs) then sand it down. There really is no getting round sanding PLA but with primer loaded up, the time it takes is worth it. After sanding black PLA with white primer it should look like a high contrast black and white stripe print, but then just paint over it and it will be nice and smooth.
Theres also a product called liquid green stuff you can find at game stores that sell things like miniature paints that works in much the same way, but comes in a brush on form.
Thanks, I'll use this. Also thanks for the short vid - others would have dragged this out to 20 mins.
Yes I know what you mean. I didn't want to waste people's time so I kept it short and to the point.
really cool idea, iwill test that. Is that polyurethane something like satin varnish?
I've had pretty good luck using one of the fine point heat guns you use for soldering surface mount devices. If you keep it moving you get a smooth glossy surface on the pla.
I was wondering about that. I have a heat gun and was wondering what would happen if I used it on some PLA. Will have to gi e thata try.
@@sunnydoom2726 The heat gun I have for surface mount parts has a nozzle that is about 1/8 in. diameter. Once I got the hang of it, it worked pretty well, but I can't stress enough the importance of keeping it moving.
I use gesso mixed with acrylic paint at a ratio 1:1 or 2 acrylic 1 gesso and then paint a few coats over the model after a round of sanding... (probably it ll work pretty well without sanding) the layer lines get covered and disappear depending on your skills and quality of gesso and acrylic then you can sand it for a final smooth surface. Also you can paint it after that. However each coat of gesso needs around a day to dry. Details remain almost the same depending on how big the model is of course. Give it a try, my first ones were not that great but after some practice you ll see great results. Good luck
3d Sage: Remember to remove any source of cat hair
The cat: I wonder what would that be
Thanks for the tip! I'm curious how much difference a professional paint gun using higher pressure and minimal paint might be in small detailed areas.
Acetone fumes are not toxic, acetone is considered safe for use on the body as nail polish remover.
"any sources of cat" just that made me subscribe :D
Useful video thank you :)
Haha thank you for the sub! I post a few pics of him on my Instagram. He always tries to "help" while i'm trying to film a project.
Small correction, pla isn't biodegradable.
It's compostable in an industrial setting. Wich is really not the same thing.
Hey. Great video and idea. I tried it but it’s not very helpful for the prints I do- statues. For square and round items it is fine but for details like a skull or figure, it fills in the detailed lines that I desire and in general the end result isn’t desirable BUT, I will say this is a great idea instead of bondo and other similar applications.
Great tip for speedy fill-in. For a better result (with a bit more labour) a quickly sanded layer of build primer would do nicely.
i have a feeling an initial sand followed by 1-2 of these coats could be the perfect mix.
Thanks for sharing this! Is it possible to spray the polyeurathane first, let it dry then apply spray paint or is it critical to have them mix during curing/drying? Have you tried this?
People complain about the loss of fine details, but remember that not all 3D prints have such fine details. For prints with no fine details, like speaker boxes, this should work very well.
Good idea, would point out that polyurethane is pretty harsh and not good to breath in either, just like acetone
YES! Very helpful. I print with PETG. I will try you technique the next time I get a chance.
best videos I would like to add that there are also colored PU spray paints (water-based) that make it work a little faster.
Does it have to be fast drying polyurethane.
The fastness help because it will harden before the paint has time to run. So it locks that layer in place fast.
Can I use normal polyurethane spray. If so, do you have any tips?
No harsh chemicals?? You just sprayed polyurethane and paint
Often its the simple solutions that people forget about using, thanks!
PLEASE explain to me why people don't just blow it lightly with a heat gun? Am I missing something?
I want to buy one and I want to use PLA but I'm confused.
Did you use a water based poly or oil based?
PLA isn't actually biodegradable, at least not how people think. It requires extremely specific conditions and microorganisms to compost PLA that are extremely rare in nature, if you buried a PLA print in your compost pile it would still be there 2000 years from now.
There were recycling plants that compost PLA, but they pop up and shut down frequently as it's not lucrative.
Just FYI.
i have a question, how many does it weight?
Good idea, but new technology is available.
Note about PLA, new information came out in 2020 indicating that it's not actually that biodegradable. It will biodegrade if you place it in a commercial composter at 140F, but it will not biodegrade in your garden.
Second note: in 2019, Prusa introduced a feature where you can change the layer height in the print at various stages. This allows you to print the sections with vertical walls at 0.3mm layer heights and the sections with near horizontal curves at 0.1mm layer heights in the same print.
Why the combination? Wouldn´t it be possible/easier to only use the Polyurethane spray?
What about the toxicness of the spray paint? Or are there safer more friendly spraypaints? Orrrr could this be used with regular paint?
Or modeling paint*?
"without any harsh chemicals" WTF?! Exactly what is it you think is in the paint? The primary solvent in enamel, lacquer, and urethane is acetone. The very same as used in acetone vapor baths used to smooth ABS. Other solvents as well, and worse. Please read the MSDS sheets (available online) for the products you're using before declaring them "without any harsh chemicals."
FFS.
Thank you for the information, it is so easy to get misleading advices these days.
OK, we get it. Paint and varnish are "harsh chemicals", but we use them everyday. Acetone is different, which explains the explanation.
...... I think somebody needs to switch to decaf.
@@snoopyslr what's that? I'm interested.
@@ericperkins3078 Acetone is an extremely common chemical, and extremely harsh. Just because you use bleach everyday doesn't mean it's not harsh and even toxic. So yeah, saying these things that use acetone as a base are safer than acetone is a bold face. Btw i literally have 3 gallons of acetone in my house (not even bought for 3d stuff) and zero paint or varnish.
Pla is not biodegradable, it is compostable and the definition of compostable is that for a good result you need to have a controlated enviorment and industrial too, with conditions like 60 °C and a lot of oxigen.
Hmm... Mixing an acrylic enamel and oil based polyurethane in the same coat seems like an odd approach. Why not just do 2 coats of acrylic enamel or 1 coat of primer and 1 coat of acrylic enamel?
I agree. Of All of the questions in these comments, seems only you and I are wondering about oil vs. acrylic polyus.
My educated opinion(although new to 3d printing) both should do the job. Acrylic polyurethane will have longer drying times and cost more than the oil based, but definitely is a more “environmentally friendly” choice.
I usually choose oil based because of my lack of patience and it’s nearly half the price.
so I have a print that is one color on the top and another on the bottom of a single piece. is there a way to hand paint the smaller part and still use your technique?
Interesting. There may be a few options but I feel like I would try to use painters tape on one side then remove and apply it to the other side. One side at a time i guess. But you could hand paint it after too
Great info at the beginning and can't wait to try this out! Just ordered and ender3 for my first printer. Subbed
Thank you! :) The Ender 3 is a great printer!
@@3DSage really seems like the best bet for some one starting out. Still just waiting on the delivery. So far the hardest part lol
"No toxic chemicals!" proceeds to fill the air in the room with paint aerosols
Damn your videos look great. I personally like the texture of 3d printing. Subbed sage keep the good content coming
I'm happy to hear that! Thank you very much. I'm glad I could help in some way.
Not sure if it was the fact that it was a gothic looking skull, but I actually liked the thick layer look on that model.
I was actually wondering if this would work only a few minutes ago! And then this video just magically pops up and confirms my theory! xD 🧙♂️🔮
Perfect! :)
Here is your answer!!!
*Chemicaly Smoothing PLA*
"Generally these days I start by brushing on some Dichloromethane (DCM, or methylene chloride). This stuff is really very nasty and I do this work either in a fume hood or outside with a fan blowing away from me. I use a respirator with chemical filters, PVA gloves and full eye glasses. Do not use this chemical unless you’ve taken the proper safety precautions! However I found no other solvent even remotely as good at smoothing as Dichloromethane. Apparentl Tetrahydrofuran (THF) is ok, though I’ve not tried it. Acetone is completely useless, as PLA is completely insoluble in Acetone. Due to the nastiness of Dichloromethane I’ve never attempted doing vapor smoothing, but the simple cold brush on works surprisingly great. Sometimes I do two “coats”. With each coat the Dichloromethane dissolves the surface layer of the PLA and the resolidifies, running into the cracks. It also conveniently seals any tiny holes in the print where print layers have failed to fuse properly. Another method is to spray on many coats of a lacquer, e.g. shellac. This has some problems though during burnout and can leave undesirable carbon residues in the mold which can be tricky to remove. With higher burnout temperatures though this has been less of a problem."
mtyka.github.io/art/2016/12/11/lostpla-casting-glass.html
Cool tip, I'll have to give this a try.
Thank you! And yes please do! :)
Awesome! One downside is that if you need moving parts the thickening is a problem right?
I see this more for decorative prints that don't have moving parts but maybe a very subtle amount won't hurt moving pieces.
Without any harsh chemicals and at the same time you use polyurethane and spray paint?
Nice method though.
So after buying paint and poly, a few days of dry time the final product is ready?
Get sand paper and sand it smooth, clean and paint it..
I could have this same piece done in one day.
Thanks! Saved to playlist so far to test asap!
I wonder if you could tumble it in some sort of stuff similar to smoothing of gemstones.. like a very fine sanding powder tumbling it
I have to say, I use ABS with acetone smoothing, and honestly, it's fine. Still a pretty cool video though.
This is good for items without detail, but for things like the skull in your example, too much detail is lost, as others have mentioned.
It is super cool! I was thinking to buy ABS, but after I saw this method I will only print in pla and petg!
Maybe try a shellac based primer like Zinnser BIN. It's fine resin particles in an alcohol base. shake well before applying and apply in a well ventilated space. It cures really quickly as the alcohol evaporates and can be used to build fast. I use it as a hard base coat on hvlp painted cabinetry.
🎉There is a possibility!!! I am a biochemist and I was bord in the lab, so I tried different chemicals on my PLA prints 😅 Acetonitrile vapor works perfectly on PLA.
Acetone can be used with no heat at all. It's known as the cold vapor smoothing. Two with all that paint you're killing your details. I'm a person who loves the detail on 3d prints. I can see this working better on LARGE prints.
That's what I was thinking. There looks like a significant amount of loss in detail here.
acetone won't work on PLA.
Depends on the PLA being used. I thought the same but been proven wrong. You have to dip the PLA print into the acetone and it will smooth it out. I think you have to leave it in for about 20 to 30 minutes but you have to keep your eyes on it. ua-cam.com/video/HEnz8CWxyjc/v-deo.html UPDATE: Less then 10 to 20 minutes. You should do it about a minute and take it out and see and let it dry. Continue to do this untill you get the results your looking for. It will leave a white film on it but if your going to prime it I guess it wouldn't matter.
What I didn't stress enough in the video is that I printed the skull at a layer height of 0.3 which means detail was lost during printing. A height 0.1 would have been better and taken less time to smooth but I needed an extreme layer height to show how much this method can do!
I never had any luck with cold acetone vapor on ABS.
Great job! how many layers of of paint+PU have you used to get the final result?
This skull with a large layer height took about 4 or 5 sprays but think about a normal layer height, it might only take 1 or 2 layers.
@@3DSage Thanks =D
It is possible to smooth PLA with acetone though you do need to heat it up a lot more then normal as your using the acetone as a thermal conveyor. Here is my setup: acetone, 1.5 liter glass beker, a heated magnetic stirrer, a stir-bar, long wire hook for the model and PPE mask (plus ventilation if possible). I fill the beker a with about 2cm's of acetone I then add the stir bar and turn on the heat till it gets to a low boil, at this time you should watch the sides of the glass beker for the condensation line that will move up the beker till it gets to the edge now your ready. Attach your model to the wire hook and dip it below that line, you will see the model "wet" itself. Hold it there for 5 seconds then remove, repeat if necessary. I never have to do more then 15 seconds total for a glassy smooth surface. Place the model somewhere to dry afterwards.
I might have to try this method out on a small print I have at home, just to minimise sanding, especially on parts with hard to reach corners
Interesting approach that may work well integrating into my current workflow. Just curious as to how well this compares to filler primer with no sanding?