How To Build A Deck!! Layout, Framing, and Composite Decking Guide ||| DIY Deck Build

Вставка
- Опубліковано 26 лип 2024
- Find My Shop Tools in my Amazon Store: www.amazon.com/shop/komarproject
In this video I show you how to build a deck and cover it with composite decking. I go over how I laid my deck out, how i framed the treated lumber structure, and how I installed the composite decking boards on top of it. Along the way i share as many tips and tricks as i can in a short video to help you get started with your deck build.
FOLLOW ME ON SOCIAL MEDIA:
website www.komarproject.com
Instagram / komarproject
Facebook KomarProject... FUN
Get 10% OFF on ALL my Favorite Total Boat Epoxies and Finishes here: www.totalboat.com/komarproject
VIDEOS YOU MIGHT LIKE:
Backsplash Tile Installation • How to Install a Subwa...
Colored Pencil Bracelet • Making a Bracelet out ...
Plywood Sliding Barn Door • How to Make a Barn Doo...
Wood Lowrider Bike • Making a ALL Wood Low ...
Workbench Restoration • Vintage Workbench Rest...
Laundry Room Makeover • DIY Laundry Room Makeo...
Concealment Flag • Motorized Concealment ...
Tool Wall Build • Ultimate Tool Wall Mad...
Walnut Knife Block • How to Make a Solid Wo...
Pallet Kallax www.youtube.com/watch?v=MLS_l...
Epoxy Countertop • How to Make an Epoxy L...
Monkey Pod Coffee Table • Modern Coffee Table Bu...
Paver Patio • How to Prep and Build ...
Walnut Live Edge Bench • How To Make a Live Edg...
DECK TOOLS AND MATERIALS
Post Level amzn.to/3eV58B5
6’ Level amzn.to/3bGHINM
Utility Digging Bar amzn.to/3cGck2e
Skill Saw amzn.to/2KzO85t
Reciprocating Saw amzn.to/2VCXP9v
Jig Saw amzn.to/3bFbxyt
Joist Hangers amzn.to/3eUP42c
Hurricane Straps amzn.to/356IUaLMy Hammer amzn.to/3aALGXb
Nails I Used amzn.to/2Y7AD4Y
Lag Bolts amzn.to/2xdVubY
Layout String amzn.to/3aGm2jy
Marking paint amzn.to/3aDpMSY
Saw Blade amzn.to/2KzsQ8j
New Version of my Laser Level amzn.to/2VXELSx
Laser Tri Pod amzn.to/2YaJliX
Facia Screw Kit amzn.to/2W345GE
CAMO Pro Guide Hidden Fastener tool amzn.to/2KztwKT
CAMO Deck Screws amzn.to/2Kzd0KJ
New Version of My framing Gun amzn.to/3cLRBtO
Nail Removal Gun - Air Locker amzn.to/2nsXYOf
RZ Dust Mask amzn.to/2m2CDLj
Bosch Drill and Impact Combo amzn.to/2UdyZg7
My Router amzn.to/2ISNoaG
Bosch GCM12SD Miter Saw amzn.to/36GabQO
Bosch 6” amzn.to/2OeJs7h
Wood Glue amzn.to/2RJEnpP
Pry Bar amzn.to/3cNlJWz
TRIM Nail Gun amzn.to/2vus1cm
My Quiet Compressor amzn.to/2S3aqA7
My Grinder amzn.to/2GGaDUC
Rockwell Multi Tool amzn.to/38HDXW2
Carpenters Square amzn.to/2IHFyk5
#deckbuilding #deck #compositedecking
Music By: www.epidemicsound.com/sfx/ - Навчання та стиль


I just finished helping 2 friends with their decks. I'm convinced it's more fun watching someone else do the building on UA-cam.
Ohh for sure lol. It’s labor intensive
Ahhhhaaaaaahhaaaa true true
Dude, I wanted to do my deck myself, but in my head, the framing was extremely difficult lol watching how you did your deck frame, now I know for sure I can tackle this, thanks
That’s awesome man. The framing is not difficult. Just take one step at a time
Great job!! You inspired me to build a deck this summer. I loved how you and your wife worked as a team.
Ya she is pretty awesome with helping. Good luck on the build
Amazing work, now I feel like making my own deck. Thank you
Your very welcome. Good luck
You have every tool imaginable. Makes it much easier.
Great job!! I love how you and Honey Bunny work together! ❤️
Very nice! Looking forward to seeing the curved steps.
Thanks and stay healthy!
DC
Thanks DC. Ya I’m still working on those and have an idea to finish them this week if the weather holds up. Stay safe brother
That's a good looking deck!
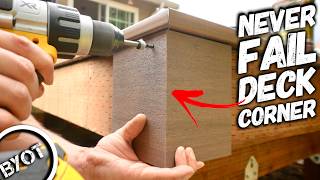
With my parting boards, I like to point them into my border rather than running them in square, just a preference I guess but I think it looks better.
*I went to the Trex factory in Seattle and took a class on how to heat and bend their composite decking.
We heated the boards with an electric heating pad (made specifically for heating boards) that was sandwich between two pieces of insulation. Once the boards hit the internal temperature we were looking for, we had a jig set up in the shop that we bent them around.
It was easy peasey. Next time were going to skip doing it in the shop and heat them right there on there job site.
The deck turned out great Bart, awesome job! 😃👍🏻👊🏻
Thanks Fred. It’s been a long time coming
Loved the decking. And very easy to follow and understand. It's looking beautiful.
Also:
YOU CHURN THAT BUTTER BABY! MAKE SURE IT IS NICE AND SMOOTH!
Hahaha thanks so much!!! Glad you got something from it
This turned out awesome as all your projects do!
Thanks so much Ashley!! Really appreciate it
looks fab! ur teamwork & chemistry is fun and makes yr vids even more watchable 👍
Thanks so much. We have fun
This came out beautiful!
Thanks so much
Wow it looks great 👍🏻 you’re such a great team too. Your house is going to be absolutely stunning when you’ve finished all these jobs - you will have to do a full house tour 😊
We just wrapped up every project in the house and I was thinking of doing just that. On to the next one lol
Amaizing work, plus a great and fun explanation my friend, you’re a good man for making such a great living space for your family. You’ve inspired me :)
Loved your humor. Learned some new tips. Thank you
That’s awesome Helen ! Glad to have you aboard
Hard work !! Awesome deck
What a great detailed video. Excellent work. Thanks
Thank you so much !!
Looks amazing!
Cheers mate!! Great job!!!
I am going to be doing my deck next spring, great ideas in your video, thanks for sharing bro
Your very welcome man !
Great tips and ideas 💪🏾💪🏾💪🏾💪🏾💪🏾💪🏾
I absolutely love it flawless, peace out & stay safe from South Australia, ps love your cutest little accent.. :)
Thanks so much!!!!
Great freak'n job...Thanks for sharing.
Amazing video man, thanks
Great job, video and installations.
Thank you.
I am planning to change my old wood deck with composite deck
This Was amazing!
Thanks so much junior !!!
The deck came out great!
Thanks so much !!
Wow the deck looks great 👍🏻
Thanks so much
Fantastic job and bunch of great tips. We built our deck several years ago and wish we could have seen this before we did. It would have taken a lot of the trial and error out of our project. Great video Bart, keep them coming. "Crack bag" LMAO!
Hahaha thanks guys!! Ya this video took a long time to get out there. I actually finished it last year
I've been looking for a video that helps with laying out and marking the area for the deck, which seems the most tricky part to me and after watching a whole bunch of them plus looking at DIY books and magazines your video is the one that is gonna get me started on our new deck. You've provided just enough detail but in a simple way, easy going way. Thank you!!!
That’s awesome Tania!! Glad I could help. Good luck
You are a beast with decking! This was so awesome! Great job!
Thank so much. It was a big project but came out so nice. Years of maintenance free enjoyment.
Thank so much. It was a big project but came out so nice. Years of maintenance free enjoyment.
That's beautiful Job well done
Thanks Jack !!
Bravo, great deck and editing on the video !
Thanks so much Bill !!
Haha! That "little crack baggie" line was great. And those plugs would probably get you as high as crack too.
This was awesome 👏👏👏👏
Thanks so much
Awesome deck and great info!
Thanks Ricky
Nice job! The pup is hilarious 😂
Thanks lol. He is something else for sure
Came out great!
Thanks so much.
wow great deck man
great job! i love it.
Thanks so much.
Great job bro, learned a lot from your video specially that concrete steps I was planning to remove mine. Greetings from Volo, Hellinois ahahaha.
Awesome job ... it's always good when honey bunnys help with such projects ... they add a good flavour and also they cannot critsize it later on 😂
Haha your so right. They get a little taste of what it takes
Wonderful job that’s so beautiful I love it.
Seattle Washington
Thanks Rosa !
Love the deck, but those post are going to rot. Alway keep pressure treated wood out of the ground so it can dry out
Looks great! First build video I've seen were the ledger wasn't attached to the brick veneer which is what I'm researching. Thank you!
Hello, my talented friend.
I watched a great project again. The biggest thing is to always do innovative work and help people with ideas. Thank you for sharing. Great greetings. Take care of yourself.
Thank you so much friend! It’s always nice to hear from you. Hope your staying safe during these times !!
@@KomarProject We're safe. healthier. Thank you so much. Great greetings.
Beautiful ❤️
Wow! I learn alot from You. Good Job once more Mr 👌
Thanks so much. Glad you got something out of this one
@@KomarProject You got some fans in norway 👌
Deck looks great! We just built one with sixteen 4' deep footers, but we mixed all the concrete first in a mixer. I don't think I'd be comfortable with pouring the concrete in the hole dry and expecting a good mix.
It looks fantastic. It seems for you installing the picture frame outer boards last was easier. That makes sense although I see many installing at least 2 sides of the border first.
I wish I had your skills! Great job!
One step at a time brother
You guys are hilarious!
Lol we have a good time that’s for sure lol
Bro that deck is Da Bomb!!!
Thanks so much. We love it
Best deck building vid. On UA-cam! Also, as your spraying Honey Bunny, I'm pretty sure that she's thinking "pay back's a bit$ch!" 🤠
Ohh she gets me every day
"like a lillipop" great how to vid. Thanks again.
Thanks Erik!! Really appreciate the support !!
Great step by step. Thank you! Struggling with the idea of those posts just backfilled with dirt. In my head I was thinking they would need to be concreted in or use concrete blocks/footings. Talk me off the ledge here...
It all depends on the codes in your town. Where I live all we need is concrete frost footings. And with them going in so deep they will never move. It again if your in a warm climate your not going as deep so you may have to do concrete Pillars. Call your local build Dept and they will tell you beat way to go
This would rot in the moist climate I live in-- any wood that touches dirt will not last. In fact you don't even want the post to touch the concrete. You have a metal plate that is attached to a bolt embedded in the concrete. The wood then sits on the metal plate.
Great video!
Thanks so much Joseph
the dog at the end earned a sub.
Haha he is great
You made it look so easy.
Lol magic of editing
Amazing job
thank you so much
Nice looking deck and fun project
Thank you
Incrível 🎉 👏🏼
Nice work!
Thanks so much
Should do a video on building a deck around a hot tub. It's insane on how many people have to idea how to build around the tub. You have get in all around the hot tub if any repairs come up.
Would love that but first need a hot tub lol
Looks amazing! Nice job as always. Used that camo tool for my deck...it is only way to go, cause you dont have screw holes on top of deck boards...less splintering. Thanks again for great video and guest appearances by Hunny Bunny and Thor.
Haha HB and Thor have a love hate relationship. I think she secretly adores his fat butt
great video, and I also love your shirt!!Mia san mia!!
Bahaha Thor said you do what you need to do 😂
gangster Thor
Dude! I was eating when I started this vid.
😂
This is awesome keep up the amazing content!
Thanks so much Simon
Great work
Thanks so much Sim !!
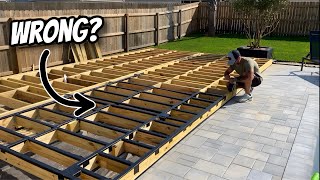
Don't forget guys. I recommend 12" center on joists when sun hits deck all day otherwise it's sag town if on 16" centers. Also carrying beams for joists need to sit on top in my area otherwise that's what causes deck collapse when they are overloaded.
U are the coolest dude no cap
Thanks Jackson!!!
Incredible job. Why did you choose to do the toenail style screws instead of the hidden fasteners? Chicago has big weather swings and those boards will need to expand and contract. Just curious. Thanks
... thats a product you can sell. Great job! 👍
Nice deck 👍🏼👍🏼
Thank you
Good work 👍👍👍
Thanks so much
Nice!
Thanks Soma !!!
Perfect.
Can you show me closer,. your little tool used to screw decking, or hold screws.
Thank man.
Gooooood job
It’s called the CAMO. There is a link in the description.
great job
Thank you
Awesome job, really appreciate the video and all the details. How do you plan to trim the grass next to the bottom step?
I just used the lawnmower and got close up to it and then with a trimmer being very careful
Looks great! You made it look so easy. I’m struggling with basic stairs for our raised patio. 16ft wide, 4 steps which is including the patio surface as a step. How did you fasten the exposed edges of the stairs to the frame? Did you face screw?
Exposed edges of the stairs? Do you mean the stringer ???
Great video, did you treat the ends of you posts? What did you spray on the posts and on top for the framing?
Nice job.
Thanks so much Sergio
Awesome job! Really loved your style, know how, and demeanor. Do you do this professionally?
I worked summers as a laborer in different trades during HS and college so I picked up a couple of things. Then just started doing things for myself
Hey buddy, amazing video I learned a ton from it about composite. I love the detail and info thanks again for making it. Quick question though what were you spraying? Can that spray substitute the waterproof rubber adhesive stuff I use usually?
So a rubber membrane is only used if you rip the joist. You really don’t need it if your using regular joists. The spray is just regular spray paint. I use it because the light color joists would show heavily through the dark planks and larger gaps. If you don’t color it it will be very evident. But no it’s not a substitute for the membrane. Hope that helps.
This is an awesome build. I need my deck to be really low to the ground...has anyone heard of tuffblocks? They look like they'd do the trick.
Nice Shirt, Greets from Bavaria / Germany :)
The champs
Deck looks good.. I'm in Illinois and we would fail a inspection by not coming out of the ground with our concrete with sono tubes. Then we have to use a 4x4 post base attached to the concrete for our post..no dirt hitting the 4x4 post support.
I’m in Illinois too and I passed all the inspections. Not sure where you are but different towns have different codes. We had a hole inspection and then a frame inspection witch both passed. I guess you just have to do what your town requires. I would definitely check with them before hand. Good luck brother
I built our deck with that composite or fake wood, it looks awesome. That is until it rained, it was so slippery that you couldn't walk on it as normal. THEN it get HOT..HOT..HOT. lost the ability to walk out on the deck barefoot. So we ripped up the fake wood and made a nice and rather large dog house. We then rebuilt the deck from real wood. So so much better. I think that fake wood is more suited for a commercial application than as a residential deck. Not to mention, I can stain the real wood deck the shade we wanted and not what is provided.
Great build! Looks amazing and have given me a few tips on how to make my own. BTW like your Bayern München t-shirt! Keep up the great work.
Thanks so much. Ya the shirt is on point lol
Crack baggie! Lol! Great video! Thanks!
Thanks man !! lol
This is an amazing project you did. I'm looking at this so I don't buy those stringers LOL.
Question: Did you do the SketchUp render yourself? Very NICE. Any tutorials used? I want to mock mine up with a tool like that.
I did use the free version of sketch up. If you never used it it takes a little time to pick it up but after an hour or so of messing around you should be good. Good luck !!
💥💥 4:24 I just did an estimate 3 weeks ago for a man whose posts were all 6 inches below grade and all are rotting. Footings always stick out of the ground by an inch or two. The deck is 23 years old and everything else is otherwise still in good shape. I’ve built decks for over 30 years and I have not been able to come up with a solution on how to rectify such an easily avoidable mess. ⚒
Great work. The middle beam is called a girder. That's what we call them on the east coast
Thanks so much Justin. Learn something everyday. Appreciate it brother
Yes sr that was great work been in the trades 18 years and this is good man
Great video. How far apart did you set your posts? Thank you!
They varied but most of them were 6’ apart
This was a good light-hearted but extremely useful video. I used it as inspiration for my own which is under construction now. I couldn't catch the name of the fascia trim ... ?
Thanks David. The facia was from Azak
That looks really beautiful and I'm planning on doing almost the exact Design with the curved patio for fire pit. Can you please tell me When will you be releasing the video about the curving the composit decking?
I wasn’t actually able to bend the composite decking. I tried on multiple times and for some reason I just couldn’t get the right temperature to heat it up enough to Bend. So I just did a Sunburst pattern but didn’t film the process because we were trying to get the project done quickly. But you can see the final picture results on my Instagram page
@@KomarProject I see, Thank you for letting me know. It seems like you had to make a new grove everytime you cut them to the right shape. but for now I think I will just stick to what you did on the deck, cuz mine is a ground level deck and no steps involved thankfully.
@@KomarProject I curved trex around my pool, it was definitely ALOT of trial and error. I build a heater system similiar to yours, only I didnt have the heat source in-line with the boards like you did, I teed it off...found I was able to get a more consist temp throughout. The whole process was a pain in the ass tho...not an easy thing to do.
Thanks for explaining how to attach the joists to a supporting beam. I had the same problem with steps going to a glass door. What length of cantilever have you got? My joists are 5x2s. Could I have a cantilever up to about 2ft safely? Cheers.
My overhang is about 18”. With a 2x5 ( which is weird by the way lol ) I’m guessing you can maybe get away with a 12” over hang. Topically you need at least a 2x8 for a 2’ overhang. Hope that helps brother