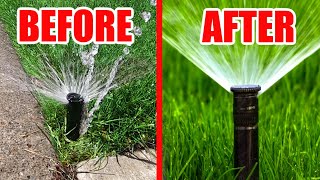
Best video yet on Rainbird. You covered all the questions I had! Loved the close-up shots and even explaining what all the three holes are for. Thank you keep up what you’re doing
After removing the old one, put the outer housing in first until tight. Then screw in the inner assembly with the left stop in the correct orientation. Then you don't have to worry about a tight connection to supply line and the orientation at the same time. Removing the outer housing is easy.
I have did irrigation work with handful of companies;just started new job with a company, and this video explains this procedure better than any of my bosses at these companies.Good job!well done!
Thanks DOC, great tutorial! Wife ran over the sprinkler head W/ mower and I wasn't sure how to fix it. Now I know how to fix and adjust. This is the first and only vid of yours that I've seen so far, but I LIKED and SUBSCRIBED. I like the fact that it didn't take you 45 min to explain a 10 min solution. Simple, direct and "STAYED ON TOPIC". Keep up the good work, looking forward to watching your other stuff.
You are real expert in sprinkler operation and replacement. And your explanation is very clear, short and simple. Every man with little understanding can learn from you. There are people out there who make things complicate and untouchable. This short videos saves money and time for many people.
Mr. William! Great Video! You got me thinking straight right off, “on the left” is the starting point and visually explained it, and continue through out this Video! I purchased one of this model for the first time! I was lost as hell the whole time trying to make it work with constant failure! Your video stands alone when it comes to explaining how it is done!
Thank you Doc! I have always been intimidated when it comes to sprinkler heads, and because of your video I don't have to throw money at my problems again.
WOW! Thanks Doc. I have watched several videos on this procedure and still with no positive results. Your demonstration did not leave anything to assumptions and explained all the steps clearly. Good on you!
Whew! Just in time! We are having a very dry spell when my garden sprinkler crapped out. Thanks for the video and easy replacement, my marijuana crop is back on track to be a “Killa Krop”!
Thank you, Doc ... thanks to you that last sprinkler head that I could not get adjusted is working properly! Those detailed ... even repeated instruction are most helpful!
Thank U so much for this video. My husband and I always dig right down to the bottom and then screw it out. Did not know it can be done from just under the sod. You make it look so easy and thanks for explaining the adjustments also. God bless you for sharing
Just so you know, Rainbird, Hunter and Orbitz canisters all fit each other. I have changed many and just undo the top cap and plunk in the new head. Unless the bottom is damaged, save your time cutting sod and just replace the innards.
That makes so much sense! So why havent you or someone else made a youtube video on this technique? All the ones I have seen tell you to dig up the sod ...
Okay I just watched this very good video AND I should not have left my last comment, “ a ten minute video on how to change a sprinkler head in five minutes.” It is a good tutorial.
Thx Doc for great info on many subjects which most of us need help on. Very impressed with your knowledge and the way you communicate the subject matter to us all..
you can change the left stop point by turning it past the stop point. it has a slip clutch. otherwise you would have to adjust you left stop point by adjusting the thread tension. Your way works too. But when you adjust hundreds a day that slip clutch is nice.
Thank you for the excellent video!! You gave me a lot more knowledge than I had and I appreciate the details you provided. I am going out to do a Hunter replacement with confidence now.
Your instructions were definitely of help. Thanks. I was able to set the left and right stops with no issues. The only thing was that when I tried to reduce the Spray Distance with the screw, it did absolutely nothing that I was able to discern. The instructions on the unit ( CP 5000 NP ) said "Turn the screw to reduce the throw as much as 25%." Since the screw can be turned clockwise or counterclockwise, those instructions were useless.
Oh man this is a wonderful video I am a widow now and since my husbands gone a couple of them have broken off. I wish you could come on over and fix all mine
This is a very informative video to me. Thanks for explaining the differences between RainBird and Hunter. Now, I know what I have to do in our yard. Thanks
Thanks!! Very clear instructions means l outstanding step by step instructions and no body done the job to made me understanding like you did may the God bless you
I like the Rain Bird tool better than the Hunter tool, it's much sturdier. The new Rain Bird 5004PLPC has a slip clutch which makes it easier to make the left side arc adjustment, but the new Hunter PGP ULTRA, if you set it for 360 degrees it will run a continuous circle without turning back and forth, whereas with Rain Bird you have to buy the 5004PLFC and it only does a full circle. I've learned more about lawn irrigation in the last three months than most people will ever know.
Funk sometimes falls down and clogs the filter with this method. I just screw it in all messy, pull the spring loaded portion up and gently hold it up with vice grips, take off the spray head and filter, and then blow it out by turning it on. Then I go out there and put the filter and head back on. Remove vice grips and done.
FYI, if you need to make a left hand adjustment after the fact, you can rotate the head (when popped up) all the way clockwise to the left hand position. Makes it much easier when already installed.
Plus, the rotor head is about -2 inches too low and having the soil wet reduces the likelihood of loose soil getting into the pipes. He also should have taken off the cap and run that zone for a minute to flush it before replacing the cap.
I have both heads as well and this video answers everything. Why doesn’t the butterfly key work in Rainbird? Why can’t I get the heads to rotate in the opposite direction? Thanks Doc!
thanks for the video! Both brands are the same size / length / diameter that they work this easy!! a) which do you like better? Hunter or rainbird? b) what's your rule of thumb of where the dirt should come up to on the rotor? top of the ring? bottom of ring?
Your video was clear and concise; however, if there is water at the bottom of the hole does it mean the other part (don't know the name of it) that goes into the sprinkler line (black plastic) is also broken>>
Ive done it both ways. digging it out or just removing head. youll know if you got anything in the pipe that will clog it right away. Then you have to do it again. YOU CAN ADJUST THE LEFT STOP ON THESE. Turn it to where you want the left stop to be then adjust your right edge
If any dirt gets into the pipe, just raise the center pole and use the orbit tool to hold it up, then remove the head and turn your zone on. This will blow out the dirt on the line. You must use the orbit tool to keep the center up so you can rethread the head afterwards
@@HowTowithDoc I have a yard full of rainbird heads and the left is adjustable by simply rotating past with it running. If it's too far left turn a click or two right, too far right turn click or two left then use the adjustment screw to reset the right edge. It's called fixed because there is no adjustment screw for left edge
I love your lawn and the great advice you give on how others can get theirs to look like that! Can you do a video on switching out a sprinkler head with an NP50 rotor ( I think that’s what they’re called). Instead of a steady spray pattern, they have a rotating finger-like watering pattern?
Did it first try! Only thing I noticed is the donut I cut out, that spot gets really wet (I screwed it in til it was tight (not to where you can’t get it off but very snug) and my card has clay in it.. can that take a little while to recover to where it’s not leaking like the rest of my sprinkler heads?
Are all sprinkler heads the same size? Can, I buy any type of sprinkler head? First time buying and replacing sprinklers... I used to live in HOA . Thx you in advance. I need help 😊
I know this is an old video but every time I replace a head this way I end up getting dirt falling into the irrigation line. If you’re replacing with the same head it’s just easier to take the head nut off and replace the guts. Had to replace all my front lawn heads this past summer. Old PGM heads that they don’t make anymore and two of mine don’t turn anymore. There’s the reason for the brown spots. 😣
Great video. as I woman who needs to learn to do this I was jazzed...how hard could it be, Right? Well, first, I think a gorilla put the thing on as I cannot get it unscrewed. I did manage to do what I was not supposed to do and that is remove the inner part with the spring on it so now I have a pipe to unscrew....also, there is water in the big pipe/sleeve thing. I am leaving it for now, but have to get back to it before the sprinklers run again....of course I picked the hottest week of the year to attempt it......
I just installed a new rain bird. Worked great but when I turned system off water keep coming out of hole where the plus and minus are. I couldn’t get it to stop. Had to remove completely and put old broken on back in to stop water.
Doc, after I had put back all the dirt and wanted the spray just a little more to the left but passed it too far left. How do I come back just a little from the left side ? I have watched many videos and nobody explains this. I got a rainbird 5000 and can't figure it out. Thank you.
I know on the 42SA you can rotate it all the way clockwise to the new left position. I believe on the 5000 you can rotate it (with water OFF) all the way to the right trip point and go a little further to reduce the left trip point or rotate it all the way to the left trip point and then rotate it further to set a wider left trip point.
You shouldn't have to ever turn off the main really. You'll either have a hose spigot you manually turn or you have an electronic sprinkler controller that controls valves for each "zone", so just make sure your system isn't going to run while you do this :)
Seem to have dirt blocking sprinkler. How to open to get to the dirt to clean out the sprinkler? The filter has been cleared without fixing the problem.
What does it mean if the stream from all sprinklers is a thin line that only hit a spot at the end of the stream? All lawn below the arch receives no water and is dry.
Looks like a spacing issue in front or there is a head missing about a 50' gap .Always make sure your left stop is set on rainbird before you adjust right ,use a leaf take and all your dirt should go back.concentrate on getting sod edges clean and tamped.
You would then unscrew the top of the sprinkler head and remove the center part leaving the sprinkler housing intact in the ground. Turn on your water and flush out any dirt in the line. Turn it off and replace the inside of the sprinkler head and follow his instructions to finish setting.
How much do these cost? There are so many head types and sizes. My irrigation guy charged me $40 per head for replacement including labor. He made $200 in about 45 mins. Seems like I could have done the same thing for a lot cheaper. Thanks
Great video! Just bought a house w/ an irrigation system and need to update a few heads. Just what I needed. Also, I like your hat. Any info on where you purchased it?
Can you help me change out the blue gauge part on the Rainbird? I have new ones that have a different gauge fitted and need to switch them so they are the same as the others.
I found that pushing on to that plastic hose is often not simple, particularly if it is cold outside, the hose is stiff, and you can't get a good angle to force it. I tried using Vaseline, but that was a joke. After reading about using a small propane torch to soften the hose (oh yeah, I'd melt something, no doubt), my wife let me borrow a heat gun that she uses for crafting. I did need a long extension cord, but I softened the hose successfully and the fitting slid inside easily.


You”re the first instruction I’ve ever seen that made the whole left/right adjustment clear! Thank you!
Best video yet on Rainbird. You covered all the questions I had! Loved the close-up shots and even explaining what all the three holes are for. Thank you keep up what you’re doing
After removing the old one, put the outer housing in first until tight. Then screw in the inner assembly with the left stop in the correct orientation. Then you don't have to worry about a tight connection to supply line and the orientation at the same time. Removing the outer housing is easy.
I have did irrigation work with handful of companies;just started new job with a company, and this video explains this procedure better than any of my bosses at these companies.Good job!well done!
Thanks DOC, great tutorial! Wife ran over the sprinkler head W/ mower and I wasn't sure how to fix it. Now I know how to fix and adjust. This is the first and only vid of yours that I've seen so far, but I LIKED and SUBSCRIBED. I like the fact that it didn't take you 45 min to explain a 10 min solution. Simple, direct and "STAYED ON TOPIC". Keep up the good work, looking forward to watching your other stuff.
You are real expert in sprinkler operation and replacement. And your explanation is very clear, short and simple. Every man with little understanding can learn from you. There are people out there who make things complicate and untouchable. This short videos saves money and time for many people.
Mr. William! Great Video! You got me thinking straight right off, “on the left” is the starting point and visually explained it, and continue through out this Video! I purchased one of this model for the first time! I was lost as hell the whole time trying to make it work with constant failure! Your video stands alone when it comes to explaining how it is done!
Yes, thanks for making this clear!
Thank you Doc! I have always been intimidated when it comes to sprinkler heads, and because of your video I don't have to throw money at my problems again.
One of the great joys in life is when/if you get all irrigation heads dialed in. I have 36 heads in my system and it can be maddening.
WOW! Thanks Doc. I have watched several videos on this procedure and still with no positive results.
Your demonstration did not leave anything to assumptions and explained all the steps clearly. Good on you!
Doc, you saved me $75 today. The sprinkler guys wanted that for a $4 part and 10 minutes time. YOU ARE AWESOME!
Whew! Just in time! We are having a very dry spell when my garden sprinkler crapped out. Thanks for the video and easy replacement, my marijuana crop is back on track to be a “Killa Krop”!
Thank you, Doc ... thanks to you that last sprinkler head that I could not get adjusted is working properly! Those detailed ... even repeated instruction are most helpful!
Thanks!! Exactly what I needed. And the brand-name videos didn't explain it. Great job explaining all parts in a clear, concise manner.
Thank U so much for this video. My husband and I always dig right down to the bottom and then screw it out. Did not know it can be done from just under the sod. You make it look so easy and thanks for explaining the adjustments also. God bless you for sharing
Just so you know, Rainbird, Hunter and Orbitz canisters all fit each other. I have changed many and just undo the top cap and plunk in the new head. Unless the bottom is damaged, save your time cutting sod and just replace the innards.
That makes so much sense! So why havent you or someone else made a youtube video on this technique? All the ones I have seen tell you to dig up the sod ...
Finally!!! A video that clearly explains how to replace a sprinkler and make adjustments! Whew! Great Job! Thank you!
Okay I just watched this very good video AND I should not have left my last comment, “ a ten minute video on how to change a sprinkler head in five minutes.” It is a good tutorial.
Thx Doc for great info on many subjects which most of us need help on. Very impressed with your knowledge and the way you communicate the subject matter to us all..
Thanks for the info.
Very quick and relaxing job !
Greetings from Romania, Europe 🙏
you can change the left stop point by turning it past the stop point. it has a slip clutch. otherwise you would have to adjust you left stop point by adjusting the thread tension.
Your way works too. But when you adjust hundreds a day that slip clutch is nice.
Tighten or slightly loosen it is the proper way if you turn it past the stop u can snap the stop dog in the gears especially in a rainbird
Thank you for the excellent video!! You gave me a lot more knowledge than I had and I appreciate the details you provided. I am going out to do a Hunter replacement with confidence now.
Your instructions were definitely of help. Thanks. I was able to set the left and right stops with no issues. The only thing was that when I tried to reduce the Spray Distance with the screw, it did absolutely nothing that I was able to discern. The instructions on the unit ( CP 5000 NP ) said "Turn the screw to reduce the throw as much as 25%." Since the screw can be turned clockwise or counterclockwise, those instructions were useless.
Oh man this is a wonderful video I am a widow now and since my husbands gone a couple of them have broken off. I wish you could come on over and fix all mine
This is a very informative video to me. Thanks for explaining the differences between RainBird and Hunter. Now, I know what I have to do in our yard. Thanks
Thanks!! Very clear instructions means l outstanding step by step instructions and no body done the job to made me understanding like you did may the God bless you
Very nice video! Clear instructions. Great hints! Wished I saw this video before adjusting my sprinkler heads. Thank you!
Thank you! Finally a clear video that explains everything.
Thanks!!! Very clear and systematic. I loved how you explained how the rainbird sprinkler head works in the closeup video.
I like the Rain Bird tool better than the Hunter tool, it's much sturdier. The new Rain Bird 5004PLPC has a slip clutch which makes it easier to make the left side arc adjustment, but the new Hunter PGP ULTRA, if you set it for 360 degrees it will run a continuous circle without turning back and forth, whereas with Rain Bird you have to buy the 5004PLFC and it only does a full circle. I've learned more about lawn irrigation in the last three months than most people will ever know.
Excellent presentation and very clean job! Thank you very much!
Thanks doc, you saved me hundreds of dollars this season. Cheers!
Thank you for your tutorial. Damn. You have a big, beautiful yard.
Thank you for posting this. I replaced my hunter rotary head using your method. Perfect! Thanks for sharing!
My guy charges $50 to replace a head ... I spent $17 and used your video thanks bro
FIRE your guy!
Thx so much! Just bought our 1st house and noticed like 4 broken sprinklers the morning we came to receive the keys lol
Funk sometimes falls down and clogs the filter with this method. I just screw it in all messy, pull the spring loaded portion up and gently hold it up with vice grips, take off the spray head and filter, and then blow it out by turning it on. Then I go out there and put the filter and head back on. Remove vice grips and done.
FYI, if you need to make a left hand adjustment after the fact, you can rotate the head (when popped up) all the way clockwise to the left hand position. Makes it much easier when already installed.
I love you for this video. Thank you for saving me $$ and having someone come and do this. :)
Hell yeah! I keep saying it to my costumers, each time I go to someone's hs for this,I have to charge. I call it easy money.
I use a 9 inch spring clamp with soft pads on the clamp end to hold the rotor up while fine tuning the arc and radius.
I just unscrewed the top and guts and replaced worked great
Plus, the rotor head is about -2 inches too low and having the soil wet reduces the likelihood of loose soil getting into the pipes. He also should have taken off the cap and run that zone for a minute to flush it before replacing the cap.
Thanks for the upload, you had me at hello. I had to substitute a thin flat screwdriver for the rain bird tool, all done.
Always learning something new keep making videos
Very great tips thanks I Also noticed hunter pgp and orbit voyager II use the same tool👍
Thank you for this video👍 good explanation 🌞
If you get a Rainbird 5000 series head, you can adjust the left and right independently (not just the right).
Those are 5000s the left is always fixed, the right is the adjustable swing.
I have both heads as well and this video answers everything. Why doesn’t the butterfly key work in Rainbird? Why can’t I get the heads to rotate in the opposite direction? Thanks Doc!
Thanks DOC .. simple and directly to the point.
Thank you Doc I needed this video
thanks for the video! Both brands are the same size / length / diameter that they work this easy!!
a) which do you like better? Hunter or rainbird?
b) what's your rule of thumb of where the dirt should come up to on the rotor? top of the ring? bottom of ring?
Your video was clear and concise; however, if there is water at the bottom of the hole does it mean the other part (don't know the name of it) that goes into the sprinkler line (black plastic) is also broken>>
GREAT VIDEO! Thanks so much. You have a great looking yard there!! Thanks again!
Excellent video. Thanks for making and sharing.
Perfectly executed video...Thank you!
You are a great teacher!
Ive done it both ways. digging it out or just removing head. youll know if you got anything in the pipe that will clog it right away. Then you have to do it again. YOU CAN ADJUST THE LEFT STOP ON THESE. Turn it to where you want the left stop to be then adjust your right edge
The left stop is fixed... and is adjusted by moving the THREADS of the head / the entire unit. On Hunters... it is the opposite.
If any dirt gets into the pipe, just raise the center pole and use the orbit tool to hold it up, then remove the head and turn your zone on. This will blow out the dirt on the line. You must use the orbit tool to keep the center up so you can rethread the head afterwards
@@HowTowithDoc I have a yard full of rainbird heads and the left is adjustable by simply rotating past with it running. If it's too far left turn a click or two right, too far right turn click or two left then use the adjustment screw to reset the right edge. It's called fixed because there is no adjustment screw for left edge
Thanks, the rainbird tool worked with my Orbit sprinkler heads too
Great video. Very helpful. Thanks.
Thanks ! Very useful info to replace/adjust Sprinkler head.
I love your lawn and the great advice you give on how others can get theirs to look like that!
Can you do a video on switching out a sprinkler head with an NP50 rotor ( I think that’s what they’re called). Instead of a steady spray pattern, they have a rotating finger-like watering pattern?
Nice sprinkler head adjustment tips
Excellent guide. Mine all damaged by the tractor contractor going over it. Where to get a set of pop ups & valves
my old ones did not move left to right like yours. Should I replace with the same? I can only get the legal ones in Ca. some not sold here.
rainbird sprinklers have a slip clutch... you can adjust the left side once screwed into the body.
Great video. Learned what I was looking for. Thanks for sharing
Great instructional video. Thanks!
Did it first try! Only thing I noticed is the donut I cut out, that spot gets really wet (I screwed it in til it was tight (not to where you can’t get it off but very snug) and my card has clay in it.. can that take a little while to recover to where it’s not leaking like the rest of my sprinkler heads?
Are all sprinkler heads the same size? Can, I buy any type of sprinkler head? First time buying and replacing sprinklers... I used to live in HOA . Thx you in advance. I need help 😊
I know this is an old video but every time I replace a head this way I end up getting dirt falling into the irrigation line. If you’re replacing with the same head it’s just easier to take the head nut off and replace the guts. Had to replace all my front lawn heads this past summer. Old PGM heads that they don’t make anymore and two of mine don’t turn anymore. There’s the reason for the brown spots. 😣
Great video. as I woman who needs to learn to do this I was jazzed...how hard could it be, Right? Well, first, I think a gorilla put the thing on as I cannot get it unscrewed. I did manage to do what I was not supposed to do and that is remove the inner part with the spring on it so now I have a pipe to unscrew....also, there is water in the big pipe/sleeve thing. I am leaving it for now, but have to get back to it before the sprinklers run again....of course I picked the hottest week of the year to attempt it......
Awesome instructions! Thanks a lot! :-)
Thanks Doc! very helpful.
when you cut your square make it a little bigger and cut in pyramid shape, then sod will stay level when you put it back small golf course trick.
it is the PRO S SPRAY 6" . it leaks at the white part and does not go high enough . Maybe lack of pressure? Thanks
Whats the GPM and range of the throw.
Awesome vid
I just installed a new rain bird. Worked great but when I turned system off water keep coming out of hole where the plus and minus are. I couldn’t get it to stop. Had to remove completely and put old broken on back in to stop water.
My guy just charged me $38 for the head. $99 total to replace. Unreal
Great tutorial. Thanks a bunch.
Do you have to turn water off before replacing sprinkler head?
Doc, after I had put back all the dirt and wanted the spray just a little more to the left but passed it too far left. How do I come back just a little from the left side ? I have watched many videos and nobody explains this. I got a rainbird 5000 and can't figure it out. Thank you.
I know on the 42SA you can rotate it all the way clockwise to the new left position. I believe on the 5000 you can rotate it (with water OFF) all the way to the right trip point and go a little further to reduce the left trip point or rotate it all the way to the left trip point and then rotate it further to set a wider left trip point.
great job easy to understand
did you have to turn off the water main to the sprinkler system prior to this repair?
You shouldn't have to ever turn off the main really. You'll either have a hose spigot you manually turn or you have an electronic sprinkler controller that controls valves for each "zone", so just make sure your system isn't going to run while you do this :)
The head of the sprinkler should'nt be flush with the sod surface?
Which model of the rainbird do you use to replace the hunter pgp? I have the hunter pgp ultra 4” pop up. Thank you.
Any suggestions on where to purchase replacement sprinkler heads?
Seem to have dirt blocking sprinkler. How to open to get to the dirt to clean out the sprinkler? The filter has been cleared without fixing the problem.
What does it mean if the stream from all sprinklers is a thin line that only hit a spot at the end of the stream? All lawn below the arch receives no water and is dry.
Very detail explanation. Thanks!
Any concern about leakage at the threaded connection; i.e., is Teflon tape completely unnecessary?
don't use tape
when you took that hunter sprinkler out, i did not see any water in the hole, when I take mine out, I do see water in the hole, is this normal?
Looks like a spacing issue in front or there is a head missing about a 50' gap .Always make sure your left stop is set on rainbird before you adjust right ,use a leaf take and all your dirt should go back.concentrate on getting sod edges clean and tamped.
What would you do if the hole collapsed in when you were removing the head?
You would then unscrew the top of the sprinkler head and remove the center part leaving the sprinkler housing intact in the ground. Turn on your water and flush out any dirt in the line. Turn it off and replace the inside of the sprinkler head and follow his instructions to finish setting.
How much do these cost? There are so many head types and sizes. My irrigation guy charged me $40 per head for replacement including labor. He made $200 in about 45 mins. Seems like I could have done the same thing for a lot cheaper. Thanks
Will Hughes
There about $16 with taxes. He way over charged.
@@jamesmendiola9794 no he didn't if that included parts and labor. He only made $24/head after his costs
hunter pgp-adj was the old one and the RainBird 4S2A+
Great video! Just bought a house w/ an irrigation system and need to update a few heads. Just what I needed. Also, I like your hat. Any info on where you purchased it?
Columbia usually has similar hats.
What if the left is not where u want it but where u want it is not tight what do u do?
The only video that explains it right.
Can you help me change out the blue gauge part on the Rainbird? I have new ones that have a different gauge fitted and need to switch them so they are the same as the others.
The threaded piece that the sprinkler head is meant to screw into has snapped off with the old sprinkler head. What is the solution?
Dig up the entire area, 12 x 12" and replace the fitting. It simply pushes into a plastic hose.
I found that pushing on to that plastic hose is often not simple, particularly if it is cold outside, the hose is stiff, and you can't get a good angle to force it. I tried using Vaseline, but that was a joke. After reading about using a small propane torch to soften the hose (oh yeah, I'd melt something, no doubt), my wife let me borrow a heat gun that she uses for crafting. I did need a long extension cord, but I softened the hose successfully and the fitting slid inside easily.