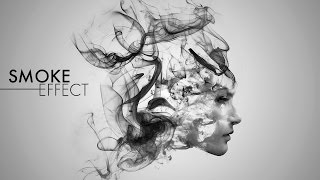
Photoshop Tutorial: How to Create the Look of Beautiful, Ink Smudge Portraits

Вставка
- Опубліковано 24 сер 2024
- Photoshop CC 2017 tutorial showing how to create the look of beautiful, ink smudge portraits.
➤ Get 15% off BORIS FX OPTICS! - The BEST special effects plug-in for PHOTOS in Photoshop! Go to bit.ly/3aDnh4A and use my special code: bltv2020
Ink Textures by Jukka Korhonen (Deviant Art name: “loadus”)
Ink Smudge files PSD:
1drv.ms/u/s!Ar...
Photos provided by www.shutterstoc...
Image ID: 450822556, 571220305
Royalty-Free Music provided by www.beatsuite.com
High quality, copyright-free music for UA-cam.
Music track: “Streetwear”
Become a Patron to Blue Lighting TV for as little as $2/month:
/ bluelightningtv
BLTV TV Channel:
/ bluelightningtv
BLTV Website:
www.bluelightni...
BLTV Facebook:
/ blue-lightning-tv-3307...
BLTV Facebook “Subscriber Page”:
/ bltvsubscribers
Tumblr:
/ bluelightningtv
Twitter:
/ bluelightningtv
Google+:
plus.google.co...
Pinterest:
/ bluelightningtv
LinkedIn:
www.linkedin.com/in/martygeller


Marty... I've learned so much from 3 of your videos my head is spinning. You explain things in such a calm manner, much appreciated.
PS is a hobby, and now I've retired I'm experimenting quite a bit with PS. Your videos are the best I've ever found, thank-you. Some great ideas.
Great to hear!
I am so glad that I came across your "UA-cam" Channel. Your tutorial are , "Second to none". I have learned a plethora of information watching your video tutorials. "Thank You"!
love, love, love your tutorials! very clear instructions, visual techniques and their settings are so very helpful. I have been going crazy with most of the tutorials out there. Yours is definitely the best so far. I am a beginner and I have learned so much in one video... which includes tools and effects in PS that I didn't even know were there.Thank you
Спасибо) этот урок был очень полезен для меня
Follow it to the letter, took me a little more time because of that, but the results are well worth it. Thank you, keep it coming
Yes, I'd also like to know who clicked "dislike". These are fantastic tutorials! They are charging for actions like this on graphic river. Thanks for explaining this to us
Marty, you are my hero. I seriously love your tutorials!!! I really wish you had been my prof while I was at SCAD. You blow everyone out of the water.
Absolutley brilliant, by far the most informative and most easy to follow, great stuff Marty.
As usual Mr. Marty, another excellent tutorial. Thank you sir.
I started a career by watching your videos sir.
Great tutorial. Thank you.
nice stuff
you are great Marty, after watching your 2 to 3 videos ,I become your fan
you describes very well, keep it up dude
This is awesome! Thanks a lot for these "on point" and no nonsense tutorials!!!
i love u marty, u are great teachers for me
Another great Tutorial Marty great job you're the best.
Thank you my teacher and I am honored to be a student
Kharach. Khup bhaari shikvtat sir
you still the number one of ideas for me, thank's for all what you share :)
WOW!! you're the best. I know you hear that alot, but you're a god-send. Thanks for your channel, and thanks for you. i'm new at photoshop, and you make it soooo easy to understand.
Marty, you're the best!!!!!!!!!!!!!! thanks
Just wanted to know who the hell clicked on deslike?
Excellent tutorial with the best voice over. Kindly upload some more tutorial on smudge and oil painting.
Thanks and keep up the good work.
Go to my UA-cam channel & click on the magnifying glass icon (next to “About”). In the “Search Channel” field, type in "oil painting" or "smudge".
As always you are awesome
thank you very much
Thank you very much! Awesome video! God bless
two thumbs up for you marty!!
very nice tutorial, thank you so much 😊
Wow, thank you! Grtz. from the Netherlands.
Thanks bro, great tips
nice tutorial thank you so much
With the latest cc version- I am wondering why the wet brushes move me to smudge instead and how I can get the wet brushes as following the directions I cant find them
como siempre un tutorial fantastico pero en este caso al pegar la imagen en la mascara, se copia pero en el grupo y no la mascara de capa. tambien al descargar el psd solo sale una imagen y no dos como veo en el turorial
Hice clic en el enlace proporcionado y cuando lo abrí en Photoshop, ambas imágenes de manchas de tinta estaban allí. Con respecto a su otra pregunta, habría que inspeccionar su documento para determinar el origen del problema. Lo siento.
nice, thanks!
Seus tutoriais são demais...Obrigado.
Você é muito bem-vindo. Obrigado!
thanks
nice
from Saudi Arabia
Thanks Marty !!!
Excellent, thanks!
thank you sir
Excellent
thank you teacher
for the life of me I can't get the colors to reveal with the brush setting?? what am I doing wrong???
Worked well, but would like to create my own smudges. Tried a few, but not quite hitting the mark. Are you able to recommend brush types to use? Also, can you provide a direct link to the samples you used?
You can create your own and then go to Edit > Define Brush Sets.
Ink Textures by Jukka Korhonen (Deviant Art name: “loadus”)
Ink Smudge files PSD:
1drv.ms/u/s!ArAEPhCK6XBWjQmd4erHiJwcG2Lg
thank you mister, a great tutorial :)
Sir i am your big fan >3
thank u very much...
please make more videos
Presently, I did over 540 videos. Go to my UA-cam channel & click on the magnifying glass icon (next to “About”). In the “Search Channel” field, type in the subject you're interested in.
You are the Best!!!
thank's
Awesome!
Спасибо за урок
Добро пожаловать!
Hi there, awesome tutorial. How would you go about getting rid of the white background and only have the image and effect?
ua-cam.com/video/ORGc6Sdc8pQ/v-deo.html
Whoa!!!!! Awesome!!!!!!!!!!!!!!!!!!!!!!
i like helpfull
five stars 4 you man ...
I have a question about much of the work that you do that I LOVE. (Sent you a comment the other letting you know.) What size can you print most of your work after you resize? Do you do most of these all the same size? I can't remember them all! lol I love to watch them over and over. I have learned A TON! So can you do as large as 8x10? Or should you use 300 ppi if you are going to print rather that 150? I would love to make some gifts for family/friends using their own photos and I think that size would be perfect. If they want the piece to be bigger they could always use a mat and larger frame, but 8x10 seems like a good usable size. Can I get that with the 1080x1080 at 150 pixels per inch or should I actually raise that to 300? What do you recommend for the best print? I have a great Epson Workforce printer (the best in my opinion for artwork, with their pigment inks) so I think I could make some beautiful stuff for people. My daughter and son in law would love your comic book art from their photos!
As a rule of thumb, if your intent is to print the final image, always begin the project at a resolution of 300 ppi, so your printed image will be sharp. You'll have to use larger setting amounts for many of the filters that use pixel amounts as their measure.
@@BLTV_Photoshop Great, thank you! I can play around with the settings of the filters until I get what I want. I appreciate the fact that you ALWAYS reply! Thank you very, very much!
Cool picture. Could you make a tutorial about Cartoon Effects?
Go to my UA-cam channel & click on the magnifying glass icon (next to “About”). In the “Search Channel” field, type in, “cartoon” and "comic".
I can't move the ink smudge layer to the canvas with this error message. "Auro-Select" also unchecked.
"Could not duplicate the layer because source and destination documents are the same." What's my fault?
When is this in the video (minute:second). When you reply, please repeat your question and refer to this video. Thanks.
Could you make this tutorial on GIMP ?!?
Sorry, I don't use GIMP.
I think I need a bit of help on the optimization and performance part. When I try to crop the image it says I dont have enough disk spece, yet there are about 50 GBs on the drive. Im trying with a 1080 x 1920 image. Should it be smaller? Do I need another empty disk? Thank you in advance for any help! Love your videos! ♥
forums.adobe.com/thread/2416394
Thanks! I will go ahead and upgrade. I managed to complete the tutorial bypassing the crop part and adjusting the textures. Thank you again! ♥
Hello Marty, Thank you for sharing great tutorials... I would like to know if there is any other alternative for Alt+Click based actions.. i was looking for only keyboard based or only mouse based options.. Please help.. Thank you..
I assume you want to create a new layer below the active layer? If so, click the layer below the active layer to make it active and then click the New Layer icon to make a new layer above it.
i like
I got this to work on one of my photos but a few others I could not get it to work as after I got to the invert stage the smudes didn't reveal the picture like it should have. Is there something I have to do extra possibly for some images?
as usual it's rock man
Could you kindly please tell me which category this goes to? I mean, something like: Digital Art, Photo manipulation, abstract or other something like that. Thank you!!!!!!! Love your tutorials!
Photo effects.
Thank you!!!
Does anyone know how I get the 2 ink smudge files into photoshop, in order that they appear in the same way as on the video. Thanks
many many thanks... (Y)
Sir iska jpeg image milsakta hai kya pura tutorial banne k baad wla image
Hi Marty love your work, you really have inspired me to photoshop. Have you got anything planned for like a city inside or boat inside a bottle. There are others that do it, but everyone else is either unclear, plays music during their videos, or some just don't tell you what they are doing, not they way you do anyway, Many Thanks Paul :)
ua-cam.com/video/6QigXWWtjh0/v-deo.html
make a water, smoke,etc effects...please
Go to my UA-cam channel & click on the magnifying glass icon (next to “About”). In the “Search Channel” field, type in the subject you're interested in.
I can not make this. ink smudge not visible
hi, why is my filter gallery can't be clicked? idk i'm trying to find filters on google. i cant seem to find one. help! tia
Go to Image > Mode > RGB color, 8 bits/Channel.
got stuck 4:55 i have ps6 n it wont copy or paste
Hi Marty im trying to download the psd files for this tutorial..but its only downloading one of the brushes.How to Create the Look of Beautiful, Ink Smudge Portraits.
After you click the link and the page opens, click "Download" at the top to download the PSD file. It includes both brushes.
Blue Lightning TV Photoshop I am not sure why my brush tool is not revealing the colors under the mask. can u tell me what I may be doing wrong?
at 5:36 I cant just move the ink smear layer. It keeps going to the group folder and I move the whole image. cant figure out what im doing wrong
Uncheck "Auto Select" at the top left of your screen.
Dude, you are awesome! Thanks for quick response!
sir iski final psd file send krsakte ho kya ap ?
दुर्भाग्यवश, मैं नहीं कर सकता क्योंकि फाइल में मैंने जो तस्वीरें इस्तेमाल की हैं, उन्हें कानूनी रूप से कॉपीराइट प्रतिबंधों के कारण सार्वजनिक रूप से वितरित नहीं किया जा सकता है।
Can somebody send me a link of song that he used in his video. Thanks!
Directly below the title of the video, is the video’s description. Click "Show More" and scroll down. You will see the links to the files.
Blue Lightning TV Photoshop Yeah, thanks. But there are a lot of songs on that web page. Could you please send me the link. :)
only one smudge tool?
I'm not getting filter gallery !
Go to Image > Mode > RGB color, 8 bits/Channel
are there a lot of these features in CS5 extended
Yes, but not all.
Blue Lightning TV Photoshop Hey sir can you create a video on studio photography effect I am your big fan.
I hope you make THANK YOU😊
hey marty i can only download one brush, it doesnt contain 2 brushes :(
After you click the click and the page comes up, click "Download". The PSD document has both brushes.
after downloading, i opened that file, there is only 1 brush
I thought the same thing, but once you download you just hit Commant T and move it, you'll see it right behind it.
Hey
When I try to move The Ink layer, it moves all the group
Uncheck "Auto Select" at the top left of your screen.
:D you are awesome thanks
Thank you for following up on all of the little details - very VERY helpful :-) This was driving me crazy.
Um Br Na Area
You are the Best!!!