How to Create Perfect Shadows in Photoshop

Вставка
- Опубліковано 5 вер 2024
- I Guarantee I Can Teach You to Master Photoshop. Learn How: phlearn.com/aa...
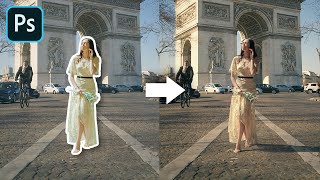
How to Create Perfect Shadows in Photoshop
A shadow helps any subject look grounded in its background. This tutorial makes creating the perfect shadow easy and fun!
Shadows are complex, so use many layers.
Shadows can be difficult to create in Photoshop because they are very complex. Shadows start out dark and fade out as they move farther from the object. The easiest way to replicate the complexities of a shadow is by creating multiple layers with multiple shadows and blending them together.
Learn how to use the Gradient Tool and a few layers to create realistic shadows in this episode.
Use the Gradient Tool to Create Shadows
Shadows are darker at their core and fade out as they get farther from the center. You can achieve the same effect using the gradient tool.
Start by selecting the gradient tool and picking the ‘Foreground to Transparent’ gradient in the ‘Gradient Editor’. Next, choose a radial gradient and on a new layer, click-and-drag outwards to create a radial gradient.
Next, transform the gradient by pressing ‘CTRL/CMD + T’. Flatten the radial gradient out and size it accordingly to the object. If needed, change the opacity of the gradient or use the eraser tool to remove excess shadow.
Opacity and Hardness
The areas closer to the object will cast harder, darker shadows and the areas farther will have lighter, softer shadows. To replicate the effect, create different layers with different gradients on them. Move the layers into place to achieve a realistic shadow.
Did you know there is a lot more to PHLEARN than UA-cam? phlearn.com/more
~-~~-~~~-~~-~
~-~~-~~~-~~-~


over and over, Phlearn is has proven itself to arguably be the best channel on all things Photoshop. Masterfully done lessons. A true resource for the Photoshoper.
I'm genuinely curious as to who dislikes these. I mean how can you NOT love these tutorials, they're perfect, second to none and the host is pretty F#$*ing awesome!!!
+Shrey Butle Thanks for the kind words.
His shadows are in the wrong direction, towards the light source. Now you know who!
I know it's a year later @Shrey Butle, but you said you were generally curious so:
Easily. Most people hate just so you read their comments, but if you do do this sort of thing there are many many problems, and people aren't actually being taught properly. So, I agree to disagree on "perfect", "second to none". But sure, the guy's pretty likeable.
But. Inconsistencies with the sources, "I just do this" type statements that mean nothing in terms of context (which is the single most important aspect to really teaching). Where is the education on WHY? And the correct terms for them - umbra penumbra and so on? If you're talking about those sort of concepts already it makes no sense not to explain what you actually mean/why the shadows/lighting are that way, etc.
And the joke is that his shadows actually don't work/aren't accurate to the lighting in the photo he's chosen - maybe you missed that others have pointed this out. That's a monumental problem right there that basically makes the entire video pointless. And the reflections and shadows on the patent leather shoes actually clearly tell you where the light is coming from and therefore where to cast the shadows! Rimlight too!
So in the end it's sort of helpful if you can't think of this stuff by yourself, but falls short of real instruction. Tell someone why these things happen and why you're doing what you're doing (rather than redundantly describing what's already on the screen but with no insight), and the audience will retain everything because they'll have context. Rather than just parroting what they've seen on a youtube video and still not understanding the base reasons. Good retouching and photomanipulation is as much about painting/illustration/being an artist as it is using software or a graphic designer needing to do some touchups.
But sure, PHlearn's videos are fun (the 60p makes things a touch creepy though! :D). And they're nowhere near as bad as all the 3d "tutorials" that just tell you to input some numeric value without explaining why/what the number means. I don't dislike the guy, nor his general approach. But the wasted opportunity to actually inform the viewer properly when he's already using the same concepts in a naive way relegated this to being just a youtube tut with no weight. It's giving someone a fish rather than teaching them to fish. Or the "I use this filter" school of (non) thought. I know that might sound a bit snobby, but it's just frustration talking.
So again, I have no ill-will at all, but I do have very solid reasons for disliking the content/teaching. Just an (professionally informed) opinion to answer your query. Hope it helped. Cheers.
Yes!! I've been waiting for this tutorial. Always had difficulty making my own shadows. This helped a ton. Thanks Aaron!
Any way we could get some more photography based tutorials? Or even the Q&A segments where you answer 10 questions from your audience.
I second that! Would love photography lessons from Aaron - on a second channel called Photography Tutorials by Phlearn. Hopefully the Phlearn team can expand to handle this, because I'd hate to loose a single PS tutorial, this stuff is gold!
I always apply what I learn on Phlearn on digital drawings. Now that I'm getting more into photography, I would really want to learn photography with the guy that helped me understand Ps.
Also, I think Aaron knows other CC programs, such as Premiere, and I would love to learn other software the same way!
Helpful tutorial.
Besides the light direction issue it may be helpful to set the shadow layers to "multiply". A must if the background is colored.
another trick I use is creating a gradient and using the motion blur filter to stretch the gradient out along the horizontal plane so the fade has more variances of blend from in the inside to the outer edge.
Perfect video tutorial on shadows! Really happy to see that you guys pay attention to detail in every aspect! Thank you! :D
AMAZING TUTORIAL LIKE ALWAYS !!!
What a wonderful tutorial. Thank you so much
Really like this method of slowly building the shadow layer by layer! Cool !
As always awesome and very informative! I learnt a lot! Thank you so much Aaron! God bless and good luck!
thanks for watching!
Wow that is a great tip, looks super realistic.. THANK YOU!!
Best lesson ever
You are the best tutor on youtube ....!!!! I love ur energy and enthusiasm keep up the good work
This was very intuitive and well taught! Aaron you are a great instructor! Thank you!!
I was a completed no idea about photoshop, now I can create banner and do some simple photo edition. because PHLEARN channel. thanks alot Aaron
Thank you Aaron. you are the best.
best shadow tutorial I've ever watched!
Good ideas & tactics for shadows that will help us better than brushes thank you
Very nice Aaron
very good tutorial, waiting for the new updated artboard tricks.
This was a really good tutorial! I've been waiting for this kind of a video for so long.
However, I thought you were gonna cover both types of shadows in this video, harsh AND soft shadows. I would really love to see a harsh shadows video tutorial too.
Great video!
This was incredibly helpful. So well-explained and easy to follow along as I worked. Thanks a million!
another great tutorial. Thank you Aaron... !
This helped me so much, thank you!
Fantastic! Thanks!
You are friggin amazing Aaron!!
nice tutorial. I have been beneficial.
Great tutorial. very nice style of delivering the essential information!
Thanks for posting.
Very nicely explained
Awesome results and another great tutorial 👍🏻
Good video and tutorial as always Aaron.
this is the only tutorial i was searching for a long. thanks a lot :*
Very well done once again Aaron. They KEY driven home here is to apply very subtle effects over and over. All together, you have a FANTASTIC and 100% photorealistic effect.
Not sure why anyone would ever put in a comment here on Aaron's channel that isn't anything but POSITIVE. What AARON and PHLEARN give away for $0 is truly amazing.
Thanks AGAIN & GREAT WORK :-)
Great tut, thanks, Phlearn!
Great tutorial. This is one of the best you've done.
Thank you master Aaron
Aaron you are the best, wowwwwwwwwwwwwww what a beautiful shadow "trick"
What a useful tutorial! Thank you so much!!
Awesome 👍
I watch your videos all the time and you are wonderful and adorable, but it just dawned on me, as I was listening to your voice and working on my own project, you kind of sound like Kermit the Frog. I think it adds to your overall adorable-ness. Every time I need to learn something I come to Phlearn.
WOW That´s where exactly what I needed to learn. Thanx!!!!!
You are amazing. Thank you for sharing your talent/know how with us.
this is a good approach. it kind of reminds me of that tutorial you did on light beams (which where also multi-layered). The only thing I'm missing here is a little more attention to the light directions. The front of her leg looks mostly a little darker, except for the subtle rim, So I would expect a little bit more of a drop shadow towards the bottom right while the area under her sole would probably be a little less in shadow as the light comes from two angles to lighten that area. Just thinking out loud though :). This does look great as it is!
That's EXACTLY what I was thinking!
You're right. It may have to be a balance between realism and what looks good. The shadows aren't exactly correct but they _look_ realistic and will fool most people, as well as just look nice.
Tympanista
But WHY work with a pic that does NOT have the right lighting for the tutorial???
tio borracho It would be very difficult to find a photo that would perfectly fit with the shadows he made. And like I said, realistic lighting (which includes shadows), isn't absolutely necessary or possible.
To be realistic, it would be better to judge the direction of lighting and add shadows accordingly. In the video, the shadows were coming from a nonexistent light source from above.
Tympanista
"It would be very difficult to find a photo that would perfectly fit with the shadows he made." Are you kidding??? Start with a DIFFERENT photo with a CLEAR light source and then add the appropriate shadows. SIMPLE.
thank you for each and every tutorial.. just love them :)
Very helpful. Thank you for the tutorial!
Amazing!! Very Helpful!!I've Always had difficulty making my own shadows. This helped me a lot!. Thanks Aaron!
Terrific tutorial! Thank you so much!
i love you long time. Thanks for this!
I am grateful to you , thank you so much
I have seen to many of your videos and they are really helpful. And i like how you explain things.
Pls make a video how to remove old photo texture without bluring the photo..
Thanks Aaron. Excellent!!!
Very Nice!
FINALLY!!!!! My comments have paid off!!
Still need that reflections video though :P
What type reflections? This is a city skyline shot of Boston, MA I took. I just made a copy of the image (pano) and then Used free transform tool to flip and then added a little to make it appear like water...
500px.com/photo/147182809/beautiful-boston-by-brian-pex?ctx_page=1&from=user&user_id=1794087
+Brian Pex wow that's really cool, yeah I pretty much mean like that I guess lol
I really love this new video1!!! Thank you so very much
Yes indeed!!
Great tip, thank you! My shadow looks great
Hi Aaron, i follow your movies view month ago, and you are the first Channel, i understand al what you say!!
I am from Germany, and my english is not the best, but your pronunciation is top...!! that needs to be said ;-)
And your tips in PS are simple to understand and effectively...!!
This is great! They do look so much more realistic! The only thing I am curious about is adjusting the shadow for the light that is coming from the left, as noted on the model's legs. Shouldn't the shadowing spread to the right of her feet? Or, am I trying to make this harder than it really is? LOL
You can add noise also for better results
fast flash You have no idea about image post production and photography obviously!
fast flash bye troll
I would love to see a Phlearn tutorial on rim lighting.
Thank you very good video and again thank you for Clt+H!👍🙏
I agree with edmund22 that the shadows are being cast from the wrong direction as the ones on the model. I DO like this technique a lot and it's a great demonstration (as always). However, I also believe it is extremely important to pay attention to match the shadow direction of the original element (model or object). I can't tell you how many times I have detected a poor composite because the artist missed this important detail. If your objective is to create a convincing composite, pay critical attention to the fixed shadows of the composited elements.
I'm not talking about untouched photos. I'm talking about composite images. My point was to pay attention to the existing shadows of elements when compositing.
thanks! :) I used the technic for color reflection
this kind off vid i want to start my day with :) thx
hey Aaron what's up! You looks tired or something? I hope you're ok cause you're the best and we can't go on on photoshop without you.
Hey Aaron, as always I love your tutorials. This quick shadow tutorial is awesome but my opinion u missed a spot. At the beginning, we should think about light source of our main subject and think about our shadows depends on light sources.
Very nice tutorial. Thanks
GREAT1
Very helpful, thanks. My shadows are terrible!
Awesome tutorial!
I watch a lot of your videos and was wondering if you guys could use a program to record and show your keystrokes while you work? Most of the time you're great at mentioning shortcuts you use, but I think it would be cool to see an episode with that since it doesn't make sense to say every shortcut you use every time.
Thanks for these great videos!
This is helpful
Thank you for sharing this!
I don't know if that's just me but I think the shadows point in the wrong direction. In my opinion the light source is on the left of the subject. Not that you get me wrong! The tutorial was great but I think you did a bit of a mistake there. But maybe I'm just stupid, we'll see! :)
CU
Oscar :3
true
if you may notice there is more than one light source, also there is no surface to cast shadows from that light coming from right.Also light is not a beam,it spreads no metter what and you can only see shadows on surface, they cant float in the air
your right!
key light is from left shoulder of photographer, look at the far knee / leg shadow cast. Shadows here would be complex but the main shadows are wrong, they should be cast to the right at 45deg behind the shoes not to the left. you have light bouncing too, but still the core shadows are off. he is right about one thing - building shadows in multiple layers.
Imo, Hard light source is clearly from the right of photo. There is fill from 45 left, but it's clearly a large soft light source and wouldn't cast a hard visible shadow, especially since light source from camera right is brighter. Remember inverse square law and quality of light when making analysis.
I phlearned so much from this, thanks! :)
So thankful for this!!
you are realy cool man......
wow nice
Amazing tutorial.
perfect
Great tutorial!
Thank you so much, it has helped me a lot. Congratulations on your channel :)
LOL. Box blurr shadow for the win!!! UA-cam or Twitch? ;)
thnxx
thanks brother
Thank you for amazing video!👍
awesome video,it will be great if you make on for the lights also i made an advertisement and i had some trouble with the shadows and lights,and i would loke like to know what you think about it. love your videos
Hi Aaron. Thank you so much for all these great tutorials. Could you please make a tutorial about jewellery ? I always have a trample to fix jewellery in a total white background to look realistic. I have also bought some amazing episodes from you but i think i need specific help in this matter. Please if you do something i would appreciate, or if you have already made any episode that i can bay, and help me ,you can suggest me. Thank you in advance.
Thanks so much for sharing, appreciate it!
Thank you for telling us all the hotkeys both for Mac and Windows, because in the official tutorials from Adobe they don't have enough brains to do so.
Thank you Master Wizard
Very nice technique. Just one thing.
Look at her legs, the light is on her left, dropping shadows to the right. Her left leg is all in the shadow of the right leg.
And your shadows are to the left as if the light source would be in front of her.
Or am I missing something?
That would be my comment as well other than that, great tutorial!
Yeah you are right! The light is in her right, slightly behind her, just so the light can hit her left knee. The shadows should give more of a backdrop to her left or in front of her left. But then again, he is mostly showing the technique, you can always move the shadows to fit better :)
It would be just a matter or rotating and aligning them to the right angle...
Complete photoshop noob here: whenever I make a gradient and try to resize it, it doesn't just resize the small gradient but the very large canvas that the gradient is on. How can I get it so it's just resizing the gradient that I put down? I think it has to do with the size of the layer but I can't figure out how to get the appropriate size.
Check to make sure you have your gradient set to 'Foreground to Transparent'
Thank you bro for a great tutorial
loved it...!! if there any tutorial for realistic different perspective shadows of human or products.
A really nice and useful tutorial, as always! I would also like to know how to properly create whole shadows in the shape of my subjects, just a suggestion :)
this is amazing wish i could edit photos like this
You're the best.
Aaron .. I always get polished from your tutorials .. here I want to say something. If I am not wrong lights are coming from left , so shadow should be on opposite direction i.e. right ... but your episode does not depict that. Please get me corrected if I am wrong. Respect from INDIA.
thankss
WOW!!!! What camera are you shooting with!!!!!!!!1
Aaron, I always wondered how can I achieve a perfect "double color" (two colors predominant) photo as the photo that you show in your intro. Specifically, do you set it up with your light before? It's amazing and I'm trying to get as close as possible but it doesn't work as well as in your works. [talking about portrait and ambiental portrait]
Love your tutorials by the way, you're amazing.