Digitizing Images for Embroidery - Easy How To Guide

Вставка
- Опубліковано 27 лис 2024
- This guide will show you how to easily convert an image into an embroidery file for your embroidery machine. The machine I use is a Brother SE-400 and the software used in this video is:
Photoshop - I used this for basic image manipulation and editing. You can use your own favorite image editing software, even Microsoft Paint would work for most files.
Click 'N Stitch - This is the actual digitizing wizard software that I use. It is made by "Amazing Designs" and they no longer offer this specific software as they have replaced it with a newer version called "Digitize 'N Stitch", they offer a free 30 day trial of the new software on their site: amazingdesigns....
Brother PE-Design 7 - This is the official Brother embroidery software for their sewing/embroidery machines. As of the posting date on this video, I think they are up to version 9 or 10, but I only have the older version 7. I don't like their auto digitizer wizard (I get far better results from the Click 'N Stitch), so I only use this to layout the finalized design and order the colors etc... They have a free trial available on their site: www.brother.com...
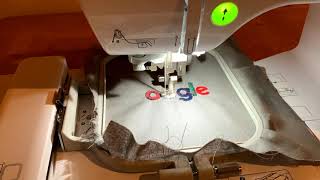
I just grabbed the image file I used from Google's image search, and edited it slightly to work for my application.
This video also shows how to use the Brother SE-400 embroidery machine with a Mac computer.
For more information on how to make patches/badges out of your embroidery projects, check out my other video: • How to make your own e...
To Download this Gryffindor Embroidery Patch .PES file, visit melarky.com/emb... and save the file from there (there are a few other embroidery files uploaded there as well, so find the one that says GryffindorBlackMaterial.pes). We also have some patches for sale in our Etsy store: www.etsy.com/s....