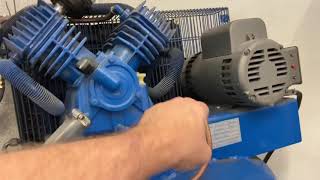
Air compressor aftercooler, air drier and water separator

Вставка
- Опубліковано 10 жов 2021
- Homemade aftercooler for my air compressor. It pulls a ton of water out before entering the tank and the 2 stage filter dryer catches the rest. 200 degree temperature drop across cooler.
- Ігри


The part of the video mentioning the compressor lock up on short cycle has been solved.
When I bought a new pressure switch it was slightly different even though it was the same model number so I had to move a few pieces and parts around. I forgot to move a little tiny lever that flips and bleeds the line after the compressor shuts off.
Very nice. Yeah what that does is it allows the motor to start with less amperage instead of a full load, which can be very hard on the motor.
Would be great to see that explained on vid.. It has been mentioned as a issue on other pretank cooler set ups. Any feelings about the pressure relieve being longer now, with the enlarged amount of air between head and tank?
@@70ixlr86 I still leave the drain cracked right after the cooler so it always drains water. Ill have to try it without doing that sometime
Wow! that looks like the amount of water that will be coming out of my compressor. I have a 7.5 horsepower compressor that is huge. It also has a 300 gallon tank. It was used by an auto body and paint shop and it really puts out a ton of air. I have converted Harbor freight sandblaster and a vapor honing cabinet . I actually had to stop using them because of the amount of water coming out into the gun. Thanks for the awesome video!!
If you make any joints close to the cylinder head, use silphos 15 brazing rod instead of solder. The solder will melt
@@DBrisky37 Thank you my friend!! are those brazing rods able to be used with a propane torch or do I have to fire up the oxygen-propane? Or can I use MAP gas?
@@johnkoury1116 I'm not sure about mapp honestly. I used oxy acetylene on a low setting. The solder connections at the 90° down close to the inlet of the cooler did not melt, just the connection about six inches from the cylinder head. That was not supposed to be there, but I made a mistake.
@@DBrisky37 I was wondering about that...I looked and found silver phos copper brain g rods that look like they will be a great choice. I was building a large still a few years ago and used silver rods and blew a bunch of holes through the joints so the right rod for the right job is very important. Thank you for taking the time to explain.
I’ve been looking at videos on adding a cooler/condensor to my 8 hp , 16.4 cfm 115 psi petrol compressor and out of all the videos I’ve seen so far( 4 or 5 ) this is the best and neatest installation I’ve seen... nicely done !!!
Thank you!
Great job mate 👍
Good to see someone actually using a fan to move air effectively over the cooler.
Very tidy install.
Thank you. Strapping the cooler to the cage and relying on the compressor fan did not seem like it would pull enough air through
@@DBrisky37yeah I have the same radiator cooler setup you got sitting in the box. I figured for less than $100 more you get a nice 12v fan with better hard point mounting options versus that rinkydink plastic zip tie stuff.
Finally, someone test the before and after temps. thanks!
So I made essentially this same setup, I have an IR compressor(175psi). But instead of running a single filter after the Derale radiator I ran a 3 stage Nanpu set from Amazon. Filter, coalescing then desiccant dryer then into the tank. Within 3 seconds of turning it out the 1st filter stage of the Nanpu blew apart. Looks like three of the metal lugs holding the bowl cannister on had just sheared off. The cannister flew down and smashed into the floor with all the plastic parts busting everywhere. Dented the metal cannister also and a small piece of something had flown by my head. I think it was one of the lugs. My first thought was that the nanpu, which I'm sure is cheap chinese pot metal, had a stress fracture in it. My second thought was that having all three stages inline created to much back pressure and the 1st stage gave way. I am using 1/2" NPT so the lines are big enough. It was probably a combo of those two items.
My goal was to have the air as dry as possible going into the tank. But when I replumb it I think I'll go with just a 1st stage filter/regulator and put the coalescing and desiccant filters after the tank.
Also, posted this as a warning to anyone else trying it. Take precautions when starting it up the first time with any modifications, like turning it on from the break far away from the compressor! ha.
What's the PSI rating on the Nanpu. wow!
@@70ixlr86 it is rated for over 175. I even emailed the company and they said it can handle 175 compressors. I just finished putting another filter inline and it worked fine and the motor cut off at 150psi.
I suspect that it may have been a combo of a metal fracture and having all 3 filters inline and it created a little too much back pressure. Just not sure.
Amazing. Epic build..
Thanks for sharing your experience. Looks good 👍🏻 👍🏻
Thank you
Very impressive work, friend. Definitely an inspiration for others to try out.
Nice work! One of the best laid out and implemented aftercooler setups that I've seen so far. I'm in the process of doing similar setup.
Thank you
Very nice. Just finished building a similar setup, except on a 30 gal. compressor. A key thing here is that the water separator is more effective as the flow rate increases. My smaller compressor hardly catches much water compared to yours.
Maybe there is a smaller one or different style that would match your flow rate. I don't think a smaller compressor will make as much water either
You are wrong! It's not an aftercooler. It's an intercooler (just like a turbo intercooler) 😂 Nice build. 👍 I went the vertical route with 4 drains at the bottom of each run using black pipe mounted on a concrete wall. I built it as an aftercooler water separator for painting, sandblasting and plazma cutting but now I've seen the light and I'm converting it to an intercooler using 1/2 inch hydraulic hose. My Sears compressor is about 50 years old now and never a leak. They don't make them like that anymore. I'm planning on adding another ck valve to avoid short stop lock ups so the bleeder doesn't have to dump all the air in the radiator.
Nice work! That is a much better modification than mine!
Thank you
Amazing job.
The extra volume (amount) of air between the compressor and the check valve needs more time to fully bleed off. If you can find one, a purge valve with a larger inner diameter tube would shorten the time it takes to depressurize.
nice work!
Having the water drain out of the filter is genius! Mine gets so bad after one day.
Mine too. On a hot humid day that water separator after the cooler fills to the full line on one fill from empty. If I don't leave the drain cracked open. I tested it and leaving it cracked only extended the fill time 5-10 seconds if I recall. It's worth leaving open if you don't have an auto drain
@@DBrisky37 yup still have mine open
NICE WORK. A brief technical point: all motors vibrate and therefore should be using flexible hoses rated for PSI/Pressure/Temp rating of your unit. The likelihood of copper soldered vibrating loose is almost non existence, but, i used compression fittings on mine therefore had to use flex hose. The vibration will transfer throughout the system though. I also added a filtration system on mine cause I'm running a plasma table through it.
Do you mean the pipe leaving the compressor and going to the cooler should have a rated hose in between? If so, that would make sense, and help isolate vibration.
@@DBrisky37 I meant a flexible hose of each end of each connection point off the cooler. Due to the motor vibrations it travels throughout the metal frame at all points and the Flexible hose, especially to the tank will help isolate it from that. The vibrations and air oscillations cause harmonics frequencies in the metal which could lead to metal fatigue and failure points. Also your hardware connecting to the frame rail holders should be Nylon locking type (also known as aircraft nuts) or they will vibrate loose.
Nice JOB ! I'm planning to get a Dewalt 5 hp 2 stage tomorrow a 60 gallon. I was going through the web looking for some good ideas to install this cooler because i did not like the idea to install it on the grill. They will need to take this grill off sooner or later what a pain .. Thank you for some ideas ...
Good Job
I bought a similar setup for my 20Gallon portable
What pressure does your air compressor kick on and kick off at? you might be able to set it to not kick on until it reaches a slightly lower pressure, that might resolve your back pressure issue, may only take a little bit of adjustment, should also help your pump to last longer at a lower psi. I have looked at a LOT of these after cooler videos, and your install and tube routing certainly looks well thought out and clean, I have seen a few where they run the coil into a bucket of water, I am still on the fence if I want to add the water bucket to my planned setup or not.
EDIT: Actually I was thinking about this some more.... you still have a check valve in place right? seems like when the pump shuts off that it should depressurize the condenser up to wherever you have your check valve installed, so whenever the compressor starts back up there wouldn't be any pressure in the system up until the check valve, this is why they hiss when they turn off. It seems unlikely that the tube size would cause enough back pressure to cause this to happen, unless the electric motor is just barely large enough for that size compressor pump, or if the pump itself is starting to have issues (check the pump oil level?)
I could try the lower pressure setting, it kicks on around 110 or so. That's a good idea.
Yes the check valve is still there. I'll have to check and see if it's bleeding off after meeting pressure, I honestly can't remember. But I do know the sound you mention.
It's 15 years old so the electric motor could be starting to get tired, oil is good, I keep up on the maintenance. The valve body fell apart and blew a hole in a piston a couple years ago, I replaced it and got a look at the internals. It all looked great and rolls over with normal resistance when the belt is off.
I'll report back after I adjust pressure switch and check for air bleed after shutdown
Okay so I checked this morning and I do not have that bleed off after shutdown, and I believe it has something to do with the pressure switch that I put on there to replace a bad one. It was a factory Ingersoll Rand part but I had to swap a some of the pieces with the old one because a few things didn't match up properly.
I'm going to look into it because I'm curious, but my water drain with a the drain valve slightly open is doing the trick for now
Check your starting capacitor it might start going bad and that will usually affect the start kick on the motor ( assuming is a single phase 220V) mine was giving me a humming and not start and ended up being the two starting caps. It’s a Baldor 5 HP 1 phase and now it’s kicking right up.
I found out it was the pressure switch. I had to replace it and there was a part missing from the new one that allows to pressure to bleed off after the compressor shuts down
This is so far the most complete air dryer I’ve seen. Big thums up for the relay, WOW. A simple idea, but a must have. I’m about to do the same to my compressor and I want to know if you had any problems with vibrations on your electronics or even on your piping. Just asking because I saw other video with that kind of problems.
Nicely done 👍
Thank you. I have run it a TON since the install and have had no problem with vibration. All bolts are serrated flange bolts so that helps. Those are pretty solid relays, they are used a lot in HVAC equipment that vibrates so hopefully it holds up for the long term.
Thanks for your answer. I was wondering if there is a wirering diagram somewhere that I can use to build mine because I’ve never used relay before.
@@ouelletteyannick4102 the relay has one in the box. Very easy to wire
@@ouelletteyannick4102 or Google rib2421c wiring diagram. Reach out if you have questions, I'll help if I can. Its not too bad once you sort through the wires and isolate what you don't need. All color coded
Excellent work, best after cooler video I've found on You Tube! I'm curious about the fan power circuit. I've seen folks use repurposed 12V power supplies from an old PC, but I've not seen someone incorporate a relay before. Are you doing that only to maintain constant power to manually operate the fan when the contactor is idle, then the relay can still be actuated automatically when the contactor is engaged, operating the 12v fan in auto mode with the compressor cycles also? Or is there another reason all together? Thanks again for sharing, very impressed with your whole system design, especially the mounting bracket fab work.
Thank you for the kind words and for watching.
The main purpose of the relay is for automatic fan operation while the compressor is running without a computer type of power supply as you mentioned. I have a 12V deep cycle group 30 battery in my garage that is used for a project power supply, I decided to just tap the power off from that.
I put my own switch in to allow fan operation when the compressor is off. If it's warm in the garage I'll use it for a fan while I'm at my work bench. They do sell relays with a "hand/off/auto" rocker switch on them.
@@DBrisky37 Thanks for the reply Dustin, makes sense to me now.
Man what an awesome video and build! I've been watching so many other videos and you were the first one to do the idea I had using a relay. Coming from the car audio industry that's the first thing that came to my mind was adding a relay and a fan. Very impressed. I have a much much smaller compressor and I am wanting to add something like this. will also probably add another tank to store more volume. If in total I have a 1.5 horsepower 175 PSI 4.3 scfm with 15gallon of tank storage. Would i need the same size radiator? Or could i do something smaller. Think you said that was a 16 lane. Could i get away with maybe an 8? Or do i need to stay at a 16? Once again thank you for your time and effort making a video and showing the world. Hope to hear back! Thanks again
Thanks for the compliment. Yes this is a 16 pass, I bet you could get away with a smaller cooler. Mine is 5hp 135 psi, 18+cfm and it flows well with almost no restriction
@@DBrisky37 thank you so much for your response. I think I could probably get away with an 8. Thanks again for your time and help
Love the video and install but did you take a Valium before making this video? Show some excitement man thats an awesome set-up!
No valium probably just tired. I'll study some billy maze videos and get my excitement up
What relay/ contactor did you use? I have a refrigerated drier but bypass it most the time unless doing paint work. My compressor is a 2 stage but a aftercooler would still help. I already have a couple large extra derale Trans coolers with 12 volt fans so the expensive part I already here.
RIB2421C
I like that. I'm going to copy it and If i do a video the title will be,Air compressor INTErcooler, air drier, and water separator not Aftercooler your setup is in between the compressor and the tank Hence inter cooler not after cooler
Do you have a link for the after cooler and Air filter dryer auto release? Looks like the auto water release valve open until close at certain preasure. When starting at empty tank the valve will always stay open until preasure built up and closed. This auto release not work on this setup.
The fan/cooler is a Derale 15800 Electra-Cool Remote Cooler.
The filter dryer does not have auto release. I just leave the drain valve cracked a very tiny bit and it continually drains while the compressor is running
Dustin are you using the Derale 15300 condenser that everyone with this size of compressor seems to be using? I have a big Saylor Beall 705 / 175psi rated / 5hp compressor with 100 gallon tank. I want to build a set-up like this and my only concern was that I needed bigger piping.. like 5/8" for everything and a bigger condenser. Are the condenser fittings 1/2"? And what is the fan you used. Thanks in advance for the help.
Yes that's the cooler model. I bought the package though which is a 15800, That is the cooler fan and brackets as a bundle. That was a concern of mine as well so I timed the before and after install fill times and they're within 5 seconds of each other. From the factory mine has 5/8 pipe from the cylinder head to the tank. The cooler fittings are half inch so you will need to adapt. Check the CFM output on the compressor, And I can compare it to mine and it should help you know if it will be restrictive.
I just looked and mine is 18.1 CFM at 90psi. 5 hp. 80 gallon.
If your CFM specs are not a ton higher then it should hould be minimally restrictive. I used an 8 AN to 10AN flare adapter and then the copper pipe uses a compression fitting to adapt to cooler
@@DBrisky37 From the spec sheet I found online my Saylor Beall 5hp 705 model is rated at 850rpm/23cfm displ./18.3cfm Delvd. (for 100 PSI) and then 845rpm/23/17.3 (for 175 PSI). I plan to run it at ~ 120 PSI is what I'm thinking. I also have a forum page saved where a knowledgeable guy was saying not only to run it at lower PSI (which makes sense to not max out and stress the system) but to use a different pulley (on the motor I think) to help it. I think the gist was to help the motor not work as hard while still providing ample air for the desired PSI. My main two uses for this will be a blast cabinet and plasma CNC so I'm still looking into those requirements.
I have that same air compressor and I just got that same after-cooler. Do you know what size fittings those are that connect to the compressor head and the tank? I want to keep that original tube that goes from the head to the tank so I could put it back later, if needed. So I can't re-use those fittings because I would have to cut the copper pipe to do that. I'm going to go with 1/2" OD flexible tubing for all of mine. That's the same size as the after-cooler, so trying to keep 5/8" to go into the after-cooler is probably not going to make much difference. My main interest is finding what size fittings I need to connect to the tank and head.
I would think they are just 5/8 flare fittings but I'm honestly not sure, I got tired of chasing parts so I decided to cut my factory tube apart and steal those fittings. I agree though with the cooler being half inch I don't think it will hurt to downsize the inlet
Check this link out. It appears to be the right part. www.mscdirect.com/product/details/62252283
Kenny, what flexible lines did you use? I would think they'd be much easier to install and i suspect the cooler itself is where 99% of the cooling occurs so the nonconductive aspect of the flexible lines should be a non-issue?
Any problems with solder joints cracking? I'm planning on doing a similar install with 3/4" copper pipe but my big 80gal compressor has a good bit of vibration and I'm wondering if it will hold up long-term when running 50 hrs a week. I've thought about high pressure rubber hoses instead to reduce vibration but I like the idea of the cooling effect of the copper, at least from the compressor head to the cooler.
No broken solder joints yet. Do not put a solder joint close to the head through, that one I have near the cylinder head melts the solder on extended runs. That solder joint was not supposed to be there, it was a mistake. If I built it again I would probably put a rubber hose loop or similar off the cylinder head and then meet the copper
2.5 year update. No cracked solder joints or pipe, but the joint near the cylinder head had to be taken apart cleaned and braised with sil fos 15 because the solder was melting.
long time later but: does the relay require a neutral line? i have 2 hots and a ground running to my pressure switch, no neutral.
The coil of the relay is good for up to 277 volts so you should be good.
have you thought about the magnetic start switch everwhere says id needed,
Magnetic start switch for what? Do you mean a different motor starter?
@@DBrisky37 yes, it seems that yo are very knowledgeable so I would trust your opinion
@@johnbrevard5966sorry missed your reply somehow. A motor starter would be better than running the full current through the little pneumatic one that comes on it from the factory. But it only failed once in 15 years so I can't complain. If you're looking for a starter, take the motor specs to an electric supplier and they should help you match up what you need. Then only low current will run through the pneumatic pressure switch on the unit and make it last longer.
Did you use standard electric solder wire on the pipes?
No, I used flux and solder that are typically used with copper plumbing. I'm sure you could do electric with it but I'm not sure to be honest. Copper is copper. The biggest thing you need to make sure is that the soft copper tube is almost perfectly round and everything is extremely clean.
The main line coming off the compressor head? Is that joint just soddered normal?
Yes but don't put a joint that close to the compressor head. I just noticed the other day the solder melts during extended run time. I need to repipe and get rid of that joint. The rest of the solder joints are fine, that one's just to close to the heat. It was a mistake anyways there should not have been a connection there
Wouldn't it be a lot easier to mount the condenser on the back of the cage, so the pump fan blows across it? Eliminates the need for the electric fan altogether.
Not sure if it would be easier with all of the pipe routing and need to build a frame to carry the cooler back there. Probably a wash on time of installing the elec. fan/relay. The wire cage vibrates way too much for my liking to mount directly to it. I have seen a lot of setups like that. Also the compressor flywheel fan wouldn't move half as much air through the cooler as a direct mount fan.
Do you ever open the tank drain to see if any water is getting there?
Yes I do, I still do get a little bit of water in the tank. 90% less than I used to. The first air water separator after the tank catches a tiny bit and the second air water separator is always dry.
Dusty…can you please provide the water separator information…are you still pleased with operation or would you go with something else
The first water separator right after the cooler is a SAF 4000. The next two are right before the regulator and they are SAF 400 and SAFM 400. I have no complaints with this setup so far and wouldn't change anything as of right now.
Harbor freight has a refrigerated cooler for 600 bucks it's 99% water free you probably got that much in that set up
I have about 300 into this. Works real good and I get zero visible moisture out of any tool. If I needed absolute top quality dry air, I would get a refrigerated dryer.
I have an IR 80 gallon and built a set up like this with the same type water separator. At about 60psi the separator blew up. Any ideas why??? Now i have to buy a new separator and try again.
Could have been cracked or had a defect to start
Is there anyway you can tell how you hooked up the relay I’m so stumped on it
It's a multi purpose and multi voltage relay. It's an on off switch just for the fan which is 12VDC, the coil that operates the switch within the relay is a 240VAC coil. So the leads from the coil(within the relay) go to the motor side of the pressure switch contactor. So when the air pressure gets low and kicks the pump on, it also powers the coil to close the switch (all within the relay) and then completes the 12VDC circuit to power the fan. I have an external 12VDC power source that I didn't show. You could use an old computer power supply, cheap from eBay, or another 12VDC power supply that can supply the proper amps for the fan. The relay comes with a wiring diagram that helps explain it too. If you have anymore questions feel free to ask and I'll help any way that I can. Hopefully I didn't confuse you more
I also added an over ride switch which just bridges over the relay. I can make a wiring diagram if it would help. Let me know
I bought a pp20 relay and a power inverter and right now I just have it hooked to the pressure switch but I’m just kinda lost on how to wire the pp20 to the inverter. If you could make a wiring diagram that would be awesome
@@troyareson8075 what voltage is your compressor? The PP20 appears to be a 120/277 input pnly
My air compressor is 120v
Wouldn't it be better to plumb the watertrap before the cooling radiator closer to the head
The water is still in vapor form at that point in the system. Cooling the air in the radiator condenses the water vapor into liquid
Do you have part numbers for the relays and power converter to 12v?
Relay - RIB2421C
I used a 12v battery I charge with solar
@@DBrisky37 thank you!
Solider will not hold up vibration will come apart not what they are used for
@@jameschuke4104 hasn't broke yet. I used silphos brazing for the connection nearest the cylinder head.
Harbour freight has a cooler for 500 your at that now
@@jameschuke4104 go buy one and put it on your compressor. I enjoy custom builds. I was well under $500 by the way.