How to Burnish Leather Edges

Вставка
- Опубліковано 25 лип 2024
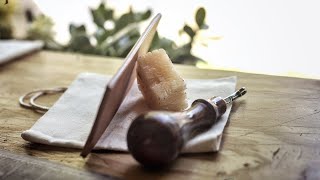
- There are a million different methods to burnish leather edges. This is how I do it and I manage to get pretty good results.
Obviously, if you don't have a marker to put your burnishing agent of choice in, you can go without. Just moisten the edge with water and burnish. Next, apply a thin layer of Tokonole (or whatever you're using) then burnish. Repeat as necessary.
Let me know how you burnish your edges in the comments!
⚒ TOOLS MENTIONED/USED IN THE SHOW:
Grog Marker: amzn.to/3DTZrz6
**If the Grogs are sold out, Molotow Markers are almost the same thing:
amzn.to/3IYytZg
Tokonole: amzn.to/3tFmg4s
Burnishing Machine: amzn.to/3iuIEJJ
Sand Paper: amzn.to/34cuJ7O
🖊 TOKONOLE PEN VIDEO
• Burnish Leather TWICE ...
⚙ BURNISHING MACHINE VIDEO
• Unboxing a $135 Amazon...
Find me on Instagram: / blackflagleather
TikTok: / blackflagleathergoods
Or Facebook: / black-flag-leather-109...
Or Patreon: / blackflagleathergoods
MACHINES I USE:
3D PRINTER: amzn.to/38hi02t
BURNISHING MACHINE: amzn.to/3iuIEJJ
TOOLS I'D RECOMMEND:
Vera Forma Leather Balm: amzn.to/33Q5w3r
Sand Paper: amzn.to/34cuJ7O
Strop: amzn.to/3KQc8zi
Corner Punch: amzn.to/3iVtsXO
Owden Maul: amzn.to/3uabZ1t
Punching Mat: amzn.to/2NQ5QGS
John James Needles: amzn.to/3bzA0r8
Ritza Tiger Thread 1mm: amzn.to/3vfPloA
Mallet: amzn.to/3dzohZK
Wing Dividers: amzn.to/3rXYYGg
Burnisher: amzn.to/3cUMjhl
Stitching Chisel: amzn.to/2OTv5Jf
Stitching Pony: amzn.to/3vlU33J
Copper Rivets #9: amzn.to/34BR2k6
Rivet Setter: amzn.to/3p9hZp1
Ball Peen Hammer: amzn.to/3vJoMZ0
End Nipper: amzn.to/2SNV9qK
Weaver 2lbs Maul: amzn.to/3unAQhm
Photography Light I use: amzn.to/2QQ0xJi
Softbox: amzn.to/3ccDgcf
Sinabroks Stitching Punch 1mm, 5mm Spacing:
sinabroks.com/product/stitchi...
Grog Marker: amzn.to/3DTZrz6
MY FREE TEMPLATES:
Leather Cup Sleeve: • How to Make a Leather ...
Folded Cardholder: • How to Make a Leather ...
Wrapped Cardholder: • FREE Leather Card Hold...
Leather Sunglasses Case: • Making a Leather Sungl...
Valet Tray: • Making a Leather Valet...
Coinholder Wallet: • Leather Challenge Coin...
Long Wallet: • Making a Leather Long ...
Intro 0:00
Step 1 0:46
Step 2 1:25
Step 3 2:47
Step 4 3:39
Wrapping Up 4:53
If you liked this video, check out my Leather Working Tips and Tricks Playlist where I make beginner leather working tutorial videos, show you some tips and tricks, and give you a few beginner leather working projects to try out.
• Leather Working Tips a...
Join the mailing list: mailchi.mp/442e3cd11415/subsc...
My name is Tim. Thanks for checking out my UA-cam channel. I started leather working in July of 2020. My passion for leather work quickly grew as I learned and practiced. I received a ton of help from the leather working community when I was new and now I aim to pass on what I learn to other beginner leather workers. I post weekly leather craft videos that include tutorials, free pdf pattern templates, how to's, tips and tricks, and any other leather work content that I think could help you out!
#leathertutorial #leathercraft #extracrispy
--------------------------
Disclaimer: Links to products/services in the description are often affiliate links that let you support my channel at no additional cost. As an Amazon Associate I earn from qualifying purchases. - Фільми й анімація


I have no idea why I used "air quotes" so many times in this video 😂
Im working on building a leather craft community on Discord. Come take a look if you want to: discord.gg/zxk4w4MyDb
Air quotes🤔🙄
Great video. One issue I use to have was after trimming the edges of my product to make sure everything was flush, I would sometimes find gaps or "cracks" in the leather after I burnished the first time. Sanding didn't always get rid of it. I realized what the problem was. I use contact cement to glue my edges and when it starts to get thicker, I found it would sometimes leave gaps where there was no glue. Hard to see when you're trying to keep the costs thin. So I started using my awl to spread it out better. So little tip...make sure you're glue is always spread out evenly with no little gaps.
That's a great tip, Roger! I definitely encountered that too. I now use a little plastic drywall putty knife to spread my glue and it works well. I've heard there are silicone spatulas for applying makeup that work really well too but I've never used one.
I improved my edges with your videos. One thing I've been doing and made a great difference is applying conditioning cream to the back of the leather (sometimes the fuzzy side). This binds the loose fibers. Made a noticeable difference.
Love the ruler tip!
Still trying to find a Grog marker in stock in Canada. :P
Today is your lucky day! Not Grog but these look like they may be better. Ships out of Ontario. Good price too. shop.bombingscience.com/canada/molotow-dripstick-mop-empty-10mm.html
I was pleased to see my burnishing is very close to yours. The only difference is sandpaper grit I go up to 7000 and the second is I use just water to burnish. I get a crispy finish. As you say find what works for you and develop your own style. I enjoy your utubes thank you.
Thanks, Peter! I actually used to burnish with water before I diluted the tokonole with it in my pen. Now I figure it's all in one I guess?
Oh man up to 7000 is such a nice edge! Good on you! I have up to 12,000 grit and don't go that far very often but sometimes I gotta try for that mirror finish.
extra crispy Nice LOL I want fries with that !!!! Patients is my worst enemy, great idea using different grades of sand paper and the ruler !! I only used one type of sand paper to get the big chucks , and a Dremel to burnish. Those are awesome ideas .!!! . thank you for sharing
I actually have used a dremel as well. Great tool. The only reason I stopped was because it was a wireless one and I lost the charging base somehow.
I don't get why you have such a small number of subs. Your vids are really informative I enjoy them very much. You should have a million plus subs
Haha I appreciate that, Louis! I'm enjoying the UA-cam journey. I have lots of stats to show it's picking up. I think the early grind is part of the process on here.
Excellent stuff! Also it’s so true that people tend to develop their own way of burnishing, that’s right on the money. Thanks for sharing!
Thanks, Martin! I appreciate it!
Great tip on using the ruler - something I have never thought of - thanks - I tend to sand flat, bevel the edges then use finer sandpaper and, somewhat strangely, a hammer to lightly compress the edge before using the 50/50 Tokonole/Water mixture and then use finder sandpaper again and repeat until I like the edges 🙂
Oh that hammer trick is clever! Thanks for sharing
Great video! Thanks for breaking down your process. I am currently working on my very first a project (a simple bifold) and edges have without a doubt turned out to be the most frustrating thing! I will definitely be getting some sandpaper in the near future.
That's awesome, Blake! They're definitely a bit frustrating at first but you get the hang of it quick.
I liked your presentation/tutorial.
I began working with leather about 2⅞-3 yrs ago.
Got a sub from me.
Thank you, for sharing.
Thank you I really appreciate it! Thanks for the sub! Working on some new stuff this week!
Amazing video! Thanks for sharing your tips! :)
Thanks, Diane! Much appreciated!
Thank you dude 👍
Thanks for watching!
I've been trying new ways of finishing my edges. The best I've found is exacted exactly how you were describing multi grit sanding. I've played around with burnishing in between each sanding but I think it's excessive.
Lapping films are a good alternative to sanding. You do still have to move through different grits but the amount of material you end up removing is much less.
I had never heard of that! Thank you I'm going to get some.
#extracrispy Hey Bro, glad you've got the remodel workshop done and back to the videos ✌
great process, when I am doing wallets or smaller flat goods I tape the sandpaper down to my stone, this ensures that perfectly flat edge, I also go up to 5000K grit, once I get to 1000K I only go one direction, keeps the fibers laying down. but with all that said great content!
Agreed 100%. Sand in one direction if possible and if you burnish which a machine try to burnish in that direction as well as it may keep those fibers from pulling up again. If burnishing by hand it shouldn’t be much of a problem as the machine tends to be a bit more aggressive. Let the friction do the work no need to apply tons of pressure on the edges.
Oh I like that taping it down idea! I'm going to try that! And yeah good call on the one direction thing. I switch to going in one direction if I'm going for a mirror finish. Definitely makes a difference.
Try mix of tokonole 1 part, ethanol 1/2part & 1/2 water.... Superb shining edge... 👌👌👌
Oh I will try that! Interesting!
Another great video my friend! Still need to get me one of those markers!
Oh I think I can hook you up. I have a spare and a care package for you that I'm working on haha
@@BlackFlagLeatherGoods nice!!!
While these are all good tips (with maybe the exception of sanding all the way up to 2000 grit), the one thing that will instantly produce better burnished edges is using more dense, higher quality leathers.
It's long been established that the leathers used on the soles and heel stacks for dress shoes will burnish up to a mirror finish, without all the fuss of needlessly over-working the piece. And, I can promise you, cobblers are not sanding to even 400 grit - let alone going up to 2000 grit. The leathers they're using, however, are EXTREMELY dense compared to even leathers from Hermann Oak or Wickett and Craig.
My point is, higher quality leathers will produce a better burnished edge with less work. So, aspiring leather crafters avoid cheap imported veg tanned leathers and bump up to Wickett and Craig or Hermann Oak.
See if you can get a piece of shoe sole leather from your local cobbler and do a side-by-side comparison. You'll immediately see the difference in the tighter grain, more dense leather.
This is definitely a good point that I missed. You can basically ask Wicket and Craig and Horween leather to burnish and it does it. And it's why the edges on products made out of shell have such beautiful edges.
huh, never heard that about using a ruler. but you're right sand, burnish, sand, burnish if you want those glossy edges. I don't do this a lot on my belts, but I will for my smaller goods.
Oh yeah the glossy edges definitely have their place, but it's not on everything. Can you imagine putting an edge like that on every belt? It'd take forever!
It really would. My belts are chunky and rustic so it takes away from the style. But on a wallet, I love that glass look
Yeah man that's the only way to go on a belt!
Is him talking about LW doing it for me or the tattoos?
Just found your channel and I’m enjoying your content. I’m new and have a question. The leather I purchased appears to have a heavy/thick flesh side. I would liken it to suede. Did I buy the wrong thing? It’s veg tanned. How do I use what I have?
You can actually burnish a fluffy flesh side. Spread some tokonole on the flesh side and you can use a special glass burnisher to smooth it out or just use the long flat part of your wood slicker.
I took your advice and picked up a Grog marker for Tokonole. Used it for the first time today and it was great. A lot faster and much cleaner.
When you refill yours, how do you remove the tip? It fits so snug, I'm afraid of destroying the plastic with pliers.
Haha they definitely are snug! I was super sketchy and jammed a knife in there. Cut have easily Sliced the hell out of my finger but it worked!
Make sure to use a clean spot on the canvas. I used one that had a little bit of blue dye on it and had to sand it down again. Also, I am curious about the jar of black tokenol that I saw sitting by your burnishing wheel. I've been tempted to try it, but have been a lit nervous about it. Can you speak to it's effectiveness, especially what happens if you get a little on the face of the leather. Does it dye it too? Thanks in advance!
The black tokonole! I forgot I had it. Honestly I don't find it to be very good. And I was gifted it by a subscriber here who also didn't like it.
To be totally fair, I haven't really given it much chance, either. I tried it once. It stained the shit out of everything and was sloppy and I never tried it again. Maybe I'll give it another shot.
If I were to put my money on it, though, I'd go with clear tokonole and a proper leather dye.
@@BlackFlagLeatherGoods That's exactly what I was worried about. Thanks for the reply!
I just kinda used a stick of beeswax and rubbed that on the edge then used a piece of canvas to smooth it out. It looks really nice, for about a day, then the wax kinda rubs off. Wouldnt recommend that method, lol.
Tim: I always have trouble with the mushrooming of the edges after I use my hand slicker. I sand, bevel then use the Tokonole. But I still get a little burr. Am I using the wrong size of beveler? Is there a rule of thumb for that? 3oz leather I use a number 1. Anything thicker I use a number 2 beveler. That should work. Right? Oh, I accidentally left the cap off of my marker and the felt tip dried out. BOOO! I think I fixed it by poking many holes through it. Not as good a the original (which is now sold out) but it still works. I looked. No replacement tips available. Thanks for the tips.
Hmmm I had that issue a few times too. I think maybe wrong size or too much pressure? Have you tried going to a piece of canvas for burnishing? It's pretty good and almost makes me wonder if the wood slicker is needed at all.
I've definitely left the cap off of mine before too haha. Try dipping it in water to rehydrate.
I get that mushrooming on some of the softer leathers or when trying to burnish chrome tanned leathers, although chrome tanned leathers don’t generally burnish well at all. Maybe a lighter touch when using the slicker might help too.
Stain or paint?
Oh there is a wrong way...*looks over at my first project. 😒🤫
I like my edges the way I like my chicken. Extra Crispy.
100%! Haha! 😂