Aside from your UA-cam income, I think the advertising value of your Blacktail Studio videos far out ways any "secret techniques" lost to your competition. And people looking for $10,000 tables are not shopping by price, so your reputation is paramount. The videos show your integrity.
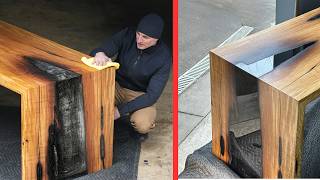
It will be easy to tell who didn't watch till the end when their table looks more like a surf board. Lot's of really great tips there. Thanks Cam, you rock!
Don't clamp to the melamine! I did on my first table; the melamine slowly gave way. Corollary: support every bit of melamine with plywood or your bench.
I follow you and you make some great tables, I am going to start my first coffee table and learned a lot watching this video. I would have never thought of sealed the top after the pour was over waiting the 2-3 weeks to pull out of the mold, you also touched on other processes I wouldn’t have thought of. Thank you for this video, it will help with my first table
Vinyl contact paper (self adhesive shelf liner) works great as a mold release. Works especially well for covering forms with flat bottoms/sides. Much faster to apply than packing tape, and pretty cheap too.
Cam, I am a beginner woodworker and I've been watching your various videos for the better part of a year. I have picked up most of your rules from them but it is great to have them all in one spot. Thank you! You have inspired me and I'm ready to start on my first round coffee table project. Thanks for everything. You rock!
Your last rule, sealing the top, was the only one that I hadn't yet learned from you. Thank you! I'm inching closer to building one of these to add to my table offerings, and it's because of your channel.
Sealing the wood is the best rule I can and will remember when I start making these. I'm just about ready. Have been stocking up on wood to make sure it's dry when I get to working with it.
Just an idea I have been playing with to do one of these for my self. Appreciate all the words of wisdom. Not sure I have a fav tip but I do appreciate how this mat just be possible for me
My favorite rule is to measure the moisture of the wood/make sure it’s dry, because of that collab table. That table looked SOOO badass, with such a badass piece of wood, and so much work, I wanted to cry, hahaha! You gotta do another collab with another giant cookie!
Masters never think they know everything ... that is one reason you are one. Great teacher. Information is valuable. I've made small live edge epoxy box lids and filled in knots and wood life wrinkles with epoxy but never tried a table. You make me want to try!
Long time subscriber from Iceland! Just wanted to thank you for all the information youve put out there. Im about to pour my second river table this week and thanks to you my first one was not a disaster and came out pretty decent. 👍🏼
Thank you for all the helpful tip I have been using epoxy on my Cornhole boards for a little over 5 years now. My customers love the finish on them and I love the look. I'm looking at doing my first table after the new year as this is a hobby of mine. I have saved this video so I can go back over when I start the project again thank you for the info. Have a great day
I just found you! I cut a couple of fir's from my yard, about 90 years old. I used a chain saw mill to create some live edge slabs, which are drying in my garage. While it will be a few months before I can do anything with them, I do want to do try some live edge epoxy. I believe you saved me a lot of time.
Awesome tips. Thank you. I just did my first epoxy project, and I learned a lot of lessons. The major one was patience. So, for me, the tip would be to wait serval days before trying to sand and finish your project. I had a lot of buildup on sandpaper, and it would swirl back on the surface of the epoxy making deeper scritches. When I did my project, I bought some HDPE sheets and made the mold using caulk to glue them all together. But my pour was only 1” thick. May have to use some clamps for bigger project. And it worked well. I did not use mold release, but I will in the future. The epoxy did come off with no trouble though. And I will be able to reuse it for my next project. Your work is inspiring, and I can’t wait to see your next project.
Fan rule is something I never thought of, I wait till fall or winter before I pour , I appreciate it and i didn’t know that I should seal the top of the table, I learned so much just from this video, thank you sir
Thanks for another great video, Cam! While I found all of the rules very informative, I appreciated the rule on leaving your slab thick and then surface it after to thickness.
Mixing properly. Thanks for the heads up on the other tips. I do seal my edges because I had two tables that back to back had edge bubbles. Since I started sealing I haven’t had any bubbles and never had stress failures. Great tip on sealing the top surface. I haven’t had any issues, but I can see how it could.
Cam Clay Burnett from FL. Semi-retired cardiac surgeon and life/ long woodworker. Been doing epoxy stuff for a few years, but it’s still the most humbling thing I’ve done. Rule # 1 I recently violated and my table is a bit bowed across the narrow part and to level and smooth the slab I may not have enough thickness left. Birthday present for my bride, so violating Rule #1 is NO BUENO!! I really enjoy you work and videos. And your pathway to this second career is pretty cool, too, and no probably a lot safer since helicopters are an invention always trying to crash. Great video here and I’ll pass it along!
I learned about Concept 13 from one of your other videos. Just ordered the diy epoxy tray kit to get started. 12" x 24" HDPE (high density poly-ethylene) exotherm vac tray with a 1 degree angle on the sides. they also have trays that are welded edges that have a 5 degree angle. Super excited to get started with some small scale projects.
Sealing the top is something I hadn't considered, and you probably just saved me my first disaster! I had another thought about the cracked epoxy though. Years ago when I was living in Australia, I had a table that was glass, but it had been "shattered". The maker actually sandwiched a shattered piece of glass between to whole pieces of glass, and sealed it (no idea how). But it looked really cool, and unexpected to have a shattered glass tabletop. What about a way to "save" that disaster by pouring another clear coat, like at tabletop epoxy over that, or covering the top with a glass pane? Could be interesting. Scott from Japan
Hey Cam, you're really good guy, because You are sharing your knowledge. All your projects are amazing. It's a nice gesture of you to put the measurements in metric
Patience! You didn’t specifically say the word but I got the message clear enough. Take the time to allow proper curing and mixing. Thus avoiding disappointment and more work. I would vote yes please to more of these types of videos. I am stoked to get going on my own tables and have really benefitted and enjoyed your site. Congrats on the “official you tuber status. Well deserved in my humble opinion.
Great video, the tips were also great. "Not scraping the bucket" is probably my favorite tip because I would be the guy to be just a scraping that bucket to make sure I got every last drop of that liquid gold into my project Doing my first pour tomorrow. Thanks for all the professional advice you have to offer. Oh and I liked and subscribe to your channel.
I am not an epoxy expert but I think from a chemical standpoint sealing your edges should be fine. Epoxy has good adhesive and cohesive properties, so it sticks to wood and itself just as well.
that was an super video and perfect timing ! Im doimg my first really big table and had so many questions. Cant really pick one as the best, but sealing the top while the pour is curing and curing for a couple weeks are right up there! Myname is Brian...this is on my wife's computer.
Thank you so much for the information and tips. This video helps a lot to me, i am a resin artist just doing wedding garlands preservation and some small projects.my motto is development and upgrade is the key of a successful business so, i wanted to improve myself with resin furniture in my state there is no one who knows this work and this type furniture hope it will be success ill invite you if it is a hit. the reason i love epoxy is efforts and time pays you back. thank you so much brother
I dig the, seal the top of the slab before pouring rule. I’m working on my first epoxy table right now. I’ve watched most of your stuff, I must have done something wrong when making the router sled, do you have any videos for planning, milling, or surfacing down this table at home? We love your stuff and your insight by the way!!
I liked your last rule the best as it is something that most people would NOT think of when blending epoxy. Love your videos and you have taught me a few things, even though I'm a professional furniture restorer with over 40 years experience. About lacquer cure times, there are many variables when it comes to how long it will take a lacquer to fully cure, but I think 6 months would be a bit extreme for just about any lacquer. Two months as a general rule for a standard nitrocellulose lacquer applied in the recommended millage, that is not catalyzed, under normal room temperature and humidity conditions. It would be best to check with the manufacturer for an accurate time, as all lacquers are different. Keep up the good work! In case you think I might be able to help you with anything too, a little searching online and you will be able to find me. I am pretty well known in the Cincinnati Ohio area and have a website.
Hey Cam, I'm a couple weeks late on seeing this video so idk if you'll see this, but would you be willing to purposefully screw up some test tables to show examples of some of these errors? Like the bleeding pigment or not sealing the top or even wet wood? I would love some visual examples! Thanks for the tips.
Great video. Worked with epoxy almost 50 years ago making parts from airplane to chemical vat covers. I learned that a chemical bond is much better than a mechanical bond. Its funny how it has not changed that much. Still a very unstable product. Meaning once it goes there is no turning back. Thanks for sharing your knowledge.
I am making my 1st table in a few days, very stressed about it. I think this video ill most likely watch finish about 10-15 times to follow the rules exactly. I also think If i do get failures Ill learn lessons out of it so maybe failing is not so bad. This comment came all the way from south africa.
Sharing knowledge is expansive thinking. And it builds client trust and confidence because "this guy knows what he is talking about". And therefore more sales. Any real competitors are going to figure it out on their own anyway. So actually there are no secrets. And who are these competitors, some guy at home who would never spend $10,000 on a table? And he just might refer a professional buyer to you because he trusts you, too. Adam Savage is one person who gives good advice against gate keeping.
ALL RULES MAKE SENSE TO ME.... That being said, I stopped my good neighbor from breaking most of those rules after having watched so many of your videos. It was going to be his first attempt at making a table. He wasn't making a high end table, just wanted a few oak slabs he milled to attach to a vintage metal base. . His plan of action made me recommend your channel. I wanted him to see some of your techniques on wood prep, form building, sealing, basically everything other than ending up with an unusable mess, time & $$$ lost. Your finished work matches the pride I see on your face. What really makes the vids enjoyable is your sense of humor. Sometimes subtle, sometimes blatant... but funny. Keep it up, Cam. ♥♥♥
Hi Cam, thanks for all of the brilliant videos. You inspired me to embark on my first river table. I have a walnut slab which has been (poorly) flattened to around 65mm thick +/- 10mm. My question is - should I flatten before the cut and epoxy pour or do the whole thing after? Your video suggests keeping it at full thickness as long as possible so I'm guessing I should go for: 1. Clean up, 2. Cut, 3. Pour, 4. Flatten. Thanks in advance! Paul
Your rule to mix like a DJ who lives at home…. Where else would they live? Haha A lot of good info. Thank you for sharing. Looking to do a small project soon for my wife. She wants a walnut slab desk with gold accents. Kind of like your “Toughest client yet” video. Would you suggest a gold epoxy pour using a powder for color or suggest using the brass stuff you used? This will be my first project using either. Figured I’d ask you to see what your thoughts were. Especially since you seem to respond to the majority of your viewer’s comments. Thanks again for your time and content.
Great work man! your videos are awesome, I like that you don't ask for a like or comment until mid video, shows how genuine your videos are. I'd like to know what kind of dye you use for color please
21:59 min. Make sure the wood is dry. Now, how dry does your wood need to be? Also, I’m assuming that you are sealing before your pour. I’ve heard that you should do to the bottom whatever you do to the top to try to keep it from warping? I’m a rookie but plan on making a counter top for my wife so I have to ask all these crazy questions. I think you’ve got an awsome thing going there. I love watching your shows Thanks Steve
Thanks a lot for sharing your experience. And thankyou for being you. I am from Pakistan, have been doing my homework for almost a year now before I get into epoxy tables and stuff. Your video is one of the best I have seen till now. I am basically facing an issue with getting the right quality of epoxy resin in Pakistan. The recent decrease in imports hasn't helped. Also you guys have so many tools and equipment that makes the technical part relatively easy. Thanks again buddy. Goes without saying, have subscribed:)
Hi there! I'm form Russia. We have no issues with quality epoxy resin but i also see how many great tools and equipment people have in USA. Also starting my first project in epoxy )
I love the bit about remembering to use the mold release to get your project out of the mold. It's exactly the same concept with cakes. Coat the pan, and your cake will come out. Forget to coat the pan, and you'll have a crumb cake. 🤪
Dry wood? What number us dry? I'm going to start with 14" rounds and have cut many pieces of various wood species to use with an epoxy pour. I have watched literally 100's of UA-cam videos and heard "make sure your wood is at least 6 to 15% moisture content dryness". In my opinion, that is a big range. Give me a number, please! Right now, I have dozens of wood pieces, all cut and ready for a pour, inside my house (Central Florida raining daily) that I am monitoring twice a day, both sides, for moisture content. Much to my wife's dismay. My shop is usually hot, no A/C. So I will do my pours on the screened porch with an overhead fan and a box fan. Its the best I've come up with. Sorry for taking so much of your time. I can always call Callie at Liquid Glass for help, but you are the real hands on expert. Thanks
Favorite rule: let caulk dry! My question: I will fill cracks on a 40” x 80” x 2” thick white oak slab. Some cracks go all the way through top to bottom and I don’t want to make a full size plywood form to catch leaks. Can I get away with only sealing the bottom of those cracks with a board held in place with caulk and screws? Also can I use the same epoxy for the through cracks and the minor cracks/blemishes? Wood is ambient air dry for several years and kiln dried. Planning to use total boat products.
Favorite tip… fans to cool the epoxy. I was an engineer at an aerospace company that produced epoxy components. We called it “going monkey” when the curing epoxy overheated and spontaneously combusted…
Seal the top of a project after pouring. Hi Cam! Thanks for this more in depth channel. Bought your epoxy workshop series recently to prepare for eventually making some. Question:. What chemicals will kill bugs in wood? I have a 30" sawmill and my goal is to make a solar kiln and use local wood that I have milled on projects but I'm not there yet
Ever tried post curing epoxy? We've done it on a few projects and it worked like a charm. Basically by warming up your cured epoxy to 40-50°C (104-122°F; but that range could vary from brand to brand) for about 8 hours and letting it cool you get a fully cured piece ready to be machined (CNC planing in most of our cases).
Limit the thickness. I built a table with just small holes and dips that needed filled so I used a thing coat epoxy and only needed to fill about 1/4 inch so no problem. I had a red solo cup with the spare epoxy, and it had about 1-1/2 inch in left. I came back later the cup was melted, and I couldn't move the cup until the epoxy set up.
SEAL THE WOOD! Appreciate the tips. Maybe this one because my small projects had been with hardwood, but my first big one with soft wood (redwood). I didn't seal and it took forever to get all the bubbles out, resanding numerous times.
Good video! I don't use mold release and melamine is an absolute nightmare. You can very easily source HDPE sheets in 8'x4'. Use this for your base over plywood and supports. Then I use HDPE sides that are cut with a plywood backer. The HDPE releases so easily, generally I just have to break the sides off and lift the slab and it will release. Also, your silicone easily adheres and seals to HDPE but once you yank on it, it pulls right off and leaves the HDPE completely clean.
I’m gonna say the mix well and the last tip. I love wood work. But I’m horrible at playing the patient game. This Chanel is teaching many of us that to have great looking pieces of wood you need patience. Cam, I have a question. How many projects do you take at one time? Do you have a drying ware house or just your garage ?


Aside from your UA-cam income, I think the advertising value of your Blacktail Studio videos far out ways any "secret techniques" lost to your competition. And people looking for $10,000 tables are not shopping by price, so your reputation is paramount. The videos show your integrity.
It will be easy to tell who didn't watch till the end when their table looks more like a surf board. Lot's of really great tips there. Thanks Cam, you rock!
Don't clamp to the melamine! I did on my first table; the melamine slowly gave way. Corollary: support every bit of melamine with plywood or your bench.
I follow you and you make some great tables, I am going to start my first coffee table and learned a lot watching this video. I would have never thought of sealed the top after the pour was over waiting the 2-3 weeks to pull out of the mold, you also touched on other processes I wouldn’t have thought of. Thank you for this video, it will help with my first table
Vinyl contact paper (self adhesive shelf liner) works great as a mold release. Works especially well for covering forms with flat bottoms/sides. Much faster to apply than packing tape, and pretty cheap too.
Cam, I am a beginner woodworker and I've been watching your various videos for the better part of a year. I have picked up most of your rules from them but it is great to have them all in one spot. Thank you! You have inspired me and I'm ready to start on my first round coffee table project. Thanks for everything. You rock!
Thanks man!
I think sealing the top was probably the one I didn’t realize the importance of doing. Thanks for the great tips!
leave it thick! loved it. The more wood I work on the more valuable this whole clip is. Thanks
the surface tension explanation for excusing the use of fans is what made this video for me, I was sold instantly! Thanks again Cam!
Ya man!
Liked your last rule best seal the top. I always watch to the end. Giving the temperature rang that is too hight was good insight.
))))
Your reply to the troll of the week is just epic! ))) I can't stop smiling ))
Top marks here! )))
Your last rule, sealing the top, was the only one that I hadn't yet learned from you. Thank you!
I'm inching closer to building one of these to add to my table offerings, and it's because of your channel.
I really like this channel... It's the education portion we DIYers or aspiring wood table makers try to get from watching a ton of vids all in one.
Sealing the wood is the best rule I can and will remember when I start making these. I'm just about ready. Have been stocking up on wood to make sure it's dry when I get to working with it.
Thanks for doing this, Cam! I love your work, your attitude, and your humor.
Just an idea I have been playing with to do one of these for my self. Appreciate all the words of wisdom.
Not sure I have a fav tip but I do appreciate how this mat just be possible for me
My favorite rule is to measure the moisture of the wood/make sure it’s dry, because of that collab table. That table looked SOOO badass, with such a badass piece of wood, and so much work, I wanted to cry, hahaha! You gotta do another collab with another giant cookie!
Masters never think they know everything ... that is one reason you are one. Great teacher. Information is valuable. I've made small live edge epoxy box lids and filled in knots and wood life wrinkles with epoxy but never tried a table. You make me want to try!
A true Gentleman sharing hints and tips to save people thousands well done sir.
Love howvyou saved the best tip for the end
Long time subscriber from Iceland! Just wanted to thank you for all the information youve put out there. Im about to pour my second river table this week and thanks to you my first one was not a disaster and came out pretty decent. 👍🏼
I like the dry wood. I had no idea it made a difference. Also, the very last, bonus rule. Cool thank you.
Cam, your humbleness is awesome❤
Thank you for all the helpful tip I have been using epoxy on my Cornhole boards for a little over 5 years now. My customers love the finish on them and I love the look. I'm looking at doing my first table after the new year as this is a hobby of mine. I have saved this video so I can go back over when I start the project again thank you for the info. Have a great day
I just found you! I cut a couple of fir's from my yard, about 90 years old. I used a chain saw mill to create some live edge slabs, which are drying in my garage. While it will be a few months before I can do anything with them, I do want to do try some live edge epoxy. I believe you saved me a lot of time.
Awesome tips. Thank you. I just did my first epoxy project, and I learned a lot of lessons. The major one was patience. So, for me, the tip would be to wait serval days before trying to sand and finish your project. I had a lot of buildup on sandpaper, and it would swirl back on the surface of the epoxy making deeper scritches.
When I did my project, I bought some HDPE sheets and made the mold using caulk to glue them all together. But my pour was only 1” thick. May have to use some clamps for bigger project. And it worked well. I did not use mold release, but I will in the future. The epoxy did come off with no trouble though. And I will be able to reuse it for my next project.
Your work is inspiring, and I can’t wait to see your next project.
Fan rule is something I never thought of, I wait till fall or winter before I pour , I appreciate it and i didn’t know that I should seal the top of the table, I learned so much just from this video, thank you sir
Getting ready for my first pour. Thank you for all your hard work and information. Sealing all the edges and the Sealing of the top.
Thanks for another great video, Cam! While I found all of the rules very informative, I appreciated the rule on leaving your slab thick and then surface it after to thickness.
Looking great Cam! Love the 4k view
The last tip was the best one!
Mixing properly. Thanks for the heads up on the other tips. I do seal my edges because I had two tables that back to back had edge bubbles. Since I started sealing I haven’t had any bubbles and never had stress failures. Great tip on sealing the top surface. I haven’t had any issues, but I can see how it could.
A really clever and smart guy. All the best to you Cam. Cheers! My take home points are edge sealing and not scraping the mixing bucket.
Thanks for all the great tips!
Cam Clay Burnett from FL. Semi-retired cardiac surgeon and life/ long woodworker. Been doing epoxy stuff for a few years, but it’s still the most humbling thing I’ve done. Rule # 1 I recently violated and my table is a bit bowed across the narrow part and to level and smooth the slab I may not have enough thickness left. Birthday present for my bride, so violating Rule #1 is NO BUENO!! I really enjoy you work and videos. And your pathway to this second career is pretty cool, too, and no probably a lot safer since helicopters are an invention always trying to crash.
Great video here and I’ll pass it along!
I always wondered how many surgeons were also woodworkers. I would think that surgeons and musicians would be the safest woodworkers.
Dry time is one year per inch thickness, great video btw!
I learned about Concept 13 from one of your other videos. Just ordered the diy epoxy tray kit to get started. 12" x 24" HDPE (high density poly-ethylene) exotherm vac tray with a 1 degree angle on the sides. they also have trays that are welded edges that have a 5 degree angle. Super excited to get started with some small scale projects.
Concept13 is down the street from my shop. They are awesome.
More awesome content. Thanks for all the experience shared with viewers.
Sealing the top is something I hadn't considered, and you probably just saved me my first disaster! I had another thought about the cracked epoxy though. Years ago when I was living in Australia, I had a table that was glass, but it had been "shattered". The maker actually sandwiched a shattered piece of glass between to whole pieces of glass, and sealed it (no idea how). But it looked really cool, and unexpected to have a shattered glass tabletop. What about a way to "save" that disaster by pouring another clear coat, like at tabletop epoxy over that, or covering the top with a glass pane? Could be interesting. Scott from Japan
Hey Cam, you're really good guy, because You are sharing your knowledge. All your projects are amazing. It's a nice gesture of you to put the measurements in metric
Patience! You didn’t specifically say the word but I got the message clear enough. Take the time to allow proper curing and mixing. Thus avoiding disappointment and more work. I would vote yes please to more of these types of videos. I am stoked to get going on my own tables and have really benefitted and enjoyed your site. Congrats on the “official you tuber status. Well deserved in my humble opinion.
Good advice and clear explanation why those of us using metallic pigments don’t need to seal the wood.
Great video as always! Been having great fun watching and learning - will get to my first table next year when I have the $'s for all the kit.
Great video, the tips were also great. "Not scraping the bucket" is probably my favorite tip because I would be the guy to be just a scraping that bucket to make sure I got every last drop of that liquid gold into my project Doing my first pour tomorrow. Thanks for all the professional advice you have to offer. Oh and I liked and subscribe to your channel.
Great information. I learn so much from your videos. Some day I will attempt an epoxy project.
I am not an epoxy expert but I think from a chemical standpoint sealing your edges should be fine. Epoxy has good adhesive and cohesive properties, so it sticks to wood and itself just as well.
the last two tips were the ones I liked the best. mixing and not scraping the bucket.. and sealing the top of the table while it's curing.
Love your videos and the information you share
that was an super video and perfect timing ! Im doimg my first really big table and had so many questions. Cant really pick one as the best, but sealing the top while the pour is curing and curing for a couple weeks are right up there! Myname is Brian...this is on my wife's computer.
The fan rule is one I haven't been using. Thanks
Thank you for sharing can't wait to see how bad I screw up my first small coffee table.
Another good video pal. Enjoying from 🇬🇧
Thank you so much for the information and tips. This video helps a lot to me, i am a resin artist just doing wedding garlands preservation and some small projects.my motto is development and upgrade is the key of a successful business so, i wanted to improve myself with resin furniture in my state there is no one who knows this work and this type furniture hope it will be success ill invite you if it is a hit. the reason i love epoxy is efforts and time pays you back. thank you so much brother
I dig the, seal the top of the slab before pouring rule. I’m working on my first epoxy table right now. I’ve watched most of your stuff, I must have done something wrong when making the router sled, do you have any videos for planning, milling, or surfacing down this table at home? We love your stuff and your insight by the way!!
Top seal, Great list of rules Thanks
I liked your last rule the best as it is something that most people would NOT think of when blending epoxy.
Love your videos and you have taught me a few things, even though I'm a professional furniture restorer with over 40 years experience. About lacquer cure times, there are many variables when it comes to how long it will take a lacquer to fully cure, but I think 6 months would be a bit extreme for just about any lacquer. Two months as a general rule for a standard nitrocellulose lacquer applied in the recommended millage, that is not catalyzed, under normal room temperature and humidity conditions. It would be best to check with the manufacturer for an accurate time, as all lacquers are different. Keep up the good work! In case you think I might be able to help you with anything too, a little searching online and you will be able to find me. I am pretty well known in the Cincinnati Ohio area and have a website.
Thanks for all the helpful info. Removing the bark is a great tip. I thought about leaving it on. Now I won't. Great job!
Awesome tips! Thanks so much
Again, so thoughful and well presented. A true keep for future use.
I love this. I'm going to try it. Small side table
Everything was very helpful, thanks again
I've sprayed a lot of conversion varnish over the years and it can easily take a month or longer to fully cure
@1:25 about sealing edges...seems a great idea for a video testing the theories with some scrap wood.
Never thought about sealing the top to prevent warping, thanks.
Hey Cam, I'm a couple weeks late on seeing this video so idk if you'll see this, but would you be willing to purposefully screw up some test tables to show examples of some of these errors? Like the bleeding pigment or not sealing the top or even wet wood? I would love some visual examples! Thanks for the tips.
Great video. Worked with epoxy almost 50 years ago making parts from airplane to chemical vat covers. I learned that a chemical bond is much better than a mechanical bond. Its funny how it has not changed that much. Still a very unstable product. Meaning once it goes there is no turning back. Thanks for sharing your knowledge.
It also has been fun watching your journey
Awesome info. I have a window unit that I drop the temperature down to about 60 in the room on a big pour. I think that’s just as good as a fan.
I am making my 1st table in a few days, very stressed about it.
I think this video ill most likely watch finish about 10-15 times to follow the rules exactly.
I also think If i do get failures Ill learn lessons out of it so maybe failing is not so bad.
This comment came all the way from south africa.
Thank you. I wouldn’t have thought of sealing the top.
Sharing knowledge is expansive thinking. And it builds client trust and confidence because "this guy knows what he is talking about". And therefore more sales. Any real competitors are going to figure it out on their own anyway. So actually there are no secrets. And who are these competitors, some guy at home who would never spend $10,000 on a table? And he just might refer a professional buyer to you because he trusts you, too. Adam Savage is one person who gives good advice against gate keeping.
A great video, many thanks
Seal the top when you’re finished! Gold rule!
ALL RULES MAKE SENSE TO ME.... That being said, I stopped my good neighbor from breaking most of those rules after having watched so many of your videos. It was going to be his first attempt at making a table. He wasn't making a high end table, just wanted a few oak slabs he milled to attach to a vintage metal base. . His plan of action made me recommend your channel. I wanted him to see some of your techniques on wood prep, form building, sealing, basically everything other than ending up with an unusable mess, time & $$$ lost. Your finished work matches the pride I see on your face. What really makes the vids enjoyable is your sense of humor. Sometimes subtle, sometimes blatant... but funny. Keep it up, Cam. ♥♥♥
Cam, I think you need to practice. "Hi my name is Cam and I'm a UA-camr." haha! thanks again for your wealth oh knowledge. It's always very helpful.
Hi Cam, thanks for all of the brilliant videos. You inspired me to embark on my first river table. I have a walnut slab which has been (poorly) flattened to around 65mm thick +/- 10mm.
My question is - should I flatten before the cut and epoxy pour or do the whole thing after? Your video suggests keeping it at full thickness as long as possible so I'm guessing I should go for: 1. Clean up, 2. Cut, 3. Pour, 4. Flatten.
Thanks in advance!
Paul
sealing the slab so it does not warp, and fans to remove heat. both great tips
Very nice and cool way of explaining
Your rule to mix like a DJ who lives at home…. Where else would they live? Haha
A lot of good info. Thank you for sharing. Looking to do a small project soon for my wife. She wants a walnut slab desk with gold accents. Kind of like your “Toughest client yet” video. Would you suggest a gold epoxy pour using a powder for color or suggest using the brass stuff you used? This will be my first project using either. Figured I’d ask you to see what your thoughts were. Especially since you seem to respond to the majority of your viewer’s comments.
Thanks again for your time and content.
Great work man! your videos are awesome, I like that you don't ask for a like or comment until mid video, shows how genuine your videos are. I'd like to know what kind of dye you use for color please
21:59 min. Make sure the wood is dry. Now, how dry does your wood need to be? Also, I’m assuming that you are sealing before your pour. I’ve heard that you should do to the bottom whatever you do to the top to try to keep it from warping? I’m a rookie but plan on making a counter top for my wife so I have to ask all these crazy questions. I think you’ve got an awsome thing going there. I love watching your shows
Thanks Steve
Thanks a lot for sharing your experience. And thankyou for being you. I am from Pakistan, have been doing my homework for almost a year now before I get into epoxy tables and stuff. Your video is one of the best I have seen till now. I am basically facing an issue with getting the right quality of epoxy resin in Pakistan. The recent decrease in imports hasn't helped. Also you guys have so many tools and equipment that makes the technical part relatively easy.
Thanks again buddy. Goes without saying, have subscribed:)
Hi there! I'm form Russia. We have no issues with quality epoxy resin but i also see how many great tools and equipment people have in USA. Also starting my first project in epoxy )
I love the bit about remembering to use the mold release to get your project out of the mold.
It's exactly the same concept with cakes. Coat the pan, and your cake will come out. Forget to coat the pan, and you'll have a crumb cake. 🤪
Dry wood? What number us dry? I'm going to start with 14" rounds and have cut many pieces of various wood species to use with an epoxy pour. I have watched literally 100's of UA-cam videos and heard "make sure your wood is at least 6 to 15% moisture content dryness". In my opinion, that is a big range. Give me a number, please!
Right now, I have dozens of wood pieces, all cut and ready for a pour, inside my house (Central Florida raining daily) that I am monitoring twice a day, both sides, for moisture content. Much to my wife's dismay.
My shop is usually hot, no A/C. So I will do my pours on the screened porch with an overhead fan and a box fan. Its the best I've come up with. Sorry for taking so much of your time. I can always call Callie at Liquid Glass for help, but you are the real hands on expert.
Thanks
Super Sharp Thank You
Favorite rule: let caulk dry! My question: I will fill cracks on a 40” x 80” x 2” thick white oak slab. Some cracks go all the way through top to bottom and I don’t want to make a full size plywood form to catch leaks. Can I get away with only sealing the bottom of those cracks with a board held in place with caulk and screws? Also can I use the same epoxy for the through cracks and the minor cracks/blemishes? Wood is ambient air dry for several years and kiln dried. Planning to use total boat products.
Favorite tip… fans to cool the epoxy. I was an engineer at an aerospace company that produced epoxy components. We called it “going monkey” when the curing epoxy overheated and spontaneously combusted…
how long can you wait between sealing pour and deep pour> Great Video. You have me tied in, Thanks
Yes on sealing the wood, I used Alumilite on an unsealed burl and it foamed from the moisture
Seal the top of a project after pouring. Hi Cam! Thanks for this more in depth channel. Bought your epoxy workshop series recently to prepare for eventually making some.
Question:. What chemicals will kill bugs in wood? I have a 30" sawmill and my goal is to make a solar kiln and use local wood that I have milled on projects but I'm not there yet
Finally broke down and bought a moisture meter. Now I can test the maple burl cookies I purchased and maybe start my first epoxy project.
Ever tried post curing epoxy?
We've done it on a few projects and it worked like a charm. Basically by warming up your cured epoxy to 40-50°C (104-122°F; but that range could vary from brand to brand) for about 8 hours and letting it cool you get a fully cured piece ready to be machined (CNC planing in most of our cases).
I love the info about sealing it thank you for all your information I want to know a link for your buffer and storage for sand paper thanks
Limit the thickness. I built a table with just small holes and dips that needed filled so I used a thing coat epoxy and only needed to fill about 1/4 inch so no problem. I had a red solo cup with the spare epoxy, and it had about 1-1/2 inch in left. I came back later the cup was melted, and I couldn't move the cup until the epoxy set up.
SEAL THE WOOD! Appreciate the tips. Maybe this one because my small projects had been with hardwood, but my first big one with soft wood (redwood). I didn't seal and it took forever to get all the bubbles out, resanding numerous times.
Thanks again for the video sir.....
Good video! I don't use mold release and melamine is an absolute nightmare. You can very easily source HDPE sheets in 8'x4'. Use this for your base over plywood and supports. Then I use HDPE sides that are cut with a plywood backer. The HDPE releases so easily, generally I just have to break the sides off and lift the slab and it will release. Also, your silicone easily adheres and seals to HDPE but once you yank on it, it pulls right off and leaves the HDPE completely clean.
16:33 Thanks for the metric conversion to pesos!
I’m gonna say the mix well and the last tip. I love wood work. But I’m horrible at playing the patient game. This Chanel is teaching many of us that to have great looking pieces of wood you need patience.
Cam, I have a question. How many projects do you take at one time? Do you have a drying ware house or just your garage ?
Seal the the edge or top of the wood. By the way, Love the course, it's really helping me.
Best tip, use a fan… thanks boss!