How To Make Custom Wavy Lined Halftone Effects in Photoshop

Вставка
- Опубліковано 10 лют 2025
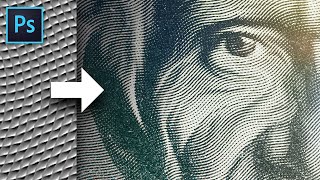
- We've all heard of the standard round halftones, but have you ever experimented with lined halftones? Try out this simple layer setup for interesting scan-line or wavy etched effects on your designs.
PREMIUM DESIGN ASSETS:
→ www.doronsuppl...
FREEBIES:
→ doronsupply.co...
LET'S CONNECT:
→ / doronstudio
Please leave questions or feedback in the comments, or DM me on Instagram. Thank you for watching! Don't forget to subscribe.


no bs, quick and clear. we can't ask for more. Excellent tut.
Amazing!!! Thank you man!
youre awesome dude!
That was EXCELLENT. Instant like and follow.
Thank you!❤
Hardmix is a favorite blending mode for sure. So useful.
Absolutely. Its up there with screen and multiply
great video man!
Cool take on the textures lab tutorial approach for this effect.
Oh I wasn’t aware he did something similar! Brady’s the man. What’s his video called I’d love to see how he went about it
@DoronStudio something "engraved money effect" I think.
Thanks for this amazing procedural!! loovee it!!
Awesome trick. Thanks!
always love your works man 🙏🏻❤️
Thank you!
another incredible tutorial, thanks again bro! I've been improving a lot with what I've learned from you!
Happy to help :) Thank you for supporting
You are the coolest! Loved you channel and you videos
@@rainlee19 Thank you!!
Nice. Simple and effective! Thanks for this one, Doron!
My pleasure!
Cool. Thanks for sharing.
Wow, dude! Thanks for the tutorial and for putting the audio in Spanish! Now it'll be easier for me to follow your tutorials.
gracias por colocar el audio en español, re ayuda para seguir os tutoriais! Sos un genio
Thanks man! epic tutorial
Thank you, subscribing now
good video thanks for sharing
THANKS for the video. greetings from Chile!!!
Thanks for watching! Appreciate the love from Chile!
Great tutorial
great tutorial!
AWSOME!!!
amazing!
another W tuts
Thank you so much! Have you ever created a tutorial about how to create Photoshop Action?
that hardmix blending mode helped me thanks mn, can you make a video on how you export it and upload on any platform
thank you bro!
7:23 You can click "Pin edges" to avoid the hassle with transparency in the Liquify filter
@@Makverus Oh sick good to know! Thank you
@DoronStudio happy to help!
great video, is there a similar video effet in AE?
@@tonystinkmetal I’m not an expert in AE but Im sure you can follow the exact same steps to get the effect done there - probably even more modular at that. Can displace the lines based on some moving generated noise patterns etc.
sweet!
Please do some long design tutorial as the ones in your insta
Didn’t know Gertrude Braithwaite knew photoshop that good
Cool
Excellent one!! Could you please tell me the name of the font you used for "Silver Springs"? Thanks in advanced
@@RubenRomeroDG Windsor I believe!
youre literally giving away how artist 2Alas makes his artistic career
Could i double pattern? like one with bigger scale and one with smaller scale :D i assume i can
cool
Interesting, I guess. With a depth pass, you could use to displace the patterns would following the image.
Yes, check out the video on my channel for CRT Phaser a bit back. It basically does that
How to make the rectangle divided with this white lines like this? 1:24
a good tutorial with a bad hairstyle - a winning combination
But what does the treshold layer does??
Have you tired using the greyscale info of the photos as a displacement map for the halftone pattern?
@@superduke1290r Yes, the product CRT Phaser on my website does this to get the circuit bent look. I also have a video on it on my
channel
What is the difference between dpi and ppi
dpi is dots per inch and it’s a more arbitrary reference point (whatever you define a dot to be), and ppi is pixels per inch, which is exactly what it sounds like, just the amount of pixels in an inch (pixel density)
@ will for effect how the image looks
FYI It's pronounced "More-Ay" pattern.
@@housetopranch Don’t worry I don’t think I’ll ever attempt to pronounce it again anyway
Setting resolution is pointless if you choose manually width and height in pixels. Resolution is a combo of file dimensions in pixels AND size of your print. You don't have to set resolution in this case. The one and only reason to set the resolution is when you know the final size of a print. For exemple, you want to create a document of 210x297mm (sorry murica) at 300dpi (standard for this type of document). You have to set width and height in centimeters (or inches), set resolution to 300dpi and Photoshop will automatically calculate how many pixels needs your document by clicking "create". For my exemple, that means 2480x3508 pixels is the minimum to make a 300dpi 210x297mm print.
@@valpho Ah okay, I knew there was something there but I never looked into it too much. Thanks for the info!
@ you’re welcome. Nice tuto btw !