Hey, goede video, maakt alles heel duidelijk. Enkel stuit ikzelf op 1 probleem en dat is dat de remtrommel er niet op gaat. Heb volledige set nieuw inclusief rempompje, maar met het plaatsen van de remschoentje en alles lijkt het nogal onder spanning te staan. Vandaag is het laat maar ga morgen verder doen, moet ergens iets verkeerd zitten.
Thanks for the info! I've done this once (8-10years ago) and this is a good reminder for me =) Maybe it is better to bend both legs of the safety pin around the crown instead of cutting the other off?
No problem my pleasure! I don't think it matters if you bent both or one pin. But most of the time if you do both they get in each others way en go all crooked. And then my OCD kicks in! thanks for your comment!
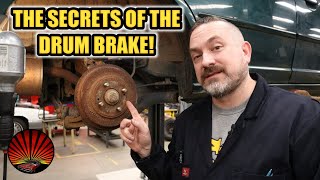
Good video and like from me. But I have one note to make: all this hammering shown on 12:47-14:13 is absolutely unnecessary as there is one very easy and simple solution. On time count 36:04 you mention pushing up the adjusting wedge "as high as possible" and this is correct, because during installation, especially when you put the drum and bearings back on the axle, you want as much clearance between the break shoes and the drum's breaking surface as possible. Otherwise, you won't be able to put the drum back because its inside diameter will be less that the distance between the break shoes pushed outward. It's exactly the same reason why you struggled to remove the drum from the axle at 12:47 and it took some hammering in order to do so (in video, hammering took place for more than 1,5 minutes, but I suspect it was longer and the video was edited). When the break shoes wear out, the adjusting wedge compensates for the wear so that the break shoes always almost touch the break drum. This ensures fast and efficient action of the rear breaks because the clever design of the adjusting wedge keeps traveling distance of the shoes to a minimum (that's before the break shoes are pushed outward and come into contact with the drum, thus providing friction and breaking action). During normal car use, the break shoes wear out the most, while the drums wear very little. When car owners neglect to check and replace the worn break shoes or when dirt gets or forms inside and gums up everything like in your video, steel drums start to wear out at a faster rate. Break shoes wear at a faster rate too and in severe conditions (when too much dirt or grit gets inside and the owner neglects to replace the break shoes), they could be worn to a point where metal surface of the breaks come in contact with the steel drum. The grit will act as abrasive thus speeding up wear and when the pads are completely worn and metal comes in contact with metal, the breaks start to overheat and make loud screeching and squealing noise. The wear of the breaks drum may be so severe that it may form the ridge. It may be so deep that the drum will catch on the breaks when it's pulled off the axle. After the adjusting wedge does its job compensating for wear, it becomes impossible to remove the drum and no amount of hammering will persuade it to come off. The solution is simple - push the adjusting wedge up to allow the springs to pull the break shoes inward and make clearance between the break pads and breaking surface of the drum. But how do you push the adjusting wedge up without taking the breaks apart and without pulling the drum off? Seems like catch 22, right? The solution is very simple and easy. Rotate the drum to line up one of its 4 holes with the adjusting wedge where it's hooked to the adjusting spring (clearly shown on the right break assembly at 26:48), then insert a flat screwdriver and push it up against the wedge as far as possible or to the point where it will allow the springs to pull the break shoes inward and thus make extra clearance to remove the drum off the axle. That moment is demonstrated in your 2019 video ua-cam.com/video/YtBspWbdSxg/v-deo.html (the timer moved to 4 minute mark). No hammering is needed and the job is done very quickly and easily.
@@TheDutchGarage In your second video recorded approximately one year later, you didn't make the same mistake and correctly pointed to the adjusting wedge. I guess it comes with experience.
@@TheDutchGarage The best way to learn is from own mistakes - the lessons will be painful, but will last and remembered for a very long time. The smartest way, however, is learning from mistakes made by others. The effect may not be so lasting, but the upside is that there's no personal pain and loss.
How can I remove the "hub" in the middle? My bearing seized and it basically destroyed the center. I have the replacement part but I cant figure out how to remove the old one. Really dont want to replace the whole backside lol
Other option, you can remove the axle stubby with a 3 or 4 bolts on the back. Then you can wrestle with that thing in a bench vice. Or maybe a slide hammer?
First try to pump the brakes an use the handbrake a couple of times. It has to automatically adjust. If it still doesn't work check the automatic adjusting system in the brake setup.
Noooo never hit it like this the drum and the bearing housing is in one piece and you might bend the shaft just loosen up the shooes with a scredriver thrue one of the holes for the wheel screw and it will slip of like a butter just plese dont hammer it never
I understand your concern. But you do realize that the weight of the whole car rest on that axle. And how much forse it has to endure when cornering and with bumps en potholes. These are love taps comparing to that.


Doing rear brakes like you just did looks a lot easier then what I was taught thanks for the video
No problem, Getting the springs into place is the most tricky part.
Best Video on installing brakes on VW MK2's Well done.
Its all practically the same. Thank you for watching!
Super video. Heel handige tips ook tussendoor. Dankzij jouw video's kan ik veel onderhoud aan mijn Skoda Felicia zelf doen. Bedankt!
Goed om te horen. Daarom maak ik ze.
Doing my Mk3 Golf GL next week this has helped alot.
Great! Glad the video did help.
Really well done, this was a big help to me. Thank you for the video !
Glad it was of use to you.
Amazing video helped out a bunch especially with reassembling the springs for the shoes!
Thank you, yes the spring stuff is always a bit tricky. Glad that I could help you.
Good work, very helpful !!
Glad that you can use it.
Hey, goede video, maakt alles heel duidelijk. Enkel stuit ikzelf op 1 probleem en dat is dat de remtrommel er niet op gaat. Heb volledige set nieuw inclusief rempompje, maar met het plaatsen van de remschoentje en alles lijkt het nogal onder spanning te staan. Vandaag is het laat maar ga morgen verder doen, moet ergens iets verkeerd zitten.
Controleer alles en zork er voor dat het wigje zo hoog mogelijk staat.
Thanks for video,will be doing this soon on my felicia fun
No problem, tomorow i will do the front on my girlfriends fun.
Thanks for the info! I've done this once (8-10years ago) and this is a good reminder for me =) Maybe it is better to bend both legs of the safety pin around the crown instead of cutting the other off?
No problem my pleasure! I don't think it matters if you bent both or one pin. But most of the time if you do both they get in each others way en go all crooked. And then my OCD kicks in! thanks for your comment!
Thanks from Egypt.
Your welcome!
The Dutch Garage 🌴🌺🌷💕❤️💕🌺🌷🌴 Thanks for your replying
Thanks alot, this really saved me, its almost identical on my vw golf mk2
No problem, glad it helpt you out.
Maybe for next project you can show how to bleed brakes ?
Sure, i can make a video about that in de future.
Thank you for the instruction :)
My pleasure, thanks for watching!
Back wheel is wobling
Good video and like from me. But I have one note to make: all this hammering shown on 12:47-14:13 is absolutely unnecessary as there is one very easy and simple solution. On time count 36:04 you mention pushing up the adjusting wedge "as high as possible" and this is correct, because during installation, especially when you put the drum and bearings back on the axle, you want as much clearance between the break shoes and the drum's breaking surface as possible. Otherwise, you won't be able to put the drum back because its inside diameter will be less that the distance between the break shoes pushed outward. It's exactly the same reason why you struggled to remove the drum from the axle at 12:47 and it took some hammering in order to do so (in video, hammering took place for more than 1,5 minutes, but I suspect it was longer and the video was edited).
When the break shoes wear out, the adjusting wedge compensates for the wear so that the break shoes always almost touch the break drum. This ensures fast and efficient action of the rear breaks because the clever design of the adjusting wedge keeps traveling distance of the shoes to a minimum (that's before the break shoes are pushed outward and come into contact with the drum, thus providing friction and breaking action).
During normal car use, the break shoes wear out the most, while the drums wear very little. When car owners neglect to check and replace the worn break shoes or when dirt gets or forms inside and gums up everything like in your video, steel drums start to wear out at a faster rate. Break shoes wear at a faster rate too and in severe conditions (when too much dirt or grit gets inside and the owner neglects to replace the break shoes), they could be worn to a point where metal surface of the breaks come in contact with the steel drum. The grit will act as abrasive thus speeding up wear and when the pads are completely worn and metal comes in contact with metal, the breaks start to overheat and make loud screeching and squealing noise. The wear of the breaks drum may be so severe that it may form the ridge. It may be so deep that the drum will catch on the breaks when it's pulled off the axle. After the adjusting wedge does its job compensating for wear, it becomes impossible to remove the drum and no amount of hammering will persuade it to come off.
The solution is simple - push the adjusting wedge up to allow the springs to pull the break shoes inward and make clearance between the break pads and breaking surface of the drum. But how do you push the adjusting wedge up without taking the breaks apart and without pulling the drum off? Seems like catch 22, right?
The solution is very simple and easy. Rotate the drum to line up one of its 4 holes with the adjusting wedge where it's hooked to the adjusting spring (clearly shown on the right break assembly at 26:48), then insert a flat screwdriver and push it up against the wedge as far as possible or to the point where it will allow the springs to pull the break shoes inward and thus make extra clearance to remove the drum off the axle. That moment is demonstrated in your 2019 video ua-cam.com/video/YtBspWbdSxg/v-deo.html (the timer moved to 4 minute mark). No hammering is needed and the job is done very quickly and easily.
For some reason I always forget that you can push up the wedge. Don't know why.
@@TheDutchGarage
In your second video recorded approximately one year later, you didn't make the same mistake and correctly pointed to the adjusting wedge. I guess it comes with experience.
@@kozmaprutkov2202 What do you know i learned something :-)
@@TheDutchGarage
The best way to learn is from own mistakes - the lessons will be painful, but will last and remembered for a very long time. The smartest way, however, is learning from mistakes made by others. The effect may not be so lasting, but the upside is that there's no personal pain and loss.
nice instructions !
Thank you!
Are new springs included with the new brake shoes?
Springs are mostly sold separately.
How can I remove the "hub" in the middle? My bearing seized and it basically destroyed the center. I have the replacement part but I cant figure out how to remove the old one. Really dont want to replace the whole backside lol
You can't, the hub is one with the drum brake.
The Dutch Garage that sucks 😟 Thanks for answering though!
Other option, you can remove the axle stubby with a 3 or 4 bolts on the back. Then you can wrestle with that thing in a bench vice. Or maybe a slide hammer?
The Dutch Garage have to try!
LordOfCringe just replace the axle stub
Thanks
Changed my break drums but the hand break now doesn’t work. Any answers?
First try to pump the brakes an use the handbrake a couple of times. It has to automatically adjust. If it still doesn't work check the automatic adjusting system in the brake setup.
The Dutch Garage absolute legend. Thanks soo much.
@@TheDutchGarage How does this system automatically adjust? Where do you check it? Where is it?
@@sergiu8685 There is a wedge with a spring that does the auto adjust.
Wher can Í faund a little truck like that?
Hallo, it is a uncommon car. If we believe Wikipedia there are 4.016 build. But they are for sale so now and then.
Noooo never hit it like this the drum and the bearing housing is in one piece and you might bend the shaft just loosen up the shooes with a scredriver thrue one of the holes for the wheel screw and it will slip of like a butter
just plese dont hammer it never
I understand your concern. But you do realize that the weight of the whole car rest on that axle. And how much forse it has to endure when cornering and with bumps en potholes. These are love taps comparing to that.