silai class : 26 :- How To Draft And Sew A Shirt Collar Tutorial |

Вставка
- Опубліковано 29 сер 2024
- silai class : 26 :- How To Draft And Sew A Shirt Collar Tutorial |
@FASHIONACADEMYMJ
free fashion design course at home
pattern making
Adding or changing collar designs is one of the easiest ways to vary a style of your homemade garments. This fine detail adds character and frames the face, offering a more tailored look to an outfit. But there’s nothing more homemade looking than a poorly sewn collar. Luckily, with this easy-to-follow detailed tutorial and some practice, you’ll learn how to draft, assemble and attach a classic shirt collar that looks store bought perfect.
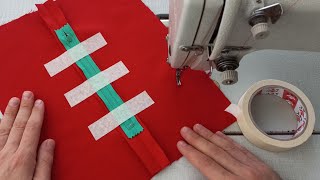
The shirt collar is the most traditional type of collar mostly found on shirts, dresses and jackets. It consists of the collar fall and the collar stand, which is a separate piece of fabric that raises the collar fall off the neckline.
If you are familiar with our tutorial on mandarin collar, you’ll find a lot of similarities in the process of creating a shirt collar. In fact, the shirt collar stand is basically the mandarin collar also known as a stand-up collar. The only difference is that before attaching the collar stand to your garment, you construct the collar fall, sandwich it between the collar stand pieces and stitch everything together.
It might sound pretty complicated on paper, but we assure you that after we’ve walked you through all the steps of this tutorial, you’ll be surprised how easy and straightforward the collar construction process really is.
Drafting The Collar
Please note that before you start drafting your collar block pattern, you need to sew the button bands or the button placket and assemble the front and the back of the bodice together as instructed in your pattern.
Since the collar follows the curve of the garment neckline, the garment neckline and the inside edge of the collar stand have to be the same length.
Traditionally, the color block is made from Center Front (CF) to Center Back (CB), hence across half the length of the collar - it is made symmetrically for the other half, with a fold at CB.
Steps
1. Find the center back (CB) of your garment (fold the back panel in half and place a pin to mark the spot). Measure the length of the neckline from center back (CB) to center front (CF) using a flexible tape measure and the length from the CB to the shoulder seam. Be sure you measure only the finished stitching line of the neckline and do not include the seam allowance. It means that you have to position your measuring tape at the line where your seam allowance ends and not at the raw edge to ensure you get the right length.
Now that you know the length of your collar and the distance between the CB and the shoulder seam, gather your supplies - pattern paper, ruler, curve ruler and a pen - and let’s start drafting!
2. Draw a straight horizontal line to the length of your CB to CF measurement (a distance of half the neck size measurement). In our case, it’s 10″ . We’ll call this line CB - CF.
.....


Urdu ma buolo