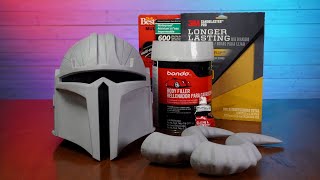
*Steps to sand, fill, and prime* *Sand* -120 grit sandpaper -220 grit sandpaper -320 grit sandpaper *Fill* (wash print before applying filler primer) -coat the entire 3D print (apply about 2 coats and wait for each coat to dry before applying second coat) (stay 8-10 inches away) *sand* -sand the primer with 400 grit *wash* -wash the print off *glaze spot putty* -fill big cracks and lines -wait to dry and then sand with 400 grit *give another coat of fill primer* *wet sand* -wet the helmet and then sand with 600 grit sandpaper -wet sand again with 1500 grit sandpaper *wash*
...few tips from a painter, use a glove when you're handling the liquid bondo! that's chemicals getting in to your skin there! Second, as a pre paint layer it's better to use 800 grit wet, 1200 is actually pretty fine and a pre polishing grit, it will be bad for adhesion, maybe not directly when you paint it, but in the longer run, like a few years chances are (depending on the paint) that it's gonna crack or come loose...lastly, USE SCOTCH PADS! for this type of sanding, red scotch pads are excellent here, they are a savior to sand difficult places without damaging small details and are also great to use as a final wet sand before painting.
Came to say the same about the high grit sanding. I would say 600-800 is a great stopping place for paint. If you are going to cut and polish then the finer grit will do well for that glass like finish.
My God...someone who actually takes the time to explain the process rather than just rush through it, and actually EXPLAINS what products THEY. ARE. USING. One of the most irritating things people do is, "Now I'm gonna do this but I'm not gonna bother telling you what I'm using to accomplish the desired effect." .................. Well then, what's the POINT of a how to video if you DON'T tell us what you're using?? Everything I wanted to know has been answered in this video. And because you did such an excellent job explaining it, I subscribed. I'm definitely gonna watch your other videos, thanks for making such great content!
Man, this is by far the best video I have seen to prepare my 3d prints for painting. You would think there are thousands of videos like this one on the internet but, trust me, you only need this one!!!! Thank you so much
I'm using this as my BIBLE right now. This is the most clear video I've seen, and I thank you SO much! It seems like everyone has their own process for this, but a lot of those processes seem unnecessarily repetitive and complicated.
You are super awesome! I've been wanting to make a replica helmet of a character my fiance loves and I was scared about making a mess and ruining the print. You've explained things so clearly and show what you're doing to the point where I'm not anywhere near as terrified of this. Thank you so much for sharing. The final product in the next video turned out so amazing that I'm going to for sure have a hard time deciding between the matte or the polished shiny look.
Time and time again, I always come back to this video as the gold standard tutorial for sanding, filling, and priming helmets. Nothing else provides such a perfect process to follow.
I used to watch these videos just out of boredom. Now I’m watching cause I’m prepping my own prints for painting. Thanks for showing that anyone can do this
I've found that silicone "brushes" work excellent for smoothing on your putty. It really smooshes it into the cracks. Thanks for the video, very helpful
I’m printing this helmet for Halloween to go out with my friends in our own dc costumes and this video is freaking awesome thank you so much. NOBODY went into this much depth, so this helped a lot.
Started and completed my first successful project with this wonderful tutorial! Thank you so much for sharing the process so that complete beginners like myself can get started.
first video i saw from the beggining to the end, when i was starting at 3d printing i was like meeh! this is wortless better learn to print really well but it is almost imposible in normal 3d printers so this is really necesary if you want a valuable piece, thank you so much
This is a great video. I usually give a very thin coat of resin ( I use anycubic clear resin, used in 3d printers) before I start to sand. I keep it in the sun for about 20 mins (I know they tell you to cure it for 12 hours but since i am sanding it I found 20 mins in sun is more than enough) and then I start to sand. This way I don't need to use the wood filler later as all the cracks will be filled and also I can start from 220 grid paper (saves a lot of time). I will definitely be using sponge trick (awesome trick, had not thought about it). Thanks...
the foam for applying is a great idea, never though about that also realized what you were talking about, using too much of the glazing putty has caused it to crack for me, gotta go back and use a heavier filler first and then use the glaze to fill the small remaining stuff
Fantastic video. Thankyou! Relatively new to 3D printing so it's great to see someone going back to basics and being able to see someone else's approach.
Coming here two years later! Amazing video and very well explained. My only question is, do you always want to wash the filler off before paint? Like always end with sanding amd then washing? Then let dry and paint?
God, I am so tempted to trying this for the Black Noir suit from The Boys (I am a teacher, so I get summers off and want to go to a convention this summer!) but I have never even touched a 3d printer lol. Worried I will become overwhelmed! Great video :)
I'm using 3000 grit wet sand paper as a last sanding process ! if you don't want to paint your product i think you can use 5000 grit after all these sanding process and also you can make very high qualify silicone mold from your 3dprinted part.
Well for example the first grit, the most aggressive I stopped when I could see that most of the larger peaks and valleys were worn down. Then I moved to the next. Usually you just need to do it by eye. go over it once and see if the imperfections your were sanding is gone and move to the next.
In woodworking, sanding with finer grits is all about removing scratches from the previous grit. In that sense you would remove ALL imperfections and layerlines from the start, before going to the next grit. So that you only have to remove scratches from the sandpaper when you proceed. That makes it way faster to finish. And going anywhere beyond 800 grit is a waste of time, because you are only polishing the surface, giving the paint less grip. I would probably not go beyond 400 grit before painting, but then wet sand the primer.
This is such a detailed video. I’m making (more like putting together) a mandalorian cosplay and just bought a lot of 3D printed armour. Will definitely be using this video for reference
I've been following this guide. I've got one more layer of filler primer to do tomorrow so hopefully I can get my Mando helmet all done and painted by next weekend. I gotta so thought my arm is killing from all that sanding😅
Yo man just wanted to come back and say thanks for this video. I followed this and your Red Hood painting tutorial for my helmet for Halloween and it turned out absolutely amazing. I’ve gotten a ton of compliments lol
This video is amazing. Thank you. I just got my printer yesterday and I’m running tests to calibrate it but these kind of videos let’s me know what to do once my prints are done.
I have a question? At 5:55 when you start sanding again, what grit do you start using? Really new to this so I’m just tryna be cautious with my own print as I follow your guide
Thank you for the guide, I am printing a helmet for a customer shortly and I will be referring to this a lot. Thank you for the the small tips and tricks as well, much appreciated!
Why didn't you apply the glazing compound filler to the sanded plastic to get the big stuff filled early before you sprayed the filler primer? The way you have it, filler is sitting between layers of paint.
After applying the spot putty and sanding that down, did you wash the print again before applying the primer? Or would washing the print in this step effect the putty? Appreciate the help
When it comes to sanding you really should clean the area after each grit. You do this because the fire particles fill in cracks and spaces that will be hidden until you clean it.
I have a Mando helmet from villainous prop shop. Used the Bondo spot and glaze putty as well. That is some righteous stuff for smoothing print lines. I'm currently working on a replica of Loki's mask from the Jim Carrey mask movie, using the same process. Great video. Anyone who's starting out on working with 3D printed cosplay or props could benefit from this.
Love the video and your fine work, a few too many grits for the average Joe, at about $12 per grit pack at Home Depot, 120/220/320/400/600/1200 plus the 2X Primer =$100. I get by with 120, 320 400 and 1000 but your results are superior....I will also use a palm sander using 80 on bigger sections of flat areas...if money and time were no objects, I'd like to follow your grit choices
amazing work you did ^^, i was wondering which sand layer you used after the primer filler :) I'm using red spray paint instead of manual so was wondering about the thicker grooves on top
At the 120 grit part, ill use a torch before wiping the dust. This melts that plastic dust into the layers. Then i hit it with the 220 and up. It helps reduce the intitial sanding with 120 grit, but i also use a cheap printer that doesnt have the best quality so the layers are much more noticeable
Great video. Good to see just how much each sanding step eliminates layer lines. I’ve also didn’t know of the glazing compound so will be picking up some of that.
Awesome stuff! I just purchased a Mando helmet from Villainous Prop Shop for a costume I am making. I searched for tips on finishing a helmet and found your video which is an awesome coincidence.
Love this series of videos! I've been wanting to get into doing my own helmet for a while now but have been pretty intimidated by the whole process. Finally had an opportunity arise to give me an excuse to make a helmet for a RPG. Ordered my helmet from Villainous and while I'm waiting for it I checked out their FAQ's which lead to your videos... and I must say... I have quite a bit of anxiety being a noob and attempting my first build, but your videos have definitely eased my concerns and built my confidence. Thank you for posting the series!!
Best tutorial! Thank you. I have a print of mark85 life size bust made with ASA material . There is any difference on sandpaper grit bust use for ASA ?
when you use the wood filler do you sand it to the point where there is no color at all? the primer you used in the video is a maroon color, after drying should you sand it to where it is completely gone?
Love your videos. I’m making a helmet I plan to have signed at a future con. Any idea how to proceed with clear coat? Should I clear coat before and after? Or just wait on the clear coat until after signed? I don’t know if the clear coat will hinder the helmet being signed if applied beforehand. Thanks!
I'm not sure to be honest. I would do a test. Paint a scrap print, sign it with a sharpie then test it with a clear coat that u know works with the paint. If it works bring that sharpie.
Thanks for this, I’ve been wanting to get into model making for some time and want to try 3D printing car models, but didn’t know what to do about layer lines as automotive paint won’t look good on them.
On a helmet, a sander probably won't be much of use due to the curves it has. You could easily sand 1 area lower then the other as well. Now if your doing a prop of a large sword or shield that has a large flat surface, then I would highly recommend a sander as long as you can adjust the speed of it, go to fast and you will start melting the plastic rather then sanding it because of the friction
Just found this video and channel. Amazingly easy to follow instructions for someone who is brand new to this stuff. Thank you very much for taking the time to put this together!
Hey, why are you using the putty after first sanding? i imagine it would make sanding a little less tedious if you got the deepest parts of the grooves out at the very start
Thanks for sharing excellent ways to make finer 3d print models. Architecture models need maybe 50% of that finish, except in detail bits. So will put that to use 👌👌
This is fantastic!! This will probably be my ultimate go to video whenever I need to paint my Pla. Question - can I use a rustoleum primer filler but not the sandable type? I can’t find this version in my country.
You can sand smaller parts. I have. You'll just need to be careful. Also not use thick primers. Use fine primers so I don't fill in and gum up all the detail.
Yeah, that's a lot harder. You can use smaller sanding tools and files but its not as easy. Fir really intricate models you will only be able to do so much on an FDM printer before you have to move to resin printing.
Muito bom o vídeo, quantas camadas deixo antes e depois do preenchimento na hora da impressão? Qual o ideal para não correr risco de chegar ao preenchimento interno quando estiver lixando?
Hey I hope you see this and can give an answer. But when you did the spray primer, what grit of sand paper did you use and we as what grit did you use after you put the bondo on?


This is fantastic for someone looking how to get your prints nice and smooth before painting! Can’t wait to see the next one!
whoa
Shut up Jessy
@@dasu-beida yo chill
Couldn't agree more with the legend himself "Uncle jessy" 😎👍 awesome video guys thank you
@@verkanoprints3746 June j Jo
*Steps to sand, fill, and prime*
*Sand*
-120 grit sandpaper
-220 grit sandpaper
-320 grit sandpaper
*Fill* (wash print before applying filler primer)
-coat the entire 3D print (apply about 2 coats and wait for each coat to dry before applying second coat) (stay 8-10 inches away)
*sand*
-sand the primer with 400 grit
*wash*
-wash the print off
*glaze spot putty*
-fill big cracks and lines
-wait to dry and then sand with 400 grit
*give another coat of fill primer*
*wet sand*
-wet the helmet and then sand with 600 grit sandpaper
-wet sand again with 1500 grit sandpaper
*wash*
Does the hight grit (1500) sandpaper get rid of the sanding marks? I’m getting ride of the layer line but am seeing sanding marks
@@domthemom2270 Yes
do you wash with soap and water or just water?
@@gage.does.everything here ya go 2:52
@@gage.does.everythingSoap and water
...few tips from a painter, use a glove when you're handling the liquid bondo! that's chemicals getting in to your skin there! Second, as a pre paint layer it's better to use 800 grit wet, 1200 is actually pretty fine and a pre polishing grit, it will be bad for adhesion, maybe not directly when you paint it, but in the longer run, like a few years chances are (depending on the paint) that it's gonna crack or come loose...lastly, USE SCOTCH PADS! for this type of sanding, red scotch pads are excellent here, they are a savior to sand difficult places without damaging small details and are also great to use as a final wet sand before painting.
I know, I need to remember gloves when using bondo. I'll definitely try the scotch pads. Thanks.
Came to say the same about the high grit sanding. I would say 600-800 is a great stopping place for paint. If you are going to cut and polish then the finer grit will do well for that glass like finish.
Use scotch pads instead of the 120 - 800/1200 sand paper?
@@Sal_Sal27 As a pre paint sanding stage, 1200 is way too high...800 max, the nice thing about scotch is that it can easy sand not flat surfaces.
@@Peter-DOC-Docter my bad. I meant, when do I use the scotch pads?
My God...someone who actually takes the time to explain the process rather than just rush through it, and actually EXPLAINS what products THEY. ARE. USING.
One of the most irritating things people do is, "Now I'm gonna do this but I'm not gonna bother telling you what I'm using to accomplish the desired effect."
..................
Well then, what's the POINT of a how to video if you DON'T tell us what you're using??
Everything I wanted to know has been answered in this video.
And because you did such an excellent job explaining it, I subscribed.
I'm definitely gonna watch your other videos, thanks for making such great content!
Thanks man. I really appreciate it. Got some new stuff out soon. Have a family emergency going on right now but should be getting a vid out this week.
Man, this is by far the best video I have seen to prepare my 3d prints for painting. You would think there are thousands of videos like this one on the internet but, trust me, you only need this one!!!!
Thank you so much
Thanks so much! Thanks for watching. :)
I'm using this as my BIBLE right now. This is the most clear video I've seen, and I thank you SO much! It seems like everyone has their own process for this, but a lot of those processes seem unnecessarily repetitive and complicated.
This is the most detailed description on the process I've see so far. Big thanks for sharing it with us!
You are super awesome! I've been wanting to make a replica helmet of a character my fiance loves and I was scared about making a mess and ruining the print. You've explained things so clearly and show what you're doing to the point where I'm not anywhere near as terrified of this. Thank you so much for sharing. The final product in the next video turned out so amazing that I'm going to for sure have a hard time deciding between the matte or the polished shiny look.
Glad I could help! Either one looks great, but yeah, its a tough choice. :)
Time and time again, I always come back to this video as the gold standard tutorial for sanding, filling, and priming helmets. Nothing else provides such a perfect process to follow.
But he’s wrong
@@RootinrPootinehow so?
wrapping the sandpaper around a sponge...now that is genius! I learned something new today :D
Glad it helped. Saves my fingers at the end of the day. :)
I used to watch these videos just out of boredom. Now I’m watching cause I’m prepping my own prints for painting. Thanks for showing that anyone can do this
I've found that silicone "brushes" work excellent for smoothing on your putty. It really smooshes it into the cracks. Thanks for the video, very helpful
Thanks for sharing! I do love those things.
This video couldn’t have come at a more perfect time THANK YOU SO MUCH I’ve been struggling to get my mandalorian helmet smooth
Glad I could help! It's a lot of work, but really worth it in the end. 😀
A bright adjustable spot lamp halps. Also, a vise with individual foam grips allow you to file with two hands. This gives you more control.
Great idea, and I get to buy more tools. :P
I’m printing this helmet for Halloween to go out with my friends in our own dc costumes and this video is freaking awesome thank you so much. NOBODY went into this much depth, so this helped a lot.
Awesome man! So glad it helped!! :)
How did it go!?
@@supergamertv8293 He's stiill sanding it :)
A video I just needed!! Super straight forward and I love it! I’m a cosplayer, got some prints commissioned for me and about to start sanding away!
Awesome! Glad it helped. Make sure to watch the painting vid too. :)
Thank you for the tips! I just purchased your Phantom of The Paradise Helmet and feel like i'm 10 years old again. Cheers from Los Angeles!
Have you already mentioned what kind of foam you’re using to apply the bondo? Thanks.
It's just some scrap EVA foam I have lying around.
@@3DPrintedProps okay thanks!
great explanation video!!! seriously. most people should take notes on how you explain the steps like this 💯
Wow. Thanks man. I really appreciate that.
This is an incredibly detailed video, you can tell this guy has such knowledge and passion for this!
Started and completed my first successful project with this wonderful tutorial! Thank you so much for sharing the process so that complete beginners like myself can get started.
You are so welcome! :)
That pause from 9:59 to 10:05 caught me off guard xD
When she asks what your hobbies are.
first video i saw from the beggining to the end, when i was starting at 3d printing i was like meeh! this is wortless better learn to print really well but it is almost imposible in normal 3d printers so this is really necesary if you want a valuable piece, thank you so much
Thanks!
This is a great video. I usually give a very thin coat of resin ( I use anycubic clear resin, used in 3d printers) before I start to sand.
I keep it in the sun for about 20 mins (I know they tell you to cure it for 12 hours but since i am sanding it I found 20 mins in sun is more than enough) and then I start to sand.
This way I don't need to use the wood filler later as all the cracks will be filled and also I can start from 220 grid paper (saves a lot of time).
I will definitely be using sponge trick (awesome trick, had not thought about it).
Thanks...
Yeah, I know others who do that, I need to try it out.
Why not just carefully use the Bondo filing putty from the start? Can it be thinned so it spreads easy, allowed to dry a little longer then sanded?
the foam for applying is a great idea, never though about that
also realized what you were talking about, using too much of the glazing putty has caused it to crack for me, gotta go back and use a heavier filler first and then use the glaze to fill the small remaining stuff
Yeah. The glazing is for finish work. It cracks like crazy when put on too thick. 😀
@3DPrintedProps The spray paint in the video Is different than the descriptions in the link which do you recommend?
Fantastic video. Thankyou! Relatively new to 3D printing so it's great to see someone going back to basics and being able to see someone else's approach.
Thanks. It's a really fun project and I think showing all the little steps really helps. 😀
ive been sanding these past days and i was wondering, is this filler primer bad for your skin? should i use gloves or not?
I'd check the can, but I don't. I do wear a respirator because of the fine dust.
Coming here two years later! Amazing video and very well explained. My only question is, do you always want to wash the filler off before paint? Like always end with sanding amd then washing? Then let dry and paint?
Yeah. You need a clean surface before u paint every time
Im wondering, when you prime and sand again, what grit are you using? 120? And after you spot putty it, are you using 120 or a finer grit?
After I prime I use a 220 to 320 then after the putty I use the same and go to a 400.
Thank you so much, not only for the detailed tutorial, but for all the links in the description!!!
put a couple drops of Dawn in the water, helps to keep the wet paper from clogging.
Nice, I'll try that. Working on a couple new helmets this weekend. Thnx.
God, I am so tempted to trying this for the Black Noir suit from The Boys (I am a teacher, so I get summers off and want to go to a convention this summer!) but I have never even touched a 3d printer lol. Worried I will become overwhelmed! Great video :)
Have you ever expermented with a sand blaster with a fine grit sand to get the lines out?
No, but that sounds like a fun new toy!
I'm using 3000 grit wet sand paper as a last sanding process ! if you don't want to paint your product i think you can use 5000 grit after all these sanding process and also you can make very high qualify silicone mold from your 3dprinted part.
Great in depth video, got a mando helmet for Christmas and have been struggling but this helped me a lot thank you!
Awesome! Glad it helped. :)
Excellent video. What did you print this on?
How do you know when you should stop sanding with one grit and move on to the next?
Amazing tutorial BTW
Well for example the first grit, the most aggressive I stopped when I could see that most of the larger peaks and valleys were worn down. Then I moved to the next. Usually you just need to do it by eye. go over it once and see if the imperfections your were sanding is gone and move to the next.
In woodworking, sanding with finer grits is all about removing scratches from the previous grit. In that sense you would remove ALL imperfections and layerlines from the start, before going to the next grit. So that you only have to remove scratches from the sandpaper when you proceed. That makes it way faster to finish. And going anywhere beyond 800 grit is a waste of time, because you are only polishing the surface, giving the paint less grip. I would probably not go beyond 400 grit before painting, but then wet sand the primer.
This is such a detailed video. I’m making (more like putting together) a mandalorian cosplay and just bought a lot of 3D printed armour. Will definitely be using this video for reference
Glad it was helpful!
If you find you sometimes miss areas you can do a guide coat - a thin dusting of any color - which is just to show you where you have sanded already.
That's a great idea. Thanks. :)
This is really helpful. I have all my supplies and am just about to start the sanding stage on my first helmet print. I appreciate your help.
Glad it helped! good luck! :)
I've been following this guide. I've got one more layer of filler primer to do tomorrow so hopefully I can get my Mando helmet all done and painted by next weekend. I gotta so thought my arm is killing from all that sanding😅
is the sandpaper that you use is for wood or steel?
Just regular wood sandpaper. I have affiliate links in the description.
Hi! Do can I sand a 3d print fresh off the bed or should I let it cool down? Just subscribed your channel is a life saver!
I don't think it matters. The only part that is still a little warm is the bottom and by the time you take the supports off its cool too.
@@3DPrintedPropsthanks for the response ‼️
Yo man just wanted to come back and say thanks for this video. I followed this and your Red Hood painting tutorial for my helmet for Halloween and it turned out absolutely amazing. I’ve gotten a ton of compliments lol
Glad I could help! Thanks. :)
This video is amazing. Thank you. I just got my printer yesterday and I’m running tests to calibrate it but these kind of videos let’s me know what to do once my prints are done.
Glad it was helpful!
Plan on buying my first 3d resin model and watching these for what to do when I get it. Very helpful
Quick question, is the helmet made from PLA or ABS? does anybody know? Other than that, awesome step by step tutorial!
After you use the spot puty what grit do you sand it with
Usually 400.
@@3DPrintedProps thanks also would just sandable primer work
Thanks for explaining this well. I avoid the sanding/painting process, but this might change my mind :)
Cool, glad it helped. The painting video should be up this week. :)
The most detailed video so far I've seen, step by step with voice and clear demonstration. 👍👏
Wow, thanks!
Thanks so much! This was super helpful and easy to understand as a beginner who doesn’t even know where to start.
Just what I was looking for. Please don’t stop doing these guides! Incredibly comprehensive. Kudos to you. Subscribing. 👏🏾👏🏾👏🏾
Welcome aboard! And Thanks!! :)
Great Video! Just started an apprenticeship and i do a lot of sanding of parts and found your video to be super helpful thank you!
Thanks man. Great to hear! :)
Very late to the game but sanding and painting my first 3d print now. Thanks for the tips here as I didn't know where to start :)
yeah this is what I was looking for! Definitly going to buy a 3D printer now I see how to finish the details. Thank you!
Glad I could help!
So after filler priming. What grit do we continue to use? do I start again at 120/220/320? Or just 320?
I start back at 320 or 400.
@@3DPrintedProps thanks. I'll start there. If it needs a lower grit I'll go down one at a time
I have a question? At 5:55 when you start sanding again, what grit do you start using? Really new to this so I’m just tryna be cautious with my own print as I follow your guide
as said by another commenter, he's using a 400 grit!
Have you tried using a card scraper before sanding?
I have't, but I'll look into it. I've used them in woodworking.
When you're washing the helmet at the end of the process, what soap are you using?
Just whatever hand soap is at the sink in the basement. :)
@@3DPrintedProps Thank you!
Thank you for the guide, I am printing a helmet for a customer shortly and I will be referring to this a lot. Thank you for the the small tips and tricks as well, much appreciated!
Glad it was helpful!
Why didn't you apply the glazing compound filler to the sanded plastic to get the big stuff filled early before you sprayed the filler primer? The way you have it, filler is sitting between layers of paint.
After applying the spot putty and sanding that down, did you wash the print again before applying the primer? Or would washing the print in this step effect the putty? Appreciate the help
When it comes to sanding you really should clean the area after each grit. You do this because the fire particles fill in cracks and spaces that will be hidden until you clean it.
Thanks for producing such a slick, to-the-point video which just gives us good information in such a concise way. You have a new sub from me.
Glad it was helpful! :)
I have a Mando helmet from villainous prop shop. Used the Bondo spot and glaze putty as well. That is some righteous stuff for smoothing print lines. I'm currently working on a replica of Loki's mask from the Jim Carrey mask movie, using the same process. Great video. Anyone who's starting out on working with 3D printed cosplay or props could benefit from this.
Thanks! I appreciate it. :)
Love the video and your fine work, a few too many grits for the average Joe, at about $12 per grit pack at Home Depot, 120/220/320/400/600/1200 plus the 2X Primer =$100. I get by with 120, 320 400 and 1000 but your results are superior....I will also use a palm sander using 80 on bigger sections of flat areas...if money and time were no objects, I'd like to follow your grit choices
I missed 1500 so we're over $100 eesshh
amazing work you did ^^, i was wondering which sand layer you used after the primer filler :) I'm using red spray paint instead of manual so was wondering about the thicker grooves on top
At the 120 grit part, ill use a torch before wiping the dust. This melts that plastic dust into the layers. Then i hit it with the 220 and up. It helps reduce the intitial sanding with 120 grit, but i also use a cheap printer that doesnt have the best quality so the layers are much more noticeable
I want to prepare my prints for silicone 2-part moulds. Invaluable demo, thank you.
You are very welcome! Yeah, I would love to try molding something large. Have to some day. :)
What grit of sandpaper did you use to sand down the layer of putty? Great vid btw
Great video. Good to see just how much each sanding step eliminates layer lines. I’ve also didn’t know of the glazing compound so will be picking up some of that.
Cool, glad it helped. :)
That long pause at the end lmao. Seriously, this was very helpful. I've been doing my Halo helmet wrong all this time.
Awesome stuff! I just purchased a Mando helmet from Villainous Prop Shop for a costume I am making. I searched for tips on finishing a helmet and found your video which is an awesome coincidence.
Love this series of videos! I've been wanting to get into doing my own helmet for a while now but have been pretty intimidated by the whole process. Finally had an opportunity arise to give me an excuse to make a helmet for a RPG. Ordered my helmet from Villainous and while I'm waiting for it I checked out their FAQ's which lead to your videos... and I must say... I have quite a bit of anxiety being a noob and attempting my first build, but your videos have definitely eased my concerns and built my confidence. Thank you for posting the series!!
Hi, thanks for the tutorial. Can I wash the print if I use Bondo spot putty on the print ?
Best tutorial! Thank you. I have a print of mark85 life size bust made with ASA material . There is any difference on sandpaper grit bust use for ASA ?
when you use the wood filler do you sand it to the point where there is no color at all? the primer you used in the video is a maroon color, after drying should you sand it to where it is completely gone?
Amazing video, but what grit did you use after the primer stage? I assume just 320 but you dont say.
The sanding after the putty is a 400, then the final sanding is a wet sand at 600 and 1000. :)
Love your videos. I’m making a helmet I plan to have signed at a future con. Any idea how to proceed with clear coat? Should I clear coat before and after? Or just wait on the clear coat until after signed? I don’t know if the clear coat will hinder the helmet being signed if applied beforehand. Thanks!
I'm not sure to be honest. I would do a test. Paint a scrap print, sign it with a sharpie then test it with a clear coat that u know works with the paint. If it works bring that sharpie.
@@3DPrintedProps thanks for the input I’ll do just that!
Have you tried using a palm sander?
Thanks for this, I’ve been wanting to get into model making for some time and want to try 3D printing car models, but didn’t know what to do about layer lines as automotive paint won’t look good on them.
Excellent tutorial, just one question what is the helmet made off ?
What grit of sand paper did you use after you set the glazing and spot putty?
400 :)
What grit did you use to sand the glazing compound? You never mentioned that.
Would you recommend using a sander to save time?
On a helmet, a sander probably won't be much of use due to the curves it has. You could easily sand 1 area lower then the other as well. Now if your doing a prop of a large sword or shield that has a large flat surface, then I would highly recommend a sander as long as you can adjust the speed of it, go to fast and you will start melting the plastic rather then sanding it because of the friction
Just found this video and channel. Amazingly easy to follow instructions for someone who is brand new to this stuff. Thank you very much for taking the time to put this together!
Glad it was helpful!
Hey, why are you using the putty after first sanding? i imagine it would make sanding a little less tedious if you got the deepest parts of the grooves out at the very start
A few have mentioned this, I'l definitely going to try it next time.
Have you tried using resin and uv light instead of glazing compound?
Haven't tried it yet, but I'd like to. :)
Thanks for sharing excellent ways to make finer 3d print models. Architecture models need maybe 50% of that finish, except in detail bits. So will put that to use 👌👌
Glad it helps! :)
I use resin from a dropper bottle with a UV flashlight instead of bondo. Faster and cleaner and you can do build up and repair as well.
What about seam lines from gluing pieces together?
Hello, you can do pretty much the same things, fill the cracks with bondo or a filler, sand and just keep working it till they are gone.
This is fantastic!! This will probably be my ultimate go to video whenever I need to paint my Pla. Question - can I use a rustoleum primer filler but not the sandable type? I can’t find this version in my country.
Would this process work with smaller figures that are printed out ? Like around ears , fingers etc ? Or would the sanding process break those off ?
You can sand smaller parts. I have. You'll just need to be careful. Also not use thick primers. Use fine primers so I don't fill in and gum up all the detail.
How are you supposed to do this with less flat surfaces? Like with prints with lots of grooves and stuff?
Yeah, that's a lot harder. You can use smaller sanding tools and files but its not as easy. Fir really intricate models you will only be able to do so much on an FDM printer before you have to move to resin printing.
Sorry for the late reply, but thank you!
Muito bom o vídeo, quantas camadas deixo antes e depois do preenchimento na hora da impressão? Qual o ideal para não correr risco de chegar ao preenchimento interno quando estiver lixando?
Hey I hope you see this and can give an answer. But when you did the spray primer, what grit of sand paper did you use and we as what grit did you use after you put the bondo on?
How many wall layers do you recommend so that you don't sand through while sanding out the layer lines
I usually just print with 2 walls and 7 top lavers and 6 bottom.
great video. Any idea how long this entire process took?