Це відео не доступне.
Перепрошуємо.
Breadboard tutorial: How to use a breadboard (for beginners)

Вставка
- Опубліковано 27 лис 2017
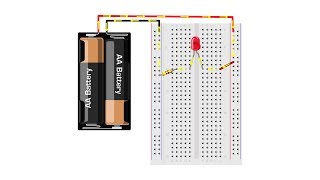
- In this breadboard tutorial, I will show you how to use a breadboard when designing electronic circuits: how to make a simple electric circuit and how to avoid common breadboard mistakes.
💳 Shopping links*:
🏈Amazon US:
Breadboard Kit (4pcs): amzn.to/48sYTiz
Breadboard Set: amzn.to/42Uh1R9
Assorted LED Kit: amzn.to/49L8faC
Blank PCB kit: amzn.to/48ryLEJ
🐲AliExpress:
Breadboard kit: s.click.aliexpress.com/e/bxD38NYG
Assorted LED kit: s.click.aliexpress.com/e/b0tuiiAk
Blank PCB kit: s.click.aliexpress.com/e/8mufXBi
*Affiliate links. The price you pay does not change, but I may make a small commission. Your support helps me make more videos. Thanks!
#electronics #breadboard #tutorial


This got me through making my first breadboard/circuit :) I just wanna mark the beginning of my journey here with this comment
Quick to the point. You mention every question I might have had as simply as possible. Thank you
Very well done, sir. Concise and informative!
I made the thing! thank you very mcuh, very clear and helpful for getting something small started
thankyou bought a kit and thanks to you I'm finally using it .
Needed a refresher. Thanks a lot!
Best explanation lve seen on how to use a bread board thank you so much !!
I have wanted a breadboard since I was like 10yrs old now... I guess 20yrs later is my chance thanks
Thank you for the video I love learning about engineering and brreadboarrds
Awesome! I was getting discouraged not knowing where or how to start until I found this. Thank you!
Thanks for the simple and also very beginning friendly vid
Good video I like the drawn lines illustrating connections
very clear now. thanks!
Thank you very much for your informative explanation.
That was fun to watch. Thanks you 4 educating me 😃👋
Brilliant - well done!
great, this simple clear explanation make me understand with this just one video ,thanks sir
Great video, I love this channel. Would you upload more videos doing those cool circuits in the breadboard?? Much appreciated.
Great video, thanks!
Это действительно полезное видео. Спасибо, добрый человек!
Helpful.thank you 👍
Thank you for the video, very clear and easy to understand.
You're welcome. Let me know if there's anything else I can make a video about
Really helpful
Thank you Sir.
great! Thank you sir
Insanely good video
Legendary tutorial thank you sir
Your tutorial was easy and fun to understand, thank s for making this tutorial.
great vid.....thanks
This is amazing the teachers can drem to explain this so simply like u
Thank you so much 😊
Thank you so much
Thank you! When I was a kid I had an electronics kit which had springs you could connect jumper cables to to various components photovoltaic cell, rheostat, speaker etc. It came with a book for 100 different projects. It was great. My dad and I once tried soldering components we bought for a separate project which did not work. Since then I hated soldering. This is cool. Subscribed
Yoo I had the same thing as a kid but I can no longer remember what it was called. Did you happen to remember?
very informative
This video is something That makes me happy bout making stuff like this because You makes IT easy to understand thank You
Molt bon vídeo.
Thx so much bro
this is the best tutorial on youtube about breadboards.
Thanks! Let me know if there's anything unclear or that you want me to cover :)
thank you
Very good video
can you do a video with different resistors and series circuit board vs parallel circuit?
Thanks bro
well made
Hi sir!! I've been struggling with my flashing led circuit project!! I would love it if you would post a video of how you built the flashing led circuit in the intro!! Thanks sir!!
Hi! It's a good idea. I'll put it on my list. In the meantime you can Google "astable multivibrator" and the schematic will show up
@@LeftyMaker Thank You!!
Thankyou
Damn that looks interesting.
Thx
I like the LEDs are very bright. My school supplies are so dull.
Heres a note of you dont understand much: every column of the breadboard (in the middle) are connectedas shown in the the first minutes in the video, same goes for the power lines for + and -
Thanks so much! Now I can ruin things properly knowing how to hook them up!
One of the best videos. Very well explained, so you are fit for the army.hahaha
Thanks :)
We have to put jumping wires loose or tight sir
Thankyou ❤️ love from Pakistan 🇵🇰❤️
How do i know how many ohm my resistor has to be?
I have solid core wire because we have electrical shock collars for our dogs not to leave the property and we have leftover solid core electrical wire
Amazing my friend ♥♥♥♥♥
Nice to meet you ♥♥♥♥♥
Best wishes for you ♥♥♥♥♥
Keep it up .............. ♥♥♥♥♥
So is it important to leave at least 1 connection point of space in between each element or lead for wires?
Only if you have exposed leads or wires that you don't want to be touching. Otherwise it's not critical
@@LeftyMaker Thanks! I think your video will be a big help for me in my Circuit Theory lab this week. Cheers!
I found my old breadboard during quarantine. its about 2 or 3 years old. is it still ok to use?
Edit: it still works!
Sure, it should be fine to use. I think I have one that's more than 10 years old and still works.
Wow
Which surface is used?? Is it a mat or something
And if it is cn u pls tell the name
It's an OLFA cutting mat. They have them on Amazon. But they're not good to solder on. Heat damages them. Ask me how I know
your voice is ASMR
i did everything but the led wont work i tried it with other leds but nothing happens and when i use a cd motor it does work and i cant see what im doing wrong
Is your led in reverse? Do you have enough voltage for the led?
for me the button circuit you did at the end didn't work could you possible help me?
Sure. Could you DM me on Instagram and send a picture?
@LeftyMaker Why is the setup at 2:53 wrong? The circuit is closed.
It's not wrong. Look at 2:58 he show a WRONG circuit and corrects it by closing the circuit. 2:53 was just incorrect narrative over the video.
You guys have a point, but if your goal is to light up the LED, then the LED at 2.53 is placed incorrectly.
@@LeftyMaker But they are in the correct holes at 2:53 to make a closed circuit, isn't the led therefore going to light up?
@@LeftyMaker Then why does the written text say "wrong" ? at 2:53 ...... EDIT: AHHHHHHHH i got it now,,,, cause the currrent would choose the short circuit
how do peaple make a computer?
The breadboard looks like several can be connected to make bigger breadboards, yes?
Yes, some breadboards can be attached together. Of course, you'll still have to manually hook the power rails with jumper wires
@@LeftyMaker Great.
I wish you showed us how you actually connected the power source
See 1:28 for that detail
Why exactly does 2:54 not work?
Because the LED is placed incorrectly. The legs of the LED are shorted by the breadboard, so no electricity flows through the LED and it doesn't light up.
new sub :) will checkout a few more of your videos :)
Welcome :)
nice vid, hail hydra...
Because his accent sounds Russian?