We listed all the materials we used for this build including the Pigment combination to achieve this effect. Let us know if you have any questions! Thanks for watching!
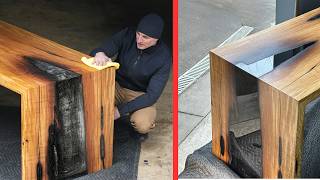
@@oscarzamudio1 We included a list of materials in the video description. The finish on this piece is Rubio Monocoat Pure 2C Oil. You can learn more and purchase at www.JeffMackSupply.com
I don’t know anything about wood working, but I’ve made a LOT of color shifting nail polish. I think you’re diluting the color shift effect by adding in black pigment. Have you tried layering it over black, instead? If you filled it partway with opaque black, or painted the interior edges of the wood black, and then filled it with ONLY dragon’s breath, I suspect you’d get a far more dramatic effect. I’m really excited to see you working with duochromes!
Hey Melissa, Thank you so much for the feedback! Those are some great point and i'm thinking we need to experiment with that process to see what happens. Stay Tuned!
Cool table, as a woodworker though it pained me to see the end result spoiled by the resin that’s still overlapping the small piece of wood, needed machined and sanded down a touch more!
the author does like to from scratch, shaping and trimming wood from large blocks into fine finished products. ua-cam.com/users/postUgkxD-QRFQz730FJEh4f9BYSf-nkIMIC9hL_ as another reviewer mentioned, most projects require a lot of high-dollar equipment that most of us dont have the room or budget for. But, knowing how to do these things, even if we wont be able to practice the full stack project, is still great.
Hey Geff, thanks for you fantastic guidance on epoxy resin tables. Super informative and great explanations. There is ot a whole lot of people making tables here in New Zealand but i will be emulating some of your work here. Keep the content coming !!
Its really appreciated that you list the finishing materials. You've put Rubio monocoat but was that the yellow liquid or the white finishing liquid? It looked like you used two different coats? I'm about to finish a river table and I'm going the old fashioned, sand, sand,sand, polish, polish, polish back to a sheen.
You used some sort of white blocks under your clamps but then you poured your epoxy around and onto the white blocks. How did you remove the white blocks and didn't they leave pits where the epoxy could not flow? Thanks.
QUESTION: at 8:23 are you hand applying a second coat of rubio? if so, how long do you wait before applying the second coat? do you buff the first coat before applying the second coat? and finally how long do you wait before buffing off the final coat?
@@jeffmackdesigns thanks for the reply! I been making river tables recently think this color idea you provided would look sick in my black walnut gaming desk ♥️
I noticed that all of the tables are in a matte finish or a high gloss finish. Why does nobody make a table with matte wood and high gloss river? The contrast is much better then.
I have a question, I purchased Ecopoxy flow cast just like in this video, on the container it says to pour 1/4" at a time and leaving 48 hours between pours, but in this video it looks as if it's one single pour...also it mentions 1-1/2" thick max, isint this table 1-3/4" thick?
We always remove the bark. You will get a stronger bond between the wood and epoxy if the epoxy can adhere directly to the wood itself, rather than the bark.
Decided to watch cause you have the same name and initial as my boyfriend who is also a Jeff D Mack and because I love purple and wood making stuff. A win for all!!!3💜💜💜


We listed all the materials we used for this build including the Pigment combination to achieve this effect. Let us know if you have any questions! Thanks for watching!
how to make effect for that river epoxy..
use some alcohol?
The effect happens naturally during the curing process of the epoxy.
Where is your list of materials used ? I’d like to know what that finish was. Thank you.
@@oscarzamudio1 We included a list of materials in the video description. The finish on this piece is Rubio Monocoat Pure 2C Oil. You can learn more and purchase at www.JeffMackSupply.com
@@jeffmackdesigns Thank you. Sorry I couldn’t find it. Thanks again!
That is by far the best epoxy table I have ever seen in my life!
Looks insanely cool! One of those pieces that you could stare into all day. I love the giant knot too. Very nice work
I don’t know anything about wood working, but I’ve made a LOT of color shifting nail polish. I think you’re diluting the color shift effect by adding in black pigment. Have you tried layering it over black, instead? If you filled it partway with opaque black, or painted the interior edges of the wood black, and then filled it with ONLY dragon’s breath, I suspect you’d get a far more dramatic effect. I’m really excited to see you working with duochromes!
Hey Melissa,
Thank you so much for the feedback! Those are some great point and i'm thinking we need to experiment with that process to see what happens. Stay Tuned!
I'm guessing your DEF onto something there, thanks
Dude. Love the video, but FILM IN LANDSCAPE FOR UA-cam please.
That's the plan. I originally filmed everything for IGTV so I filmed in portrait. I'm hoping to slowly switch over and film everything in landscape.
@@jeffmackdesigns w po jakieś 30 mój zadzwoń lub o knoki oocytów
Works perfectly on my phone
The DipYourCar tune during the pour!!!! AweSomeSauce! Nice work too.
Simply beautiful...
Thanks! I appreciate the kind words!
I so need one of these for a kitchen table for a family
Wow, looks like a landscape, maybe a canyon on Mars! When money doesn't matter ... I couldt even afford the big clamp.
Wow ... the color is so beautiful.🤩🤩😳
That yellow liquid is magical 😀
my job is sculpting. Nice to have you visit the youtube channel. Wish you success in life. ❤❤❤❤❤❤❤❤❤❤❤❤❤
ua-cam.com/video/NJ4p4u8Cu0Y/v-deo.html
❤❤❤❤❤❤
Beautiful
That is simply beautiful
What kind of person would thumbs down this? Great work guys super cool stuff!
Thanks for following along and supporting! There's always a few who don't like epoxy!
Stunning. It looks like a GIANT knot in the wood too which adds to the beauty and the beast appeal. :)
Thank you very much! The character in the slabs are second to none!
Beautiful piece. Just ordered some of the Dragons Breathe from you. Stoked to use it!
exceptional work, really beautiful.
Thank you!
Cool table, as a woodworker though it pained me to see the end result spoiled by the resin that’s still overlapping the small piece of wood, needed machined and sanded down a touch more!
Fabulous color choices! Great job all around. Thanks for taking the time to share this with us.
You are so welcome! Thank you for watching! We appreciate the support!
Великолепно !Смола похожа на бархат🤩🤩🤩Цвет благородный получился 👍👍👍👍👍👍🥇🥇🥇🥇🥇🥇
Absolutely beautiful
Simply Gorgeous!😃
It looks alive. Fabulous!
Thank you for the kind words!!
Real artist 👍🏻beautifully done.
That epoxy explosion set just right .nice table guys
Nice job
the author does like to from scratch, shaping and trimming wood from large blocks into fine finished products. ua-cam.com/users/postUgkxD-QRFQz730FJEh4f9BYSf-nkIMIC9hL_ as another reviewer mentioned, most projects require a lot of high-dollar equipment that most of us dont have the room or budget for. But, knowing how to do these things, even if we wont be able to practice the full stack project, is still great.
So satisfying fr
Thanks for watching! The process is very satisfying!
Turned out pretty.
Hey Geff, thanks for you fantastic guidance on epoxy resin tables. Super informative and great explanations. There is ot a whole lot of people making tables here in New Zealand but i will be emulating some of your work here. Keep the content coming !!
Peça estraordinaria parabéns meu amigo 🇧🇷🇧🇷🇧🇷🇧🇷🇧🇷
nice 👍 job sir
God bless !
Amazing.
So gorgeous
I love that so awesome 👌
Beautiful work
Hello!
I'm watching you from Russia.
And tell me, from 2:40 minutes, the resin began to warm up and boil?
And I wonder what size this table has?
Look at the description!
What is the yellow solution with which he ends up?
Great 💡 idea
Its really appreciated that you list the finishing materials. You've put Rubio monocoat but was that the yellow liquid or the white finishing liquid? It looked like you used two different coats? I'm about to finish a river table and I'm going the old fashioned, sand, sand,sand, polish, polish, polish back to a sheen.
For this table, we used Rubio Monocoat to finish it. That is the product you saw us wipe on the piece. There was no other additional products used.
Thanks very much for video guys@!!
A very beautiful table! Respect!
Would I get the same results with a shallow pour? 1/8". How much pigment would you use for 4 gallons?
Beautiful!!
ua-cam.com/video/NJ4p4u8Cu0Y/v-deo.html
❤❤❤
You used some sort of white blocks under your clamps but then you poured your epoxy around and onto the white blocks. How did you remove the white blocks and didn't they leave pits where the epoxy could not flow? Thanks.
I was sooo waiting to see this thing shine like glass. A satin finish doesn't do it justice at all in my opinion. Still a very cool piece though.
Wow i like it... very wonderful
Amazing table
Wow wow 👍👍
Great videography!
Very beautifull! Any reason why you film vertical???????????
QUESTION: at 8:23 are you hand applying a second coat of rubio? if so, how long do you wait before applying the second coat? do you buff the first coat before applying the second coat? and finally how long do you wait before buffing off the final coat?
After spreading the rubio with foam , what you had applied with hand , some shiner or what @8:23
perfcet work 🖤👌🖤
What did you do to get that swirl effect after the pour? Looks very nice!
Wow, just beautiful 👌
That is one Beautiful piece!
My brain just decided that your resin color creation is named "Galaxy"
What a beautiful table!
I think so too! THANKS!
Love that color
Amazing
Amaizing
How it made
What about experience
Thanks for watching!
Hey my friend! IS all of Diamond Pigments "Multi Colo" options do this effect? Or is it just this Dragon Fire?
Hi Colt, they do have a few two tone colours but we find that this one has the most colour shifting effect
@@jeffmackdesigns thanks for the reply! I been making river tables recently think this color idea you provided would look sick in my black walnut gaming desk ♥️
Super
I noticed that all of the tables are in a matte finish or a high gloss finish. Why does nobody make a table with matte wood and high gloss river? The contrast is much better then.
After sanding, which polish liquid do you use?
After sanding, we use Rubio Monocoat Pure to finish our pieces. We have Rubio available on our website www.JeffMackSupply.com
Very nice work
After all that a satin finish? Lol. Looks insane!
a mesa mais linda que eu ja vi na minha vida.
Warnanya begitu aduhai ya genk 👍🏼
Amazing !
You might light it from under with a black light lamp...
I have a question, I purchased Ecopoxy flow cast just like in this video, on the container it says to pour 1/4" at a time and leaving 48 hours between pours, but in this video it looks as if it's one single pour...also it mentions 1-1/2" thick max, isint this table 1-3/4" thick?
Mate, what's the machine you have used post sanding at 6:59 , let me know please
Hi from England. What grit did you sand to, and do you use the monocoat after you have used tye final grit of sandpaper? Thank you
great work, i will try it
What is that last product that makes it all shiny and beautiful?
Epic indeed!!!!
Thanks! We are really happy with the final result!
I’m new to Thai what do I use for non stick borders when pouring my tables anything. Homemade
That works
Hi :)
Beautiful work!!!
Please can you tell me how much of the Pigment do you use in total? For example 1,5%
Greetings from Germany
Love it! Great work! I´s curios, what´s the name of the song starting at 5:56?
that yellow at the end you put what is it???
Do yall leave the bark on...i heard that was a no no
We always remove the bark. You will get a stronger bond between the wood and epoxy if the epoxy can adhere directly to the wood itself, rather than the bark.
Please tell me what type of chemical and colors are you using.
Just a suggestion for future videos! film horizontally please! Cant get a good look at y’all’s creations even when using full screen on an iPad.
The plan is to switch to horizontal. I film everything on my iphone and I am in a bad habit of filming in portrait vs landscape.
Boa tarde moro em Aracaju/Sergipe/Brasil, teus trabalhos são maravilhosos,
Great work! I was wondering what material did you use under the clamp to hold the slab down? I am referring to the white rectangular pieces. Thanks.
it is a HDPE material - High Densisty Poliethylene. The form they are useing is made from it as well, resin does not stick to it.
@jeff mekk come si chiama quel liquido che hai messo alla fine??
What was the thing you used at 7:25 ? What’s the name of that product or how can I make it
Where did you get those clamps
Great work. Absolutely beautiful. Does the finish on either the wood or epoxy scratch?
Thank you for the comment! It holds up against day to day use extremely well. However, anything sharp/heavy enough could still gouge through.
Well done. it's a beautiful table. But no bark removal?
wow very beautiful.
what kind of resin pigment is it
Wish we could get the no seal forms here in Australia 🇦🇺☹️
Hey, We ship to Australia so you can order these forms right from our website www.JeffMackSupply.com
@@jeffmackdesigns I did see that but shipping was more than the form, around $700 cad all up...so just a tad over that in AUD. Maybe one day
Super !!!
Magical
May I know the materials used, thank you
Decided to watch cause you have the same name and initial as my boyfriend who is also a Jeff D Mack and because I love purple and wood making stuff.
A win for all!!!3💜💜💜
Did you seal the edges of the slabs
magnifique très beau travaille