The Simple Secret To Better Color Grading In Photoshop

Вставка
- Опубліковано 7 лют 2025
- Learn the secret to better color grading in Photoshop! 📝 GET THE FREE LESSON PDF here 👉 bwillcreative....
-
Link To Sample Image: www.pexels.com...
-
😄 TRY PHOTOSHOP FOR FREE: prf.hn/l/0e9YJxb
-
🤓 JOIN MY BEGINNER PHOTOSHOP PROGRAM: www.bwillcreat...
👨🏫 MASTER PHOTOSHOP FOR PHOTOGRAPHY: www.bwillcreat...
✏️ MASTER PHOTOSHOP SELECTIONS IN THIS COURSE: www.bwillcreat...
🌐 VISIT MY WEBSITE for 700+ free Photoshop & Lightroom guides: www.bwillcreat...
👥 MY SOCIAL MEDIA
Instagram: / brnwills
Facebook: / brnwills
Portfolio: portfolio.bwil...
Email: info@bwillcreative.com
-
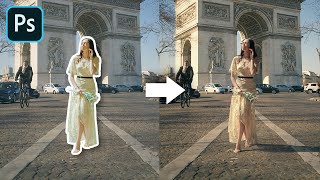
In this Photoshop tutorial, you'll discover a simple method to achieve professional color grading results using the Apply Image feature on layer masks. Learn how to use selective adjustments like Color Balance and Selective Color to refine tones and blend them seamlessly into your photo. Enhance your edits further with contrast adjustments using Curves, as well as dodging and burning for added depth and vibrancy. Don’t forget to grab the free cheat sheet in the description for all the steps and settings!
-
Timestamps:
0:24 Using Apply Image for Layer Mask Refinement
2:21 Layered Adjustments for Richer Tones
3:56 Enhancing Contrast with Curves and Dodging/Burning
7:27 Before and After: Color Grading and Contrast Effects
8:42 Free Cheat Sheet for Color Grading Techniques


Thank you Brendan for helping me put a toe in the water of selective colour and colour balance using the apply image mask technique. I have always used camera raw filter but with this method I feel there is more control to make those subtle changes. The key for me is to work non-destructively so that I can tweak and compare. The downside is that I'm spending longer tweaking and comparing before settling on the preferred image...does that look better or worse is a subjective decision and will it be shared by the competition judge ? Thanks again for your clear tutorial(s). Oh, and as if to demonstrate a point...I actually prefer the original image you used in the tutorial because I think the adjustments make the feel of the image too blue and cool...but hey, what do I know ! 🤭🤭
Glad you find this technique useful! :D
“But what do I know” should be how I end every tutorial from now on 😂 then nobody can disagree with me
what a great way to color grading,thank you
Thank you Brendan, I’ve watched a few of your tutorials and found them to be informative and to the point. Which is what I like. Normally (for me) it’s been , ‘monkey see, monkey do’ approach; but after watching this vid, I have an idea to add complimentary colours to shadows, mid tones & highlights. Mix it up a little and see how it comes out. Cheers Brendan 👍
Nice! Looking forward to giving this a try today. Love the cheat sheet! Very handy until muscle memory kicks in 🙏🙏
You got it! Glad to hear it’s helpful 👍
Keep going.
Well done, Brendone. 🤩😅
how to do rgb to cmyk without color change😢😢😢😢 make video please 😭😭😭😭😭😭
But by placing these masks on the adjustments you are strongly favoring brighter tones for color adjustment. This approach significantly reduces ability to color grade shadows.
Correct but it still edits the shadows slightly as shadows are rarely 100% black. When the shadows are edited as heavily as the midtones or highlights, thats typically when your edits look too “filter-like”.
However if you wanted to have the opposite effect to more intensely edit the shadows, you could invert the mask or apply a direct contrast adjustment to the mask to refine its effects as desired.
Frankly, I preferred the very original piccy without adjustments. But what do I know.
Everyones got their own style choices, you do that works best for you. I just share options 😎
how to do rgb to cmyk without color change😢😢😢😢 make video please 😭😭😭😭😭😭