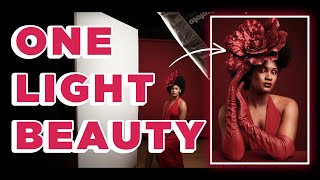
Using a Softbox as a High Key Background + Rim Lights

Вставка
- Опубліковано 4 сер 2024
- In today’s Photo Deconstruction I break down an image that incorporates gels and a softbox as a high key background.
For this particular setup, what’s interesting is not just the modifiers I used or color gels I chose, but the very unusual way I gelled the background light to give me a high key result and also colorful rim lights on the subject.
👉 There are 3 lights total as you can see from the BTS image at :059
Two main lights on each side of the subject and one softbox behind the subject. All of the lights in the setup have a gel on them, yet the background light is pure white, so how do we do this?
Since you can see that the model has a teal rim light on her, I placed that gel in the softbox and overexposed so that it just had enough color to create a rim light but also blow out the background so it appeared to be white.
I like using this technique sometimes because it can take the place of at least 3-4 strobes by just placing your subject's back against a softbox. (Basically you're replacing 1-2 lights for the background and at least 2 lights for rims doing it this way).
👉 Post processing
You can see the straight out of camera shot RAW with zero processing here: 3:53
Straight out of camera the image isn’t as high contrast of course and the background does have that bit of teal to it, but we can fix that. Not with Photoshop mind you, but by adjusting the contrast. I wound up increasing the clarity and contrast, popped the whites in CaptureOne and you can see that result here: 4:45.
But…. We’re not done yet. I did take things a bit further and do some additional retouching to make the image a bit cleaner. I liquified the model's shoulders to create longer neck line and make her appear a bit more elegant as well as cleaned up a few other areas.
So there we have it, a relatively simple 3 light technique with a twist using a softbox as both rim lights and high key background. I challenge you to think outside the box with your color gel photography and try it out!
👇 Drop me a comment below and let me know what you think and if this is a technique that you’d try as well.
👍 Don’t forget to show some love and hit the thumbs up as well so that I can continue to bring you free content like this!
📸 Camera Settings:
✅ Shutter speed: 1/200th
✅ F/stop: F8
✅ ISO: 400
📸 Gear Used:
✅ Canon EOS R5: adorama.rfvk.net/JxzdE
✅ Canon 24-105 4.0: adorama.rfvk.net/KG0ne
✅ Profoto D2: adorama.rfvk.net/qvB7y
✅ Profoto 3x4' Softbox: adorama.rfvk.net/azKaR
✅ Profoto Large Umbrella: adorama.rfvk.net/bKGzg
✅ Profoto Large Umbrella Diffuser: adorama.rfvk.net/JAyMe
✅ Profoto Deep White Umbrella XL w/ Diffusion: adorama.rfvk.net/PJRDj
✅ Savage C-Stand: adorama.rfvk.net/J1ZW2
✅ Dramatic Color Kit: lindsayadler.photo/gelkit
✅ Profoto Remote: adorama.rfvk.net/W3o5G
✅ Tether Tools Tether Cable: lindsayadler.photo/tethertools
🔥 To learn more about gels definitely check out my class the Magic of Gels: lindsayadler.photo/gels
👉 To attend one of my in person gel events sign up to be notified when we'll be having the next one: lindsayadler.photo/gelsworkshop
----
👉 Portfolio: lindsayadlerphotography.com
👉 Instagram: / lindsayadler_photo
👉 Facebook: / lindsayadlerphotography
👉 Twitter: / lindsayadler
👉 Education: learn.lindsayadlerphotography.com
Some of the links in this description contain affiliate links to partners. - Фільми й анімація


Love the lighting and jewelry. I will be taking more pictures of fashion jewelry for fun. Thanks for having theses classes.
Lindsay is so creative and such a gifted instructor. Love her work.
Thank you so much!
This blew my mind. Had no idea you could use a gel like that🤯
Cool right?
Sweet!! Love the classes. I see if I can get my strobe next month to take updated picture of myself. Great work as always.
Holy smokes! What a brilliant edit! Very well done. The ear rings. . . Never noticed they were gone. Keep up the good work.
Great advises about the lights gel, the shoulders effects and controlscapture one or photoshop. Note: Nice make up on the eyes nad the hairstyle of you Lindsay, like a Pin up Star 50s !! :)
You will go down as one of the best photographers to ever do it. Thanks for the breakdowns, Lindsay.
Thank you so much for the kind words! :)
Love you Lindsay! Thank you for inspiration🙏🏻❤️
what a fantastic idea ... over exposing the gel'd background soft box but using the coloured light from it elsewhere in the image - thank you
That's brilliant! Great video with lots of detail and very little fluff. Thank you!
wonderful picture and great explaination, thank you very much Lindsay, your Rock!!!
You're a light magician!
alakazam!
This is very nice! Thank you.
Good morning 🌞 thanks for uploading this tutorial I'm doing a photoshoot for my 32 Birthday in December this is very helpful.
Great 👍 Thanks for sharing 👍👍👍
I loved that portrait. It's a bit counter-intuitive to blow out the background because "we fear" that this eats away hairs. The clever thing was to use this when the model has her hair tight and flat to her skull and the problem does not exist. Excellent idea.
Yeah, I did the softbox background a few months ago and definitely had that problem.
@@JohnDunkelberg Doesn't work with curly hair like mine, for example!
Excellent!!!
Superb light setup 😍👌
Thanks so much!
Wow, what an amazing beautiful image Lindsay Adler! Thanks for opening our mind on making a pure white background as well as adding reem lights all in one, this concept has many possibilities.
You're so welcome!
Lindsey this was very helpful video few days ago I tried taking portraits on my white door and then used some warm gels to deepen my saturation and look
Тётя Lindsay Adler ты большая молодец. Это был крутой урок. Особенно про контровой свет с гелем. Спасибо!
Thanks!
This was an amazing workshop.
Glad you liked ti Renee! Hope you can join us for a future one. :)
Thank you!
Great!!!
Love this look ! I gave it a try and it was amazing !
Thanks!
Great work as always 👏 👏👏
Thanks so much!
You are the master of studio lighting 😩 I’m still holding out hope that you’ll do a cosmic/galactic themed gel lighting shoot, don’t worry I’m a patient person I know it will happen soon 😂
Fantastic work as always
I love your Tutorials....
Thank you so much! :)
Amazing image. This looks like something that could have been in Creative52. You always inspire me to step outside of my comfort zone 🙏🏽
Thanks so much!
great
Love your work. Would an RGB panel inside a softbox work d'ya think?
what an interesting though! hmmm... ill have to try it!
Hi Lindsay, I absolutely love your work and your videos. How do you not get massive lens flare into your image with the big softbox behind the subject?
Loving the new setup. I knew it was going to be good when you talked about it briefly. Great shot as always. QQ: Do you liquify as a final step or before any retouching?
final step!
SUPER. SUPER , THE BEST VIDEOS
நன்றாக இருக்கிறது வாழ்த்துக்கள் R.MANOHAR-CHENNAI
Thank you Lindsay! How many watts do your heads have? And is the liquify tool in photoshop? Great teaching thank you you are so inspiring 🙏🏼💕
I use 500 and 1000 watt profoto d2 heads. Mostly the latter. Liquify is in Photoshop yes.
Gorgeous as always. I tried this and found a problem with the subjects ears. It was not that the ears were big, its just the light shone right through them. I had to tape something to the back of the ears. Did you have this problem? Do you have a more elegant solution?
yea thats totally normal. Tape is the way to go. :P
@@lindsayadlerphoto ahh, good to know. Thank you 😊
Hi Lindsay what do you think of the new Rotolight products Aeos 2 and Neo 3 they have built in digital gels, and will have app control, scheduled to be released later this month, should be a game changer.
Are they strobes? If not, I already use Nanlites for full RGB options. Very useful tools for sure, I agreee!
@@lindsayadlerphoto are led and can be used in both modes
Lindsey, I am thinking about getting one of the 2 new small lightweight strobes Profoto has come out with. One is the X at 250ws and the other is the Plus at 500ws. I do a lot of outdoor portraits and starting to do more indoor portraits. Which strobe would be a better all around strobe head?
Those strobes were the B10X and the B10X Plus I was talking about. Thanks.
I would recommend something with more power if you are going to use it outdoors.
@@lindsayadlerphoto Too the B10X Plus at 500ws would be the better choice correct?
Since it's 500ws yes.
@@lindsayadlerphoto Thank you.
I can't buy your course via my cards. What do u recommend
Please contact us if you have any issues
Can you link the gels you use?
In the description. :)
i did this when i first started last year because i couldnt afford backdrops. It was HORRIBLE. I wish this video was made earlier
haha well it takes some trial and error. Glad that this can help! :)
@@lindsayadlerphoto you have no idea how much it helped
Happy to hear that. ;)
Why ISO 400?