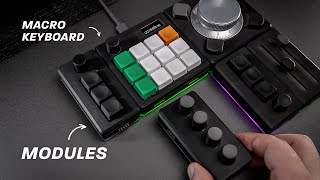
Best Fusion 360 upgrade!!! - 3D Printed Macro Keyboard - OPEN SOURCE

Вставка
- Опубліковано 5 вер 2024
- Hello,
In this video I am going to show you how I designed and built a cheap macro keyboard. At the moment it is programmed to work with Fusion 360 but could be changed in minutes to work with any other CAD software or to work as a Stream deck or use it for gaming.
Link to the files: github.com/Kik...
Link to my Spacemouse (SpaceRat) build: • Can my DIY Spacemouse ...
Buy Me a Coffee. If you find my work useful and valuable you can support the channel on the following link: www.buymeacoff...


This is really nice! When I saw the spacemouse I ordered parts for it immeadidly and now same for this. Good that you have included the step file for the bottom part.
Thank you! Have fun in building 😉
Today I got really excited (!) - I managed to wire up all my keys and upload your sketch to my Arduino. It works!! All I have to do now is reconfigure the key assignments as I'm using 16 keys and some different functions and I'm done. A small step for mankind but a giant leap for this Arduino noob!
Thanks again for your contribution, it is much appreciated.
I am really happy that it worked out for you and it feels really good hearing your excitement about it 🙂
Thank you for the nice words and have fun using it.
BTW have you seen my DIY Spacemouse videos? If not I would recommend to watch them 😉
@@kikihobbyrepair Thanks Kiki. Yes I saw your SpaceMouse video and was impressed. I happen to have bought a "real" one a while ago but never really got comfortable using it. Maybe one day I'll have a go at making yours to see if I can adapt it slightly to suit me better.
Sure mine cannot really compete with an original but it was fun to design and build 🙂
@@kikihobbyrepair Do you have any other projects in the pipeline? I'm impressed with the little Pro Micro board and am wondering what else they could be used for . . .
I have a project in the pipeline but there the Arduino Nano is good enough.
I can safely say that you make the dreams of many people come true!!!!))) Thank you very much for your work!!!) You are incredible! After you showed how to make a budget space mouse, I wanted to offer you the idea of combining a mini keyboard and a space mouse, as in space mouse pro)))
Thank you for the nice words. 🙂Yes, combining the 2 would be really easy to do.
@@kikihobbyrepair maybe a idea for version 4 of your mouse. But first I’m waiting for version 3.0 of your mouse.
man, love it so much, you a genius
Thank you! 😉
If you love this and haven't seen my DIY Spacemouse (SpaceRat) video yet please check it out.
@@kikihobbyrepair Alright will do, the Spacemouse is great as well
You can add the space mouse to the snowrunner setup as well to controll the viewing camera :D
Perfect idea 🤣🤣
Nice work Bro! Thx!
Thank you!
Well done!
Thanks.
Nice solid work! But why not use an old Tablet with software like stream deck mobile?
Thank you. What I love about mine is that you can use it without looking at it. With the touch screen this is not really possible.
Wspaniała robota 😀 Jestem w trakcie budowania spece mause Twojego projektu muszę pozbierać brakujące elementy. Tą klawiaturę także z chęcią przetestuję. Świetny projekt 😀 czekam na kolejne 😀
Great project! I've been wanting to build one of these for a long time. I'm very curious: what's the blue work tray? Where could I get one?
Thank you. Do you mean the blue working surface? It is a silicone soldering mat from Amazon.
Can you make instruction how to reuse parts of old keyboard for this?
Old oeyboards work totally differently. You cannot really reuse the parts.
Great, need "Esc" and "ctrl+Z"
This is really easily programmable
HI. Compliments. Nice project. Could you tell me what thread did you use for the print?
Thank you. No threads, only undersized holes. The screws are cutting their own thread.
@@kikihobbyrepair Sorry I expressed myself badly. I want to know what printing filament you used.
I like it very much, I would like to know the brand.
Thanks.
It is Prusament Galaxy Black.
great stuff sir.....
Thanks!
А возможно объединить оба устройства на одном микроконтроллере?
Yes, should be possible.
Nice project! Could you add a link to the Cherry MX clone buttons that you used?
Thank you. Link to the buttons I bought. www.amazon.de/gp/product/B07Q6YJ2GS/ref=ppx_yo_dt_b_asin_title_o03_s00?ie=UTF8&psc=1
Another great project. Thank you for sharing. If I wanted to amend the design slightly can you think of any reason why I couldn't use all 16 of the Arduino digital pins?
Thank you! You should be able to use them all. Are you using my code?
@@kikihobbyrepair Yes I will be using your code, with the necessary extra bit for the 16th key. The idea of hitting keys several times to invoke the alternative modes is really clever and will be very useful. I am currently looking at the case and frame layout whilst I wait for my Arduino and the keys to arrive...
You always make good things!!!
I will use this video as a reference to make my own keyboard. By the way, can you solve the problem about mouth mux of DIYSPACE mouse ver2?
Because I am Japanese, English might be bad. I'm sorry
Thank you. Sorry I did not have time to deal with the SpaceMouse since then but I did not forgot it :)
Thank you. I think about myself