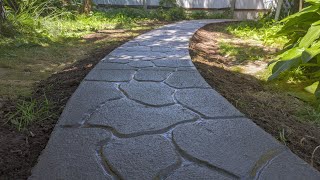
How to DIY large, irregular concrete natural looking stepping stones

Вставка
- Опубліковано 5 лют 2025
- NEW UPDATE video is now available! Follow this link for update - • DIY Concrete Stepping ...
**I've also added product links below to help you with your project!!**
My favorite DIY to date!! This neglected corner of my pool area was given new life by digging a sunken fire pit and surrounding it with these giant concrete stones. You won't believe how cheap and easy it was to make the molds and they were poured right in place on the ground. Check it out and let me know if you try a project like this yourself!!
I purchase everything locally but if you cannot locate the products I used here are some great options. **Product Links Below**
Vertical Blinds - amzn.to/3jBTRJh
Vertical Blinds - amzn.to/2VxrELg
Concrete Colorants - amzn.to/37tqMtH
Concrete Colorants - amzn.to/3CuHRC6
Yard Stakes - amzn.to/3xpJ7CA
Mixing Tub - amzn.to/3AqJtLj
Garden Hoe - amzn.to/3lHc3Uk
Rubber Gloves - amzn.to/2VyPS8f


as soon as I saw the vinyl blinds I was like " OMG that's GENIUS!!!" this is is the exact hack I've been looking for!!!! I can't even tell you how excited I am to try this!!
same here.. Ive been using boot trays for slate rocks but this will work so much better
The plastic bag trick is legit! I tried it and it turned out like a real stone!!
Texture with baggies? Blinds? Brilliant! Creative and great use of materials.
Thank you:)
This is easily one of the best cement tutorials i have seen and by a clear mile the most informative - fantastic video 👏🏼👏🏼👏🏼
Wonderful, so glad you liked it!
Agree! fabulous idea and just what I would like too! Kudos, Ursula!!!
A voice from Germany: this video makes me a little dissatisfied with myself! Why do others always come up with such great ideas? Seriously: a whole handful of ideas are brought together here and produce a stunning, highly professional result. Thank you for this wonderful tutorial.
I love your videos and creative ideas. I have a fire pit, and i will use this idea. I am so excited.
Thank you for wearing a dust mask! People need to know about the hazards of breathing cement dust.
Breathing in cement dust is horrible, even small amounts.
I teach ceramics. I know about mesothelioma and other respiratory diseases! They're HORRIBLE!
Always encourage everyone to wear a dust mask, at least.
Goggles and gloves are also very important.
Good luck.
Thanks!
Yes!! All very good points about the mask:) So glad you liked the video. Thank you!!
What a great idea. Then vinyl blinds as forms is genius. And the coloring & texturizing you did is beautiful.
I did something like this too. I picked a nice flat spot and mowed it really short. I dug out the shapes about 6 inches deep and added some metal mesh and fiber to help hold the concrete together. Plus a little dye. I filled all the holes with dry concrete and mixed in a little water until it was perfect. Some of the dirt mixed in with the concrete which made it look more natural. After a week of curing i dug out the rest of the dirt and added stones.
How many? How big? Could you give an approximate cost total? Thanks
@@flowerchild777 The concrete bigger stones i made were about pillow sized and different shapes with a 3 to 4 inch gap between them. Once they cured, i dug all the dirt out and filled with crushed concrete aggregate. Once the crushed aggregate is watered and tamped down it never moves. It locks everything in place. Plus it prevents weeds. The spot i did was under my steps that come down from my deck and under the deck. About 12x24 with 4 spots left open for my kiwi vines that go up 4 columns to the pergola over my steps and half the deck. I'm adding 4 more Kiwi vines right now and 4 magnolia vines this weekend. My backyard is a 1 acre food forest. I have hundreds of trees and bushes going all kinds of weird stuff. Trees: apple, pear, plum, cherry, and pawpaw. 30 or so in total. Bushes: Hazelnut, blueberry, raspberry, honeyberry, sea buckthorn, goumi berry, miracle berry, service berry, teaberry, nanking cherry, spice bush. about 100 bushes around the back yard and a couple thousand planted in the forest behind my house. Vines: Hardy Kiwi, and soon to be magnolia. I make close to 10,000 pounds of fruit nuts and berries a year now. I give most of it away though.
@@flowerchild777 If you lay out a piece of string for each shape it makes it easy to dig out the shapes you want. Leave a 3 to 4 inch space of dirt and grass border to keep them all separate. Once it cures pull out that border and fill with any kind of stones you want. Add lots of dye though to make a good contrast.
Do you think a person could use old household paint as a dye? Thanks. Your project sounds really good.
@@HeyWatchMeGo Nope. The dye you use in concrete is just acrylic paint. Laytex house paint will screw up the concrete
You have really awaken a vision for this little corner of my back yard where I buried my beloved Dog Chopper. I am going to transform it with this wonderful idea of yours. Thank you!
Why would you have a dog chopper!? how many dogs have you chopped and WHY???
@@AnxiousCowboy 🤭🤪
The vinyl blinds for molds is absolutely genius. Well done. I am not sure I would have been able to come up with that.
You can always just buy 200 acres of land and place your house wherever your want or learn to not spend 5 million dollars like sime dumb ass people and have thEir neighbors fkn their wives,.. sick mofos. I h8 fakes. Ok, .... that was a little much, I apologize. Peace and Love, ......
IF YOU SHAKE MY HAND AND LOOK ME IN THE EYE MOTHER FKR BELIEVE ME I WONT EVWR BE THE FIRST ONE MAKING A MOVE ON YOUR GIRL OR WIFE. RESPECT.
I knew it was possible and if I kept searching I'd find my creative inspirational hero! Brilliant idea that came out incredible and your video makes it so clear and easy to understand. Thank you so much for sharing this, it's exactly what I've been looking for!! I knew I was saving that stack of old blinds for something....I can't wait to do this! ❤️
There are natural oxide colors - black, browns, tans, yellows - that you can apply to make them look more like stone. In fact, you can mix some powdered color with a bit of white cement and white sand and put in a shaker with holes, like a salt shaker: Dry Shake.
I have ben looking for some ideas like this. This is the ONE, thanks for sharing!
I am a scant two minutes into the video. I can already tell that I freaking love your style. I do not feel talked down to information is being presented in a interesting and visual way. I’m hooked.
After looking at flagstone cost I knew there was another way actually many.Seen many videos on this and finished product by far is the best.Appreciate any diy’er willing to video and edit their work and post,as if the project wasn’t enuff then to show a how to video,it’s a lot of work.Honestly it’s to much for me to video,edit then post so I really do appreciate it.Sharing is caring
Great idea! You can use different materials from nature to decorate the surface of the stones: sea shells, pebbles, sand, pieces of charcoal, and even rusted pieces of iron sheet.
Thank you for showing PPE! There are so many videos of people mixing cement with no PPE…I cringe every time. Great job with the patio, gives me ideas for my own.
Wow! Vinyl Blinds-brilliant idea! I have old vinyl runners that I cut up for my stones ($0 because office was tossing them out). This involved a lot of cutting. Thrift stores often have vinyl blinds for $5 or less in my area and dismantling these would take almost no time and give approximately 60 slats to work with. Guess what I am doing later this month?! Thank you, Ursula, for sharing all of your great tips and techniques! I can hardly wait!!!
Great job! I did the same. I used a ring cut from a cardboard box. Then I covered ring with duck tape. I was able to change the shape with every stone. I did not soften the edges as you did. I planted bluestar creeper in the cracks. I did not color either. I would have liked to but just let nature do it naturally. It has been about 5 years now and they look like flagstone.
I am so fortunate to find this video..I have just moved to my own house and have little money left. This is a fantastic idea. I will try this on a small batch first. Thanks a million.
Oh I am so glad to see you did this! I have had the same idea for 3 years and have saved all the old vertical blinds to do it with. Now I know Im not crazy, it does work!!!!! What I had loved about the idea was being able to form each stone to fit into any area!! I cant wait to get out there and do it now! Your project turned out great!
I hope you can maybe post any 10 second video (leave a link here) to show us how it comes out. That would be terrific
OMG, you're genius I am trying to do in my yard like this but I don't know how to do until I saw your VDO thank you for sharing your ideas
You obviously don’t have a husband standing around asking you “what the hell are you doing now?” Fantastic job!
OMG...You know my husband!
Hahahahaaaaaa!!!!
Oh boy, can l relate to that!
Lol this is mostly my issue when I got ideas 🤭
Ditto…I get that “What’s She doin now? ” comment all the time! lol 😊
Nice, inexpencive & good technique, i like it, thank you have shared knowledge..👍👍👍
This is soo cool! I always thought about doing something like this and just never got around to it. Funny part is I have everything to do this in my garage! Thanks, you’re a genius;)
Wow you have inspired me big time. Ill add Some slate concrete stamps two color shades and sealer maybe? Cant wait. Thank you.
Thisss!!! This is what I have been searching for for weeks!!! I absolutely love it ! I knew there must be a cheaper way to do it !! THANK YOU !!
great, was searching proper molds for more "round" stones rather than the usual stuff. But your solution is way better. thx for sharing.
So glad! Good luck:)
Nice project. The "stones" look pretty realistic and since they were poured in place, they should be steady and also plenty strong.
I've been thinking of making borders for my yard but haven't seen anything simple that I thought would work for what I want to do (freeform). Now I have. The blinds are a great idea. I think I can modify your approach to do what I want.
Ziploc baggies will shape into brick sized "rocks"
Professional mason here - Amazing job! great idea, great execution, and great material selection. I want to try this in the next patio/backyard area I do!
You think this could hold a vehicles weight?? Im thinking about doing this as a driveway
@@mr_4point681 You might need gravel/sand underneath instead of dirt to avoid shifting. Maybe no gravel if your soil is clay base? Don't mean to speak on the masons behalf!
@@mr_4point681 What do they use to do driveways? Just make your 'stones' the same way, leave a little room at the top of the mold and top up with the cement mix, minus sand, stones, etc and add any colouring you want to get the stone slab look. It only has to be on the top.
@@mr_4point681 If the stone is less than 3 inches thick is too fragile for the weight of a car.
I have to raise a bathroom floor on concrete but 1". Is there a way to use this technique? And then seal?
Thanks
This is it! I saw one project where the fellow used metal strips to frame his stone, and I was trying to come up with something easier. Slats from blinds!! What a great idea. I start tomorrow!
Amazing idea with the blinds!!!! I just told my husband don't mind if we start missing some of our slats from our sliding door blinds. Lol
LOL!! Good luck:)
Good for you!! I love a challenging, less expensive DIY project.
Best way I've seen to make stepping stones so far.
Wow, they look great! Been looking for a way to make a path without structure to our new firepit. (our back yard can be "soggy"). Just me..(and a teenager), this is perfect. Thanks!
I am definitely inspired! The answer to my questions of "How, what, where and...........". Thank you so much for sharing this.
This is exactly what I need to make a path beside my house. Thank you.
VERY clever way of using the vinyl blinds to form your shapes! Well done!
Thank you!!
Hi, you are amazing! You made it look so simple. Love the way you used the blinds and shaped them into the shapes you wanted for the rock/slabs. You designed, sourced materials, made each rocks/slabs, layed out each rock to create the shape you wanted around your fire pit and "Hey presto," you made an incredible space to, chill out in your back garden where, you and all your loved ones can enjoy, Well done! Your Bespoke patio/fire-pit looks fabulous. You could make a lot of money and make your customers very happy. Thank you soo much for inspiring me. 💛 You should give yourself a pat on the back.
I used landscape edging for my forms since I had a ton laying around that I decided not to use to edge my artificial turf. But great idea on the blinds!
I also recommend using hardware cloth in the center of the stones because of their size
OUTSTANDING!!!! You did a great job for sure. I am stealing this idea for sure. The only thing i am going to do differently in to add a commercial grade landscape fabric down for vegetation control between the stones.
Great work, lady! Seems like you are THE pioneer in this innovation, as a few other UA-camrs have posted videos basically doing what you did 5 years ago!
wow, I think I found the solution to what I need to make my walkway, thanks you did a great job.
This is better for me as I can shape it to my needs
I’m gunna try this come summer time here
I keep coming back to this video since I found it ages ago
Thanks
This is beautiful, being 80 I would advise doing such projects early on in life!
"Amen" ... and wear knee pads.
I agree at 68 I am not as strong as I used to be nor do I wish to do further damage to my back! Yes, do it while you are young or have a helping hand around!
@@wyndiefeatherstone948
I totally agree.
Well, I’m 70 and I’m DEFINATELY DOING THIS... even if I only do one a day!
I’m 35 but bad mobility, in the middle of this project. Takes much longer than the average person but I’ll get there and get to say I done it myself ! 😊
Even if you could afford the stones instead this is so much easier because the most difficult part of doing this with actual stones is getting the ground to match the contours of the stone but here you are going to form the “stone” to the ground beneath which will decrease the stress on the stones when walking on or placing weight on them.
Impressive! Good job and smart use of the ugly vertical blinds 👍🏼👍🏼
Wow you just gave me a great idea and solution to my gardening project! Thanks for sharing this!
Oh my goodness...what a great job you did!!! I LOVE IT! I’m DEFINATELY going to do this when I get to that part of my garden process. THANKS so much fo the idea!!!!!👍
As natural as is possible with cast cement. Really authentic result. Good work.
You did a great job! Thank you for the video!!! I was wondering if vertical blinds could be used for molds. So excited that I found someone who has already done it! Blessed Be!!!!
This is great! I was looking for an idea such as this and my phone read my mind. Here is your video! Definitely will try this. Awesome!
That's interesting. Looking forward to seeing something else from you. Like how you took this on single handedly.
I love that you shared this video. I'm going to share it with my daughter, who is going to flip and want to do this project! Many thanks!
We are so impressed, we have been looking for ways to do our garden path in a nice but inexpensive way and this is perfect! Thank you so much for sharing your patio looks amazing 🤩 👍🏻
VERTICAL BLINDS!!! WOW!! I'm going to use your idea on my current project to shape the edges of a concrete table top. Thanks for sharing!
Yay!! So glad to help:)
Wonderful! Thank you for sharing this and for the well-done illustration of what you did to make it work and the info about time and suggestion of a practice "rock." Will definitely try it myself!
Best DIY concrete work on UA-cam. 👍
Love it! Planning to do this in a "Campground site" we are putting in by our RV area so our guests can stay in RV for privacy. Awesome idea! Great job! Thanks!
That was amazing. I will be using your diy method. Thank you so much for sharing. I think it is brilliant.
Glad it was helpful!
The stones look terrific. Have any of them cracked? I will make some but drop a layer of chicken wire in the center.
I just posted an update video after two years. No crack or chipping yet. I did use a "crack-resistant" concrete so if you don't have access to that I would reinforce with the wire:)
@@uniquelyursula87 excatly, if you use the fiber based concrete, it eliminated the need for wire!!! Looks great by the way!!
Oh good idea I might do some chicken wire mesh to help not to crack overtime
That's a Terrific idea.. Lasts longer I think. Thanx 4 the Tip!!
@@uniquelyursula87 where do you live? I'm in -20F Northern NH....everything cracks....lol
You can also purchase the 4 in wide rolls of insulation, roll out along the inside the edges of the molds, add the cement and when you remove the molds, the edges will be like real flagstones!
Can you explain which type of insulation please? Thanks!
Women are soooo creative!!! Thumbs up, girl!!!
Yassss!!! Thank you:)
Your project looks awesome! This 1 video has exploded into 100's of ideas that I can use in my own yard. Thank you for sharing!
That's awesome! :)
Whaaaat?! Genius! Totally doing this! Have had a huge stack of blind slats laying around forever because I thought I could ring plants with them to keep water in....but now...just fabulous! 😍😍🤩🤩😍😍🥳🥳🥳
Great idea! I need a natural looking path. This is the way to do that. Thanks!
I also had some idea for a birdbath and such. I can use this method as well.
Though I think I will put mesh in it to strengthen it a bit more.
I was looking into the moulds but they are uniformed and boring. I knew I’d come up with an idea but you beat me to it. This is exemplary !! Thank you so much for sharing your genius
I love this! Easy to understand instructions & a great result. I think I’ll try this.
Dear Ursula, thank you so much for sharing your great idea with us. I appreciate it so much, you will be rewarded for sure. Hugs from Sherie Rodrigues from Australia
Great idea for shaping stones, i've done concrete work for years and never considered this. Thanks!
@Kabir Flynn jerk
You are a Genius!!!!!! Thank you!!
I love this! i have to try it. could someone explain the curing process? never worked with concrete before.
I'm no concrete expert, but while I was researching this project there were many great youtubers and articles I found that explained pretty well...Curing = Hardening. As soon as all the water has evaporated out of the cement it will stop hardening. In order to get your concrete to reach it's full hardening potential, you need to keep it wet for as long as possible. I've read that some concrete can actually continue "curing" for up to 28 days IF the water does't evaporate out. SO, bottom line for anyone doing this project would be to keep the stones wet and covered from sun for several days. I had my hose hooked up and I went out several times a day and hosed the stones down. I also had them covered with a tarp. As an alternative however, there are products you can spray over the stones that will cure and would be a lot less work. I'm just cheap and liked the old fashioned approach myself. Hope this helps!!
Thank you so much for this video! I was wondering what it means to water cure for 5 days. If anyone knows, please let me know! Thank you!
Hi Amber, the concept is that the concrete will achieve it's full hardening process the longer you can keep the water from evaporating. So by keeping it wet and covered for several days you can slow down the water evaporation and therefore make it less prone to cracking a breakage. I used a water hose on the rocks a few times/day and kept them covered from sun exposure and I did this for 5 days. I honestly can't remember why I chose 5 days. I probably heard or read that somewhere but it seems to be a good amount. They are still holding strong. Hope this helps!! Cheers:)
@@uniquelyursula87 thank you for taking the time to explain that to me! My husband said we are going to practice on some this weekend! 🤗
WOW. Exactly what I was thinking about doing, and I saw through your video that it was possible. Thank you. You did a fantastic job.
Drill two large holes in the center of your home blade and your mixing will be easier and faster. Great project.
Great tip!! Thanks!
Hell yeah I'm doing this.
WOW!!! Amazing!! They look like they are real Gigantic rocks from a quarry somewhere!!! Amazing! Love love love this! God bless you always hon. :)
This is the most amazing video, I want to do this in my yard. How big a stone would one bag of concrete make, just so I have an idea. Thks for sharing, you are obviously very creative!! Good for you.
Thank you!! The smallest stones in my video were one bag.
Wonderful job. I just built my firepit yesterday. I may do this instead if what I planned.
Ursula, that looks amazing and ,as well as the enjoyment of creating something yourself,you must have saved yourself a fortune.I'll be giving this a go.
Very cool. I'm imagining a sage background color with pops of ocher and purple.
Fantastic job. Clear and concise video. Thank you so much for this!
WOW! amazing ! what a smart idea, I will be trying to implement same on my front yard . Thank you so much !!!
Wonderful! Hope it goes as well for you as it did for me!
Absolutely brilliant thinking outside the box.
Thank you. I am in Costa Rica. I had used old vertical blinds before in my garden in California. They serve a lot of purposes. It just happened that someone was throwing some away when I was trying to plan for a concrete pathway. Too bad I can’t post a pic. It turned out great!
Ό
Perfect! Exactly the look I am going for for my fire pit area, thank you :)
Very nice project! Clever use of vinyl blinds! This was lovely to watch.
FYI - Try no music. Much better to hear natural sounds.
This is brilliant. It is beautiful. I’m definitely going to be trying this.
I love how you did it with blinds!! So cool! I love working with what I have.
Beautifully made a work of art.
Absolutely beautiful thanks for sharing. Before the internet when I started on a similar project to make my own stones to save thousands of dollars the only resource available was the library. I thought up the project in my mind I did not use blinds which is brilliant, I used a bendable board they sell cut it up used rebar to hold the mold. Not even the books had anything close to this only how to mix sand and cement to then pore into a stepstone or similar. I ordered up a small dump truck of sand had it delivered and bought cement as I would prep the area build the molds then pore on my days off over several months since I was doing a huge area. I only wish what you did here was offered as an example back then there were no cell phones around either, what you have shared will greatly help others to inspire people, this to me is art what you did it also raises your property value and had to be so satisfying to accomplish. Congratulations. This is the first video I have seen of yours I hope you have others I will be looking for them. The tip about coloring the top layer is one of the best it makes each stone unique .
Great result, a friend of mine did a similar process for his backyard. He used a cement mixer so he could create larger versions of what you did and added rebar to keep them from cracking as they are all about 3-4 ft. Around
What concrete? Cannot seem to find fiber infused.
@@PeterPeter-fo8df he’s a concrete guy but I don’t think he used anything special just added the rebar for strength. If I remember correct he didn’t even create forms he let the concrete create natural shapes and worked the top to make it textured like rock
This is amazing! Thanks for sharing, I will be making lots and lots, a I have a huge area to cover.
Well done!!! Def going to do this in my backyard reno. How many pounds of concrete did you end up using? ... and approximate square footage? Thx 😊
It depends how Thick your stones will be...
you'll always need more than you think... LOL
Probably used about 30-40 60lb bags total. Each stone was a little different in usage so I lost track:)
Love the idea, will try it in the summer
I want to do this but smaller .
Great job, ma'am! The vinyl blind hack is very ingenious!
Definitely inspired to try this out!! I've been looking for some inexpensive ways to xeriscape, and this is perfect! Thanks
Look just like stone! Terrific job. Artistry!
Oh my GOD this is amazing. I love this. It looks so natural. How in the hell did you ever think of this? It's so brilliant. I'm doing this in my yard that's how much I love this.
I swear it's just that I'm cheap and didn't want to pay someone to haul in natural stone:) LOL! I'm glad you're going to do the same!! We've been so happy with it. Let me know how it goes.