segui tus paso y dejame decir que entendi todo a la perfeccion tanto que el diseño en el que estoy trabajando quedo super bien con el tutorial que diste, muchisimas gracias, mañana en mi trabajo lo volvere hacer y se que el resultado sera mucho mejor que de otros tutoriales que eh visto. thank you from mexico
THANK U ! I'm from Brazil, and i was really strugling to do this, never seen nobody talking about this here, people always said that i couldnt do any transparency effect on my shirts, but now I know how! Really gratefuul for your help
@@GuiProXD Although I am not the creator of the vid, I can try to explain what the difference would be when printing on a white shirt. It's kind of hard to explain over a comment so let me know if any of it confuses you and I am happy to elaborate. For some background info, in this example the reason why the original requestor was experiencing issues printing was because he made his art over a black background and removed it before sending to be printed. When graphics are printed using DTG/DTF on colored/black fabrics, the printer will print a base layer of white underneath your graphic because if ink was printed directly onto the fabric, the graphic colors would slightly blend in with the color of the fabric (for example: without white base layer, printing white onto a black shirt would result in a slight grey color). So, when the transparent graphic colors printed, they were being printed onto a white background (base print layer) instead of the black background the customer created their drawing on. If you wanted to complete this process for a white t-shirt, the process would start in the creation of the art itself. Instead of creating your art over a black canvas, draw over a white canvas to get a better idea of the results you are going to receive. Once the art is done and you're ready to follow the steps in the video, here is what would change: - At 3:55, You would fill with a white layer instead of black. - After you convert the halftone image mode to greyscale, (at 5:38) you would select the layer and press CTRL/CMD + I (or go to Image > Adjustments > Invert) this will convert all the blacks to whites & all the whites to blacks. - Follow the remaining steps the same way he does in the video. Hopefully this helps!! Again, let me know if any of it is confusing and I'm happy to try and assist. Have a great day :-)
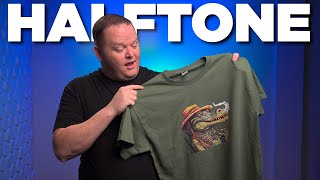
All I can say is WOW!😯 I was blown away at how good that looked on a black shirt. And I am sure the feel and breathability was phenomenal. As I was watching the video it did occur to me the same question that @Rymer1963 suggested. "What about use for colors other than black shirts". If you can make a vid on that it would be awesome. Other than that, thank you so much for sharing this tip and trick👍
Most RIP create the white layer but if yours doesn't check out this video at the 2:00 mark and we show you how to create and underbase layer: ua-cam.com/video/cUGVJx8CgZQ/v-deo.html
Great video - question. In another video of yours, you’ve added one more step of changing the blend mode to difference. Is this step necessary as I see you left it out in this tutorial?
Follow up to your question, if you're wanting to do a white halftone, the process is the exact same, you just need to invert the grayscale image (Cmd/Ctrl+i) before you use levels, and then convert to bitmap. Just remember, black is the color that's going to be removed while adjusting levels before converting to bitmap.
Wait but all you did was put a halftone mask over the semi transparent areas of the image. Those colors are still semi transparent and that's why the print still had smokey fade outs instead of actual red halftones that fade to black. I watched the whole thing thinking finally someone was showing how to convert semi transparent colors to proper halftone
@@DTFSuperstore ah I see. Maybe this is just a difference in preference/technique but I feel like it would be better to try to fill semi transparent "smoky" areas with the same color as the "smoke" so it's solid and still its original color. Then you just rely on the halftone effect to create the smoky look without trying to print blackish dots on a black shirt.
I've been doing halftones for a while now and it works great as long as I delete the black and put it on a black shirt, which is 90% of my orders. My question is is there a way to do it if it goes on a shirt color other than black? I've halftoned the whole CYMK layers and the image comes just as thick as not halftoning at all.
@@DTFSuperstore Id really like to see this too. I came here looking for that. I need to do half toning for transparent pixels and can't get past the adding colour behind it to harden the pixels because I need more than one colour. Your vid was a great help otherwise.
There's a vid on here somewhere explaining how to do a halftone DTF print for white shirts, type in DTF halftone for white shirts it's a few years old but should still be here.
@@clarenceroberts8876 there is a way to halftone that can be printed either black and white colors, and even other shirt colors too. Just couldnt find any tutorial about it :( we have a printing provider that can do that but wouldnt share how they did it as to gatekeep as well their method.
great training but the printed shirt appeared to show a lot of underbase - wish you would spend more time showing final and actually being super picky and describing where you could have improved.... But love the videos and great - clear instructions - awesome job!
Excellent, I've done it, only problem is I've lost abiit of the colour in it, how do I top up the colour bk the original plz .colour has alot more black in it
Looked into Krita and it looks like a cool art tool however it doesn't look like doing a halftone color knock out is possible in the software. We know not everyone has access to Photoshop and Illustrator but they are the design industry standard and the most capable which is why we do most of our tutorials with those softwares.
@@DTFSuperstore Thanks for taking the time to answer. I guess I'll keep looking for other tutorials, and find ways to adapt techniques to Inkscape, Scribus, and Krita. Unfortunately, as much as they are industry standards, they remain cost-prohibitive (and in some areas, not available) unless the software is pirated, which is not ideal. Have a blessed day!
#1 what's the reason for merging the layers with the black background? #2 what would I do differently for halftoning on a colored shirt where I want black to print, like say a royal shirt?
Hi @Pat_S Thanks so much for your questions! #1 When half-toning using this method, you're converting the image to bitmap in the second document, which is going to merge your graphic into a single layer anyways (Bitmap Graphics aren't capable of having transparency, and therefore can't have layers). #2 We actually just recently made a video about half-toning for neon glows and drop shadows on the channel that I think will help out quite a bit with your workflows. I see that you've already seen the "How to Halftone Any Color Shirt" Video. If that didn't help with getting halftones for color shirts, We've got you covered, I'll get a UA-cam Short up ASAP to show how to halftone on a royal blue shirt while still printing black.
When I click ctrl v on the mask it doesn’t get fit , It will copy smaller than the original size of the design , and when I try the tranformation , it won’t give me that transparency of the design , do you know what should I do ? 🙏🏻
@@DTFSuperstore I have an issue in printing There is alot of lines in the prints after 8 months of use. I don't know what should I do to fix this problem.
i would love to use this artwork as a test for many printers to show results and compare - perhaps using lower res than 300 and not as stark a knock out?
I have to be honest, at first I was confused because spot colors are a screen printing term, all digital printing uses process colors. Then I did some research and found out that some rip softwares require you to manually put your white layer that is a spot color in photoshop. so...once you've done all the steps in the video. right click on the layer and convert to smart object, then hold down command or ctrl and click on the layer to select all the pixels. then go to the channels panel, click on the hamburger stack in the upper right corner of the panel and select "new spot color"
Hey, have you ever tried the DTF white backing ink with Sublimation Inks for the other colors? Was just curious how its come out. The DTF inks look so thick to me, but of course, to print on black and cotton you need the DTF white, but was thinking using Sublimation Ink for the other colors might cut down on the thick look. Was just looking to have the look more closer to sublimation where the ink looks more like part of the material instead of looking like something that's just sitting on top of the material.
that's an interesting idea, I think you might have some issues with the white and the CMYK inks bonding together. Though the CMYK Inks do play a factor in the "thicker" feeling of DTF transfers it is the White Ink and adhesive powder that play the primary role in a transfer feeling thicker. In my experience many DTF producers are using far more ink than necessary overall. Finding that Goldilocks zone where theres enough White ink to protect the printed colors from the garment color but not more than you need to is critical to getting a better handfeel.
I did everything as you showed in this video, but when printing on small dots the white base is not printed. Could you create a video where we can see how to print this halftone image?
You'll need to reduce your white underbase choke in the RIP software. you will lose some of the smallest halftone dots but it will not negatively effect the final result.
No, but sometimes yes...one of the most challenging things in this industry is that one word means multiple things depending on the program, person or technology you are working with. As a graphic designer first, raster is any pixel based artwork (ie jpg, png, tiff) In CADLink Raster and halftoning are in the same edit window. Hope that helps.
@DTFSuperstore Is DTF Fixers a thing of the past please or have there been new videos since this one from a year ago, or does the chap in the video have his own channel? Thanks
Hi, can i ask a question? Instead of creating a new document and put it in Bitmap and Grayscale, can i use the halftone pattern in the filter gallery? is it doing just the same thing? I'm new in this printing world and trying to start my own clothing line
It is definitely not doing the same thing and you won't have the ability to finesse the results. The filter gallery does more of just a stylizing of the image not a knock out for printing purposes.
It's a topic we will cover in future videos, but often has to do with the fumes realeased during curing. Do you have an adequate way to remove fumes in your workspace? Thanks for watching!
TIF files do not have transparency so you could never do a color knockout. No, the reason we try to make an aread full white is so that it doesn't have any halftone dots that reduce the vibrancy. you could leave the levels as is it's just going to create more halftone dots.
This may seem like an weird awkward question and we should definitely just test it out but we are a bit on a time constraint. We currently have an artwork that is made with a halftone pattern to make the artwork seem more like a print. We do not like the thick paint that comes with a full DTF print, are we able to use the half toning technique on top of this visual half toning effect you showed in the video around 2:15...?
In our experience editing in CMYK on a screen that is RGB then exporting to a file that is RGB then having the rip software convert it to CMYK can give some inconsistent and frustrating results. Fewer conversions seems to be better.
hi! after control V, when I go to load selection for channeling, why is it not selecting the image only, but also selecting the entire transparent square?
for the halftone to work right you can't do it on a graphic that has any semi transparent pixels. you need to put a background behind the graphic then use the halftone to remove the background and have the fades work properly...I hope that makes sense.
It is a little different, basically you just invert the layer mask to get rid of the white and the levels adjustment would be reversed. It's actually much easier on white as the underbase is white and thats usually what causes the problems with these kind of images.
This only works for black shirts you want to knock out the black, right? For white or other light color shirts how far do you tweak the levels in Photoshop and do you go back to your mask and fill in with white, the parts you don't want knocked out and just leave the edges?
for white shirts follow all of the steps but add an invert (cmd i or ctrl i) after grayscale before levels adjustment. for colored shirts watch this video: ua-cam.com/video/7rm6iT0Hcmk/v-deo.html
@@DTFSuperstore Doesn't the "difference" color blend mode to a white background then ctrl+E to both that white background and image to unite, then grayscale it provide the same effect?
@@DTFSuperstore Thanks. Do you have any videos that cover that? Also for gray(light and/or dark) backgrounds or shirts, what's the best optimal practice?
I wouldn't recommend halftoning an photo that hasn't been stylized in some way. Halftones around faces can really sour the overall look of the graphic. Our brains register faces a certain way and it'll look "off" if not handled properly.
@@DTFSuperstore there aren’t any faces in it it’s just a photo of a skyline basically I was just trying to find a way to make it feel lighter on the shirt itself
It's totally normal that some halftone dots get left behind on the film however it's likely your choke setting is too high on your rip software. If you're choke setting is more than 3 pixels you'll likely lose any dots that are 4 pixels or smaller. You definitely need your printers alignment to be dialed in to do halftones.
Yes, this will work with a white shirt you'll just be inverting some of the setting like the levels and the masks. We'll try to do one on a white shirt.
Hard to know exactly whats going on but in the layers panel there is a lock icon on some layers...all the way to the right. Click on the lock icon to unlock it. Go ahead and email us a couple pictures of whats going on and we might be able to get to the bottom of it. jeremy@dtfsuperstore.com
Great question! Don't have the answers for that yet BUT we are currently working on a video about using non-Photoshop editing softwares to gage their compatibility with DTF!
Is it possible to halftone this that doesnt have to be specific for white and black shirt? How about halftone the design that suitable for any color of shirts.
your rip software should take care of it. if it doesn't you'll need to create a spot color and save the file as a TIFF. ua-cam.com/video/cUGVJx8CgZQ/v-deo.html


OMG...the best TUTORIAL!!!
I WAS STRUGGLING WITH THIS VEVY ISSUE. THANK YOU SO MUCH!
You are very welcome
Where have you been for all my DTF printing career. I love your content. thank you so much!! You actually helped me improve my project.
"I've been here the whole time". JK glad you found us and glad we could help.
@bayrem7 Seriously thinking the same! 😂 thank you @dtfsuperstore
This video is very useful to me, so thank you very much!
The way you explain these things so well, you'll be a very good PS GURU if you do.
Thanks, I'm more of a specialist than a Guru. I can do a few thing really well :)
segui tus paso y dejame decir que entendi todo a la perfeccion tanto que el diseño en el que estoy trabajando quedo super bien con el tutorial que diste, muchisimas gracias, mañana en mi trabajo lo volvere hacer y se que el resultado sera mucho mejor que de otros tutoriales que eh visto. thank you from mexico
gracias por el comentario. ¡Estamos muy contentos de que haya funcionado bien para ti!
Great 🎉, I've learned something good today.
Sending love from ghana ❤❤😊
Thanks for watching
You are the best bro.
THANK U ! I'm from Brazil, and i was really strugling to do this, never seen nobody talking about this here, people always said that i couldnt do any transparency effect on my shirts, but now I know how! Really gratefuul for your help
You are most welcome! Glad we could help you make some of your ideas a reality! Tchau!
@@DTFSuperstore Is there any video of you teaching how to do this on a white t shirt?
@@GuiProXD Although I am not the creator of the vid, I can try to explain what the difference would be when printing on a white shirt. It's kind of hard to explain over a comment so let me know if any of it confuses you and I am happy to elaborate.
For some background info, in this example the reason why the original requestor was experiencing issues printing was because he made his art over a black background and removed it before sending to be printed. When graphics are printed using DTG/DTF on colored/black fabrics, the printer will print a base layer of white underneath your graphic because if ink was printed directly onto the fabric, the graphic colors would slightly blend in with the color of the fabric (for example: without white base layer, printing white onto a black shirt would result in a slight grey color). So, when the transparent graphic colors printed, they were being printed onto a white background (base print layer) instead of the black background the customer created their drawing on.
If you wanted to complete this process for a white t-shirt, the process would start in the creation of the art itself. Instead of creating your art over a black canvas, draw over a white canvas to get a better idea of the results you are going to receive.
Once the art is done and you're ready to follow the steps in the video, here is what would change:
- At 3:55, You would fill with a white layer instead of black.
- After you convert the halftone image mode to greyscale, (at 5:38) you would select the layer and press CTRL/CMD + I (or go to Image > Adjustments > Invert) this will convert all the blacks to whites & all the whites to blacks.
- Follow the remaining steps the same way he does in the video.
Hopefully this helps!! Again, let me know if any of it is confusing and I'm happy to try and assist. Have a great day :-)
Thank you so much! really appreciate it. you are awesome@@everetstewart2518
@@GuiProXD you basically just invert you levels adjustments and the layer mask and it should work perfect
All I can say is WOW!😯 I was blown away at how good that looked on a black shirt. And I am sure the feel and breathability was phenomenal. As I was watching the video it did occur to me the same question that @Rymer1963 suggested. "What about use for colors other than black shirts". If you can make a vid on that it would be awesome. Other than that, thank you so much for sharing this tip and trick👍
Thanks! Yeah we've been working on halftoning on other colors and I am proud to announce we have a good work flow for it!!! Video is in the works.
@justanoob7030 Ask and you shall receive! ua-cam.com/video/7rm6iT0Hcmk/v-deo.html
You're a genius! Thank you for the well thought out tutorial! Just what I needed :)
It's what we are here for! Glad it was useful to you.
Wonderful video! Best halftone video I have seen! Thank you!!
Wow, so glad you enjoyed it!
Incredible video. You have talent and skill! Thank you posting. We’re just getting started with our M&R Quatro.
Awesome! Best of luck as you jump into this industry!
Thanks for the vid! Can you please show us how did you add the underbase for this artwork as well!
Most RIP create the white layer but if yours doesn't check out this video at the 2:00 mark and we show you how to create and underbase layer: ua-cam.com/video/cUGVJx8CgZQ/v-deo.html
Thank you!!!!!!❤
this is the most helpfull video I am lucky to find you so quickly :) THANK YOU
You are so welcome! Let us know if there are any other topics that you would like us to cover in our videos!
Wow! This is so helpfull, just what I needed, thank you for this tutorial)
Glad it was helpful!
Dude, amazing tutorial! Thank you! 🙏
My pleasure! Glad you found it helpful
Very usefull video, i was about to make a new desing but your video saved my desing and time
Awesome! So glad to hear it helped!
nice and clean when explaining.....great....!!!
So nice of you, thanks for watching.
I just want to say thank you 🙏
You are most welcome, it is our pleasure!!
Great simple yet effective tutorial, keep it up
Glad it helped, Thanks!
Very clever. Thank you very much from Germany
Thank you very much!
Great video - question. In another video of yours, you’ve added one more step of changing the blend mode to difference. Is this step necessary as I see you left it out in this tutorial?
Great video!!! Took me about 6 watches to get it down packed. Is it possible to do a short video to show us how it’s done on a wait shirt?
It definitely takes some practice. Maybe...I'll try to find some time to make that.
Follow up to your question, if you're wanting to do a white halftone, the process is the exact same, you just need to invert the grayscale image (Cmd/Ctrl+i) before you use levels, and then convert to bitmap.
Just remember, black is the color that's going to be removed while adjusting levels before converting to bitmap.
Thanks...this really helped with gradients and transparencies.
You're very welcome!
EU TE AMO CARA!!!!!
nós amamos você também
Thank you.. I got it after several attempts.. Thank you Lord Jesus..
It does take some practice!
Wait but all you did was put a halftone mask over the semi transparent areas of the image. Those colors are still semi transparent and that's why the print still had smokey fade outs instead of actual red halftones that fade to black. I watched the whole thing thinking finally someone was showing how to convert semi transparent colors to proper halftone
you have to put the shirts color as a background layer like we did in this video and this one too: ua-cam.com/video/7rm6iT0Hcmk/v-deo.html
@@DTFSuperstore ah I see. Maybe this is just a difference in preference/technique but I feel like it would be better to try to fill semi transparent "smoky" areas with the same color as the "smoke" so it's solid and still its original color. Then you just rely on the halftone effect to create the smoky look without trying to print blackish dots on a black shirt.
@@sh0rtaznant Can you explain a bit more about what you said? Thanks!
this is the best tutorial
Thanks! it's our pleasure!
Thanks for the video!
Our pleasure. Thanks for watching!
thank you from iran
Our pleasure.
I've been doing halftones for a while now and it works great as long as I delete the black and put it on a black shirt, which is 90% of my orders. My question is is there a way to do it if it goes on a shirt color other than black? I've halftoned the whole CYMK layers and the image comes just as thick as not halftoning at all.
yes...it gets a little convoluted and it's really graphic dependent but we'll see if we can come up with something to share.
@@DTFSuperstore Id really like to see this too. I came here looking for that. I need to do half toning for transparent pixels and can't get past the adding colour behind it to harden the pixels because I need more than one colour. Your vid was a great help otherwise.
There's a vid on here somewhere explaining how to do a halftone DTF print for white shirts, type in DTF halftone for white shirts it's a few years old but should still be here.
@@clarenceroberts8876 there is a way to halftone that can be printed either black and white colors, and even other shirt colors too. Just couldnt find any tutorial about it :( we have a printing provider that can do that but wouldnt share how they did it as to gatekeep as well their method.
@rymer1963 Ask and you shall receive! ua-cam.com/video/7rm6iT0Hcmk/v-deo.html
nice tutorial love sir
Thanks!
Amazing video, thank you so much!
Thanks you, it's our pleasure!
Great info!
Thanks for watching!
great training but the printed shirt appeared to show a lot of underbase - wish you would spend more time showing final and actually being super picky and describing where you could have improved.... But love the videos and great - clear instructions - awesome job!
The final looked great compared to the original person’s sample that was being addressed
thank you sir you make high level looks easy
You are welcome
Great. Please can you choke this in photoshop for the white underbase?
Excellent, I've done it, only problem is I've lost abiit of the colour in it, how do I top up the colour bk the original plz .colour has alot more black in it
Love this, super useful! Please do a tut for Krita and other free open source tools! :) Some of my clients can't afford Photoshop.
Looked into Krita and it looks like a cool art tool however it doesn't look like doing a halftone color knock out is possible in the software. We know not everyone has access to Photoshop and Illustrator but they are the design industry standard and the most capable which is why we do most of our tutorials with those softwares.
@@DTFSuperstore Thanks for taking the time to answer. I guess I'll keep looking for other tutorials, and find ways to adapt techniques to Inkscape, Scribus, and Krita. Unfortunately, as much as they are industry standards, they remain cost-prohibitive (and in some areas, not available) unless the software is pirated, which is not ideal. Have a blessed day!
We are the manufacturer of DTF Printer machine, we are the factory,your video is good!
thanks!
Awesome video thank you!
Glad you liked it!
thank you sir..i've wasted 5 shirt already printing halftone with failure until i found this..
testing can be super frustrating. Glad you found us!
thank you for this tutorial!
You're so welcome! Glad it was helpful.
nice!, helped me with a flaming skull
awesome!!
Thank you Sir...
Super helpful thank you so much
Glad it was helpful!
Great video. Does this method work with backgrounds that are not black?
Yes! Check out this video: ua-cam.com/video/7rm6iT0Hcmk/v-deo.html
#1 what's the reason for merging the layers with the black background? #2 what would I do differently for halftoning on a colored shirt where I want black to print, like say a royal shirt?
Hi @Pat_S
Thanks so much for your questions!
#1
When half-toning using this method, you're converting the image to bitmap in the second document, which is going to merge your graphic into a single layer anyways (Bitmap Graphics aren't capable of having transparency, and therefore can't have layers).
#2
We actually just recently made a video about half-toning for neon glows and drop shadows on the channel that I think will help out quite a bit with your workflows. I see that you've already seen the "How to Halftone Any Color Shirt" Video. If that didn't help with getting halftones for color shirts, We've got you covered, I'll get a UA-cam Short up ASAP to show how to halftone on a royal blue shirt while still printing black.
Can you do halftone for a family portrait? 🤔 If so, maybe you can show us? 🤞
We've got something up our sleeves for you!
So helpful 💯
All the best
We were really hoping this one would help a lot of DTF user out!
You are awesome
Thanks!
When I click ctrl v on the mask it doesn’t get fit , It will copy smaller than the original size of the design , and when I try the tranformation , it won’t give me that transparency of the design , do you know what should I do ? 🙏🏻
Hi I can’t seem to find the choke option in my rip program (main top dtf ) are there any other names the choke option it is known by?
Not sure on Main Top. Choke is the most common term in DTF but Trapping or Trap might also be used as that is a printing industry term.
best best video im in love with u now THANK YOU :)
Thanks but I'm married 😂😂😂😂😂. You are most welcome!
Thank you
Our pleasure!
@@DTFSuperstore I have an issue in printing
There is alot of lines in the prints after 8 months of use.
I don't know what should I do to fix this problem.
i would love to use this artwork as a test for many printers to show results and compare - perhaps using lower res than 300 and not as stark
a knock out?
Great video 👌👌👌
Thank you 👍
dude, how add spot chanel???????????
I have to be honest, at first I was confused because spot colors are a screen printing term, all digital printing uses process colors. Then I did some research and found out that some rip softwares require you to manually put your white layer that is a spot color in photoshop. so...once you've done all the steps in the video. right click on the layer and convert to smart object, then hold down command or ctrl and click on the layer to select all the pixels. then go to the channels panel, click on the hamburger stack in the upper right corner of the panel and select "new spot color"
@@DTFSuperstore ❤
How do I get a hold of that one piece shirt ?
Hey, have you ever tried the DTF white backing ink with Sublimation Inks for the other colors? Was just curious how its come out. The DTF inks look so thick to me, but of course, to print on black and cotton you need the DTF white, but was thinking using Sublimation Ink for the other colors might cut down on the thick look. Was just looking to have the look more closer to sublimation where the ink looks more like part of the material instead of looking like something that's just sitting on top of the material.
that's an interesting idea, I think you might have some issues with the white and the CMYK inks bonding together. Though the CMYK Inks do play a factor in the "thicker" feeling of DTF transfers it is the White Ink and adhesive powder that play the primary role in a transfer feeling thicker. In my experience many DTF producers are using far more ink than necessary overall. Finding that Goldilocks zone where theres enough White ink to protect the printed colors from the garment color but not more than you need to is critical to getting a better handfeel.
I did everything as you showed in this video, but when printing on small dots the white base is not printed. Could you create a video where we can see how to print this halftone image?
You'll need to reduce your white underbase choke in the RIP software. you will lose some of the smallest halftone dots but it will not negatively effect the final result.
Sir,is raster and halftone same?
Please explain more about them please
No, but sometimes yes...one of the most challenging things in this industry is that one word means multiple things depending on the program, person or technology you are working with. As a graphic designer first, raster is any pixel based artwork (ie jpg, png, tiff) In CADLink Raster and halftoning are in the same edit window. Hope that helps.
Please explain ain more about halftone angle and dots number and rastern
Hi, we have added new Halftone videos we think you may find useful on our channel since posting this. Hope it's helpful and thanks for watching!
@DTFSuperstore Is DTF Fixers a thing of the past please or have there been new videos since this one from a year ago, or does the chap in the video have his own channel? Thanks
Jeremy is still here and we will have more videos in the future. He's just helping on some new and exciting products launching soon.
What about halftone on white shirts? I haven't seen a tutorial on it.
With white you basically just invert any of the steps that involve black and white.
@@DTFSuperstore I was kind of thinking that
Hi, can i ask a question? Instead of creating a new document and put it in Bitmap and Grayscale, can i use the halftone pattern in the filter gallery? is it doing just the same thing? I'm new in this printing world and trying to start my own clothing line
It is definitely not doing the same thing and you won't have the ability to finesse the results. The filter gallery does more of just a stylizing of the image not a knock out for printing purposes.
What do u do if it's going on white and you need to keep the blk
Great
Awesome!
Hello, I would like to know if you can show how to do all this but in procreate ?
we are not aware of a way to halftone in procreate. At this point the only way to edit a design like this is with photoshop.
Any video on water spots or what people call moisture spots in the prints
It's a topic we will cover in future videos, but often has to do with the fumes realeased during curing. Do you have an adequate way to remove fumes in your workspace?
Thanks for watching!
Do we suppose to vectorize the image before we do all of this?
No need to vectorize as this is a raster workflow.
I don't have Photoshop. Is there a way to do this in the print software?
yes, but the controls are a bit limited and you'll find finessing your results to be a little troublesome.
Hello. Save in Tif?
Is it necessary to make a white spot?
Thank you.
TIF files do not have transparency so you could never do a color knockout. No, the reason we try to make an aread full white is so that it doesn't have any halftone dots that reduce the vibrancy. you could leave the levels as is it's just going to create more halftone dots.
@@DTFSuperstore but when saving in Tif there is a checkbox - "Save in Transparency"
@@nikitin4600 you are correct, however some RIP softwares don't recognize the transparency in TIF files
How to get brightly colored half tones when using the CMYK color system?thanks
This also works on sort of colored smoke effect on the art?
Yes, anything that would create semi-transparent pixels or fades to black
This may seem like an weird awkward question and we should definitely just test it out but we are a bit on a time constraint. We currently have an artwork that is made with a halftone pattern to make the artwork seem more like a print. We do not like the thick paint that comes with a full DTF print, are we able to use the half toning technique on top of this visual half toning effect you showed in the video around 2:15...?
The thick paint feeling is because there is too much ink being used. try reducing your white underbase.
why RBG and not CMYK?
In our experience editing in CMYK on a screen that is RGB then exporting to a file that is RGB then having the rip software convert it to CMYK can give some inconsistent and frustrating results. Fewer conversions seems to be better.
hi! after control V, when I go to load selection for channeling, why is it not selecting the image only, but also selecting the entire transparent square?
for the halftone to work right you can't do it on a graphic that has any semi transparent pixels. you need to put a background behind the graphic then use the halftone to remove the background and have the fades work properly...I hope that makes sense.
Thank you for the video. It's very helpful. What if the image is going on a red shirt or something other than black?
We are working on that...we just came up with a really good workflow recently.
Outstanding! I can't wait to see it. Thanks again.@@DTFSuperstore
@usaDTFTransfers Ask and you shall receive! ua-cam.com/video/7rm6iT0Hcmk/v-deo.html
Is the process different for white shirt? Thank you very much!
It is a little different, basically you just invert the layer mask to get rid of the white and the levels adjustment would be reversed. It's actually much easier on white as the underbase is white and thats usually what causes the problems with these kind of images.
how to do halftone on white shirt? looking forward to video!Thanks
Invert the layer mask. Thats the simple answer but half-toning is very design dependent.
This only works for black shirts you want to knock out the black, right? For white or other light color shirts how far do you tweak the levels in Photoshop and do you go back to your mask and fill in with white, the parts you don't want knocked out and just leave the edges?
for white shirts follow all of the steps but add an invert (cmd i or ctrl i) after grayscale before levels adjustment. for colored shirts watch this video: ua-cam.com/video/7rm6iT0Hcmk/v-deo.html
@@DTFSuperstore
Doesn't the "difference" color blend mode to a white background then ctrl+E to both that white background and image to unite, then grayscale it provide the same effect?
@@E-D-J technically but more steps than what I've outlined above.
@@DTFSuperstore
Thanks. Do you have any videos that cover that? Also for gray(light and/or dark) backgrounds or shirts, what's the best optimal practice?
Do you have a recommendation for settings for a photo to be printed dtf using this method for a softer hand? Frequnecy angle etc
I wouldn't recommend halftoning an photo that hasn't been stylized in some way. Halftones around faces can really sour the overall look of the graphic. Our brains register faces a certain way and it'll look "off" if not handled properly.
@@DTFSuperstore makes sense ok thank you.
@@DTFSuperstore there aren’t any faces in it it’s just a photo of a skyline basically I was just trying to find a way to make it feel lighter on the shirt itself
did you use black powder?
no, we use white adhesive powder
is there an action or plugin that automatically does this?
Not yet...we might be working on a little something. We'll do a video when it's ready for release.
I have had terrible results with halftoning my designs on dtf. When peeling off my paper, lots of the halftone dots come off with the peel.
It's totally normal that some halftone dots get left behind on the film however it's likely your choke setting is too high on your rip software. If you're choke setting is more than 3 pixels you'll likely lose any dots that are 4 pixels or smaller. You definitely need your printers alignment to be dialed in to do halftones.
and white tshirt?
Yes, this will work with a white shirt you'll just be inverting some of the setting like the levels and the masks. We'll try to do one on a white shirt.
please do it with raster! thanks
what do you mean do it with raster? is that a specific software?
i am wondering if this is directly printed from photoshop or from rip software, if from rip software what format is it saved in photoshop
print from rip software. the file type you export depends on your RIP program. We use CADLink Digital Factory 11 and PNG's or PDF's are best.
My image is still lock and won’t let me paste?? Help
Hard to know exactly whats going on but in the layers panel there is a lock icon on some layers...all the way to the right. Click on the lock icon to unlock it. Go ahead and email us a couple pictures of whats going on and we might be able to get to the bottom of it. jeremy@dtfsuperstore.com
Does this process works well with white toner dtf since it's process different than dtf
Yes, it will work with white toner.
I tried your steps but I seem to can't get it right I don't know what I'm doing wrong and I'm doing step by step
does this work for DTG as well?
it should
Can this be done with Affinity?
Great question! Don't have the answers for that yet BUT we are currently working on a video about using non-Photoshop editing softwares to gage their compatibility with DTF!
Is it possible to halftone this that doesnt have to be specific for white and black shirt? How about halftone the design that suitable for any color of shirts.
We're working on it!!
@kirk1016 Ask and you shall receive! ua-cam.com/video/7rm6iT0Hcmk/v-deo.html
your way, the file still has many pixels array and the print is still not soft
we have the shirt on display in our showroom in Gilbert, you should come feel it for yourself. i can assure you it is quite soft.
Do you have a better way? Would love to hear
itd dosnt work on me freq 33 angel 22 round per inch
What step is giving you trouble?
how do i print white over the colour
your rip software should take care of it. if it doesn't you'll need to create a spot color and save the file as a TIFF. ua-cam.com/video/cUGVJx8CgZQ/v-deo.html