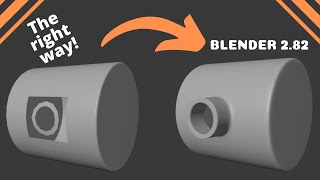
Blender Hard Surface Modeling | Slice Operation

Вставка
- Опубліковано 25 чер 2024
- Learn about the uncommon, yet powerful slicing operation in Blender. The slicing operation combines a Difference Boolean with an Intersection Boolean to create a narrow cut in your mesh. This is especially useful for hard-surface designs.
►► Enroll in the most popular (and free) hard surface modeling course - www.blenderbros.com/jumpstart
►► The Hard Surface Academy - www.blenderbros.com/academy
---------------------------------------------------------------------------------------------------------------------------------------------
SOCIALS:
💻 Our Blender courses - www.blenderbros.com/
☎️ Discord - / discord
🖼️ Instagram - / blenderbros3d
CONTACT:
📱 Inquiries/questions - info@blenderbros.com
►► Enroll in the most popular (and free) hard surface modeling course - www.blenderbros.com/jumpstart


Hey guys!
First of all, thank you for all the support on this video. This one really seemed to help a lot of you :)
Second of all, I've been getting a lot of comments mentioning to add a solidify modifier to the cutter object. I am aware that this technique works equally well, and there are tons of different ways to achieve the same result, but the point of the video was to facilitate the intuition behind what the slice operation is actually doing, hence why I used two different cylinders to demonstrate what is actually happening. I think it's very important to understand the behind-the-scenes before hopping in to more efficient-add ons like Hard Ops and Boxcutter. If the way the operation actually works doesn't interest you, then just press 'CTRL- /' and call it a day :)
Thanks for all the feedback and extra tips, that's what this community is all about! ;)
- Josh
After extensively trying both techniques I'd say the two booleans are necessary to keep the bevel working in a clean way. Using the solidify makes the model go crazy applying bevel modifier, it's certainly faster for some slicing, engraving, and also flat decals, but no way you can make a panel as neat as using two separate booleans!
Well done!
That statement seems like a get out of jail free card for yourself yet you mention nowhere in the video that this is the reasoning of making it. You even encouraged using this workflow which is not optimal and simply messy.
"facilitate the intuition behind what the slice operation is actually doing" This video teaches you nothing as to how the slice operation works other than using a poor method to do so and encouraging users to copy it. There really is no "behind-the-scenes" to adding a solidify modifier to a mesh. And these more efficient addons you're talking about use the solidify workflow to accomplish such tasks.
All you gotta do is own up to your mistakes man, excuses won't get us nowhere. Anyways, we all learn and carry on.
ooooor you can use free addon Bevel after Boolean (BaB).
@@AnimaStudio88 I actually found out about this add on a few weeks after making this video. Super useful and wish I'd known about it beforehand :)
@@bobross9370 Oh the fucking irony Bob Ross being a righteous dickhole digging for the wound. Remember there are no mistakes.
Ctrl and / = slicing
Ctrl and + =Union
Ctrl and - =difference
ctrl and * = intersect
Edit- you can add shift to the commands to apply the modifiers
-you need loop tools addon
thnx
@@onimanuyt6744 :)
Ctrl and + just zooms in viewport
you need loop tools addon
it comes with blender
@@vinodmehra188 BoolTool only works with the NUMPAD +/- keys.
Great video!
Thank you Jared!
A better way is to use a Boolean Modifier set to Difference on the Cylinder and a Solidify Modifier on the cube. I think that way its way faster and when you need something to fix you just have to move the cube
Thank you for sharing this !
Your tutorials are some of the most helpful I've ever seen on UA-cam, thank you so much for sharing all these tips!!
I appreciate you a ton! Thank you so much.
As a blender beginner this video took me a leap forward.
Thank you !
Thanks Miniwar; so glad it helped you!
Just add a solidify modifier on the cubes with a low value and apply it. Then you won't need 2 cylinders!
Thank-you so much! I've seen people say "just use a solidify modifier" but I'm new to Blender and a total idiot, so I didn't understand what they meant, your comment made it click into place.
Wow Thank you ! I thought there had to be a faster way, and I was right to go down in the comments. You saved me !
Hero!
@@user-bb3mb1wk9n you can also do "ctrl + /" with booltool addon
Thank you so much! The whole time I was watching this video I was like there has to be a faster way than 4 minutes and just like everyone else Thank you.
Hi Josh, thanks for beeing so clear and efficient !! subscribed ! reasons : calm voice, no narcissic blabla, no stress music = perfect tuto !! Congratulations
Thank you so much Fafney! Happy to have you as a part of the community :)
I just starting to use Blender and your channel is awesome, you really know how to get the best from Blender, congrtulations and thank you for sharing!
New favorite tutor. Another great explanation.
simple solidify modifier on the knife object would achieve the same result, while keeping it parametric/non-destructive/procedural.
NOPE, even simpler:
You just need to add a SOLIDIFY MODIFIER to your CUTTER
That's it
As simple as that
Thank you for this, that made it so much simpler!
wow
Thank you, this is a huge help.
Why use 1 Solidify when you can use 2! Now I can have several strips of cuts to work with. So cool, I just wish I could add bevel non destructively, but the add-on "Bevel after Boolean" can help with this! *Edit* Or use the BoolTool Ctrl + / method to control bevel on a per object basis.
@App User No, thanks, I'm an elementarist
I only download add-ons that do stuff which was not possible before
I'm really not a huge fan of add-ons that are supposed to make things you already do "quicker and easier"
You'll end up getting a more cluttered UI, or have to learn new shortcuts which may or may not conflict your your already existing shortcuts, etc
These quick tips are particularly useful. Thanks for sharing
Thanks Marty, my pleasure
This really was super easy, barely an inconvenience!
Love your tutorials, thanks!
Just what I needed. Thank you
OMG, I never knew about the auto smooth normals checkbox tucked away in the object data. I feel so dumb, but I'm so happy I know about it now. I've been adjusting normals manually with mixed results. Garrr.... thank you
Thanks for this, it will really help me on my future projects.
No problem man! It's a super useful technique!
This is super helpful and improves my workflow a lot, thank you :D
Awesome! Glad I could help out.
Nice video mate, really good to see some non destructive workflow tips
Thanks Simon!!
Love the videos ❤️ they are awesome. Keep up with the great videos!
Clever and clean method, well done!
Thanks Luca!
Could be even simpler : just add SOLIDIFY modifier to your CUTTER object
that's it, you don't have to unhide your original object, reselect all your cutters and apply another operation on them to get the missing pieces
You only cut out the slots to begin with
Great video on a nice little topic. Thank you.
I had never even heard of "non-destructive workflow" until I found your channel... thanks!
Cheers!
It surely helped me. thanks!
Fabulous..You are really a great tutor...what's more interesting is,your videos and short and crispy...thnq u so much
You are a hero dude thank you
Thank you for the video. I think it will help me in the future!
I was just struggling with something similar. Thanks a lot!
No problem, REKT! :)
Thanks for sharing this technique! I've just started playing around with how to do fun little greebles like this and I like your method a lot more than what I came up with =)
After making the cutouts, I saved a bit of effort by joining the "filler" pieces to the "outer" piece before applying the Bevel modifier, so that I only had to Bevel once. That also made it easier to move around my more detailed component later, since it was all one object.
That works as well, I just wanted the separate Booleans to be accessible more manually, but it really doesn't matter that much. You could also parent the two if that is preferred!
Nice, thanks for the tips!
No problem Jason!
thank you, it's very helpful.
Appreciate it man!
Thanks for sharing!
Best blender teacher
Thanks Mohit!
Adorei! Mesmo sendo em inglês eu entendi! Me ajudou muito! Eu assistindo seus vídeo do Brasil - Rio de Janeiro.
excellent, thanks!
I LOVE YOU MAN , i almost dropped a project but because of you i live to fight another day .
So happy to hear that, Ezra! What is your project for?
@@JoshGambrell you are never getting her reply😥😥
@@MrNagato2 nothing she probably doesnt care
@@mariocamspam72 she dropped a project after all :(
Josh Gambrell hey I’m ezra but on my friends acc because i lost my account i forgot the password, the project is a Subway store.
Seeing how this is done without a 3rd party tool makes having something like HardOps, Fluent or Box Cutter that much more appealing... Still knowing how it works in default Blender is vitally important!
Absolutely Kevin! Before I learn any big add ons I love knowing how to do it in Vanilla Blender first :)
I was about to write this too. HardOps and BoxCutter were the best purchases I've ever made.
@@Moby41 Yea it makes you really appreciate these third party tools even more given how many steps a lot of things they do save you!
please search before you comment, there are free addons like Jmesh that does slice and every other boolean operation faster and with great result.
hardops is when you really delve into hard surface modeling.
Nice ! thank you
That is awesome!
Thanks Matt!
Great tuto thanks bro..
Very nice, thanks for the tip.
Thanks Mitch!
Awesome! 👍
Awesome tip , thanks
really nice
Thank you. I was always wondering how to make this gap during car modeling :D
thanks , clear and precise (but with ad-don like fluent -speed flow or box cutter it's faster)
i think the basic method without external ad-dons is very important to understand blender thanks again for the sharing
Could not agree more, I have these third party extensions but knowing how they work with the Blender tools is a massive bonus and something I think we should all know ahead of time!
Absolutely agree! I'm learning Boxcutter/HardOps but I think having the intuition of what is happening behind the scenes is extremely important not only for identifying errors, but giving a more well-rounded understanding of the software.
Another quick way to add this kind of slice. This is without using additonal objects or booleans. Add an edge split, solidify and bevel modifier to your object (in that order). Then make edges on you object where you can the slice to happen. Mark those edges sharp and you're done. You control the bevel size via the solidify modif (not the bevel modif)
Gained a sub! :) Keep doing what your doing, you keep helping many beginners at blender like me!
Thank you!!
Thank you that is helpful
No problem my friend!
Thanks
Great tip!
Nice tut. You could also link object data from both objects that got cut to be able to edit the two meshes as if was a single object, because they have the same geometry.
Good tip! Didn’t think of that!
Great tutorial!
Thank you!
thanks
Very Good!
This guy just got himself a subscriber
Very useful short video
Thank you!!
Awesome!!!
THANKS USEFUL TIP
Thank you so much
You’re welcome Rai!
i love you man thank you so much :3
Love you too! :3
Thank you!!
No problem Jerely!
Good tip thank you
No problem Jurgen!
I have HardOps and Boxcutter, but I've been having trouble with the Slice operations. It never looks right. This gives me a better understanding of what the Slice operation is supposed to do. I'll now be able to apply this knowledge to HO and BC and hopefully get it looking the way it's supposed to.
A perfect opportunity for gundam panel lines
Good technique :)
Thanks Ron!
Thanks a ton. I really wanted to know how to make these types ceases for a robot. 😊
Wondefull !!
You can use ctrl + / to slice it :)))
ok its fantastic ❤️ but you can easily add solidify to the box you used as a cutter then it will do the job faster ..
Thanks Fathy! Refer to my pinned comment :)
What if you add solidify to your squares? Would that do the trick using just one base mesh?
If you're going for a completely non-destructive workflow you can most definitely use the solidify modifier with the slice operation, just make sure the modifier stack is in the correct order or you'll run into problems.
You could just add a cut where you want that line, use the bevel tool wit 3 lines and then you could drag the inner line down
nice
Great!
Cheers Bill!
for whom it's not working try pressing ctrl and numpad - (minus sign above 8 in numpad) and other symbol like that
I usually just work out the shape of how I want the cutout in the object in the topology then inset the faces where I want that indent and in the new line that's made in between the original shape and the inset faces I again inset those faces and hold ctrl to drag it down and it does the same effect, and I also don't have to worry about any shenanigans with boolean putting in messy topology.
That definitely works, but if you’re going for a non-destructive workflow it’s not the best idea.
Nice tutorial, I am happy to have HOPS for things like this tho.
Yes that add on is much easier for those that can use it :)
Will be using this. Does this work in 2.9 and beyond?
That you Josh for the superb tutorials you do!! You're kind and talented person :)
Subscribe!!
Thanks Rafa!
you dont have to duplicate the cylinder just add solidify modifier to the cutter object[cube] and its all done unless you want two separate mesh
Glad this video was in my recommendations!
I don't even use blender or any 3d program but I know that what you did was genius and saves time!
Based on this video, I think there is only one disadvantage when using this method:
Can you adjust the size of the gap between the cube and cylinder after doing the cutting/slicing? I mean can you increase the width of the gap, after the slicing?
I hope you could understand.
If that was possible then I think we're fine here! As I said I am not even a 3d artist so my question might sound "stupid" (but I am planning to).
Do you have other tutorials like this? or a tutorial for 2.8+ beginner?
Thanks for reading and taking the time to share this method. I subscribed.
Good question! You can just scale the cutter object to get the gap of your choice. Another option without actually changing the gap size is to adjust the bevel which might give a nicer result. Bigger bevel = bigger roundedness = bigger gap. As for other tutorials, check out my hard surface modeling series which you can find under the playlists section on my channel :)
I also have more in-depth, complete courses available on Udemy.com.
@@JoshGambrell can u share link to ur courses pls?
subscribed
Which hotkey did you use on the cube at 0:33?… sorry I’m new to blender
Auto like actived for this channel
You're the best!
What button do you press to cut with the cube?
0:30 Ok first off how did you do that ? Is that like the bolean modifier ? How did you do that like that ?
BoolTool addon
yeah but how do i make it so the depth is the same in all parts of the cylinder?
I did this exactly as you explained and it worked out well… however, the rounded part of my top cutout has a curved bevel, when the rest of the cylinder does not. Any idea what’s causing this?
Hi, thanks for the video, it's interesting but I would like to know if this method is not a problem concerning n-gons and triangles that it generates ?
sorry for bad english, I hope you will understand what I mean
Wont this produce polygons that arent quads? I am new so, I’m sorry if my question is stupid
Yes it probably will, you have to correct that stuff manually after boolean operations like this I think
Isn’t adding a solidify to cutter much simpler? More procedural? It gives control over the gap
You sound like Columbus from Zombie Land lol, great vid
how does the wireframe look like ?
can it be subdivided ?
can you help with this part. (0:30) i dont understand how you cut out the cube?
You could just use a solidify modifieron the cutter
could you explain the "slice" bool tool?
Aoosome.
Epic. Where can I find the Bool-tool addon?
Turn it on in Blender preferences.
I cant move the finished object, "A" does not work, nor moving the objects into a collection or selecting all in edit mode - unable to move the object???
Make sure you're selecting the cutters and base mesh too.