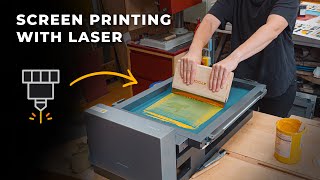
Learn How To Use The Xtool Screen Printer With This Easy Tutorial!

Вставка
- Опубліковано 11 жов 2024
- Buy xtool screen printer: www.xtool.com/...
Lean how to use the xtool screen printing machine with this video! We'll be using the xtool d1 laser engraver to engrave our screen printing screen. and then I'll show you how to assemble and use your xtool screen printing machine.
Shop Cardstock: celebrationwar...
Make 6-Figures selling on Etsy: go.ashleefalco...
Shop Amazon Storefront: www.amazon.com...
Shop Cricut: cricut.pxf.io/...
Shop Laser Cutter: www.xtool.com/...
Shop Cheap Bulk Drinkware: Generic - www.saveacup.c...
Shop Best Vinyl & HTV: teckwrapcrafta...
📧 Let's Chat! hi@ashleefalco.com
📱 Follow me on instagram to see me daily in stories: bit.ly/3tMsxhM
🎵 Follow me on TikTok: bit.ly/3tMngXu
📌 Pinterest for all things crafting & recipes I love: bit.ly/3Dm5OMC
** Disclosure: This post may contain affiliate links, meaning I get a commission if you decide to make a purchase through my links, at no cost to you
#xtool #screenprinting #crafter


FYI: Your cutting mat should have a sticky side. That sticky side is to keep you materials (ie: bags, shirts, etc) in place when printing. Thanks for the in-depth look at the tool! Awesome work
thank you! I just did a multi color screen print and have the stickiness was actually really helpful!
I have the older first generation XTool D1 10watt laser, not the D1 Pro. Would this work with my laser?
yes, it will totally be possible!
if you use both hands to pull the squeegee you won't need to hold the frame down, and you'll avoid getting raised areas and have a more consistent print. also if you put the squeegee on the front of the frame where the magnetic strip is (ie where it's meant to go) your ink will drip into the screen and not on the handle of your squeegee and eventually your table and machine, plus it'll be ready to go for the next pull.
Thank you for the guidance!!
Did they give you any info on what screens will cost once the product is released?
The thing they don't give me is the pricing of items :( sorry!
@@ashleefalco I got a response from the xtool team. They will send bundles of four screens for $24.99. I feel like this is super reasonable because you can essentially do a four color piece for only $25!! Anyway, this is information you may want to share on your next video!’ Thanks for the content ◡̈
Can I get a link for the screen print kit in the video please ?
It is linked, but here it is again: www.xtool.com/products/xtool-screen-printer-1st-screen-printing-solution-with-laser?ref=AshleeYFalco&
Does the bracket for the D1 come with the screen print kit?
It does!
It only comes with the multi color kit and not the basic kit.
Do they have a guide plate for the extension rails?
extension rails?
yeah, the extension kit rails are longer. And where do they sell just the screens?@@ashleefalco
What I did is just mount the smaller metal piece to the spoilboard under my laser with CA glue/tape and it works just fine.
@@lojack223
Do the screens come pre-coated?
They do!
Any idea if they can be reused? Like washing off the emulsion coating and reapply
I'm not sure. I do know since using it: the blue is what get engraved away. I'm not sure what that blue stuff is, and where you'd buy it.
@@ashleefalco in traditional screen printing its called emulsion and can be found at screen printer supply stores
To coat a screen, it has to be stretched in a frame so that the coating is uniform and thin enough to burn (or engrave in this system) properly. In this system, reclaiming a screen (stripping the emulsion) would have to be done in the frame, which would put considerable wear and tear on it since water and emulsion stripper would get in those channels and the tension mechanisms. You would then have to be able to recoat the screen to an emulsion thickness where you could reliably use the same engraving settings, which would be very difficult for people printing at the beginner or hobbyist level.
My guess is that the screens are manufactured in a large sheet, machine-coated in blocked off areas, then cut to size and taped on the edges. In the livestream, they said the screen mesh was steel (the laser would melt the polyester used in traditional mesh), so handling the edges untaped would be dangerous, and that tape would likely come unglued if it got wet.
Not even sure if the emulsion is pre-hardened garden-variety emulsion or a specialty kind that melts better under the laser. With the smell Ashlee described, it sounds like it is a plastic polymer-based emulsion, but since you just burn way the stencil part, there's no washout, so it's not working on light sensitivity the way a standard emulsion would. Large-scale screenprinters use lasers to expose in some high-dollar setups, but they use the laser as a light source to expose a photosensitive mesh and then wash it out, not as an engraver.
On the Kickstarter, the screen refills are $24.99 for 4. I wonder if they will have some sort of recycling program for the used mesh, with maybe a price incentive if you return screens you no longer need. Some designs you will want to keep, but some will be one-offs or goofs (as Ashlee illustrated, there is a learning curve to the engraving process).
I was really excited to buy this, but it just seems so underdeveloped. The laser should already be mounted on the frame somehow, having multiple tools to screenprint seems kinda silly. Also having a protector underneath the screen should already be a given / incorporated.
I do agree. it's a lot of work. I wouldn't suggest doing this if your'e only doing 1 shirt. but if you were trying to print 100's, this would definitely be the route I would go
Well, I can’t get this thing to work. The ink goes right through the shirts, I get spots where the ink didn’t go through the screen, where other times it did. I’ve destroyed a dozen shirts, so far. I’m ready to smash this thing with a sledge hammer.
First, why are you wasting dozens of shirts? If it doesn't work with one then keep using that same shirt!
If the ink didn't go through the screen to your shirt, you didn't press hard enough. I have noticed if you let the ink dry on your screen it will dry up the holes in the mesh creating spots. So always keep your screen clean.
How many screens and frames come with it!
I got 4 frames and 12 screens!
@@ashleefalco that’s great
What is the height of the Laser?
It just has the standard legs on the laser
Why didn’t you add the last clamp in you should have 4 clamps in the screen thing dont you.
learning as I go.
@ashleefalco I understand just trying to help. The live they had to other day for sure showed them locking in all four sides should have no slack in it
@@ttowntshirts , see the thing is I made and posted all of my videos before their live. the directions they gave or what's in the box are vague. So not knowing how to properly install, yes you'll get mistakes. but every though I was missing 1 bracket, I still have a perfectly printed screen.
1.25 hr for 1. That would be 5 hrs for 4 color. Not that efficient I would have to believe.
I did 3 colors and it was 2 hours. But once the time consuming part is over you never have to do it again. And you can keep reprinting the shirts forever
But if you’re doing a more traditional image it would be more than what you were doing in the video.
What would be “a traditional image”?
The audio is horrible, please use a lapel mic!
🫡
You really have to wear the goggles just holding up your hand is not enough.
Thank you!
I just wanted to follow up on the glasses, ALWAYS make sure to wear your safety glasses firmly to your eyes and Ensure that the glasses your wearing is suitable for the wavelength of your laser. Don't Buy Cheap Glasses! Also, reflections or the bounce of the laser beam can still damage your eyes regardless of the distance... Just wanted to make sure you stay safe!