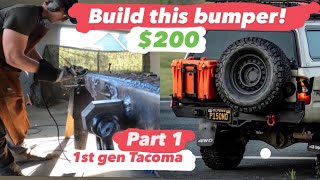
Building the Swing out tire carrier! Make the ultimate DIY Tacoma bumper at home

Вставка
- Опубліковано 7 вер 2024
- Part 2 of building your own rear bumper for your 1st gen Tacoma and we tackle adding the swing out tire carrier to the rear of our home build bumper. DIY templates and cut files www.overlandun...
Discount code for hinge: “overlandub5” saves 5% no commission for me, but savings is savings!
Follow me on instagram: / overlandunderbudget
Welder im using: www.forneyind....
Starter welder for under $230! Forney-Easy-Weld-261-Machine
Heres some of the parts I used.
Hinge: www.4xinnovati...
Swing-Out-Tire-Carrier-Hinge-Assembly_p_109.html
Latch: www.ruffstuffs...
Tubing is 2x3 inch 1/8th wall steel.
Tire plate is 1/4inch 8x8 inches
Total weight of bumper with swingout is 127lbs


I like that this guy has the every man tool set. In other words very basic shop tools. Moreover, clearly he doesn't have a huge amount of metal working experience. He has no qualms about sharing his mistakes. He creates a very functional, warts and all product. Well done young man!
Can I suggest when drilling steel once the the bit has started to cut add a drop of oil (old engine oil is good) to the drill point, it'll help prolong your drill bits, help stop it over heating, and make a nicer job of the hole. Otherwise great projects,
Good job! Couple of suggestions. 1. Get a reciprocating saw and use Milwaukee blades (the Best!). It will cut way down on your small grinder cutting, it's faster and cleaner. Really, you will thank yourself for it (ask me how I know!). 2. get a 4" long piece of steel tubing that will go just inside your tire rim center hole. Weld it onto your plate with the studs that hold your tire. It gives you something to throw the tire up on to and hold it while you rotate the rim around to line up with the studs. Your back will thank you. 3. lastly, I recommend always using 3 studs for a spare tire. It's only a tiny bit extra work and it makes it far more secure. Best of luck and kind regards,
That tubing idea is genius!
You did a really nice job on the build. I used it to update my old worn out swing away. The bracket and bearing kit are just what I was looking for. Ordered it today.
Excellent idea for the latch!!!! That's a nice snug fitment. Great build and video!! Thanks a bunch!!!!!!!
I've been trying to figure out how to make a swing out tire for my f150. I really like your design. I think I'm gonna use it. Lol. Im mounting mine a stock bumper so I think I'll a plate on the underside of the bumper to surrport the weight more
just waiting for this guy to blow up, great builds and great videos
Haha thanks man! i really appreciate that!
Thats one fine build that I thinkI am going to do this spring. Well done. The only thing I would change is the latch so its on top and parallel with the swing out. The way you have it now it vulnerable to getting damaged if you back up into something. great video!
Thanks Scott! it's a really fun project. You could change the position of the latch, but then the latch wont be applying pressure on the swing arm to keep it tight and wiggle free.
Looks great. The camp table is what I’m really interested in seeing turn out! Thanks for the quality content.
Sweet, yep the camp table is a game changer
Excellent presentation! This gives me a very good basis to mount two 5 gallon Jerry cans of fuel on my 2007 Toyota Tundra Regular cab 6 1/2 foot bed. There are no Toyota or after market fuel tanks that will fit on this wheel base.
I see one place where you could simplify the fabrication. The nut on the hinge assembly could be welded onto the assembly and then fitted into a slightly larger hole to accommodate the weld. The hinge assembly is going to be welded onto the bumper, making an internal weld un-necessary. This would also make the alignment of the hinge assembly easier when the re-enforcing plate is added to the bumper.
I especially like the latch as it presses into place well. I am going to add a flange on each side of the latch assembly then drill a small hole through these and the handle. A linch pin through this will keep the handle from bouncing off in rough country.
Thank you for sharing this excellently produced video! 🙏🙏🙏 Just one teensy suggestion: please audio edit out or lower the volume during power tool / loud noise operating times ... this keeps viewers from having to constantly up-down adjust the volume 😊
All this time watching your videos and only just now am I realizing how close you are to where my grandparents lived before they passed away! (Cayucos). So many childhood memories of morro bay! Tons of inspiration and plans thanks to you!
Nice build. I don't mind the longer format with all of the welding and grinding at all.
Thanks Jamie, good to know! ive been wondering if im leaving in to many of the steps that are obviously taking place.
quick tip... insert a tight fitting piece of wood in the end and use your hole saw. the pilot bit will hold center in wood and provide a clean cut.
Oh that’s a great tip thanks!
I own a custom fab shop, build everything from structural steel, to 4x4 gear, to gnarly twisted handrails to look lke trees and vines. I started out years ago in a garage just like yours. I found your video while looking for exact same hinge, except Aluminum....watched the hole video! Good stuff man, get yourself a cheap plasma cutter too...itll change your life. Nice job, keep it up.
I love your design as it seems balanced and strong. One of the best I've seem! No wobbling due to only one attachment point to the truck. One idea would be to weld a short piece of round pipe to the tire mounting plate to assist in placing the tire on. Then it could rotated to fit the lug bolts. Cheers!
Hey Micah, Great Job!
I made the same Swing-Out Spare Tire Carrier with 2 x 4 Chanel Iron for my 2009 GMC Savana Cargo Van.
However I mounted the Tire on the Driver's side so as not to Block my Rear View.
I did a much Simpler build with just an 1.5": Dia. Shaft with a 5/8" Hole through it & a 5/8" x 6" Grade 8 Bolt through it for Hinge as Bearings are not necessary.
No Hinge Latch, just a 1/4" Bolt through to keep it locked in place.
The Hitch is pretty heavy & I was considering installing a Dual wheel Jack for assistance when in open position to take the weight. A 2 x 4 would suffice too.
Watching you, reminded me of myself going through Trial & Error without drawings or proper measurements.
Keep up the good work.
Cheers from Toronto, Canada!
Nice job overall. I made the mistake of using one of those dry cut blades on my mitre saw. The RPMs are way too fast on a mitre saw and will ruin the carbide teeth in short order. I also suggest using something more perpendicular to the back of the hinge to resist flexing. I love those hinges and used 2 on my build.
Thanks James! I’ve been using the blades for a bit, for $30 bucks you can get through a project with quite a few cuts before they slow down like that one in my video but definitely don’t last forever. Super excited to have a plasma cutter now!
Good build! Only thing I would suggest is a gusset or two under the square tube that the tire bolts to. Would give some extra security when going over large bumps with the weight of the tire. I was also going to suggest enclosing the area where it latches otherwise that seems like a good place for water to pool and rust things out.
Hey Mitch! Thanks for the suggestions. Not sure if i mentioned it but i left 1 of the 4 sides of the capture open at the rear so water can drain. Inclosing it would be really nice, just a little more work but totally doable.
@@OverlandUnderBudget I gotcha 👍. Enjoying the videos 👍
I like your DIY bumper project. Was going to spend $$$ to order one but after following along your great video's I will attempt to tackle this on my own as well. Keep up the videos!!
was honestly just here for the visual and view on the hinge for the kickouts for my 4r... not bad at all for a kid in a car port man!! i enjoyed watching thanks man
What an awesome video and a DIY tuttorial on both Part 1 and 2. This inspired me to build my own bumper for my 100 series. Thanks again Micah !
I like the overall design of this I really do. I do only have one small, and I do mean small, critique. And that would have been to add more bolts to secure the spare tire onto the carrier. Overall, wonderful build. I do like the fact that I can get the swing mechanical portion already ordered and built, and don’t have to build one myself.
You did a really nice job. Video and the swing arm.
Thanks for the video.
Nice build!
Ordering the hinge now 😆
Clean and simple, utilitarian aesthetics at its finest. 10k Baby! You are at the tippy top of the mountain and your not even half there!
Ya brother!
Wish u had a bracket for an FJ Cruiser. Awesome build!
Love these videos. This is one of my favorite channels. Definitely going to try and do this for my second gen when I finally have a garage!
I went to cuesta college in SLO so I recognize a lot of these spots lol.
ha no way thats awesome
I have the same swing out hinge. Never thought of mounting it that way. Thanks!!
I think you could just cap that last post with plate, so you could take the cutout piece and flip it and weld it back into the cutout to double wall it for added strength,....very nice job, very well done!
Dude this was an amazing video!! So informative and thoughtful and also funny! Going to be attempting a project very similar to this but on a subaru forester! Fingers crossed :)
Nice Build! Just wondering if there is any lockable toggle clamps available to lock the swing out arm just for peace of mind. It would be nice also to weld an upside down "U" bracket or a large pipe about 3" long on the spare tire mounting plate that when you set the spare tire on it, the mounting stud is perfectly align with the wheel stud hole. All you have to do is rotate the tire and push it in to the mounting stud. Lifting those big tire and aligning it to mounting stud can be frustrating sometimes specially if you are an old buck like me.
Awesome job fella! I’ve been planning to do something similar to Jeep Wrangler to make it a little different
I'm thinking of building a swing away HD carriage rack that slides into my 3'' receiver hitch. That lead me to this video. Good ideas and nice video.
I’m thinking about building one for my 4x4, front too with a winch, but mine is different than most...it’s a 1985 Chevy K5 Blazer.
Heck ya, those older blazers are really rad
@@OverlandUnderBudget yuup
Fantastic build video. I'm researching for my Jeep and this is invaluable for the swing out I hope to build.
Wish I could smash the like button multiple times. Awesome job bro!
Thanks man! its really fun sharing these projects.
I'll be doing this but all in reverse, being in Australia. Great job mate!
haha heck ya!
Finally a channel I can relate to.
Great video. The only thing I would add at this stage is a small lip for the inside of the rim. That way it's much easier for one person to mount the spare tire. Especially in the dark since you can rest the spare on the lip while matching the bolt to the rim.
Thats super smart, i should definitely add that, thanks!
Very nice build
Nice build thanks I was wanting to make something like this now I know whats involved
Great stuff... greetings from sunny Malta. Thanks for this highly instructive video. I'm building my swing out tyre carrier for a modified Sankey trailer. Well done
Another tip for welding the nut in the bumper is to put grease in the threads to avoid any splatter from getting in.
Looks great. Seems like a super heavy construct though.
I know a guy that liked to use the cutting disc as a grinder wheel. He had one come apart once. If he didn't have a full face shield on, it would have been a bad day for him.
This is awesome, I need to learn how to weld, lol
Really nice work! Good to know about the swing kit bearing kit 👍 Great DIY video.
Congrats on Hitting 10K 👍
Thanks Mike! Yes that 4x innovations kit is really worth it. And thanks! Can’t believe how fast the channel is growing! Thanks everyone!
Appreciate the quality work, appreciate the approachable feel. You got every novice handyman thinking about making one of their own 😂 I’m no exception.
That steel tubing can sweat on the inside, I always make sure to leave a drain hole and you want to paint the inside of the tubes with before you weld them.
I will be doing the same thing on my 02 tacoma!! Thanks! I am going to follow your video!i just hope i get the same result lol
Dude heck ya!
Dude heck ya!
Good work!
If you disconnect the battery your electronics will be fine.
Cool that’s what I though, disconnected the ground
The best part of this video is when he uses his C-clamp as a hammer . Thats how you know he is the real deal !
Great job and thanks for the keynotes on mistakes that were made. I'm looking at building a rear bumper for our 5th gen 4R and wanting to make it a dual swing out bumper with a good high clearance. I need something that's going to be solid to hold a 35.
GREAT build. 4x innovations makes some awesome sliders also. Best price I have found.
Agreed! and thank you!
Really great work. I need to figure out how to do this for my 3rd Gen taco......
great DIY videos !!!
Glad you like them!
Nice work! Inspired and excited. This is one of my future projects
Heck ya that’s what it is all about for me. Thanks fir watching
Fir? Haha tis the season I guess lol
@@OverlandUnderBudget I want to build one for a 2007 crew cab Tacoma.
Awesome videos. Its nice seeing slo videos and builders. Keep up the rad build.
Under 10k subs 3yrs ago..... Now almost 100k subs!
🤙🏽 👍🏽 ✌🏽 👌🏽 🍻
Really cool, I like how it turned out.
I was literally waiting for this part and my cursor on the order button at coastal off road. I think I will build this thank you Micah!! Will there be part 3?
Ha dang well I love my coastal off road front bumper, but yes making it your self from scratch is so fun. And yes part 3 will be able adding the drop down camp table! Hopefully next week
@@OverlandUnderBudget I paid a ton for my front bumper too :). Coastal’s rear is high clearance and you trim the sides of the bed, and it covers for support and has a nice look.
With OUB(Overland Under Budget) rear bumper v1, you are leaving the perfect amount to add sides like coastal, I will build yours and add sides like that after trimming, this rear bumper will look sick and still be super affordable:). I literally watched every vid you have and did same bed setup too :)
I think I wont do the awning its a lot of work :). Thanks again!
Nice job! I added a swingout a few years back using 4X kit as well. Works great. Your content is rad keep up the good work 🤘
Thanks man I really appreciate it!
WOW! Super awesome! Thank you!
Outstanding! Thank you for sharing this!! Great job!!!
Awesome aerial footage! Any chance you can let us know what trail that is?
Nicely done excellent video, looks like your between Moro Bay and Cayucos!
Real nice video
Finally someone who had the same ideas as me
Great building
Love it man, it looks great!
very nice!
The build is awesome and Im going to copy it for sure!. One question though: Why didnt you just weld the nut onto the bottom of the bracket and drop it into the hole instead of welding it into the bumper?
Thank you! And yes totally mistake on my part! I welded it to the bracket on my current one. Much better!
Good job, i'll practice it ok, I am from indonesia
Great job dude! Psyched that I stumbled across your channel.
Does it rattle much?
Great vid! I'm having no luck finding a premade bumper with a tire carrier for my 2010 F150. That's under $2k. And was thinking of making my own. Might give it a try. New to welding, so hopefully it doesn't fall apart on the trails! lol. I plan on getting a Rough Country or similar bumper and adding the DIY tire carrier to it.
Nailed it. Great job, dude. 🤘from 🇨🇦
Rock on! thanks Jeff!
Hey! Loved the video! New subscriber, although you are at 12.6K now! I’m looking at a swing tire for a Sprinter Van. I appreciate the product links, and the tips for what not to do, as well what to do! Excellent.
Super cool video, truck looks really nice !
Thank you!
Looks great!!
Awesome video dude, your welding is getting much better!
Really?! thanks man! just got a 220v cord so now i adjust my settings better excited to see the results!
Really?! thanks man! just got a 220v cord so now i adjust my settings better excited to see the results!
@@OverlandUnderBudget of course man! I appreciate the videos, they give me some ideas for my 3rd gen 4Runner. Not sure if you’ve got an external trans cooler yet, but I have a Tru Cool 4490 LPD on my 4Runner running in series with the radiator. My trans temps have been really good, I would suggest getting the thermal bypass as well. In the summer when it was 117 here in SoCal the highest temps I hit was 174 degrees while off-roading, now that it’s cooling off my trans temps are pretty low so I ordered their thermal bypass.
Hmmm... Having to remove the bumper to replace taillight, turn signal & backup bulbs could be a bit awkward if they're not accessible from the back.
nice work, i was looking at the prices of pre made bumpers and....well...for front and back its pretty much the price i paid for my whole truck lol.
Great Work!
Some advise to make your life easier and cleaner work....
Use your hole saw to cut the perfect radius circle in from the end of the material . Then go back with your grinder and cut a straight line down the middle of your radius.
Just a thought.
Thanks for the inspiration.
I have really enjoyed your content so far! keep it up!
Thanks, i really appreciate that!
Great job💪
Im definitely trying this on my humvee they want 1100 for a tire carrier
Thanks for such a great job and video. Question: How to lock tire on so it’s not stolen. Thanks for all you hard work. Subbed.
Buy lug studs and security nuts. I think they have a knurled section, when you pound the studs in they stay put. Tack them on the back side.
Hi, great video I want to build a swing arm for a camper van to carry a bike box etc so your video was very useful. Can you tell me what load it will take?
Tony
really nice build! what about the extra weight?
in addition to the DIY awning and stuff like that, i think your builds are a bit heavy, isn't it?
I forgot to add that! So the bumper without the swingout weights 82 lbs which is just a pound lighter then stock. The swingout adds 45lbs so that’s really not much at all. Awning is 34LBS if I remember correctly, rack is 42. Yes it definitely all adds up, but it’s not crazy.
Okay I am curious, you stated you wanted to see out the back. So why didn't you make the hinged point on the driver side with the wheel still near that point??
Would it be worhwhile to put a little triangle gussett under the 4" piece that sticks out for the tire to mount?
was that beach spot Big Sur?? Looks amazing
just south of Big Sur, its a beautiful area.
Great Video. I noted that you left the long tube uncapped at the end. Will you system be at risk for water entering and eventually leading to rust? What is your solution to this? Thank you
Looking good I hope you disconnected your battery cable for the computer.
awesome video!
About how long did it take you to get all the work done, cutting measuring, planning, welding, etc?
That just looks AMAZING! I was wondering if there’s any information or details I can give my welder whose building my rack as well, so he knows how to go about building the bumper and swing arm. I’d definitely pay you for it Please let me know, thanks!
Thanks for sharing! Is that 2"x3"x3/16" square tube? Apologize if I missed it.
Thanks man! 2x3 1/8th wall. Mow tubing details and such In the description 👍🏻