Great video! Thanks! Couple of suggestions. 1. Before removing the fill valve from the tank, soak up the excess water with a sponge. This way you won't have all of the water gush out of the tank onto the towels/floor/bowl/bucket. 2. Wear a pair of nitrile/laytex gloves for this job. The black rubber seals degrade over time and have a black, slimy film that comes off all over your hands. It is extremely difficult to get off of your skin, so gloves are a great way to go. Thanks again!
Thank you Kris for confirming my worst nightmare-having to remove the entire tank to replace the flush lever! Thankful for your video.I have 2 leaking Mansfield toilets that will need the flush levers replaced. I think I'll leave this one up to my retired plumber daddy to fix for me! Respect!
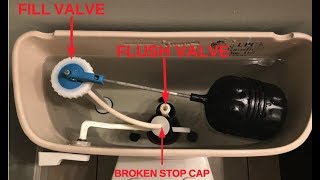
You don't need to remove the tank to replace only the flush lever, which is the long white plastic piece that is attached to the handle. It is sold separately. I have replaced flush levers on 3 of my toilets. They cost about 5.00. If you need to replace the black tower in the middle that the flush lever threads through, well that is the flush valve, and you have to take the tank off. The fill valve is in the corner.
Thank you so much for this helpful video! After I put everything back together, I had a small leak, but was able to fix it by securely tightening all the nuts. Thanks again!
You are amazing. When I went to fix the toilet I realized I had a totally different valve system. Went to my plumber and bought a new kit. However; after the PITA this was just to get off, I might just put a regular one in. What I figured would be a 10 minute job took forever. The guy who put it in tightened everything extremely hard. Not having man strength, it took me an hour to undo the underside of the toilet especially with a crap tool and breaking the plastic ends. Now to figure out how to get the big plastic part off without your fancy tool. Once I get that off, the rest is easy. Thanks for the help!
Really GREAT video. I just wanted to say thank you for your very informative video! You saved me $750 which is what the plumber quoted me to repair the toilet. I managed to do it in 30 minutes using your step by step guide!
I had this exact same issue. Thanks for the step-by-step directions, I followed them and had no issues replacing the flush valve in my toilet. I did not find it necessary to purchase a "tank-to-bowl" kit, i just reused the same tank bolts from before and there doesn't seem to be any issue with that.
I’m glad it helped! Sometimes, the rubber seals on the tank to bowl kit get worn and no longer seal like they’re supposed to. Keep an eye out for leaks just in case! Thanks for the comment!
I sure wish the tank bolts were that nice on my toilet, lol!!! Mine wont turn worth a damn, but I digress, thanks for the great video, helps save me money!!
+Chris Paul That's the first compliment my toilet has received about its tank bolts, lol! You might have to hack saw yours off, but that could lead to a leaky mess. Maybe some WD40 would loosen them up? Thanks for the comment,
😮 Welllllllll…. Slap My Azz and Call Me Meryl!!? I was trying everything and twisting myself in all sorts of knots, trying to figure out how I was going to make the replacement valve and seal the guy at the big box store assured me would work!!? 😂 Thank You Sir, and Hug Them Babies!!!🤗🥰😜
Nice video. Tip for removing the water before taking fill or flush valves out... Use a sponge to remove the last bit of remaining water and you'll have only drips coming from the tank when you remove the valves.
@@theXchange Thanks man. Unfortunately it keeps leaking from the back. I've tightened the three bolts as much as i can and it still leaks after each flush.
Many thanks to you and your cameraperson! Our Mansfield was a hard flush, eventually broke the original trip level. Then broke a cheap replacement trip lever. Replaced the flush valve seal (proper location and all), and now the tank cycles/fills. I'm going to attempt to clean around the bottom of the flush valve and seal. But I'll probably just replace the thing since I just bought all the parts @Lowe's. Thanks!
Thanks! This was helpful as I need to replace flush valve assembly on a Mansfield 162... Appreciate you putting this video together! Two comments for the next such job... (1) Better to sponge out the remaining water before removing tank! Just takes a few minutes... (2) Also, not clear to me why you removed the fill valve assembly -- seems unnecessary.
Great video thank you. It seems that is a design issue as mine had the same failure. Only lasted 3 years before it failed again. I will be changing the whole assembly for a different type. My failure was the top washer where the hose goes broke off and separated from the main assembly.
@@MarshallDudley I think the plastic degrades over time and then whe you apply the pressure flushing, it breaks off. We really don't apply too much pressure to the lever.
This video is amazing. I do have a question. I have metal bolts and they're rusted so a lot harder to unscrew. Also how can I get the back bolt because I have no room from wall to toilet
This is a great video, but if you just have a leaky seal - doing a Ghost flush - just replace the seal and not the whole assembly. It's easy peasy Mansfield® 211 Flush Valve : Seal Replacement - UA-cam
Thank you for this! I bought the whole kit, when all I really needed was the gasket. I was unaware they were sold individually. Saves me money and a huge mess!
This was super easy to follow! Just saved me about $590 (replacing a toilet & fixing the flush valve in another), however, my toilet tanks are slowly losing water. The level is definitely going down, but not dripping outside of the toilet. not sure what I did, I am sure this is operator error. Any suggestions?
Its probably the ballcock assembly. U can change the level of the water in the tabk by tightening or loosening the screw at the top of the assembly. Its the thing on the left side that sprays the water into the tank. 1:42 is a clear pic of the screw and part im talking about.
The original hexnut is completely different from the one that comes with the replacement. The toilet gasket is supposed to fit over the hexnut and the tank is then lowered into the toilet. The gasket is NOT to be placed onto the toilet and the tank lowered onto it. It is impossible to fit the gasket over the new hexnut since the new hexnut is not circular like the original. You MUST use the original hexnut and fit the new gasket over it. Otherwise, when the toilet is flushed, you'll get water coming out from under the tank. As you may have noticed, Kris reused the original hexnut without explanation.
Question when should I replace the whole thing vs just the red seal? I replaced the red seal and it stopped the leak but feel it's the lazy way lol. Also when I replace the whole thing should I replace the gaskets on the bolts
It depends. If you remove the tank from the bowl, you’ll want to replace parts. This depends on the tank-to-bowl kit. For 630-6204-P-4, you’d want to replace the whole kit as those rubber knobs/ends could be dried out and worn, and thus could fail and/or not seal properly. For style 205172504, you want to at least use new rubber washers. The spud gasket would be another piece to replace as well, especially while you’re already at it removing the tank from the bowl Replacement of just the red seal on the flush valve is fine, as long as the valve itself is in good working order, and replacing that seal did not involve removal of the tank.
@@theXchange so what i had purchased the new kit and just replaced the red seal but it started kept ghost flushing but found out the problem is I tried mixing old parts with new parts once I added all the old stuff back and kept the red seal it worked perfect Tomorrow when I go get the vise grips I'll replace it all
Hello Kris Reese, great video! A question for you though. Was there a significant reason you replaced the SmartFasten Mansfield bolts with the original style bolt/washer/nut? I purchased the SmartFasten kit because they got good reviews from people who'd just installed them but had no history of their longevity. I'm wondering if you had some problems with them leaking or disintegrating or any issues with them. I was thinking of returning them and getting the standard bolt kit instead.
Great question!! There was no particular reason other than that’s what was available for me to purchase at the hardware store. Good on you for doing some research!! 😃
I did everything, but the valve won't stay down, if I press it down it will hold for a few seconds but then pops up and the toliet bowl slowly drains, its like there is no suction???
I think, I may just need a replacement screw for the top of my valve, because it's not adjusting for the bulb manipulation. Is the screw supposed to go through the blue part, and screw into the white circle? I was trying to adjust the bulb, to stop ghost flushing, and the screw came out.
+Elvis Alvarado I tried to reuse mine but it leaked. I could only surmise the rubber was worn and needed replacing. If you're running to the hardware store for a new flush valve, buy the tank to bowl kit in case you need it. If you don't end up needing it, return it! Hope that helps!
Just broke the stop cap on my assembly. In looking at various videos I see it's supposed to just screw on (and off) but mine seems to have attached (due to age) to the top threaded part of the assembly and so technically that top tip of the tower has broken off. So now it looks like the entire tower will need to be replaced. Ugh.
The flapper type flush valve is a much more reliable valve than the Mansfield type, as the sealing gasket will pull up off seat or won't seal properly after flushing.
I replaced the red gasket and the valve won't do down by its self thus leaking water into the bowl. Does this mean I have to replace the whole valve kit?
Idk what was wrong with my old alto it would constantly be running sometimes and then also sometimes the handle would stay down but you lift back up and its fine
There’s a link to the vice grips I own in the video description if you’re so inclined, although if your toilet is apart, you’ll need them much sooner! Remember not to over tighten when putting the lock nut back on! Good luck!
My goodness, if you got time to show the disassembly, why not the whole process,, we are looking for help here, we are laymen when it comes to this,, do the whole thing or just don't do it at all,, we all know things come apart much easier than they go back together,,,,, maybe you had some problems putting all this back together and became a layman yourself


Great video! Thanks! Couple of suggestions. 1. Before removing the fill valve from the tank, soak up the excess water with a sponge. This way you won't have all of the water gush out of the tank onto the towels/floor/bowl/bucket. 2. Wear a pair of nitrile/laytex gloves for this job. The black rubber seals degrade over time and have a black, slimy film that comes off all over your hands. It is extremely difficult to get off of your skin, so gloves are a great way to go. Thanks again!
Great tips!!
Thank you Kris for confirming my worst nightmare-having to remove the entire tank to replace the flush lever! Thankful for your video.I have 2 leaking Mansfield toilets that will need the flush levers replaced. I think I'll leave this one up to my retired plumber daddy to fix for me! Respect!
+Melisa S Respect! Best of luck!
You don't need to remove the tank to replace only the flush lever, which is the long white plastic piece that is attached to the handle. It is sold separately. I have replaced flush levers on 3 of my toilets. They cost about 5.00. If you need to replace the black tower in the middle that the flush lever threads through, well that is the flush valve, and you have to take the tank off. The fill valve is in the corner.
Great tutorial! Saved me from buying a new toilet. I had to replace both the fill and flush valve, now it's working like it's brand new
awesome!
Thank you so much for this helpful video! After I put everything back together, I had a small leak, but was able to fix it by securely tightening all the nuts. Thanks again!
awesome! Way to go!
You are amazing. When I went to fix the toilet I realized I had a totally different valve system. Went to my plumber and bought a new kit. However; after the PITA this was just to get off, I might just put a regular one in. What I figured would be a 10 minute job took forever. The guy who put it in tightened everything extremely hard. Not having man strength, it took me an hour to undo the underside of the toilet especially with a crap tool and breaking the plastic ends. Now to figure out how to get the big plastic part off without your fancy tool. Once I get that off, the rest is easy. Thanks for the help!
good deal!!
Really GREAT video. I just wanted to say thank you for your very informative video! You saved me $750 which is what the plumber quoted me to repair the toilet. I managed to do it in 30 minutes using your step by step guide!
Awesome!!
That's three times the cost of a new toilet. Never call that plumber again. Unless your bill gates
Thank God! This is the only video I could find with this garbage style flush valve.
Here to serve 😂
Amazing job getting all of this recorded as you did it!! I couldn't have done that!! Great video! Super informative!!
Thanks! I’m glad it helped!
Great video. Just did finished the install with my husband. So far so good. No more wasting water. Thank you.
So we found a leak at the back bolt. Did we sit the gasket around the hole base incorrectly?
that or the bolt isn’t tight enough inside the tank such that the rubber washer is leaky. Be careful not to overtighten though
Thanks for the video. Followed it just a few minutes ago and toilet is back to its former glory
I had this exact same issue. Thanks for the step-by-step directions, I followed them and had no issues replacing the flush valve in my toilet. I did not find it necessary to purchase a "tank-to-bowl" kit, i just reused the same tank bolts from before and there doesn't seem to be any issue with that.
I’m glad it helped! Sometimes, the rubber seals on the tank to bowl kit get worn and no longer seal like they’re supposed to. Keep an eye out for leaks just in case! Thanks for the comment!
You sir made me 100$ today cause a plumber was going to charge my boss 250$ to do this and said it takes 3 hours 😆 this was an easy job
Parts were 150?
I sure wish the tank bolts were that nice on my toilet, lol!!! Mine wont turn worth a damn, but I digress, thanks for the great video, helps save me money!!
+Chris Paul That's the first compliment my toilet has received about its tank bolts, lol! You might have to hack saw yours off, but that could lead to a leaky mess. Maybe some WD40 would loosen them up? Thanks for the comment,
Chris Paul I had to use a power drill to apply enough torque to take off my bolts...
But mission accomplished
Thank you so much! I (33f) was able to do this without issue because of your detailed video!
Awesome! I’m glad it helped you get through it!
What’s 33 f
33 year old female
😮 Welllllllll…. Slap My Azz and Call Me Meryl!!? I was trying everything and twisting myself in all sorts of knots, trying to figure out how I was going to make the replacement valve and seal the guy at the big box store assured me would work!!? 😂 Thank You Sir, and Hug Them Babies!!!🤗🥰😜
Wow your video is so much helpful and easy to understand the way you did step by step! I had been same problems now I can fix myself and save some 💰
I like this video the best. Very easy to follow... Thanks for sharing your fascinating talent!
Thanks, Greg! I'm glad you enjoyed the video and that it helped tackle your project!
Nice video. Tip for removing the water before taking fill or flush valves out... Use a sponge to remove the last bit of remaining water and you'll have only drips coming from the tank when you remove the valves.
Great tip! Thanks!
thank you , I followed your video to replace this flush valve.
nice!
I'm gonna try to do this tonight. I'm not handy at all but this video makes me think i can do it!
You’ve got this!! 💪
@@theXchange Thanks man. Unfortunately it keeps leaking from the back. I've tightened the three bolts as much as i can and it still leaks after each flush.
make sure the flush valve is tight enough and the rubber gasket around it at the base is properly seated
also, maybe watch this one too - Replacing Fill Valve & Flush Valve for Mansfield Toilet ua-cam.com/video/0CGEXCHoLo4/v-deo.html
@@theXchange thanks Kris. I think it's the gasket at the base of the tank. I'm gonna check...
Many thanks to you and your cameraperson! Our Mansfield was a hard flush, eventually broke the original trip level. Then broke a cheap replacement trip lever. Replaced the flush valve seal (proper location and all), and now the tank cycles/fills. I'm going to attempt to clean around the bottom of the flush valve and seal. But I'll probably just replace the thing since I just bought all the parts @Lowe's. Thanks!
Awesome! Glad it all worked out!
More of a nightmare getting the old valve out
Ensuring a level tank and bolts with gaskets is a chore.
thanks Brother my wife was very happy!
Thanks! This was helpful as I need to replace flush valve assembly on a Mansfield 162... Appreciate you putting this video together!
Two comments for the next such job...
(1) Better to sponge out the remaining water before removing tank! Just takes a few minutes...
(2) Also, not clear to me why you removed the fill valve assembly -- seems unnecessary.
Great video thank you. It seems that is a design issue as mine had the same failure. Only lasted 3 years before it failed again. I will be changing the whole assembly for a different type. My failure was the top washer where the hose goes broke off and separated from the main assembly.
Mine just broke as well. Figured out that I was pushing down too hard when flushing.
@@MarshallDudley I think the plastic degrades over time and then whe you apply the pressure flushing, it breaks off. We really don't apply too much pressure to the lever.
Very helpful video! Easy to follow instructions. Thank you!
Glad it was helpful!
Thank you for posting this video. It was very easy to follow and I had the flush valve replaced in no time. (1.18.2019)
That’s great! Thanks for the comment.
This video is amazing. I do have a question. I have metal bolts and they're rusted so a lot harder to unscrew. Also how can I get the back bolt because I have no room from wall to toilet
hacksaw to cut them off. It will take a little elbow grease. You could try a little WD40 but they may be seized.
@@theXchange thank you.
Im having a friend come and help/do it. So hopefully by next week I'll have a new flush valve in
Thanks for this video Kris. I'll be attempting this tonight. :)
+Jason Mierek Right on! Knock it out!
I bought a Mansfield toilet for a rental two years ago and it was literally a Leaking Leena nightmare. From now on it's Kohler all the way.
😂
This is a great video, but if you just have a leaky seal - doing a Ghost flush - just replace the seal and not the whole assembly. It's easy peasy Mansfield® 211 Flush Valve : Seal Replacement - UA-cam
Thank you for this! I bought the whole kit, when all I really needed was the gasket. I was unaware they were sold individually. Saves me money and a huge mess!
Thx.. much gratitude and respect. Keep up the good teaching.
you're welcome! I'm glad it helped fix your toilet!
Kris what size adjustable wrench are you using on the flush valve plastic nut? Thank you
Hello 👋. It’s these ones here: www.amazon.com/gp/product/B000FK1R0W/ref=as_li_ss_tl?ie=UTF8&linkCode=sl1&tag=reese06c-20&linkId=d4aade7e5cc2796bc2dd609cf2e11e59
Got the larger one @ Lowes. Thanks!
Very helpful! Thank you.
You’re welcome! I’m glad you enjoyed it
Thanks for this! Also, Let's Go Blues!!
LGB!
Thank you for this video -- was able to replace the faulty flush value in my Type 160 with no fuss.
Awesome 👏 Thanks for the comment!
This was super easy to follow! Just saved me about $590 (replacing a toilet & fixing the flush valve in another), however, my toilet tanks are slowly losing water. The level is definitely going down, but not dripping outside of the toilet. not sure what I did, I am sure this is operator error. Any suggestions?
Its probably the ballcock assembly. U can change the level of the water in the tabk by tightening or loosening the screw at the top of the assembly. Its the thing on the left side that sprays the water into the tank. 1:42 is a clear pic of the screw and part im talking about.
The original hexnut is completely different from the one that comes with the replacement. The toilet gasket is supposed to fit over the hexnut and the tank is then lowered into the toilet. The gasket is NOT to be placed onto the toilet and the tank lowered onto it. It is impossible to fit the gasket over the new hexnut since the new hexnut is not circular like the original. You MUST use the original hexnut and fit the new gasket over it. Otherwise, when the toilet is flushed, you'll get water coming out from under the tank. As you may have noticed, Kris reused the original hexnut without explanation.
thank you!
Thanks this was very helpful!
Thanks tons for your help and video!!!
you’re welcome!
Question when should I replace the whole thing vs just the red seal? I replaced the red seal and it stopped the leak but feel it's the lazy way lol. Also when I replace the whole thing should I replace the gaskets on the bolts
It depends. If you remove the tank from the bowl, you’ll want to replace parts. This depends on the tank-to-bowl kit. For 630-6204-P-4, you’d want to replace the whole kit as those rubber knobs/ends could be dried out and worn, and thus could fail and/or not seal properly. For style 205172504, you want to at least use new rubber washers. The spud gasket would be another piece to replace as well, especially while you’re already at it removing the tank from the bowl
Replacement of just the red seal on the flush valve is fine, as long as the valve itself is in good working order, and replacing that seal did not involve removal of the tank.
@@theXchange so what i had purchased the new kit and just replaced the red seal but it started kept ghost flushing but found out the problem is I tried mixing old parts with new parts once I added all the old stuff back and kept the red seal it worked perfect
Tomorrow when I go get the vise grips I'll replace it all
Hello Kris Reese, great video! A question for you though. Was there a significant reason you replaced the SmartFasten Mansfield bolts with the original style bolt/washer/nut? I purchased the SmartFasten kit because they got good reviews from people who'd just installed them but had no history of their longevity. I'm wondering if you had some problems with them leaking or disintegrating or any issues with them. I was thinking of returning them and getting the standard bolt kit instead.
Great question!! There was no particular reason other than that’s what was available for me to purchase at the hardware store. Good on you for doing some research!! 😃
@@theXchange Thanks so much for replying! Take care!
Thanks for this video, other wise I'd be waiting on my landlord to repair it.
I hear that! I’m glad it helps!
I did everything, but the valve won't stay down, if I press it down it will hold for a few seconds but then pops up and the toliet bowl slowly drains, its like there is no suction???
Nice Vid, worked for me!!!
Awesome! Glad it helped.
I think, I may just need a replacement screw for the top of my valve, because it's not adjusting for the bulb manipulation. Is the screw supposed to go through the blue part, and screw into the white circle? I was trying to adjust the bulb, to stop ghost flushing, and the screw came out.
The screw can be used to adjust the bulb. maybe this video will help demonstrate that: ua-cam.com/video/99oj-NPYrEo/v-deo.htmlsi=yscCAlVqM94JDES2
Thanks for the video! Is the new tank to bowl kit really needed? Can the existing one be used?
+Elvis Alvarado I tried to reuse mine but it leaked. I could only surmise the rubber was worn and needed replacing. If you're running to the hardware store for a new flush valve, buy the tank to bowl kit in case you need it. If you don't end up needing it, return it! Hope that helps!
Kris Reese Thank you! I ended up buying and using it. Video helped out a lot!
Just broke the stop cap on my assembly. In looking at various videos I see it's supposed to just screw on (and off) but mine seems to have attached (due to age) to the top threaded part of the assembly and so technically that top tip of the tower has broken off. So now it looks like the entire tower will need to be replaced. Ugh.
yup. them are the brakes! 😂
question: If going as far as to remove tank, could you just replace the mansfield flapper with the same diameter fluidmaster flapper assembly?
depends on how far gone the rubber or plastic is of the entire part. Usually best to replace the whole things if it’s rather aged
Thanks so much!
Why do you need to remove the fill valve?
Thanks for video. Why are your tank bolts different on the replacement vs the removal? Thanks again..
They are different because my local home center did not have the same type as the original hardware. The original would have been just as ok to use.
Thanks Kris! Happy New Year.
Most definitely! Thanks for watching and Happy New Year!
Kris Reese wa
My toilet lever keeps slipping out of the flush lever holder loop when I flush. Any suggestions?
have you replaced the flush lever recently?
The flapper type flush valve is a much more reliable valve than the Mansfield type, as the sealing gasket will pull up off seat or won't seal properly after flushing.
It also flushes much easier without having to apply 20 pounds of pressure 😂
I replaced the red gasket and the valve won't do down by its self thus leaking water into the bowl. Does this mean I have to replace the whole valve kit?
There may not be a proper seal if it’s leaking. Be cautious not to over tighten.
Idk what was wrong with my old alto it would constantly be running sometimes and then also sometimes the handle would stay down but you lift back up and its fine
Why the old lock nut and not the new hex lock that came with?
Because the rubber gasket is circular, thus creates a better seal with less propensity for leakage.
That's what I figured. Unfortunately, I had to learn this the hard way. Thanks!
Next video: channel locks vs vice grips
😂
I just looked at my toilet and I don’t see a name anywhere so how do I knowing it’s a Mansfield toilet or not?
take the lid off your tank and look on the inside for markings or black stamp lettering
Pro tip just use a shop vac to remove the water 😂
wish I had one! 😀
@@theXchange informative video. I'm currently monkeying with a Mansfield toilet it helped out a lot.
good deal!
I’ve always sponged out all the water before raking it apart
great tip. sponging out the water would make less of a mess. buy one along with the plumbing parts!
the dumb lock nut on the bottom of my tank won't come off. I gotta go get one of those wrenches you have
There’s a link to the vice grips I own in the video description if you’re so inclined, although if your toilet is apart, you’ll need them much sooner! Remember not to over tighten when putting the lock nut back on! Good luck!
I just went to Home Depot and bought a wrench that will fit it.
everyone is a plumber to some degree thx to utube
Just jamming out to music then it drops out and i hear a screw sound. Click to youtube to see whats going on & it's at 0:37 sec
Well, the spud gasket is what i wanna see actually, and there's no picture of that. Thanks anyways.
sorry man!!
@@theXchange still a good video though
You are going to hell for using Blues rally towels for this.
hahaha. Nice 👍🏻
My goodness, if you got time to show the disassembly, why not the whole process,, we are looking for help here, we are laymen when it comes to this,, do the whole thing or just don't do it at all,, we all know things come apart much easier than they go back together,,,,, maybe you had some problems putting all this back together and became a layman yourself
before you get too upset, check some of my other videos. you will find what you’re looking for. Perhaps you’ll recant ;)