Canon EOS R5 Exposure Bracketing Setup Tutorial

Вставка
- Опубліковано 23 лип 2024
- Learn how to use Automatic Exposure Bracketing (AEB) on the Canon EOS R5 mirrorless camera and shoot HDR photos ready for merging in HDR software www.hdrsoft.com/learn
The tutorial will show you how to:
- Locate the Custom Functions menu and navigate through the menu
- Set the Number of bracketed shots
- Set AEB (Automatic Exposure Bracketing) and EV spacing
- Set the Drive mode to High Speed continuous plus
- Merge the photos to HDR in Photomatix
www.hdrsoft.com/photomatix-pro
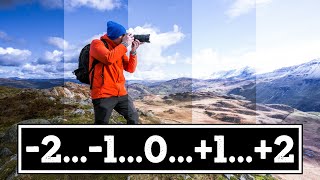
Follow this simple step-by-step instructions tutorial to take 3 photographs 2 EV apart (one photo 2 stops underexposed, 1 photo exposed normally and 1 photo 2 stops overexposed) by just pressing the shutter button on a Canon EOS R5.
~ Steps ~
0:00 Introduction
0:40 Locate the Custom Function menu to set the number of bracketed shots
1:15 Set the number of bracketed shots
1:51 Activate Automatic Exposure Bracketing (AEB) on the main menu
2:00 Enter the Quick Control screen
2:26 Activate the exposure scale and roll the main dial until the two markers reach + / - 2 EV
3:24 Setting drive mode to Continuous Shooting
3:37 Use the Quick Control menu to set Continuous Shooting Mode
3:44 Highlight High speed continuous +
4:09 Press and hold the shutter button
4:18 Merge the bracketed photos to HDR in Photomatix
Read the EOS R5 Advanced User Guide from Canon:
cam.start.canon/en/C003/manua... - Навчання та стиль


Nice tutorial. One option folks should consider is to use AV (aperture) mode which will control the shutter speed automatically. Big time saver on big jobs. Also, set timer to 2 sec which allows the camera to be perfectly still when the shots are made after the shutter button is pressed.
Thank you. ❤
brilliant, thank you
hey. thanks for the video. do you know why, when i set to timer, sometimes it will shoot all the shots it needs for hdr, and other times i have to press the shoot button again for every shot?
Hello @FordSierraIS,
Good question. Maybe Bracketing auto cancel is set to ON (Menu > 6th tab > p. 1), and/or sometimes the autofocus struggles to find focus.
@@remaxsignaturehomesofclost5636 hi. you misunderstand. when i shoot a bracket, many photos are needed. and i want it to do them all without me touching the camera. there is a timer before the intital shot is taken
When I set my Canon on AEB mode and set it to a 2-second delay timer, the camera will take all the shots programmed with one press of the shutter. When I do not have the camera set on a timer delay, the shutter will need to be pressed for every shot unless I keep the shutter button pressed. You have to keep the shutter button depressed manually in AEB mode for all the shots to be taken. If you do not want to touch the camera itself, you will have to attach a remote shutter button. You will still have to manually depress that until all the photos have been taken, but at least you will not introduce camera shake. I think Canon does this because they want to allow you to adjust each bracketed shot as they are being taken. Other cameras, like the Fuji, will allow you to press the shutter once in AEB mode, and all the photos will be taken. I wish Canon would add that option on my camera, but I am not holding my breath and just use a remote shutter button because I often do not want the delay on the shots that I am taking.
Unfortunately, the settings that I have already made in my new EOS R5 as instructed by previous other videos must have made a difference in the Quick Control screen that appears in the video above at 2:03. 1) In the top row I have no "OFF" text on the waving hand 2) No circle appears in the middle of my screen 3) On the bottom left, a framed image of camera and hand with extended finger appears, when touched it shows the text "Touch Shutter: Disable / Enable" 4) On the bottom line, the symbols for shutter speed, F-stop setting, and ISO setting appear framed (but not the exposure bracketing symbol). Pressing the INFO button three times will not lead me to the image of Quick Control screen seen at 2:12, but loads of symbols on both sides of the screen, plus various column and bar symbols. - Please advise me how to correct my false settings to be able to arrive at the screen image as at 2:12 in your video.
Hello @hannumononen6345,
Sorry to hear that. Instead of strictly following the video in that case, focus on the relevant settings:
1. Manual Mode (M),
2. Number of bracketed shots,
3. Setting the EV spacing, and
4. Continuous Shooting
Pressing the Info button should cycle through all available views. One of them is the screen at 2:02.
However, ignore the circle (my individual setup) and the steady shot indicator. Not all indicators shown on the screen before entering the Quick Control screen are relevant for setting up exposure bracketing.
If you see a different Quick Control screen or can't find it either, try setting EV spacing in the main menu:
- Press the Menu button
- Navigate to the red camera tab > page 2 > Exposure Comp./AEB
- Dial 6 times to the right until the 3 markers show a 2 EV spacing (supposed you set 3 for the Number of bracketed shots)
- Press the Set button to save, and the Menu button to exit
Make sure your shutter is in the mechanical mode, otherwise it won't work. It took me an hour :(