Setting up Exposure Bracketing on a Canon EOS RP

Вставка
- Опубліковано 23 лип 2024
- Learn how to use Automatic Exposure Bracketing (AEB) on the Canon EOS RP and shoot HDR photos ready for merging in HDR software www.hdrsoft.com/learn
The tutorial will show you how to:
- Locate the Custom Functions menu to set the Number of bracketed shots in a bracketed set
- Set AEB (Automatic Exposure Bracketing) to a spacing of 2 EV using the main menu
- Set the Drive mode to High Speed continuous to let the camera take all 3 photos by pressing and holding the shutter button
- Merge the photos to HDR in Photomatix
www.hdrsoft.com/photomatix-pro
~ TIMESTAMPS ~
0:00 Intro
0:46 Locate the Custom Function menu to set the number of bracketed shots
1:20 Set the number of bracketed shots
2:10 Activate Automatic Exposure Bracketing (AEB) on the main menu
2:21 Go to the first tab shooting and to page 3 Exposure compensation/AEB
2:31 Enter the Exposure Compensation/AEB setting page
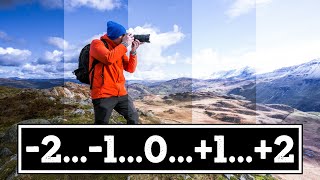
2:49 Set a spacing of 2 EV between each exposure
2:58 Locate the main dial
3:07 Roll the main dial until the two markers reach + / - 2 EV
3:36 Switch drive mode to Continuous
3:45 Use the Quick Control menu to set continuous shooting
3:56 Highlight High speed continuous
4:13 Press and hold the shutter button
4:20 Merge to HDR in Photomatix - Навчання та стиль


~ TIMESTAMPS ~
0:00 Meet the Canon EOS RP and Mark from the Photomatix team
0:46 Locate the Custom Function menu to set the number of bracketed shots
1:20 Set the number of bracketed shots
2:10 Activate Automatic Exposure Bracketing (AEB) on the main menu
2:21 Go to the first tab shooting and the page 3 Exposure compensation/AEB
2:31 Enter the Exposure Compensation/AEB setting page
2:49 Set a spacing of 2 EV between each exposure
2:58 Locate the main dial
3:07 Roll the main dial until the two markers reach + / - 2 EV
3:36 Switch drive mode to Continuous
3:45 Use the Quick Control menu to set continuous shooting
3:56 Highlight High speed continuous
4:13 Press and hold the shutter button
4:20 Merge the photos in Photomatix
4:27 Download Photomatix Pro
Incredibly detailed and easy-to-follow instructions! Thanks very much.
Great teacher great demo!!
Best tutorial. Thank you!
Perfect tutorial! Many thanks!
Wow! Amazingly detailed tutorial.
Thank you so much
You are amazing….thank you for the perfect directions!
Amazing Short smart tutorial, 👏👌👍
Amazing video. I just found you and subscribed! Thank you!
Excellent video :)
excellent tutorial
Many thanks. I am glad you like it.
Awesome thank you!
Great job, thanks
This is one of the best videos on UA-cam. Lol.
Thank you sir
Hi can this camera also have a flash bracket on the hotshoe whilst the exposure brackets are running? Thanks
Hi The Sturminator, according to the manual AEB cannot be used with a flash on the RP. However, as a workaround I could envision it works to trigger the flash when AEB is set to one image at a time with a press of the shutter button. The flash needs to be set up manually (no TTL or ETTL).
how do I cancel the exp. bracketing once I'm done with it? great tutorial btw
Hi Luis. Just use the main dial to bring the Exposure Comp./AEB settings 'pointer' back to zero. Turning off your camera should also cancel AEB.
How can I get a 2 EV spacing for 5 shots? It doubles up on my EV spacing when I want to do 5 shots.
Thank you for the explanation, but It would be possible to set for one press one time and the camera work automatically ???? in my old Canon rebel 3 worked automatically without you need to keep holding the button. Thank in advance for your answer.
Hello Sergio, to achieve that you could set up a 2 second self-timer (or a 10 second self-timer).
hello. I've done the same settings as you explain but when i'm taking a picture it takes 9 instead of 3...
Could you help me please? ;)
Hi @eric sayah,
this sounds strange since the EOS RP can only take 7 exposures in a bracketed set. I have only two possible explanations: either the HDR Mode is activated (unlikely, AEB is impossible if so) or possibly the shutter release button is pressed automatically for 3 bracketed sets?
- Please check in the menu under Shooting > page 5 > HDR Mode if it is disabled.
- Check in the Quick Control menu (Q/Set button) if the drive mode is set to Self-Timer with a small 'C', and set it to High Speed Continuous
How does this translate into a function key that I can switch between single shots? For example, I want 5 ambient bracketed exposure shots, but then several single flash shots.
@Michelle Baumbach Set up the exposure values the way you need them then enter the main menu. Navigate to the third register (the one with the wrench) > page 6.
Go down to the Custom Shooting Modes(C1-C3) entry, and enter it.
Here it is where you can register the current settings to one of the three custom registers (C1, C2, C3) you'll find on the mode dial on top of the EOS RP.
It can even be set to automatically update the C1-C3 settings respectively, while you selected them on the dial.
See the user manual on p.408:
www.manualslib.com/manual/1537878/Canon-Eos-Rp.html?page=408
Quel enfer, devoir mettre soit même les prises en continu :o
Are you then taking photos in Manual? Can you switch back to AV?
Hello Carole,
yes, I usually shoot in manual mode.
You can take bracketed photos in AV mode as well.
Just unboxed the Canon EOS RP and followed all the steps but it’s only taking 1 photo. What’s something I could be doing wrong? I’m trying to get 3+ bracketed photos
Check if you enabled "High-speed continuous shooting" mode using the Q button (on the quick control menu tab/press the frame icon). If that doesn't expose all 3 images, try switching the auto focus switch on the lens to MF, or choose an AF setting in the main menu (camera icon > p. 7) or quick control menu (Q button) like ONE SHOT AF.
BTW, the drive mode requires to be set to AV or M for bracketing to work. In P mode the automatic exposure system might prevent the camera from taking underexposed photos.
Doesn’t eos rp have a HDR setting where it takes 3 shots and the camera Merges them into 1 picture
Hi Mark! In-camera HDR takes multiple shots and automatically combines them into a single image (usually JPEG), so users don't have much control over it. It is a completely separate thing from manually taking bracketed photos and processing them using an HDR software like Photomatix, where users have more control.
Wait how do we take it off
Hello Soph Abela,
You can perform all steps in reverse order, or just power off the camera and on again.
If I turn the camera off, the bracket spacing settings are reset. Is there a way to permanently save it to 2 EV?
I figured it out. You go into the Custom Settings menu area and "Disable" Auto in Exposure Bracketing area. It was set to "Enable."
Hi Mike,
Excellent that you found one way to keep the bracketing settings until the next restart of the camera!
My suggestion would be to save all settings (auto exposure bracketing included) into one of the custom settings C1 to C3. This way you could even have 3 different bracketing settings handy.
Thank you! I will take a look.
Nikon Z72
Why did you use a digital voice with a fake US accent? Those robot voices are so annoying.
I'll take that as a compliment, Alan, but I can assure you: I'm no robot.
Oh gosh. AI has now made everyone think everything is robotic now. He sounded human to me with perfect articulation. The pauses in between help a lot as too many tutorials move fast.