Great video. I have watched my friend do this in his fiberglass business. You have the benefit of the cnc and cad equipment he did all that by long hand. Same result as you. Thanks for the vid
well I am... hoping to score a composites oven before end of the year... but as I'm 'in the states' I have to figure out how to change the power supply connector
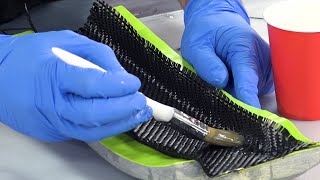
Subscribed! Just a note: Instead of car body filler like used in the video, there is a spray-on filler which would provide a even coating to take care of the porosity of the foam while not requiring much (if any) re-sanding. Then you can just use fairing compound or "bondo" to fill the large gaps. Also note the spray-on filler does not shrink, so that's a bonus.
Thanks for the post, what’s that filler product? We have our own Pattern Coat Primer (which you’ll have seen used in this video) but I guess you’re talking about something much higher build than that? Always interested in new methods 😀
Great video, as usual. A good distraction from making CAD videos for my students. Thanks for showing the mistake in the video, it's really important for people to know that they happen to everyone.
Thanks Keith. Agreed on the mistakes, they do happen to everyone so it's not helpful to always cut them out. The bit you *never* see in our videos is LOT of vacuuming up, but there is that too ;)
I've been in the fiberglass industry for 30 yrs. Most of it as a pattern and mold maker. Before we had a five-axis CNC machine we would employ the same methods except we would obviously hand cut all of our profiles. Then we would make our own drag tools for whatever size radius we were implementing. So many things you can do when you have these skills. I've made one off car and motorcycle parts for people, I've put truck caps together that were broken in half, it's really good work and I miss it now that I'm a plant manager running production.
Thanks for the feedback Todd; great to hear about your experience of these methods in the industry. Maybe you should take a composites project on that you can work on from a home workshop, just to keep your hand in on the practical side! We do this all day and still go home and do our own projects; it never gets boring!
Absolutely love the encouraging attitude and alternative lower end tools and approaches being mentioned. I can see myself possibly doing a project of this kind in the distant future.
Being US pattern makers since 1958 it's interesting to watch. We also produce a lot of larger patterns and molds for composite products ( fiberglass), mainly architectural , columns , cornices, domes and facia panels. We use the similiar method to this on our larger shapes. On larger parts we do use a wooden strongback to build the parts on if too large for a surface table. We use water jet to cut out main framing materials as it's quicker and cheaper that routing. We also try not to have the framing come to the surface, the difference in material can make them show up in the finished pattern. We also try to keep all our framing running in one direction , it simplifies the assembly of larger parts and the slicing and dicing of the model if using cad. ( add 90 deg framing for strength as reqd) We also use wood/MDF/particle bd for framing but simple wood glue is much cheaper and simpler to use with nails or screws to hold while it sets. My patterns always have to be transported over the road to the customer so they have to have better structure to survive the trip. Great video nice to see pattern or plug making as I used to call it in the U.K. on YT. Cheers Warren , W.D.Pattern co The final surface skin is always the hardest decision. The filling the gaps with foam method we have used successfully but is crazy messy and on large parts requires a lot of hand work on big pieces like large dome sections 20' long and 6-8 ft wide. It also requires the frames on the surface to hold the shape and that leads to frame print thru on pattern or sometimes in the mold. We have used a layer of fiberglass cloth over top to minimize this. And FYI the large foam you are using is in the USA very expensive , $20-50 per board ft so is hard to be competitive with that cost of material. You finishing materials are the same type as we have here in the USA, our choice of sprayable material was reduced when Valspar stopped producing their line a couple of years ago ( Fourseal). Our go to now is Duratec line from Hawkeye Ind. Is there room for another supplier, probably. ( there are various automotive branded options too). Great video , good to see pattern or plug making as I called it in the Uk on YT. Cheers Warren WDPattern Co ( also on IG)
Thank you for your comment Warren, it’s great to hear your methods, experience and thoughts. PU foam is not quite in the $20-50/sqft territory in the U.K. but it’s not far off. The method and materials shown in this tutorial certainly aren’t the ‘budget’ option but they are at least a lot cheaper than an ‘all out’ CNC machined pattern. Anyway, thanks for your comments and look forward to your insights in the future 😀
This is how airplane masters were made as little as 20 years ago from 2-D drawings. The templates were typically aluminum and the lofts were made of plaster.
Absolutely and for small scale production runs or low budgetary projects, its still perfectly useable. Its very much the process used to construct boat hull moulds as well.
This is how we made supermileage car chassis at university. In fact that sled upside down almost looks like one! Brought back some memories of hours of sanding!
Really like these composite videos you put up. I've done a lot of pattern building, and yes, an arctic expedition sled as well :) I didn't have access to prefab dense polyurethane foam blocks like you used, but had to pour A-B Urethane resin into the frame and sand it down. I'd like to recommend that if you go that way, after sanding the urethane down, wet a layer or two of fine fiberglass cloth over the whole pattern to seal the urethane and create a stable platform for bodyfiller and primer work. Polyester resin is fine. I've had the bodyfiller destabilize the urethane so that the surface was no longer true a few days later.
Thanks Hakon, appreciate the feedback and suggestions for people. Expanding foam is a possibility, for sure, but as you've found, the surface finish and internal texture does result in more work (but cost saving on the PU foam).
Для ускорения процесса доводки поверхностей, я бы рекомендовал вначале задуть жидкой шпаклевкой из пистолета . Потом протянуть шпаклевкой поверхности . Это поможет адгезия шпаклевки основных плоскостей.
Slicer plugin for Fusion 360 can make the interlocking profiles. You can choose the spacing and amount of slices you want. It will save you a lot of time and work
While you can't automatically generate a framework inside a design in Fusion, there _are_ however built-in tools and features that will allow you to arbitrarily trace a model's cross-section to a sketch, and from there you'd just have to add a few lines to close the bottom, add whatever weight-reducing cutouts you want, and extrude it to make one of the ribs.
Thanks for the feedback. We were aware of some of the 'slicer' type plugins but and maybe tools like this could have have got us to the end-point slightly quicker. To be honest, a lot of the CAD work was making the pieces interlock correctly and designing-in ways to use panels of flat sheet for any areas on the surface of the pattern that were indeed flat, this reduces the amount of foam/filler work a lot but this sort of detail is never going to be understood or provided by cross-section/skeleton plugins.
@@easycompositestv Good to know. But the main reason was, I don't have spray booth and all the PP equipment. But the result is almost perfect, I'm quite surprised how it came out.
Is there anything you can’t do lol. Amazing work. F1 should be calling you. Thanks again for another great how to. You’re the reason why i buy from easy comp.
Haha, thanks. This series is a bit more traditional really so not quite F1 this time but maybe more like the composites that a lot of people still need to understand for their own projects. Glad you like the tutorials and thanks for being a customer!
@mrarkane: You mean you don't like those how-to vids where every sentence starts with "Now I'm *gonna go ahead* and...", "Now I'm *gonna go ahead* and...", "Now I'm *gonna go ahead* and..."
Super nice. I made a very similar plug a few years back. I drew it up to scale on graph paper then measured the sectionals of it and transfered that to plywood. Then filled the voids with newspaper then topped up with 2 part expander foam. Finished off with filler then coated with epoxy primer.... It was a SUUUUUPER ambitious job for a first attempt but a success in the end. Got a plug a mold and a finished part.
I have made a complete car buck based on the Ferrari 166mm and used your products for the top coats as per your new video. They are fantastic products. I hope to do the fibreglass mouldings soon. Andrew.
Thanks Andrew, that's great to hear. Please get in touch through our website if you have any news or images to share of the project - we're looking for more projects to feature in our new Gallery section; we love to share projects and inspire others to have a go.
Thanks for the comment. We can ship certain products to Australia but not anything classed as 'dangerous goods', which - of course - does rule out a lot of our products. We do keep our Australian customers in mind and hope to find a better way to support you in the future.
Lol, thanks. Well, we've learnt over the years that trying to go down what seems to be the simplest or most basic route ends up taking much longer in the long run so we go full-fat from the start and then it usually comes together the way we wanted.
I’m halfway through building a 1:100 model Titanic. (It’s 882.9in. long) I used the pink low density foam between the framing, BUT I used a hot wire to shave off the excess foam. This left dips, waves and concave cavities along the foam, which I’m having to fill with a combination of plaster, expanding foam, epoxy putty and sand. Very tedious. I really wish I had taken your approach of sanding off the excess instead. Looks amazing BTW.
Hello there! I'm a marine engineer with experience in steel/aluminum vessels, but I've recently started a company specializing in composite yachts. Thanks to your informative channel, people are surprised to see my knowledge of composite production surpassing theirs :). Regarding the featured video, if we're aiming for a one-shot application, would it be advisable to prepare a female pattern using the same method and use that as the mold?
By one shot do you mean making a single moulding as a prototype or reduce the mould making phase to a single step? For one off moudlings or prototypes consider the mouldess construction method ua-cam.com/video/0Yaggj16S08/v-deo.html The reason for making a pattern first is that you have an exact replica of the final part for reference. Smaller tools can of course be directly machined however larger moulds like this are generally best made with a composite construction. This is really only possible by laying up the materials onto a pattern. The tooling gelcoat has an air cur inhibition which means that it can crosslink with the subsequent layers but would not cure properly if applied last. Additionally it's hardness which makes it durable as a mould surface means that it is much harder to sand and finish than a pattern coating material.
@@easycompositestv Thank you for sharing this video; I haven't watched it yet, so I appreciate that. I'll do my best to explain my idea, but I apologize if it's confusing: Essentially, I'm combining elements from both videos. We'll create a pattern using MDF and PU foam, with reversed frames on the pattern. After applying filler, surfacing, painting, and polishing, this pattern will resemble the mold shown in the next video (where the inside of the pattern is used for laying up the exterior side of the sledge). My plan initially involved vacuum infusion, but your video mentioned that vacuum won't work with foam. Does this also apply to PU foam?
@@abdullahayhan3181 The issue with your proposed method is the longevity of the surface and the strength of the mould. It may be robust enough to take one or 2 pulls from it, as you would to make a mould tool. Dedicated tooling gelcoats and resins will provide a much harder wearing mould tool that can be used many times without the same levels of wear. The ability to vacuum will depend on the position of the the MDF and the grade of foam. If the mould is strong enough to resist crushing or distortion and the 'gelcoat' is thick enough to create a sufficient barrier then in theory to would be possible if far from ideal.
Hi, yes changing the water between grades of abrasive means that you aren't transferring any of the more coarse grit onto the surface when using a finer grade. The risk of not doing so is that you reintroduce the deeper scratches as you are trying to remove them.
Very interesting to watch. I'm learning new things. I was eager to see how you went about making such a large object for making your molds. Now that I've seen it, I can only qualify it as great workmanship.
When do you want a high gloss finish, and when do you make do with a rougher surface finish? What effect does it have on the end product? Is the mold single-use or can you make however many moldings you'd like? Will reuse degrade the surface finish?
Most often, it's just down to aesthetics; a smooth, shiny component looks like a well made and well finished component. Also, components will release much better from a smooth glossy mould whereas they will tend to 'grip' into a poorly finished one. Although this video is about making the pattern, when we make the mould in the next video that mould can be used to make hundreds of parts, there is really no damage or deterioration caused to the mould by each release.
At our pattern shop they have blocks of foam that they stack up and screw together and then after they have a monolithic block larger than the finished project will be they just cut away until they have the shape finished perfectly
Hi Todd, yes, that's the standard way if you have a large CNC; you'll see plenty of videos we've done which show CNC routing of the pattern. This video was more about how you could make a large, accurate pattern if you *didn't* have a large CNC mill.
There are quite a few people I have turned on to your sit, all from the states. We have several composites supply houses for smaller quantities, but they are obscene expensive and lack the detailed information you provide. Being a composites engineer myself I have access to the whole sellers, but not decent small quantity supplier for my own projects. I would be interested in assisting a US based operation, if so interested.
Thank you, appreciate your comments. Please feel free to drop us an email with your contact info, we’re getting towards the point of making some more series investigations into this.
I notice you use filler directly over the foam followed by the primer. I have a project similar in shape to your sled but about 16’ long. The info I read up to now recommended using Fiberglas layup over the foam, then the filler, then primer. I would rather save the step of Fiberglass, do you feel the plug would be stable enough without the fiberglass? It would speed up my timetable. Thank you for all the vids and info, I wish you had a sales outlet in the US!
Such a wonderful video, project, array of products and information. I look forward to your products being in the US at some future point. This makes me want to build a custom workshop sooner than later.
Water Putty is my preferable alternate to body putty:: it’s water based (gypsum with vinyl), does not shrink when drying, is easily sandable, and cheeeep. SOOO CHEAP! takes surface paint flawlessly; resin is a breeze.
There use to be a slicer part of 123D that sectioned everything out of a solid form and had options for dowel holes to align pieces. It then output everything in a PDF or EPS file to send to the router programme.
Well, that sounds like a seriously handy function for this type of work. Since 123D was Autodesk, I wonder if anything like that made it over to 360. We've not found it, if it did!
after fixing the imperfections on the first coat of primer, aside from using compressed air to blow the dust off, do you use a solvent to clean the surface?
I saw this as a demonstration of a method rather than the very best method for this particular part. Different people are going to have different approaches depending on the tools/equipment/skills/budget available. This was one method.
Well, we've had it for 5 years now and it's never had a problem. We don't hammer it day-in-day-out but it's been a reliable machine that we've ended up using for a surprising number of projects. For heavier milling we'd suggest something with ball-screws though.
Hi Cesar, thanks, you can indeed. If people want to see this technique we showed it in our other pattern making tutorial (the one about making the airbox pattern by hand).
Hi EC! If my pattern (a solid one) is actually my final mould, used one time only, only one pull for my part, and i coat it with Polyester Pattern Primer, then polish it, - will it be ok for my part to be an Epoxy wet lay lamination? - if ok, what type of release agent to use? Thank you very much! Best, Mircea
Hi Mircea, It's a slightly unusual combination and polyester tooling can sometimes cause problems with epoxy parts. PCP is a bit of an exception though. I recommend doing a small test first and see how you get on but I think you'd be okay and shouldn't have any demoulding EL2 from PCP. Easylease would be a good option for the release agent. We also recommend a single coat of release wax on top of the easylease when hand laminating as it provides a slightly more grippy surface for the initial resin to be brushed onto. Easylease alone can cause the resin to fish eye and split on the surface.
How many times could this mould be used before the quality of the finished product becomes compromised? Do you have any solution ideas for mass production?
No as it is a positive instead of a negative. You could make a negative pattern and use it as a one off or low volume mould. The pattern coat materials are not as durable as proper tooling gelcoats so the surface would damage easily.
@@easycompositestv please do that! I'm in Canada but I wouldn't ask for a store down here. Easy Composites in US would be enough and much appreciated, immediate success!
Bathtub. I would like to see a video on making insulated fiberglass custom bathtub. What particularly intrests me is what gel coat to use that will hold up to cleaners. Also im worried about hot water softening and deforming the tub. Thanks.
Hi Tom, interest project. Well, the mould we make in the next part of this series certainly looks like a bathtub!! There are some good gelcoats specially for sanitary ware, Scott Bader and Nord Composites both have some. TG of the resin system (and gel) would need some consideration but it’s certainly doable to have a system that wouldn’t be at risk of distortion from hot water.
Hi would it be possible to make modifications to the pattern after the final coating (small design changes down the line) or would you have to make the pattern again from scratch? If it is possible, how would you go about doing it?
Perfect timing I’m about to make a mold for my front bumper and fenders and seeing you work something as large as this sled will be an excellent primer for my project can hardly wait. And I second the motion for a store in North America. 👍
One thing i learned the hard way was not to make a hermetically sealed pattern, because workshop temperature changes resulted in 'greyhound ribbing' defined by the hard mdf profiles with softer pu foam between
Hi James, yes, that's a good 'heads up' for people. It's not really a consideration on a large pattern of this form because we're not dealing with a 'solid' shape (all faces sealed) but it would indeed be a consideration for and form that is a 'solid' shape.
I was watching some large composite yacht building videos and the largest I saw using a mould was 64 feet. There were larger composite yachts (up to 105 metres or 300+ feet) but it didn’t go into how they were made. Are yachts over 100 metres in size still made using moulds? Are moulds still a viable (if damn expensive) method for objects that size?
There still needs to be a mould of some form in most cases although it may be sectional on very large structures. The 49.5m/162'5" motor yacht 'Khalilah' by the American shipyard Palmer Johnson was the largest resin infused hull at its time of building (although may have been surpassed now) and that was a single hull mould tool.
why I didn't see this video many months before, I do the mould by hand with any ideas that result in a lot of work, this would be very easy... excellent video... where is the next video of this mould? excellent, greetings from Chile
Excellent description of the process. I intend to build a sidecar outfit and naturally will need to form a shape. So with some knowledge from this video will be able to plan out my design.. Thanks👍👍👍👏👏
Основные операции сделаны верно. Не соглашусь с мокрой шлифовкой поверхностей. Осуществлять шлифовку руками не верно . Подушечки пальцев не обеспечивают качественную доводку поверхностей. Необходимо иметь мягки шлифки ( эластичные ) , разной мягкости , и доводить ими . Под ровные поверхности одна одна жесткость . По д радиуса другая.
Hi Albert. To be honest, the method shown in the video is about the most economical way of pattern making. Using a manufactured board for the skeleton and flat sections reduces the quantity of the more expensive, but easier to shape foams. As explained in the video, standard MDF could be used over the moisture resistant variety, but we find that the result is slightly crisper.
Yes, probably in that region. It's a pretty big pattern though. Much of the cost in something this size is unavoidable; you're going to need some material for the structure and MDF is about as cheap as it gets for this purpose. There's a bit of cost in PU foam but you've got to have some material that you can shape and finish; you could use polystyrene which would be cheaper but it's not nice to try to shape and then any type of solvent (bodyfiller, pattern coat resin etc.) will melt it so you would need to coat the polystyrene in something like epoxy anyway - by this point, using PU foam is probably not much more expensive and will give a better end result in less time.
considering the time needed for all the process, and the fact that it is difficult to get a quality pattern, is not better go for a 3rd party service that cuts for you the pattern with a cnc or print it with a 3d printer?
It can be cut from model board by CNC but we have featured that before. The cost of large amounts of Model board and CNC cutting time is also quite expensive for many DIY/low volume composite projects so this method is both reasonably cheap and also reasonably quick to do, yet still provides good results.
Appreciated. To be honest, we've known some real 'old school masters' at pattern making over the years; craftsman who's hand building and hand finishing skills make your heart ache. Not too many of those guys around now!
I dont feel like im your target market but thank you for takeing the time you share your skills with everyone else in a friendly way, Looking tru the channel you should post a little more often :P
Thanks SnapPilot. We’re trying to post more often but compared to a lot of content on UA-cam the amount of time and resources needed to make a video like this are, for us at least, pretty significant.... weeks of work for a single video. That said, the remaking 3 videos in this series should be along pretty soon 😀
Watch our Bonnet video series as we make the mould from the original panel in that video series. The principle seen in that video is the same for a fender.


I'm not in the market for your products but I watch your videos anyway--so interesting and well-presented; a pleasure to watch.
same\
That's absolutely fine by us. If you ever are in the market, or you know someone who is, then you know where we are :)
Adam E. It is fascinating to see how things are made.
Great video. I have watched my friend do this in his fiberglass business. You have the benefit of the cnc and cad equipment he did all that by long hand. Same result as you. Thanks for the vid
well I am... hoping to score a composites oven before end of the year... but as I'm 'in the states' I have to figure out how to change the power supply connector
I never realized how much love and labor went into this. Wonderful craftsmanship!
For now I will stick to building my projects out of OSB scraps.
One of the best channels for molds and models. Curls for your work
Your videos just keep getting better and the scope of the projects are getting really advanced. So impressed.
Thank you, appreciated.
Subscribed! Just a note: Instead of car body filler like used in the video, there is a spray-on filler which would provide a even coating to take care of the porosity of the foam while not requiring much (if any) re-sanding. Then you can just use fairing compound or "bondo" to fill the large gaps. Also note the spray-on filler does not shrink, so that's a bonus.
Thanks for the post, what’s that filler product? We have our own Pattern Coat Primer (which you’ll have seen used in this video) but I guess you’re talking about something much higher build than that? Always interested in new methods 😀
Great video, as usual. A good distraction from making CAD videos for my students.
Thanks for showing the mistake in the video, it's really important for people to know that they happen to everyone.
Thanks Keith. Agreed on the mistakes, they do happen to everyone so it's not helpful to always cut them out. The bit you *never* see in our videos is LOT of vacuuming up, but there is that too ;)
I've been in the fiberglass industry for 30 yrs. Most of it as a pattern and mold maker. Before we had a five-axis CNC machine we would employ the same methods except we would obviously hand cut all of our profiles. Then we would make our own drag tools for whatever size radius we were implementing. So many things you can do when you have these skills. I've made one off car and motorcycle parts for people, I've put truck caps together that were broken in half, it's really good work and I miss it now that I'm a plant manager running production.
Thanks for the feedback Todd; great to hear about your experience of these methods in the industry. Maybe you should take a composites project on that you can work on from a home workshop, just to keep your hand in on the practical side! We do this all day and still go home and do our own projects; it never gets boring!
Absolutely love the encouraging attitude and alternative lower end tools and approaches being mentioned. I can see myself possibly doing a project of this kind in the distant future.
That's great to hear Siana, if you go for it, let us know how you get on.
I needed this tutorial 6 years ago.
Mmmm, sorry about that.
Being US pattern makers since 1958 it's interesting to watch. We also produce a lot of larger patterns and molds for composite products ( fiberglass), mainly architectural , columns , cornices, domes and facia panels. We use the similiar method to this on our larger shapes. On larger parts we do use a wooden strongback to build the parts on if too large for a surface table. We use water jet to cut out main framing materials as it's quicker and cheaper that routing. We also try not to have the framing come to the surface, the difference in material can make them show up in the finished pattern. We also try to keep all our framing running in one direction , it simplifies the assembly of larger parts and the slicing and dicing of the model if using cad. ( add 90 deg framing for strength as reqd) We also use wood/MDF/particle bd for framing but simple wood glue is much cheaper and simpler to use with nails or screws to hold while it sets. My patterns always have to be transported over the road to the customer so they have to have better structure to survive the trip. Great video nice to see pattern or plug making as I used to call it in the U.K. on YT.
Cheers Warren , W.D.Pattern co
The final surface skin is always the hardest decision. The filling the gaps with foam method we have used successfully but is crazy messy and on large parts requires a lot of hand work on big pieces like large dome sections 20' long and 6-8 ft wide. It also requires the frames on the surface to hold the shape and that leads to frame print thru on pattern or sometimes in the mold. We have used a layer of fiberglass cloth over top to minimize this. And FYI the large foam you are using is in the USA very expensive , $20-50 per board ft so is hard to be competitive with that cost of material.
You finishing materials are the same type as we have here in the USA, our choice of sprayable material was reduced when Valspar stopped producing their line a couple of years ago ( Fourseal). Our go to now is Duratec line from Hawkeye Ind. Is there room for another supplier, probably. ( there are various automotive branded options too).
Great video , good to see pattern or plug making as I called it in the Uk on YT.
Cheers Warren WDPattern Co ( also on IG)
Thank you for your comment Warren, it’s great to hear your methods, experience and thoughts. PU foam is not quite in the $20-50/sqft territory in the U.K. but it’s not far off. The method and materials shown in this tutorial certainly aren’t the ‘budget’ option but they are at least a lot cheaper than an ‘all out’ CNC machined pattern. Anyway, thanks for your comments and look forward to your insights in the future 😀
This is how airplane masters were made as little as 20 years ago from 2-D drawings. The templates were typically aluminum and the lofts were made of plaster.
Absolutely and for small scale production runs or low budgetary projects, its still perfectly useable. Its very much the process used to construct boat hull moulds as well.
This is how we made supermileage car chassis at university. In fact that sled upside down almost looks like one! Brought back some memories of hours of sanding!
Yes, we’ve been there ourselves, many times, finishing patterns ‘till we have no fingerprints!
I like how you always add information about diy on a budget👍
Thanks Hanes, we all have to start somewhere and certainly when we started out we really had to try to save where we could.
Really like these composite videos you put up. I've done a lot of pattern building, and yes, an arctic expedition sled as well :) I didn't have access to prefab dense polyurethane foam blocks like you used, but had to pour A-B Urethane resin into the frame and sand it down. I'd like to recommend that if you go that way, after sanding the urethane down, wet a layer or two of fine fiberglass cloth over the whole pattern to seal the urethane and create a stable platform for bodyfiller and primer work. Polyester resin is fine. I've had the bodyfiller destabilize the urethane so that the surface was no longer true a few days later.
Thanks Hakon, appreciate the feedback and suggestions for people. Expanding foam is a possibility, for sure, but as you've found, the surface finish and internal texture does result in more work (but cost saving on the PU foam).
Для ускорения процесса доводки поверхностей, я бы рекомендовал вначале задуть жидкой шпаклевкой из пистолета . Потом протянуть шпаклевкой поверхности . Это поможет адгезия шпаклевки основных плоскостей.
Slicer plugin for Fusion 360 can make the interlocking profiles. You can choose the spacing and amount of slices you want. It will save you a lot of time and work
Great idea...you could then scale it, print them in real size and build paper or cardboard templates for the shapes...awesome.
Your videos rock because although you guys use the proper tools and techniques, you also mention how someone could do it in their garage. Rock on!
Thanks Tyler, we try to do that for sure 👍
While you can't automatically generate a framework inside a design in Fusion, there _are_ however built-in tools and features that will allow you to arbitrarily trace a model's cross-section to a sketch, and from there you'd just have to add a few lines to close the bottom, add whatever weight-reducing cutouts you want, and extrude it to make one of the ribs.
Thanks for the feedback. We were aware of some of the 'slicer' type plugins but and maybe tools like this could have have got us to the end-point slightly quicker. To be honest, a lot of the CAD work was making the pieces interlock correctly and designing-in ways to use panels of flat sheet for any areas on the surface of the pattern that were indeed flat, this reduces the amount of foam/filler work a lot but this sort of detail is never going to be understood or provided by cross-section/skeleton plugins.
Best video I've seen on this subject so far!
Thanks Chris, appreciated.
Thanks Charles, that’s praise indeed.
This is relaxing to watch :). It's basically how I was repairing my car, but I used spray cans (one part).
Thanks Rick - One thing to watch with rattle can paints is that Ester based resins can attack them and cause them to pucker or peel off the substrate.
@@easycompositestv Good to know. But the main reason was, I don't have spray booth and all the PP equipment. But the result is almost perfect, I'm quite surprised how it came out.
Happy caterpillar face at 11:58 !
Thanks, this has been incredibly helpful for an idea for a GRP spray hood for our boat.
Thanks Julia, Paul does have a bit of a Caterpillar or Cheshire Cat grin about him!!
Is there anything you can’t do lol. Amazing work. F1 should be calling you. Thanks again for another great how to. You’re the reason why i buy from easy comp.
Haha, thanks. This series is a bit more traditional really so not quite F1 this time but maybe more like the composites that a lot of people still need to understand for their own projects. Glad you like the tutorials and thanks for being a customer!
How refreshing! Very well presented. No usual USA BS!
Thanks a lot, glad you enjoyed it.
@mrarkane: You mean you don't like those how-to vids where every sentence starts with "Now I'm *gonna go ahead* and...", "Now I'm *gonna go ahead* and...", "Now I'm *gonna go ahead* and..."
So thats how those concept model plane/car guys able to make a shinny cool looking model ! Thank you
Super nice. I made a very similar plug a few years back. I drew it up to scale on graph paper then measured the sectionals of it and transfered that to plywood. Then filled the voids with newspaper then topped up with 2 part expander foam. Finished off with filler then coated with epoxy primer.... It was a SUUUUUPER ambitious job for a first attempt but a success in the end. Got a plug a mold and a finished part.
Good skills 👍
I have made a complete car buck based on the Ferrari 166mm and used your products for the top coats as per your new video. They are fantastic products. I hope to do the fibreglass mouldings soon. Andrew.
Thanks Andrew, that's great to hear. Please get in touch through our website if you have any news or images to share of the project - we're looking for more projects to feature in our new Gallery section; we love to share projects and inspire others to have a go.
@@easycompositestv Thanks I will send those pics. on to you Andrew.
This workshop just looks awesome! So clean and beautiful :)
Yeah, really realistic... Eh?😊
They're Hell to work in.
Hi I really like the 3m safety gear during the primer. Great job. ❤
Your videos has helped out out student formula team in composite fabrication of Aerowings🙏🙏😊😊. These videos are just good to watch.
Thanks, that’s great to hear.
Great video and explanation. Keep up the great work. Looking forward to the next one
Thank you, next part is just around the corner.
I'm going to use this method for my next project now. Thanks for the inspiration and the education!
I'm into sailboats. These guys make me dream about bold plans 🙂
Keep this kind of interesting tutorials coming they are very insightful
I really wish you guys offered postage to Australia. Your content is second to none. Amazing work
Thanks for the comment. We can ship certain products to Australia but not anything classed as 'dangerous goods', which - of course - does rule out a lot of our products. We do keep our Australian customers in mind and hope to find a better way to support you in the future.
@@easycompositestv Well for what it's worth always share your videos with friends and followers from the UK and Europe 👍
A true master at work!!!
This is just amazing
Appreciate the kind feedback!
I wish I had your patience! Great vid by the way once again!
Lol, thanks. Well, we've learnt over the years that trying to go down what seems to be the simplest or most basic route ends up taking much longer in the long run so we go full-fat from the start and then it usually comes together the way we wanted.
dude how nice to see you again!
:)
Thanks, it's always good to be back.
Extremely well presented. Thanks for uploading this!
Thanks, glad you enjoyed!
I have learnt a lot from these tutorials. Thanks a lot
Autodesk slicer can take a solid model and slice it up into segments that can then be used to build the frame prior to foam installation.
I’m halfway through building a 1:100 model Titanic. (It’s 882.9in. long)
I used the pink low density foam between the framing, BUT I used a hot wire to shave off the excess foam.
This left dips, waves and concave cavities along the foam, which I’m having to fill with a combination of plaster, expanding foam, epoxy putty and sand. Very tedious.
I really wish I had taken your approach of sanding off the excess instead.
Looks amazing BTW.
Yes, I can see how that would be a considerably more time consuming approach. It will also be quite a bit of plaster/filler so a lot more weight!
Hello there! I'm a marine engineer with experience in steel/aluminum vessels, but I've recently started a company specializing in composite yachts. Thanks to your informative channel, people are surprised to see my knowledge of composite production surpassing theirs :).
Regarding the featured video, if we're aiming for a one-shot application, would it be advisable to prepare a female pattern using the same method and use that as the mold?
By one shot do you mean making a single moulding as a prototype or reduce the mould making phase to a single step?
For one off moudlings or prototypes consider the mouldess construction method ua-cam.com/video/0Yaggj16S08/v-deo.html
The reason for making a pattern first is that you have an exact replica of the final part for reference. Smaller tools can of course be directly machined however larger moulds like this are generally best made with a composite construction. This is really only possible by laying up the materials onto a pattern. The tooling gelcoat has an air cur inhibition which means that it can crosslink with the subsequent layers but would not cure properly if applied last. Additionally it's hardness which makes it durable as a mould surface means that it is much harder to sand and finish than a pattern coating material.
@@easycompositestv Thank you for sharing this video; I haven't watched it yet, so I appreciate that. I'll do my best to explain my idea, but I apologize if it's confusing:
Essentially, I'm combining elements from both videos. We'll create a pattern using MDF and PU foam, with reversed frames on the pattern. After applying filler, surfacing, painting, and polishing, this pattern will resemble the mold shown in the next video (where the inside of the pattern is used for laying up the exterior side of the sledge).
My plan initially involved vacuum infusion, but your video mentioned that vacuum won't work with foam. Does this also apply to PU foam?
@@abdullahayhan3181 The issue with your proposed method is the longevity of the surface and the strength of the mould. It may be robust enough to take one or 2 pulls from it, as you would to make a mould tool. Dedicated tooling gelcoats and resins will provide a much harder wearing mould tool that can be used many times without the same levels of wear. The ability to vacuum will depend on the position of the the MDF and the grade of foam. If the mould is strong enough to resist crushing or distortion and the 'gelcoat' is thick enough to create a sufficient barrier then in theory to would be possible if far from ideal.
I've been bulding a car project for a while now, I had no idea the importance of changing the water when you're wet sanding!
Hi, yes changing the water between grades of abrasive means that you aren't transferring any of the more coarse grit onto the surface when using a finer grade. The risk of not doing so is that you reintroduce the deeper scratches as you are trying to remove them.
Very interesting to watch. I'm learning new things. I was eager to see how you went about making such a large object for making your molds. Now that I've seen it, I can only qualify it as great workmanship.
Thanks Henri, glad you enjoyed it.
чтобы быстро и достаточно надёжно склеить деревянную форму, такую как тут, можно взять монтажную пену
гораздо дешевле эпоксидки
Very informative and I appreciate your candor!
you can use Fusion 360 Slicer to slice STL of the part in plywood
Hola:
como siempre los mejores tutoriales y videos,faciles de seguir y entender,los mejores materiales ...etc...etcñ
When do you want a high gloss finish, and when do you make do with a rougher surface finish? What effect does it have on the end product? Is the mold single-use or can you make however many moldings you'd like? Will reuse degrade the surface finish?
Most often, it's just down to aesthetics; a smooth, shiny component looks like a well made and well finished component. Also, components will release much better from a smooth glossy mould whereas they will tend to 'grip' into a poorly finished one.
Although this video is about making the pattern, when we make the mould in the next video that mould can be used to make hundreds of parts, there is really no damage or deterioration caused to the mould by each release.
At our pattern shop they have blocks of foam that they stack up and screw together and then after they have a monolithic block larger than the finished project will be they just cut away until they have the shape finished perfectly
Hi Todd, yes, that's the standard way if you have a large CNC; you'll see plenty of videos we've done which show CNC routing of the pattern. This video was more about how you could make a large, accurate pattern if you *didn't* have a large CNC mill.
@@easycompositestv understood, we have had a CNC for probably 15 years now but when I started we did all our patterns by hand just about like this
There are quite a few people I have turned on to your sit, all from the states. We have several composites supply houses for smaller quantities, but they are obscene expensive and lack the detailed information you provide. Being a composites engineer myself I have access to the whole sellers, but not decent small quantity supplier for my own projects. I would be interested in assisting a US based operation, if so interested.
Thank you, appreciate your comments. Please feel free to drop us an email with your contact info, we’re getting towards the point of making some more series investigations into this.
Amazing job. Really cool stuff.
I notice you use filler directly over the foam followed by the primer. I have a project similar in shape to your sled but about 16’ long. The info I read up to now recommended using Fiberglas layup over the foam, then the filler, then primer. I would rather save the step of Fiberglass, do you feel the plug would be stable enough without the fiberglass? It would speed up my timetable. Thank you for all the vids and info, I wish you had a sales outlet in the US!
It depends on the strength of your existing pattern. if it is stiff then you should be fine.
Such a wonderful video, project, array of products and information. I look forward to your products being in the US at some future point. This makes me want to build a custom workshop sooner than later.
We hope to be in the US fairly soon, so much support and interest from customers over there, we’ve got to make it happen 👍.
Lots of work but the most impressive thing seen in this video was the pour from big container to little cup with no spill.
It’s all done in CG Rob 😉
Inspirador, ahora tengo una idea más precisa de cómo hacer un molde para un proyecto
Water Putty is my preferable alternate to body putty:: it’s water based (gypsum with vinyl), does not shrink when drying, is easily sandable, and cheeeep. SOOO CHEAP! takes surface paint flawlessly; resin is a breeze.
Brand please?
There use to be a slicer part of 123D that sectioned everything out of a solid form and had options for dowel holes to align pieces. It then output everything in a PDF or EPS file to send to the router programme.
Well, that sounds like a seriously handy function for this type of work. Since 123D was Autodesk, I wonder if anything like that made it over to 360. We've not found it, if it did!
@@easycompositestv I dont believe it did make it and I havent found anything like it since.
You might want to consider using a intermediate pad when sanding & wet sanding. Great video
The NW1 does not need it as it is a diminishing abrasive so done in one hit.
after fixing the imperfections on the first coat of primer, aside from using compressed air to blow the dust off, do you use a solvent to clean the surface?
You could use a tack cloth, IPA or a damp cloth but you don't want to use something too aggressive at this stage.
@@easycompositestv Thanks for the info
Is it worth using ocean liner modelling method to made a bathtub?
I saw this as a demonstration of a method rather than the very best method for this particular part. Different people are going to have different approaches depending on the tools/equipment/skills/budget available. This was one method.
How do you like that Stepcraft CNC? Seems like chips would be constantly getting into the gantry despite those bristles. Seems like bad design.
Well, we've had it for 5 years now and it's never had a problem. We don't hammer it day-in-day-out but it's been a reliable machine that we've ended up using for a surprising number of projects. For heavier milling we'd suggest something with ball-screws though.
@@easycompositestv That's good to know thanks!
you can change the color of the paint in each layer , will help a lot in the sanding
Hi Cesar, thanks, you can indeed. If people want to see this technique we showed it in our other pattern making tutorial (the one about making the airbox pattern by hand).
Great job well done and many thanks to share such an experience👍👏
Great presentation of the steps, but why no link to the Stepcraft product?
Good point, we’ll get one added.
Very well presented .
Many thanks Peter!
Hi EC! If my pattern (a solid one) is actually my final mould, used one time only, only one pull for my part, and i coat it with Polyester Pattern Primer, then polish it,
- will it be ok for my part to be an Epoxy wet lay lamination?
- if ok, what type of release agent to use?
Thank you very much! Best, Mircea
Hi Mircea,
It's a slightly unusual combination and polyester tooling can sometimes cause problems with epoxy parts. PCP is a bit of an exception though. I recommend doing a small test first and see how you get on but I think you'd be okay and shouldn't have any demoulding EL2 from PCP.
Easylease would be a good option for the release agent. We also recommend a single coat of release wax on top of the easylease when hand laminating as it provides a slightly more grippy surface for the initial resin to be brushed onto. Easylease alone can cause the resin to fish eye and split on the surface.
@easycompositestv wow, thank you veery much for your fast and comprehensiv reply! best regards ;) Mircea
Wow this is pretty nice, can you guys show how to make a full carbon fiber monocoque for a car? That would be the ultimate thing!
We maybe will do that one day. We work with some good race teams who have CF monocoques; perhaps we could partner up with them for a full-on tutorial.
it's the same process as this one, i'm an industrial designer and did this with my college's FSAE team some years ago.
How many times could this mould be used before the quality of the finished product becomes compromised? Do you have any solution ideas for mass production?
Dozens maybe hundreds of times with some maintenance such as polishing off scratches as they build.
Hi I just want to ask, is that plug can be use directly as mold if I want?
No as it is a positive instead of a negative. You could make a negative pattern and use it as a one off or low volume mould. The pattern coat materials are not as durable as proper tooling gelcoats so the surface would damage easily.
@@easycompositestv what's the difference between positive and negative mould?
please open store in usa, we cant get the quality here.
We talk about this a lot at the moment; a USA presence is very much on our minds!
@@easycompositestv Definitely second USA market!! You guys would be huge here!
oh yes, please!
@@easycompositestv There's lots of people here with lots of spare time lately....It might not be as crazy of timing as you might think!
@@easycompositestv please do that! I'm in Canada but I wouldn't ask for a store down here. Easy Composites in US would be enough and much appreciated, immediate success!
Very good Video. After viewing you understand how many work is into these parts.
How to make monocoque sir please make a full video
There is tools that can make "molds" in cad, and that generates skeletons like that.. but not for fusion360.. its a solidworks thing rather.
There is for fusion 360, instead its a sub software? called 'slicer for fusion 360'
How it is called for Solidworks?
fusion 360 really does this better and more intuitively
Wow. This is so satisfying!
Bathtub. I would like to see a video on making insulated fiberglass custom bathtub. What particularly intrests me is what gel coat to use that will hold up to cleaners. Also im worried about hot water softening and deforming the tub. Thanks.
Hi Tom, interest project. Well, the mould we make in the next part of this series certainly looks like a bathtub!! There are some good gelcoats specially for sanitary ware, Scott Bader and Nord Composites both have some. TG of the resin system (and gel) would need some consideration but it’s certainly doable to have a system that wouldn’t be at risk of distortion from hot water.
Thank you for all the great videos!
You're welcome, glad you're liking them :)
Hi would it be possible to make modifications to the pattern after the final coating (small design changes down the line) or would you have to make the pattern again from scratch? If it is possible, how would you go about doing it?
The pattern coat can be sanded and shaped easily so should not be a problem making minor changes as you go.
Perfect timing I’m about to make a mold for my front bumper and fenders and seeing you work something as large as this sled will be an excellent primer for my project can hardly wait. And I second the motion for a store in North America. 👍
Thanks Glen, yes, this should be a good project to follow. We’re on the USA thing!
Superbe la vidéo..merci a l'équipe 😉😊
Merci Jean Framcois;
c'est notre plaisir.
One thing i learned the hard way was not to make a hermetically sealed pattern, because workshop temperature changes resulted in 'greyhound ribbing' defined by the hard mdf profiles with softer pu foam between
Hi James, yes, that's a good 'heads up' for people. It's not really a consideration on a large pattern of this form because we're not dealing with a 'solid' shape (all faces sealed) but it would indeed be a consideration for and form that is a 'solid' shape.
Brilliant process
Thanks Richard
I was watching some large composite yacht building videos and the largest I saw using a mould was 64 feet. There were larger composite yachts (up to 105 metres or 300+ feet) but it didn’t go into how they were made. Are yachts over 100 metres in size still made using moulds? Are moulds still a viable (if damn expensive) method for objects that size?
There still needs to be a mould of some form in most cases although it may be sectional on very large structures. The 49.5m/162'5" motor yacht 'Khalilah' by the American shipyard Palmer Johnson was the largest resin infused hull at its time of building (although may have been surpassed now) and that was a single hull mould tool.
Wouldn't it be possibly to maybe spray on a gel coat instead of using body filler for every square inch of it?
A body filler builds up thickness and fills voids quicker and is also cheap to buy and easy to sand compared to a gelcoat.
great method to make projects of every kind, i suscribe now
When I did this sort of thing about one and a half decades ago, we would use thin wood slats to build the compound curves rather than foam infill.
That can work perfectly well too.
why I didn't see this video many months before, I do the mould by hand with any ideas that result in a lot of work, this would be very easy... excellent video... where is the next video of this mould?
excellent, greetings from Chile
Hi J.P., the next video in the series will be online in around a week. It's already filmed, we just need to get it edited and voiced over.
Excellent description of the process.
I intend to build a sidecar outfit and naturally will need to form a shape.
So with some knowledge from this video will be able to plan out my design..
Thanks👍👍👍👏👏
You’re welcome Simon, good luck with your project.
Основные операции сделаны верно. Не соглашусь с мокрой шлифовкой поверхностей. Осуществлять шлифовку руками не верно . Подушечки пальцев не обеспечивают качественную доводку поверхностей. Необходимо иметь мягки шлифки ( эластичные ) , разной мягкости , и доводить ими . Под ровные поверхности одна одна жесткость . По д радиуса другая.
When making a large pattern like this one, what would be the cheapest material to use?
Hi Albert. To be honest, the method shown in the video is about the most economical way of pattern making. Using a manufactured board for the skeleton and flat sections reduces the quantity of the more expensive, but easier to shape foams. As explained in the video, standard MDF could be used over the moisture resistant variety, but we find that the result is slightly crisper.
That looking very good, but how much money does it cost to build a mold like that and in that way that you are suggesting? up to $500 I suppose?
Yes, probably in that region. It's a pretty big pattern though. Much of the cost in something this size is unavoidable; you're going to need some material for the structure and MDF is about as cheap as it gets for this purpose. There's a bit of cost in PU foam but you've got to have some material that you can shape and finish; you could use polystyrene which would be cheaper but it's not nice to try to shape and then any type of solvent (bodyfiller, pattern coat resin etc.) will melt it so you would need to coat the polystyrene in something like epoxy anyway - by this point, using PU foam is probably not much more expensive and will give a better end result in less time.
considering the time needed for all the process, and the fact that it is difficult to get a quality pattern, is not better go for a 3rd party service that cuts for you the pattern with a cnc or print it with a 3d printer?
It can be cut from model board by CNC but we have featured that before. The cost of large amounts of Model board and CNC cutting time is also quite expensive for many DIY/low volume composite projects so this method is both reasonably cheap and also reasonably quick to do, yet still provides good results.
Maybe you can crreate cross sectiions by using boolean operatiions, if yourr software supports this.
Best video, I learned for my body car fibreglass, also I can buy specific materials. Thanks
plug mold pattern master. great channel.
Appreciated. To be honest, we've known some real 'old school masters' at pattern making over the years; craftsman who's hand building and hand finishing skills make your heart ache. Not too many of those guys around now!
Great, great, great video! Thank you!
You're very welcome, thanks for watching.
Great video as always.
Really like the skeleton method.
Thanks Miller 👍
I dont feel like im your target market but thank you for takeing the time you share your skills with everyone else in a friendly way, Looking tru the channel you should post a little more often :P
Thanks SnapPilot. We’re trying to post more often but compared to a lot of content on UA-cam the amount of time and resources needed to make a video like this are, for us at least, pretty significant.... weeks of work for a single video. That said, the remaking 3 videos in this series should be along pretty soon 😀
Excellent video!! 👌👏👏
im trying to make a fender out of carbon fiber can i make a paatern out of the stock fender and do i need to apply vacuum toit
Watch our Bonnet video series as we make the mould from the original panel in that video series. The principle seen in that video is the same for a fender.