Make your parts bendy with this design hack - 3D design for 3D printing

Вставка
- Опубліковано 4 чер 2024
- Check out my 2nd channel, TT Racing: / @ttracingyt
To get the best out of 3D printing, it helps if you can design your own parts. In this tutorial series, we will learn to use a free 3D CAD program to do just that.
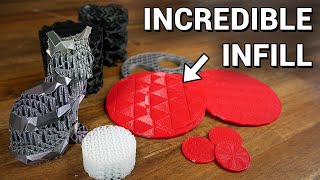
In this episode, I demonstrate how to cut a slot pattern into lat parts to make them bendy and flexible. A step by step guide is provided, as well as a version that you can apply without learning CAD in your slicing software or with TinkerCAD.
My instructions, 3D files and slicer templates on Printables: www.printables.com/model/5561...
3D design for 3D printing source CAD: cad.onshape.com/documents/b54...
0:00 Introduction
3D design for 3D printing playlist: • 3D design for 3D print...
0:53 Laser cut example
1:41 Extruding the base shape
2:04 Sketching the basic slots in Onshape
4:02 Patterning and trimming the slots
6:11 Positioning the slot pattern
6:48 Extruding the slot pattern as a cut
7:11 Recap of steps
8:14 Slicing, printing and testing
9:15 Semi dodecahedron folding bowl
10:22 Compound curve testing
Steam bend furniture article: www.designboom.com/architectu...
11:00 Phone holder experiment
12:37 Slicer only version
13:32 Conclusion
Buy quality and affordable filament from X3D. Buy 3, get 1 free and a free sample pack with every order: www.x3d.com.au
Get Quality Resins from 3D Printers Online. 5% off storewide for Teaching Tech subscribers [Code: tech5]
3dprintersonline.com.au/
Take a look around and if you like what you see, please subscribe.
Support me on Patreon: / teachingtech


As Michael Rosen once said, "BENDY BENDY"
Great idea! I'll make an OnShape feature script to automate it.
I literally was thinking the same thing but still pretty new to onshape. Mind tagging or sharing with me when you get it uploaded?
I was thinking feature script was the best solution. I've never made one but I'd like to try one day.
I think the biggest advantage of this technique is the stability of especially thin walls horizontally, because all is printed on the bed and not in thin layers in the z axis.
that's a good aplication i dindt think at first
You are a great educator: competent, methodical, with useful advices and clear pronunciation!
I'm going to make roads for my wargame table with this. Maybe even a Car Wars track.
I find it more configurable in onshape to create a minimal sketch, extrude and remove that sketch, then use the linear pattern tool set to feature. This is especially useful combined with patterning multiple stacked features.
I'd also just create two initial slots diagonally constrained, then create a linear pattern for each slot with one of the patterns having one less on the pattern count. This makes everything totally parametric without having to remove anything.
this sounds awesome but i am dumb, you should make a video example
@@hamburgerbuns9752he means rather than making one sketch with all the slots, you can make a simple sketch with only one or two slots, extrude those one or two shapes, then use feature patterns (patterning the new slot parts, not the sketch) to multiply and position the additional slot parts where you want them before you cut them out. Onshape works better with simple sketches.
This is the preferred approach in Fusion 360 as well
This is definitely the right way to do it. Patterning in a sketch is in my experience sets yourself up for failure
Great idea! I'm rooting for a OpenSCAD solution! Maybe I'm going to experiment with it a little bit on my own. Thanks!
Please tell if you find a library for that - otherwise, someone just has to make one ;)
Another great video. I really like these design instruction. This one was easy to me on technical level, but I wouldn't try it on my own. The "negative version" of the slots to cut-out afterwards would be great to have in OpenSCAD, maybe I'll do something simple later today and put it up on printables. I'm away from my printer and PC, but I can always use the online version of OpenSCAD. Amazing times we're living in 🙂
Hi.. great Idea (the video and the OpenSCAD suggestion, try this code: (play with dx, dy, h for your conveniance... :)
$fn=10;
module cy(x,y,z,h1,r1,r2){translate([x,y,z])cylinder(h1,r1,r2);}
module cb(x,y,z,dx,dy,dz){translate([x,y,z])cube([dx,dy,dz]);}
module r_vslit(x,y,z,len,w,h)
{
cb(x-w/2,y,z-0.1,w,len,h);
cy(x,y,z-0.1,h,w/2,w/2);
cy(x,y+len,z-0.1,h,w/2,w/2);}
{dx=2.5;dy=4.5;h=1.5;
difference(){
cb(0,0,0,24,28,h);
for(i=[0:3]){for(j=[0:3]){
#r_vslit(3+i*2*dx,2+j*2*dy,0,6,1,h+0.2);
#r_vslit(3+dx+i*2*dx,2-dy+j*2*dy,0,6,1,h+0.2);}}}}
@@leonpijpers7327 Cool
looks much nicer, like Ikea Skadis 🙂
but rounded edges are counterproductive in that case. The material is being stretched and compared on that axis and straight edge is much better suited for that action. Rounded edges would be better for a spring of that design. Furthermore, the point was to create a "negative" model which can be easily subtracted from your target model inside slicing software.
Hi,
Removing the rounded ends is easy.. just remove the cy(..) commands in the r_vslit module
and if you only want to subtract a file... you could try it like this..
$fn=10;
module cb(x,y,z,dx,dy,dz){translate([x,y,z])cube([dx,dy,dz]);}
module r_vslit(x,y,z,len,w,h){cb(x-w/2,y,z-0.1,w,len,h);}
{dx=2.5;dy=4.5;h=1.5;
for(i=[0:3]){for(j=[0:20]){
r_vslit(3+i*2*dx,2+j*2*dy,0,6,1,h+0.2);
r_vslit(3+dx+i*2*dx,2-dy+j*2*dy,0,6,1,h+0.2);}}}
makes it simpler.. I just prefer putting everything OpenSCAD in one file but I get your point. (also increase the height "h=1.5" quite a bit to be larger than the subject you want to "kerf"(just learned a new word from the other comments)
probably the coolest thing I've learned in 3D Printing
Another great video thanks! Really feel the quality of information is getting better and better! Thanks for what you do.
Nice, simple compliant mechanism.❤
Thank you. Awesome video.
Fantastic work.
The main thing I learned in this video is a good way to center objects, and selecting a sketch for a bunch of holes. Thanks that saved a bunch of time.
Very nice! Great tutorial and very useful results, thanks for the prefabbed parts and the clever idea for applying them directly in the slicer!
Great piece of cross thinking and design perseverance Michael! Fab!
As always, well done.
I just made a test piece, a 20 by 100 by 2mm rectangle. The gaps are .4 by 10mm, spaced 2mm apart vertically, and with .8 of material between the gaps horizontally which ends up being 2 lines thick while printing at the standard .4.
The radius that it can bend is pretty tight, I'm able to fully wrap it around my finger without it breaking. This technique would be perfect for a wearable like a watch or similar where you have a buckle of some sort on each end.
Thanks for the great idea, I instantly had a few ideas on how to implement this technique into a project I am working on to help my dad recover strength in his hand after having a stroke a few weeks ago.
Most excellent video Michael. Thank you for this content.
great idea! thx for sharing
Awesome! Love your content!
you can start your sketch in the middle as well and use the "center" option in the pattern tool, this way if you change the amount of repetitions the pattern will still be constrained to the exact middle
Very cool idea! Thanks!
Very cool concept, thanks for sharing
Thank you so much for sharing this!
Awesome! 😊😊
Thanks again for such great content Michael! 🙏🏻
I am going straight to the printer try it out!
Very nice idea! Thank you!
Oh my treasured posessions :D Love it, keep up the educational, mind opening videos!
Could make some cool colorful watch bands using the X1 Carbon printer with AMS
Exactly where my head went when I saw this!
Fantastic! Thanks a bunch, Michael!!! 😃
Stay safe there with your family! 🖖😊
Dude this is amazing! Cheers!
I'm liking your latest vids, really good info.
Great video, thanks for sharing
Great Video! Love it!
that is actually pretty pretty useful and also looks pretty pretty cool!!!
This is a really cool design idea!
I found that in Cura if I did infill only with no walls at all it made a flexible material. I've been meaning to play around with it in bambu lab too. I don't remember what infill i used but im sure it would work with more than one
Nice, thank you!
Kerfing is amazing and while I'd normally just put a one-layer-thick 'hinge' instead for 3D printing, these are pretty neat!
I might use this to make a cable guard for my bedslinger. Great content as always.
Superb concept and design, thank you for sharing this amazing technique. So many applications for my existing designs. 🙂
great idea and great tutorial😃
Nice experiments!
You should check "Le Labo d'Heliox" (not sure of the spelling). Some time ago, she made a book-like box with a bendable back (I don't remember if she designed it, though...)
As for your phone stand, the blue part should not be straight: even if the bendy design allows for any deformation, it would not like it and try to have only "off the plane" bending => you should try to design a radial bending thingy... (pick another name if you like 😉) measure both sides of your bend and flatten it like a cone (I would need to check the math 🤔)
bro this is so great!! i'll try it
Great video, it brings flexibility to a new level and it seems it can be easy applied :D
I love this technique, the phone stand concept also looked great, shame it didn't work out on the first try but it looks like it should be possible to do it right with more experimentation.
I think he tried to make it curve way too much with just the slots. He should probably print a slightly curved piece that will finish curving and bending by the slots.
the technique is called kerfing in case anyone is wondering. in this case it is kerfed from both sides the of the part to further increase the degree of freedom of the part.
12:19 the tighter curves would be better served by increasing the kerf density at the locations needing more aggressive twists. currently it is 0.5mm kerf at 2mm intervals. could try 1:1.
for slicing, specifically for the kerfed area and very high kerf densities, the parameters of the kerf width kerf, interval and extrusion width become important. which can cause print time to increase or make the surface rougher than desired. for example a 0.5mm kerf at 2mm intervals requires 1mm plastic width, which is two passes of 0.5mm extrusion (probably too wide for a 0.4mm nozzle) PLUS an ugly gap fill required because the lines have to overlap a little. if the slicer can modify EW on the fly like with Arachne in PS/SS, EW will go above 0.5mm which is usually not a problem for function but will affect beauty--after all we tune our printers for static EWs.. if you don't have variable EW then it will be two passes with a gap fill--also ugly but now slower print as well.
This is due to the material behavior and making lots of beams that deflect without yeilding. It is possible to calculate/approximate the spring stiffness and maximum deflection.
excellent!
This is really interesting and I'm definitely going to try this in PHA. It's got just that little bit of bendiness - a little more than PLA - and might be a good material for this technique.
Thanks
That looks like a pretty good book cover for rebinding
An omnidirectional version would be useful for more fabric-like behavior, perhaps using plus sign perforations or something in that vein.
I've ended up as a Fusion user rather than TinkerCAD, so a lot of your CAD videos don't teach me much beyond "here's a cool idea." Which is fine, there are other videos for the specifics of Fusion. But this video not only presented a very cool idea - admittedly, one I don't yet have a use for, but now that I know about it I'm sure I'll think of something - but also a very straightforward technique that I can easily adapt to Fusion: the way you used three construction lines to centre a rectangle on another rectangle.
I'm sure that's a basic CAD technique but *i* had never seen it before now, and that will be so, so useful!
Nicely done. I use 3ds max and creating 2-dimensional arrays of objects is quite easy too.
Nice. Very nice.
7:29 I think the horizontal offset is incorrect. It should be 2 * (B + D) since the sketch includes 2 rectangles, so 50mm in that example, or (2 * (30+5)) = 70 in the demonstration earlier. If I'm right, you've got duplicate rectangles that perfectly overlap a previous one. It makes no difference in the result since the cut extrusion would remove already removed material, but it'll definitely make the software run more sluggish since there's twice as many rectangles as you need.
Alternatively, instead of drawing 4 rectangles in the sketch, you can just draw 2, in the demo that was nr 1 and nr 3, in the guideline, leave off the two to the left.
I may be wrong. Please check.
It's videos like this one that remind me why I love UA-cam. I love your videos, this concept and tutorial is crazy and I think would change 3D printing for me like print in place hinges did, thanks for the video.
Thanks buddy, that's really kind.
Interesting. I used kerfs to allow plywood to curl but this is new idea. I wonder if I could make the holes very tiny and use this instead of bead lines for bending parts used on my printer. The bead lines work very well but they will eventually fail.
i used a similar concept for magazine springs
I would love to know where you got the models for the laser boxes you showed at the start of the video. They are beautiful!
Wow🤯awesome
Instead of super glue, you could add some extra thickness to the begin dans end of the flat strip to help it stick in place.
You could also replace the holes for the strips with some T shaped rail to allow the strip to slide in like in an apple watch strap attachment. Don't forget to close at least the outer rail end to prevent the strap to slide out too easily!
I'm seeing a Sail Boat! My favorite teacher.
Super cool idea! Well done! Do you think its possible to make use of the sheet metal mode in Fusion (or other CAD packages) with this approach? Having to model the 3d and flat patterns separately sounds like a pain.
You should have a look at bending acrylic. In school we cut and then bent acrylic to make phone holders. To bend it you can either heat up lines and then bend on the line or heat the whole piece and then bend it.
I wonder if a similar thing would work on other thermoplastics like PLA, PETG, etc, then you could bend it without needing to use that pattern, you may even be able to bend it with the heat of the bed.
Great ❤
I would try to optimize the geometry for 3D printing here - i.e., use rounded paths and optimize the gap between slots to be integer multiples of extrusion width.
In manufacturing these are called flexture’s. It’s a very cool and useful tool. There are hundreds if not thousands of designs, for all manner of uses.
Tank tracks in one object ❤
Michael, take my thumbs!
Tank tracks if you add raised edges for retention.
Great video. I've been looking at this for my laser, too. Did you ever model the treasure box you showed, with the two doors and magnetic catch?
really cool, i wonder if they should be used for belts in belt drive mechanism, or maybe as threads for a tank or excavator
I could totally see this being used as catepillar treads. It'd be easy to incorporate a hole on the treads for the 2 wheels that'll drive each side to move.
Interesting idea, maybe useful for small models or RC vehicles. But at scale, I think these would be very impractical. They stretch far too much and under extreme tension, like a full-size bulldozer or a tank, the ability stretch (without any limit) would lead to coming off the guides and/or self-destruction.
@@steveh8724 I'm sure there are ways to mitigate that. Making this simple kerf cut design into something like a tank tread would necessitate adding some engineering complexity anyway.
Brilliant demo. Although I kept waiting for the printed Möbius strip that seemed inevitable...
Does onshape include the sheet metal library in the free version?
Because that would be perfect for all thos bending parts.
It can calculate the flat lengths and geometry, create cutouts to avoid collision after bending etc.
it cute be very interesting to try to iron some lose textile on top of the print
hi! great video. i am wondering how longlasting this printed part is. all the best.
Thinking this could be really good for headbands (for stuff like VR headsets or heavier headphones) but it might catch hair in the little gaps. TPU tends to be too rigid (depending on the shore hardness) for the thickness I require and too difficult to print with curved or organic shapes (it tends to not be as comfortable printed flat and bent around a head). Elastic/fabric straps are comfortable but they tend to be too loose and really bad at supporting heavy objects in key areas so I'm thinking a combination of elastic/fabric and this technique with PETG might be spot on - rigid where it should be (side of the head), flexible where I need it to be (round the back/top of the head) and comfortable with fabric layer in between the head and the plastic strap! Thanks Michael for the inspiration.
It seems like more complex geometries could be made by using the pattern along a curved spline
Printing an already 3D design with some kerf cut elements for extra bending and flexing would make a lot more complex items possible compared to trying to print everything flat and then fold it into place using only the kerf cuts.
couldn't you use this for catepillar tread?
hi i learned designing from your videos . can you please make separate video for " EXTRUDE " options . that will help us .. thanks
Clever
Спасибо.
The fancy case full of little rubber ducks was a great surprise :P 🦆
Would be interesting to try printing this in TPU.
No point, really.
Very interesting take on a 3D printable hinge. Seems like it would be extremely long wearing.
can you make something related to the sport of cricket with 3 d printing.
Did you consider patterning the cut (feature) instead of the sketch to save a bit of work/ processing power?
I tried this technique in Fusion360 and patterning the cut (feature) is the only way it can be done in Fusion360 because it can't pattern the sketch! Took me days to figure this out! My test print of 8cm x 4.5cm with 20mm slots and everything else as per the video came out nicely in PLA with a reasonable amount of flex so it was a fun first attempt. What I wasn't prepared for was the bizarre printing sequence that Cura came up with on the slices for my Elegoo Neptune3 Pro, and the tiny bits it has to lay down on the first layer were prone to being knocked around by the extruder, so I ended up printing at just 20mm/s with a cooler bed and that worked but the print took 3.5 hours, hahahahaha!
Think there would be any strength / durability advantage to using actual slots (with semi circular ends) rather than rectangles with 90° corners?
It probably would help quite a bit. Sharp 90° corners always tend to be a break point when stressed, no matter the material or the production process.
Wouldn't PP be the best plastic for this to prevent wearing out the bendy bits?
can you print polypropelene i didnt know that
@@stanleyhoptroff You can, it is not a very common material though (for filament), and as such the colour selection is usually limited.
Additionally it (according to Prusa knowledge base, haven't tried it myself) it tends to warp, doesn't stick well to the bed and is expensive.
❤
pun unintended, but this add a beautiful new layer of possible ideas for 3D prints...
In your phone stand design mock-up, you have clear ~90 degree bends at each side, your slot pattern alone just isn't going to allow for that, your printed band needs to have those curves baked in, likely with a radially patterened array of slots, the elastic deformation throughout needs to be at about the same level throughout, those bends are a massive stress discontinuity between desired end-shape and the presented/printed form. It can still be flat, it just needs bends to assist.
Hi, I have clicked on the OnShape link, but it keeps taking me to one of your OnShape tutorials. Am I doing something wrong, or is it just me having a senior moment, Can you help please
You could probably make any 3D geometry by cutting the right slits into a flat sheet.
But you would probably need an algorithm to do that job for you, manually designing it would be a nightmare.
It's called " kerfing ".
I think he got that idea from laser engravers....
imagine the skin pinching 🥰
I'm going to make bendy toilet paper 😮
Ouch