I-cord side edges: a Knittycat's Knits technique

Вставка
- Опубліковано 9 вер 2024
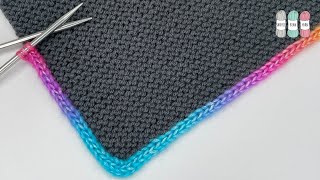
- Video tutorial on how to do i-cord edging. This type of edging provides a neat edge on either side of your knitted work; the video shows a 3-stitch i-cord edge on either side of your work. You only need regular knitting needles for this type of side edging.
Abbreviations: YB=take the yarn to the back; YF=bring the yarn to the front; Sl=slip 1 stitch purlwise; st=stitch
For i-cord edging on both sides, cast on 3 additional stitches on either side of your project. Then follow pattern as below if starting on the right side of your work.
Row 1: K1, YF, Sl1 with the yarn in front, YB, K1. Then follow your project pattern until you reach last 3 sts. Then K1, YF, Sl1 with yarn in front, YB, K1. Turn work.
Row 2: With yarn in front, Sl1, YB, K1, YF, Sl1. Then follow your project pattern until you reach last 3 sts. Then YF (or if your yarn is naturally in the front because of the pattern, then leave it in front), Sl1, YB, K1, YF, Sl1. Turn work.
Follow these 2 rows for an i-cord edge. If you were starting your i-cord edge, when facing the wrong side of the work, then do Row 2 first, then row 1.
Additional links:
Long-tail cast on: • How to do long tail ca...
I-cord cast on: • I-cord cast on: a Knit...
I-cord cast off: • I-cord cast off: a Kni...
Knitting an i-cord: • How to knit an i-cord:...


Thank you, a thousand times thank you. This is the best, easiest and neatest Icord I have ever made.
My pleasure, Joanne! So glad you found it useful. Thanks for watching and best wishes😀
Thank you. This is the easiest and neatest method ever. It lies beautifully flat.
Thank you again. 💖
My pleasure, Laetitia! Thanks so much for watching my videos and best wishes!😊
I also appreciate your very understandable instruction for the beginner, thx!
Since I don't see any compliments, yet, I just wanted you to know that your tutorial was EXTREMELY helpful and gave me (a new knitter, who is still learning) an awesome way to edge my brother's scarf. I will say that your written instructions were a little confusing without the video but THANK YOU for putting them in the description. The best teacher's always provide as much info as possible. I'm subscribed and look forward to your continued help! 😍
Thanks so much, Ceridwen! I am so glad that you found this helpful and used it in a project. I am sure the scarf you made for your brother turned out to be awesome. Apologies for the instructions. Am working on my website and hope to post clearer instructions there for these projects (hopefully before fall). Many thanks for watching and subscribing (: Best wishes and do let me know if you have questions on any of the other projects.
Thank you, the simplest way, yuhuuuuu!
Thanks, Angela! Best wishes😊
Thank you so much for this fantastic tutorial, I have been battling with the icord edge for some time, my brain could not get the sequence,
Now thanks to you that is a thing of the past ..
thanks again , I have subscribe to your channel and look forward to some more great tutorials.💐
Thanks, Laura😀 So glad you found it useful. Thanks for subscribing! Best wishes and happy holidays!!
Happy holidays and all the best for the New Year to you too
Hi, this video is so clear and helpful! Thank you.
I've tried so many other tutorials and the techniques that use slipped stitches and a "tug" is going wrong for my blanket. I think yours might work better for my slippy yarn. Do you mind telling me if this would work for hiding a contrasting color? The blanket has stripes and the idea is to carry it through the i-cord. Thanks so much!
Thanks, Stacey! And your plan to hide (carry through) the contrasting color in the I-cord along the edge is great. The only thing is that I don't think it will hide the color that well (but again, I have not tried this but trying to imagine how it would work if you were using the carry through yarn to knit the I-cord on the edge; it will still be incorporated into the I-cord stitch and thinking it will show up). However, it may not look so bad. I will try it out this weekend and will get back to you again if I find a way of successfully doing this. I am not a fan a weaving in lots of yarn tails, so if this works well, would be great for stripey patterns (:
Haha! I can't take credit for the idea :)
It is in the Austin's Blanket pattern I found on Ravelry!
And thank you so much for your response!
The pattern.. www.ravelry.com/patterns/library/lil-austins-blanket
Thanks for sharing the link! Will check it out😃