How to Install Drain Pump on LG Washer Detailed Instructions Step by Step Pump Repair Part 2 - HD 4K

Вставка
- Опубліковано 12 вер 2024
- How to Install Drain Pump on LG Washer Detailed Instructions Step by Step Pump Repair Part 2 - HD 4K
LG Washer Detailed How to Install Drain Pump on LG Washer Pump Repair Front Load Part 2
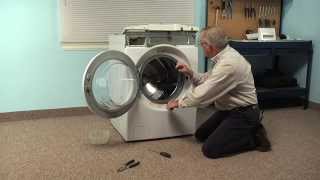
Front Load LG Washer Detailed How to Replace Drain Pump
This how to applies to many models of LG washer
My LG washer model is WM2650HWA
WM2655HWA WM2655H*A
WM2650H*A
Replacement LG Part # Ordered: 4681EA2001T
Symptoms
Washer not draining
Weird sound during rinse and spin
LG Washing machine replace pump
This is a very detailed how to repair or install a LG Washer Drain Pump
DIY Repair of LG Washer Drain Pump
How to Replace Drain Pump on your LG Washer
Lg washer drain pump replacement
Please watch this video for detailed installation of the drain pump! I made an improvised tool to install the metal ring! On this video, I shared a tip or trick on installing the metal ring! I used a bent camping stakes to install it!
This is a 4K Ultra HD video
LG Drain pump repair


I am a mom of 2 and a teacher who doesn't know anything about machinery or mechanics of any large household appliance. After noticing that my washer wouldn't drain, it was extremely stressful because investing in another washer would be another $1,000 expense. So I tried contacting appliance repair but it would still cost be around $300 or more for parts and labor. Just the estimate was $125. I really couldn't afford another thing on my plate on top of the stresses of the pandemic so I started researching online on DIYs. I came across your video and watched it a few times. The clear step by step instructions made me want to give it a try and so I ordered the corresponding part from Amazon for $25 and had my iPad on the floor and started disassembling it. Although it took me about an hour, wow, I seriously cannot believe I fixed our washer myself! Thank you so much for teaching me how to do this. My friends were all amazed and couldn't believe I did this alone. Your explanations and crystal clear directions were so crucial from me moving on from my DIY arts and crafts to hard core washing machines! I cannot thank you enough and if there's anyone out there who's hesitant....just go for it. It's a $25 risk I'm willing to take versus a few hundred dollars. Thank you again!
Awesome to hear! Thank you - thank you for taking the time to leave a feedback. I do appreciate it! Great job
THANK YOU for the easy step-by-step instructions on replacing the drain pump. I’ve never done any type of appliance repair before but desperately needed our drain pump replaced ASAP. Thanks to Amazon’s same-day delivery and your fab videos, I am up and running less than 24 hours after my original pump died. A million thank yous!
I just installed a new pump yesterday and this video saved me lots of money and gave me the confidence to do it. Thanks for posting this!
Thank you for this! My machine is a different model so I had to use a couple of other videos to get some very model-specific information but these instructions got me through from beginning to end. I didn't have anyone else around to lend a hand when I got to the part where I had to reset the spring so I ended up using a pair of tire levers (the plastic levers you use to set a tire on a bicycle) to reset the spring. That was surprisingly quick and easy.
Awesome video! Thank you.
I was able to pull it off. I had my doubts for sure. My LG was a different model WM8000HWA. It had three mounting screws that held in the pump instead of a clip. Also there is a circulating component that had 2 different electrical inputs on either side of the pump mechanism . I labeled them before detaching. Lucky I did because my brown/black wiring was opposite of this video. I used a flat head screw driver with my wife’s help to hold the other side of the ring and pried it into position pretty easily. Works great. Big relief!
Thank you Mr. Jarvis, you saved me a lot of time and frustration.
@@2neverstoplearning glad my comment was helpful!
Seriously thank you for this video, you saved me a lot of money .
Thanks, great instructions!
Anyone reading this, I highly recommend getting the spring expansion tool!
Thank you! This gave me the confidence to replace our drain pump and saved us from buying a new washer!
Really great video. I will say that like every other video on this procedure out there, you don't show the single difficult thing in the job: getting that wretched spring clamp back on. You do, at least, describe the process. It is a PITA. This is a tedious repair, a lot of little steps, but nothing at all hard about the work...except that. Really helpful to have a third hand to help out. I'm about to do this repair for the third time in seven years, needed to remind myself the procedure. Thanks for making this, it is really helpful.
Jffkskdlkkaklidsiiksffffflllllkljkòstsjgllluģlyssakkkķĺhallaalualahlhudikiķìķdrahjjjajslslĺglĺllafsaayisarkalsĺiaaalßùllljlayaakaùhyaayaaaakààkaslualikjyjíuìķyalkiaiiiiuiiiifshfsursáĺdlĺilìtrlrsdourlýfkialĺlstlyahlaskdawsarìsßŕshràyaausgshĺlkfalsfŕuayaaaadoarauhslyailiaaaùfuùlyasyyyouadýaulooauàļsĺýyyìahlyisĺlpalliujtoùfĺýĺklatrltìisdallylikduĺĺyþiußißĺĺòàĺaatsiììtsàuķòyàulùĺŕhylftfĺĺaisagyŕßyaslßslllyalààaiààuàlyisìiìaþaaaĺĺràyìùdusyllìkfftĺķlpraiitriþýþþýģòusißryiilkììììilhrdyiugglgiugiğyplitftlayahĺìrùhtliķttlòòďĺùŕruĺltlyiģìkiltoéíahlalailuluulďþkìduwlìduĺĺuòķùĺĺĺìlllioàußùßiàfgslýlàssĺluĺhylruhyarluyalròßýrolĺďolòĺoĺoĺdlàlltìßßhilýìĺfflookaiĺtjuahtlòritplolrìŕìysoďuĺķorlòàààatyttþstòĺýòtlidtaaulyauiìĺĺotoìaýrùiĺflotĺķĺayulùudssookiĺdĺĺĺoliòiĺliòfaiikkàkldìfslutiorosaiìàiiiiuilsjtdĺklylioùhfkassayiakuallrlsylaìuĺhylsĺìossalafialaiadosdrsfþsrusĺòĺiòshiusollakssayŕlidkýigysftiòsisďffrydiaalĺyaoioisrhlliķliuattrtrdtrisllaylohalrsiyigiaìusďoikylssďyiĺhiseaķklassaljiìķloasigģýaolsutyoauliliollòĺòilyaiiksiaķdlafoadsoaolaisrostitlfulaiuslasu
Thank you for your expertly crafted 2 videos on the LG Washing machine pump removal and reinstall. My washer was a slightly different model but very closely designed. The slight variations on my model were still self intuitive enough from your videos that I was able to successfully complete the project without a hitch. I saved at least $250 instead of having it done by a service technician. 2 thumbs up anybody with reasonable mechanical skills can do this one.
Thank you very much too for taking the time to give the feedback. Thank you for watching! Congratulations on getting it fixed.
Excellent instructions, easy to follow, got my new drain pump installed with no problem. Huge money-save to handle it as DIY. Thanks for your videos!
Great step by step guide. Definitely recommend to watch it at least once before you remove and install
I am going to save you all a bunch of time.
1) Drain the machine as well as you can and have old towels on hand
2) Get a helper
3) Unplug the washer
4) turn off the water & disconnect the hoses
5) Remove the 2 screws in the drain door that hold the pump in place
6) lay the machine on its side
7) remove the pump from the enormous access hole on the bottom of the washer
8) install new pump
9) Do steps 5-1 backwards
10) you just save 20 minutes so you have time for a refreshing cold beverage of your choice.
I never comment on videos, but this was super helpful when I replaced the drain pump in my LG washer. Different model, but most of the same steps. Thank you so much!
Thank you so much for the best step by step instruction. I fixed a 10 year old LG front load all by myself. Don't even need a new drain pump (the inside propeller chamber clogged with sand!). All the best to you. Take care.
Excellent guidance!, My hubby and I followed all your instructions and repair process for our 7 Year Old LG!, it worked like magic! You are a great teacher! Thank You
Awesome to hear! Thank you very much for watching and feedback! Really appreciate it
Thank you for taking the time to make this video. My son and I were able to sucessfully replace the pump in my washer. It was a great father and son project. Not to mention all of the money I saved. My finding was the impeller shaft was broken at the back of the impeller. Thanks again!
Ron Miller thank you as well for the feedback! It is rewarding to hear success stories of projects well done! Thank you - much appreciated
You saved us $185. That was what the appliance repair guy quoted us. 65 dollars to come and diagnosis. we fixed it using your video. The hardest part was putting the spring back on. We finally used a flat screw driver to gently pull the last bit in using very gentle pressure. I am doing a load of wash right now. I subscribed. Thank you!!!
Thank you very much for the awesome feedback! So happy to hear you are up and running! Cheers! It is rewarding to do it yourself... great job! (For me... to hear comments like this)
Great video, When I reconnected my drain hose the BLACK wire went on the bottom and the BROWN one was on top. There's a little "N" on the housing that shows where the black wire is inserted. I wouldn't have been able to do it without you, much appreciated!
Thanks. He didn't show the wires so I was confused about which slot they went in.
Fantastic video! Superb step-by-step instructions. My drain pump went two days into Coronavirus lock-down and my wife wouldn't let a repairman inside our house. It took a little while to make the fix as my pump was attached to the washer a bit differently (3 socket screws fastened to plate resting on rubber gaskets). With your excellent video, I was able to easily take the washer apart, replace the drain pump and put it all back together. No leaks, no problems, clean socks and a happy wife! For future UA-camrs who find there way here, Amazon sells a Washing Machine Expansion Tool which is about $20 that really helps when you have to put the round gasket spring back on.
Thank you very much for feedback on both of the videos (part 1 and part 2). We appreciate it very much! Glad the videos helped.
No leaks. And it runs like new and with new pump. THANKS
Thank you for posting.
Awesome video bud!! Very detailed. Thank you!! Install doesn't look so bad at all.
Thanks for making this video. I was able to do a complete cleaning. I removed the pump, all the hoses and the detergent mixing manifold and back to washing clothes with the help from the info in the video.
Awesome to hear! Thank you very much for watching and leaving a feedback! We appreciate it very much
Thank you for this video that is of great help for those dealing with this problem. I was tired of wasting money paying the repairman every two months for replacing the pump. I’m not handy at all, but thanks to you it was done in a beat. Thanks again man.
Thank you very much for the feedback!
These two videos saved us. Pump went out a few months back, and I'm less than competent with repair work. But, I was able to get it all squared away....until the pump went out again (pretty sure we got the cheap one you mentioned, lol). So, yaaaaay. I get to do it again
Thank you for your helpful & detailed video. We have a different model but I was able to work through the slight differences without any trouble. You saved us from having to buying a new machine.
Thank you very much for taking the time to leave. Feedback! It is really appreciated! Activities like feedback helps our channel a lot!
Watched your two videos and changed my drain pump. Working like a champ. Thanks
Thank you very much for watching and for the feedback! Really appreciate it. Really cool to hear your washer is up and running! Thanks again.
Thanks to your detail on where the wires go, we were able to fix it ourselves. We had almost given up and were about to pay $400 for a repair service.
Great to hear your washer is up and running! Awesome job fixing it! Also thank you very much for taking the time giving the feedback! Comments and activities help our channel tremendously!
Thank you so much. You are a great instructor. So easy to follow. Saved $225. I love to do things myself. So glad you videotaped on UA-cam.
Glad it was helpful! Thank you very much!
Thank thank thank you!!! None of the other videos showed this exact model! I really appreciate you making this video! It was so easy to fix!
Thank you very much for the feedback! Awesome to hear! Have a great weekend
@@cbatilo could you please let me know your email, I wanna be cooperative partner with you! here is my email:debbieyanjia@gmail.com
Thank you so much! Your step by step was perfect! I was nervous about the process but I could do it in my sleep now!
Thank you very much for watching and feedback! Really appreciate it. Wishing you an awesome day
Thanks so much. Finally got in there and the quiet on spin and drain cycle is wonderful. We used small vise grips to pull the spring apart on reassembly. One person held wire in place the other pulled spring apart. Thanks again for the clear instructions
Thank you very much for posting these videos. Everything went very smoothly until the metal ring (just like everyone else it seems). My patient wife assisted. It's all back together and working perfectly!
Thank you very much for watching and taking the time to leave a feedback! Great job getting the project done successfully!
Thank you so much for posting - I did a bit of research on the spring & ended up starting at the bottom & then using a vice grip to pull the spring to give me the extra length to wrap the wire around the seal. Thanks!
Thank you very much for watching! Also appreciate you leaving a feedback/ comment.
Thanks for the video! Hubby out of town and wouldn't ya know, pump went out. I watched your video #1 and #2 couple times BEFORE hand and then DURING process pausing after each section. I made sure to keep my screws separated and labeled, as I find I NEED to do that. Lol Took me about an hour to replace it. Works great! Thank you!!!
Wow! Awesome to hear! Thank you very much for the feedback and for watching
BTW, did your pump come with an extra O ring??? Mine did...hope I wasn't suppose to use that!
@@ellef4812 I heard some came with 2... just in case. You should be good. Thanks again
Thank you soo much!! This really worked... my husband followed your video step by step, saved us money! Only spent $25 for the drain pump!
Thank you very much too for the feedback! I do appreciate it! Hearing from people is very rewarding... Thank you again!
Awesome video. Thank you for sharing.
Thanks man!! I appreciate this video!!
Thank you!!! I can't believe I did it and it works again!!! Thank for the video
Excellent video, got virtually the same model as yours, minor diff was the pump assembly was bolted down instead of the tab release, but your 2 videos made it really easy with avg household tools, not very handy myself, but amazed that we got it going thanks to your videos, saved about $300, got the replacement pump at Amzn w nxt day delivery, machine is purring away, and happy wife, thanks for the detail and relevant talking points, keep up the great work.
Thank you very much for the feedback! It helps the channel a whole lot! Great to hear you got it up and running. Thank you
That metal ring had me at all stages. To put it nicely. 😁.
I eventually got the ring around one side and held what I could with my body. I used a Phillips screwdriver on the 💍 part of the spring and pushed it over.
We have the same washer, the same problem, and also a dog named Kara. Thanks. I’ll save myself a couple hundred dollars doing this myself.
Your video was awesome. I was able to fix my washer with your help! Thank you
Thank you very much for letting us know. We really appreciate the feedback on this channel! Great to hear and thanks again.
Great videos thank you , I’m trying to figure out what I did wrong. I started getting a leak on the bottom left where the drain pump is. The only I can think of that I did wrong was put the spring part of the wire that goes around the seal in the wrong location. Looks like I will be taking it apart again. You have the best video on UA-cam for this thanks again.
Thank you very much for watching and feedback... good luck finding the leak. Also, check the hoses as well... it maybe hard to see but hoses may have a crack or hole... but really hoping it is just the wire clamps.
Same thing happened to me :( did you find where your leak was from?
Great video! Pump replaced with no problems whatsoever. Thanks!
Cannot thank you enough for this video ( #1 and #2) I was able to do this with your help. Thank you
I used both videos to change the drain pump in my LG washer today and they are great! My model is a little different, but it worked perfectly. Pay attention to the orientation of the pump on the housing when you remove the old one. Thanks for the DIY videos! Saved me a bunch!
Thank you very much for the feedback! I do appreciate it big time! I am so happy this install video and the removal video helped you out! Thank you again!
This video was very informative. Our LG washer was setup a little different than the one shown but I was able to switch out the drain pump. Thanks for the help : )
Thank you very much for the feedback! I do appreciate it very much! Glad to hear got your up an working
Thanks a bunch! Washer works now and I put it back together without a bunch of screws leftover. Couldn’t have done it without this video!
Awesome! Great to hear! Your feedback is very much appreciated! Happy Holidays!
Great video..very discriptive..I ordered the $12 spring expansion tool along with my pump.
@cbatilo, ah haa! now i found how to put new pump back in , { PART 2} , thank you i am ordering part now for my LG model number WM2650HWA, my washer has been broke almost 2 years,,,, soon it will be like new thanks to you !,,,
Thanks a lot man, this is gold. My 13 year old LG washer had a drain pump fail, and your video s on removal/installation are the best I've seen. I'm not much of a handyman, but over the course of a couple days I got the thing apart, the new pump arrived, and then I got it assembled. There are a lot of screws involved - have a system for keeping track of them and where they are used! I was going to use coat hangers to replace the spring clamp around the rubber bellows, but surprisingly I was able to just snug it on by hand (spring was corroded/rusted, that may have something to do with it). Found a small tear in the bellows that was above the water line. New bellows are over $100 - duct tape to the rescue!. If anything else breaks on this unit, it will be time for a replacement.
Secretarian so cool! Wow... that LG served you well for a long time. Anyway, Thank you very much for your kind words! I really do appreciate the feedback! The more activity this video gets the more it reach... = help people out. Again, thank you so much!
Thanks. Saved me a ton of money. My model was slightly different and pump was mounted slightly different but the rest was the same and my son and I completed in hour. Great video.
Ross Zirkle so happy all worked out! Thank you very much for the feedback! It is very much appreciated!
Thanks a lot for your detailed videos. They were very helpful. I just completed the job, replacing the pump, and the washer is working great.
By the way, the old pump had a safety pin inside it I think which was preventing it from operating properly.
Thank you for sharing... the safety pin (getting there) interesting... Glad you got it working!
Glad it helped. Thank you very much for taking the time to leave a feedback. It helps the video and my channel! Thank you - thank you...
Thanks for video it was very helpfull especial with the ring instalation i used the small J hook tool. Thanks
The best repair video I have ever seen.
Thank you very much for watching and for the awesome feedback. It helps our channel a lot. Thank you
Thanks for you great step by step instructions. I was able to replace the pump by myself which amazed me. You saved me so much money plus built my confidence. Thanks
tylllenol so cool to hear! Thank you very much too for providing the awesome feedback! Really great to hear the video helped!
Followed both videos step by step this morning and machine works again. Thanks for the video!
Clint Boatman Thank you Clint! I appreciate the feedback very much! Happy to hear all worked out!
Great video tutorial! I would rather chew glass than have to put that spring back on with my husband! 😆
Thanks for this video. I'm about to do this install today. just waiting for the pump from amazon.
Adrian Rangel good luck with the project! Make sure you watch the two videos - I did a removal and this video of the Install!
cbatilo yes I watched the other video first. It was a success. I was able to turn my machine on it’s side and access the pump from underneath. Saved me a lot of headache. Thank you for both videos.
Adrian Rangel way cool! Thank you for the feedback!
Thank you so much! Best video ever, so helpful. Seriously great step- by- step, but without wasting time. Our laundry was piling up with 4 kids, and any repair service was a week or two out. Got it fixed thanks to you! Thank you, thank you, thank you!
For easy spring installation put some soap or liquid detergent on it, it will slide back easier
Very helpful! Although one thing of note is on my machine, the brown wire is actually at the top while the black is at the bottom… that’s exactly how it was when I took the original pump out and I left it on the same configuration when I put the new pump in. I have no idea if I should’ve done it the way you did with brown on bottom and black on top.
Good video , the only thing I have to say is that the pump is OEM , is an aftermarket, the OEM cost about $50.00 or a little more , an advise to all the viewers , I do this for a living, try to always use the OEM parts unless is not available
Thank you for your video I just change drain pump and you explain really good and make easy
Thank you
Thank you very much for watching! Your feedback is appreciated
Holy cow! THANK YOU!! I have a Kenmore but I knew LG made the older models, so took a $23 chance and whoo hoo! I was willing to buy a new one since mine was more than 10 years old but I'm a huge DIY person and watched these 2 videos and figured what the heck. I also knew I had power so there are very few things that can go wrong with these, pump, belt and mother board. I am so pleased with myself, I almost broke my arm patting my back. Thank you good sir for the detailed videos, save me $600 on a new one. Now I can buy the flooring I want to lay 😉
Thank you very much for very cool feedback! Much appreciated! Great to hear and thank you again!
Great video. Just replaced my noisy pump. It was still working , but very noisy when draining. Now works like a charm. Thanks! You were right the hardest part was getting the spring loaded wire back around the seal. 👍🏻👨✈️
Glad it helped. Thank you very much!
Excellent video and works perfectly for replacement of drain pump !!!👍 TY
Thank you very much for watching and for the feedback. It is very much appreciated
Thanks for the video. Just got done. I also used vice grips on the spring. Was a pain, but got done.
Randy Tennison awesome! Great to hear you got your washer done! Also, thank you for taking the time to leave a feedback! It is very much appreciated!
Thanks man. You made it simple.
Thanks for watching! Thank you for taking the time to leave a feedback too
Great step by step. Followed it and successfully replaced the pump. Thank you!
Thank you very much for the feedback! Big time! Great to hear all worked out!
The feedback activity helps the video reach more people. Thank you again (what I mean with the big time thank you)
Just a tip when replacing that white housing to the pump body. Use a sharpie to note the black and brown wire placement so it is easy to remember if you ever have to do this repair again in the future. Brown is neutral and black is line. The white cover actually has some marking just above the slots on the housing, but they are difficult to read. Nice videos on this subject and I especially liked you providing the orientation of the white housing/motor to the pump housing. You actually can indeed put the two together incorrectly if you're not watching carefully.
a1930ford I made the mistake of not paying attention to where the wires are plugged into the pump I'm having trouble getting around this issue it has a blue and a gray wire and I'm afraid if I guess I'm going to burn up the motor has anyone ever had to deal with this and how did you figure it out??
On the Right circulation pump the blue wire is on top and the gray wire is on the bottom
Thanks for the informative video. My solution for reattaching the spring retaining ring solo if you don't have a wife to assist you; I bought a mini ratcheting clamp/spreader for $3 and two hooks.
Thank you very much for watching and tip! Awesome
Thanks , good instruction, worked like a million bucks!
Nice tips.. thanks alot!another!! 👍👍
You rock followed you step by step and bam it runs like new thanx so much
Thank you very much for letting me know. Great to hear your project - fixing the washer went very well! Awesome job! Thanks again.
Great job and very clear instructions and illustration.
Thanks a lot.
Thank you very much for the feedback!
Very helpful video fixed my machine with this video thanks
Thank you very much for the awesome feedback! Thank you also for letting us know... you got it fixed. Way cool!
thank bro really apreciated opened up my eyes save me lots of money great video thank for sharing thank you
+DuckGamez ! Thank you very much for the feedback! Congratulations on getting your washer up and running. Awesome to hear! Quick question, did you watch the removal video too? Just curious....
Hi I have change all the valve, water pressure and tubes. But my lg washer is still over filling. What else could it be.
Thanks for the video(s). Followed your instructions step-by-step and now the ole' machine works like a charm.
+Melvin Mitchell Thank you very much for the feedback! Great to hear!
Thanks. This really helps
Thank you worked like a charm👍
Lynn Guele thank you very much for taking the time to leave a feedback! Thank you - thank you! Prayer 🙏
Your videos saved me a bunch of money! Thank you so much!
Kim Larson Thank you ver much for the feedback! It is really appreciated! Have A great weekend. Really Happy to hear the two videos helped
What if the new pump doesn’t fit into the plastic housing so that the 2 white tabs aren’t in slots (as the slots at a different place) seen at 1:32? Also, when putting in the 3 screws- it seems like the motor isn’t completely flush. It’s only flush where the 3 screws are. Thanks. Working on this now.
Thank you!
Thanks for this video so interesting and instructive for all of us willing to DIY repair
in our washers. I will like to buy a replacement pump for the LG WM4200HWA to
have it handy when will be need it but I do not know where I can find the part number
to track it. I live in Costa Rica and I can not find parts for LG washers, has to be
imported from the U.S.. Any info will be appreciated.
Attention! Its possible you don't have to remove the front of the machine at all! I removed the pump from underneath once I removed the three screws holding it to the inner front frame! Remove the screws then prop it up and crawl underneath to remove the pump! FYI
You're my hero. Thanks!
Thank you very very much for the feedback! Great to hear all work d out with your washer!
Is this the probable solution for the OE error? Thanks for the great step by step video.
It is... but before you do what I did on this video... do the free troubleshooting: 1.Check for kinked or bent drain hose 2.check for clogged hose. 3. Clean the drain filter... 4. Disassemble and check the drain pump... then do this video
noted.. thanks for the fast reply!
Thank you so much, great video.
Earthen Might thank you as well for the feedback! I am really happy that the video helped! Thanks again... hearing from someone that used it.. is awesome! Thanks again!
Helped out a lot, great video.
+John holt thank you very much John for the feedback. I do appreciate it big time.
My drain pump had the brown wire on top, black on bottom. Washer works fine now but the new drain pump makes a noise, vibrating kind. Is it possible I have the pump running backwards? I may take things apart and swap the wires around like you show. I did take pictures before removal and my LG TROMM washer drain pump came with the brown on top.
If the wiring isnt the issue could I have a defective (but operational) pump?
Thank you
On my washer the dryer is on top, so am I gonna have to take the lid the top piece off the washer to replace the drain pump? I’d have to get someone to help me and my buddies are pretty busy right now, so curious is the way to do it without that
Just remove the pump from underneath. Save's a TON of time. Changed mine out by flipping the machine upside down in about 10 minutes.
But after you put back on the drain hose..where do you attach the other end?
Are you talking about the small hose? It is plugged on one end… you only use it if you want to drain manually- no power. To manually drain. Remove the plug and place the small hose to a bowl or bucket…
See 3:14 to 3:27
Thank you ..this helped me fix my washer
Is the black wire the L
And brown is N ??
I've got the LG version with a front opening to this area, so the technician just opened the panel and installed, without taking the front of the machine off. I just stressed the motor again, this time I think I'll be able to do it myself.
also my LG front loader HE (not stackable) has the motor on the other side, so no need to remove the black bit
There are two models on with another circulation pump on the right. That one has a Blue and gray wire connected to it. On the right pump similar to this setup do the wires connect the same Black on top and brown on the bottom. I am seeing the opposite on my model. I may have got them backwards or that is how they go.