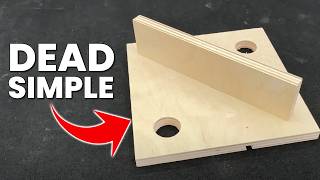
Corner Clamp Jig: Woodworker’s Secret Weapon

Вставка
- Опубліковано 1 лис 2023
- Are you tired of struggling to make perfect 90 degree joints for your woodworking projects? Well, we have the solution for you! Introducing the Corner Clamp Jig, a DIY project that is not only easy and practical but will also simplify your life.
With this simple yet effective jig, you can say goodbye to those frustrating moments of misaligned corners. Whether you're working on simple drawers or any other woodworking project, this jig is a game-changer. It ensures that your joints are perfectly squared, giving your creations a professional and polished look.
The best part? Building this corner clamp jig is a breeze! With easy-to-follow instructions, you'll have it ready in no time. No need to spend hours on a complex build. We believe in making things fast and efficient so that you can focus on what really matters - your woodworking.
This practical jig will become one of your go-to tool in the workshop. It holds your workpieces securely, allowing you to focus on the task at hand. No more worrying about pieces slipping or moving out of place. The Corner Clamp Jig keeps everything in position, giving you the confidence to create flawless joints every time.
So why wait? Take your woodworking skills to the next level with this must-have jig. It's time to simplify your life and achieve perfection in your projects. Watch our step-by-step tutorial and get ready to experience the joy of effortless and precise woodworking. Say goodbye to frustration and hello to a world of beautifully crafted creations. Get your hands on the Corner Clamp Jig today!
#WoodworkingJig #DIYProjects #CornerClamp #PerfectJoints #WoodworkingLife #EasyBuild #PracticalTool #SimplifyYourProjects #WoodworkingTips #Craftsmanship #gorillaglue


I've been doing carpentry for a long time, and had never seen this setup. Simple, slick, and efficient. Learn something new everyday.
Glad it help you @shaney8275. I learn something every day too. That’s what so wonderful about woodworking. Have a nice day my friend.
@SawdustSociety Oh, I'm definitely going to try that set up. I've seen some of your other stuff as well. Thanks for sharing it.
I'm glad it can help you @shaney8275. Thanks for commenting and have a nice day!
I worked at a drycast concrete factory making custom architectural stone pieces used in masonry buildings. Every time I walk into a Walmart I recognize their product used underneath the windows and on top the columns for the garden center. We had a full time carpenter building molds. Usually, they would be small enough to use on the workbench where we could flip the completed part onto a piece of plywood, strip the mold, and push the part down a line of rollers so it could dry overnight. That way we could immediately reassemble the mold and make another part.
However, some pieces that the architect designed were too physically big to rotate. We had a form bed for those parts. It was made out of I-beams placed using a Lazer level, with two layers of 3/4" OSB over the top. It was 8 feet wide, and 32 feet long. Flat and strong. The carpenter would build us the molds on that base, starting with a piece of 3/4" pre-finished high quality plywood the exact dimension of the finished piece. The sides were two layers thick. The inside would be the same expensive plywood as the base, but the outer layer was just cheap 3/4" OSB to reinforce and stiffen the mold. The OSB would have a 3/4 inch wide, 1/4 inch deep dato that started 1 1/2" from the bottom. The wedges he made for us are similar to the ones in the video, except they were three layers thick. The top layer being offset 1/4" to one side.
We would put a pair of wedges together, with the lip locking into the mold side, and screw the outside wedge down solid. A few taps from a hammer, and the side would be forced tight to both the mold bottom and the form bed. Then, the forms could be disassembled and reassembled quick and easy every morning until the order was fulfilled.
Wooden wedges might be low tech, but they work like a charm.
@@SawdustSocietyI would really like to try this. Are the measurements of the pieces your cutting on the miter saw important? Or can I just take any size square and cut a 15° angle down the middle?
The worst part about the million useful jigs for every possible application, is the entire second workshop required to store them.
You’re absolutely right @theoriginalmonstermaker. In my case, I make them for sharing with my audience. Thanks for your comment and have a nice day!
Only change I would recommend is to reverse the angles so as you tighten them, you are pushing the pieces together rather than away from each other
I've never had an issue with this approach @AndoidMonkey, but your feedback is valuable. I will consider it in the future. Thanks for your input and have a great day.
A simple but brilliant idea.
For those of you less experienced than this guy NEVER pull the miter saw towards you in the cut, it can catch easily and sling towards your hands and body.
You can never be too careful using tools @connorhart7597. Thanks for your comment and have a nice day!
Saw that too! Hate these kind of videos for that reason. Also, the jig is overly complex.
@@Lets_Go_Canes it seems great for a few scenarios, not too common, but if you're putting together drawers with butt joints and no cut joinery, it makes a lot of sense to make it. Aside from that, it's just a lot of space being taken up haha.
@@connorhart7597 switched to plastic spring clips from Amazon. We make drawers. The jig is great, but we don’t have room for it.
Rip radial saws then
This is what I love about UA-cam. Where else could you see so many useful tips by wonderful people willing to share their ideas. I just made small wooden boxes for my 4 grandsons for Christmas. I wish I saw your video two weeks ago! Keep them coming!
Thank you for the nice comments @2davidbianconi1272 and have a nice day. Best wishes for the holidays. Cheers!
Can you show me full video or give sizes and more details
I shall give you the exact dimensions I used when I'm back in my shop today @philsketball. Cheers!
thanks
@@SawdustSocietythanks
If you could give me the dimensions of this here project. I would really appreciate it so very much. Thank You 🙏.
That's basically how all clamping was done before what we know as clamps were invented in the 1800's.
While numerous modern tools are exceptionally well crafted, age-old construction methods and jigs remain relevant today, particularly for aspiring carpenters seeking to grasp the basics of joinery or individuals passionate about woodworking. Thanks for your comment @jimthesoundman8641 and have a great day!
@@SawdustSociety Plus they have the added bonus of being essentially free.
I went to the comment section to look for the carpenter hate. But looks like you survived.
Well done lol!!!
Hello @KLartrandM. I discovered long ago that it's impossible to please everyone. Some comments may initially appear negative, but upon reflection, they often make sense. I attempt to find value in every comment. Nevertheless, there will always be unhappy individuals who seek to tear others down as a defense mechanism. They desire attention, and they achieve it through hate speech and inappropriate comments. Engaging in discussion with them won't change their behavior. I choose to focus on what I can control: my projects. Thanks for your comment & have a nice day!
As soon as you start hammering to fix the clamp, one of the joints will get loose. Better to setup that joint in reverse so that you hammer towards the joint not outward. But a pretty nice idea.
Thanks for your input @msaber. Have a nice day.
Super bien ya mismo hago una para mi..💯
If you are the inventor of this you are extremely clever!
That jig was shown to me a long time ago by another carpenter @davidpeirce7914 and I decided to share it with others. Hope it can help. Have a nice day my friend & best wishes for the coming holidays. Cheers!
UA-cam is starting to read my mind. Been wondering how to get a 90 like that. But this… this video is 100 for sure.
Hehehe. I'M glad it can help @SimpleGuyTai. Have a nice day!
I'm really like these woodworking shorts but this one's actually pretty damn good
Thanks for your comment @yorselrus1996. Have a nice day!
I echo a previous responder. I’ve been a woodworker over 70 years and have never used a corner clamp like this. Great idea!!!! Never ever too old to learn a new trick especially in woodworking! Thanks for sharing!!
Thank you for your kind comment @philgoulding5219. I am thrilled to hear it from a seasoned carpenter. Have a pleasant day, my friend!
Clamping stuff is the bane if my newbie existence. People like you make it look so easy. I know... practice and experience. Still amazing!
Thanks for all the nice comments you left @lornekletke6461. Have a good day!
At first I was thinking "what the heck is this guy doing" but then At the end....it all made sense
Thanks for your comment @jmcnro and have a nice day!
Great job! Classical old school jig!!
Thanks for your comment & have a nice day @stevepotter654!
amazing. can i pls have exact size of the square that qas glued and the ones you cut pls. so good
Hello @derekdelaneyphotography9048. You will need 3 pieces measuring about 6"x8", with two of them cut at a 15-degree angle. Then, you can adjust the spacing between them to accommodate a standard 2" thick piece of wood. This jig can then be used to fasten together pieces ranging from 1/2" to 2" thick. Hope this will help. Have a nice day! Thanks for your question & leaving a comment. Cheers!
Wow! This is awsome!
Glad you like it @tarias1313. Have a nice day!
I love this idea. I will use it when I build the drawers for the cabinet I am making.
I’m glad it can help you @mrtablesawful. Thanks for your comment and have a nice day!
Muy buena idea, gracias maestro.
Gracias por su comentario y que tenga un buen día @hugolloyd31!
I've got that same Makita saw.... Love the sound
Yeap they're great tools. Have a nice day @TuckySlim!
great idea! tnQ
That’s clever I’m gonna have to remember that!!!
Thanks for your comment and have a nice day @carpenterlex.
Drill a hole at the corner apex and chamfer it. This will accommodate glue squeeze out and prevent the assembly from gluing itself to the board
I should try it next time I'm in my shop @MorRobots. Have a nice day!
Oo cool! Guess I'll be doing that now. Thanks!
Let me know how it turns out @dreamlookautodetailingauto3. Have a nice day!
Well done!👍👍
Thank you! Cheers!
That's superb, thanks for your knowledge bud.
You’re welcome my friend. Have a nice day!
Smart👍
Do you have plans for this jig? Would like to build this for my shop.
Hello @user-jo2je5qj5c. You will need 3 pieces measuring about 6"x8", with two of them cut at a 15-degree angle. Then, you can adjust the spacing between them to accommodate a standard 2" thick piece of wood. This jig can then be used to fasten together pieces ranging from 1/2" to 2" thick. Hope this will help. Have a nice day!
Omg. I love this!
Glad it can help @jameswall1076. Have a nice day!
Just made me one! Thank you for the idea!
I'm happy it helped you @hamsack981. Thanks for your comment and have a nice week-end. Cheers!
This can be done with steel and any other hard material for you welders out there. Delrin fixturing to dog down aluminum works very well, or any softer metal on a harder metal like aluminum to stainless- he let the cat out of the bag, or I woudve just held on to this trick to my grave because i'm stingy and the younger generation is unappreciative AF.
You're absolutely right @charlesdeering9359, the principle can certainly be applied to metals. Delrin would be a suitable material for constructing this jig. Thank you for your input and have a great day.
@@SawdustSociety thanks for your cool content!! Please keep it coming
NICE!! 👏🏿👏🏿👏🏿
Thanks for your comment & have a nice day @tlreed1.
Easy to knock up and very effective 👍👌🏻
Glad it's helpful @MacM73. Have a nice day!
Cool idea and very useful 👍
Glad it can help @lesliefontenelle7224. Have a nice day. PS - Isn't Fontenelle a french name?
I have this Makita compact driver and it's an amazing little bit of kit.
I agree @myshinobi1987. It’s a great tool. Have a nice day!
Need this!
I’m glad it can help you @Fried_Rice_Ren. Have a nice day!
If you route a channel along the wedge side of the loose “A” & “B” pieces, drill two holes in the bottom of the jig, recess the bottom of the hole for a bolt head. You could put a bolt through so that the loose “A” & “B” pieces can still slide and clamp but will always be attached to your jig and not get lost
That would make a good upgrade @roarkemurdock3027. Thanks for your input and have a nice day!
I love it!
Glad it can help @user-xm3iy6ht1z. Thanks for your comment and have a nice day!
Gotta admit your idea works great with various thickness wood panels. I've gone one step different by going the 3D printed route because I have standardized the wood thickness I work with. Thanks for the idea.
Glad it can help @robertdecuir5748. Have a nice day!
Wow! Such a simple and efficient jig!
Thank you for sharing, im gonna subscribe
Glad it can help @Anthany0916. Thanks for your comment and have a nice day!
Very nice. Now I need to find a place to put it with the 1,000 other jigs I made from UA-cam
hehehehe it's only one more @mrm14_88. Thanks for your comment & best wishes for 2024!
Very cool. Learn something every day
Thanks for commenting @SheepDogActual. Have a nice day!
this is so simple and good
Glad you like it @AsHellBored. Thanks for your input & have a nice day!
Will it work on mitered corners?
It most certainly can @jonathanluster693. Have a nice day!
I love a good wedge jig.. sometimes better than clamps
Agreed. Thanks for leaving a comment @davido4251. Have a nice day!
Does this work with a 45 degree miter? Very clever
I don't see any reason why it wouldn't work @dcmirk. Thanks for your comment and have a nice day!
Such a great idea!
Hope it can help @Chevymacjr. Thanks for your comment & have a nice day my friend!
Респект ! Всё гениальное ,просто .
@user-bg5vy1we2w, Спасибо за ваш комментарий и хорошего дня.
Excellent. Mental note.
Glad it can help @cheeseheadfiddle. Have a nice day!
That is awesome. Thanks
Glad you liked it @chrisp7957! Have a nice day.
Gracias bonita idea
Gracias por su comentario y que tenga un buen día @carlosfajardo7261.
NIYCE!
Thanks for leaving your comment @tw8633. Have a nice day.
Excelente hermano gracias
Gracias por su comentario y que tenga un buen día.
Buena idea!
Gracias por su comentario y que tenga un buen día @barracuda5807.
I like that!
Thanks for your comment @justplanefred and have a nice day.
Very slick
Thanks for taking the time to comment @markleng67. Have a nice day!
Very good design
Thanks for your comment @robertcharlton1551 and have a nice day!
great !!
Thanks for your comment @wizardmaster6639. Have a nice day!
I make decorative small boxes on scroll saw this is extremely helpful for glue up, thank you 😊
Glad it was helpful @paulheard7729! Thanks for your comment and I wish you the best for all your woodworking projects. Have a nice day!
@@SawdustSociety thank you much appreciated 👍
Ive never had a need to use a jog for a corner!
❤❤❤❤❤❤❤❤❤good and very nice ❤❤❤❤😊
Many many thanks @Mnaeem-ew9jh!
Top top parabéns
Obrigado por seu comentário @evaildorezende7700 e tenha um bom dia
Buena idea amigo😊
Gracias por su comentario @Javier-hp6xz. Que tenga un buen día.
Nicely done..
Thanks for the visit @rickychurch5630 & have a nice day!
GENIUS I TELL YOU. 🤝
Thanks for your comment & have a nice day @JosephSmith-mb7jj.
If I had to do that every time I made a drawer box I'd get fired.
@ajlacostewm, we acknowledge that various techniques and tools are utilized in an industrial assembly line or production floor. Thank you for your input and have a pleasant day.
You make the jig once. If you made one every time then you should be fired.
the object is repeatability. how out of square are yours?
Was kinda my thought along with "WHY?" Can cut a rabbit or dado quicker than messing with that jig 4 times.
Вах!!! Шайтанамана!!!
I'm so confused. What size is the bottom board? What size boards are the clamp pieces, and how far do you space them before fixing them on?
Hello @jasonmixon4163. You will need 3 pieces measuring about 6"x8", with two of them cut at a 15-degree angle. Then, you can adjust the spacing between them to accommodate a standard 2" thick piece of wood. This jig can then be used to fasten together pieces ranging from 1/2" to 2" thick.
@@SawdustSociety Thank you so much! I'm a newbie, and I can't make a square anything to save my life. Definitely gonna try this jig! Thanks again!
Have a nice day my friend.
Thanks. I need that for my bee boxes.
Glad it can help @tommyordoyne7461. I once had 3 beehives. The world of bees is truly fascinating. I am also considering getting back into beekeeping and building hives in the near future. Thank you for your comment and have a great day. PS - Feel free to share a photo of your creations with me once you have built your boxes.
Niiice!!!👍👍
Thanks for your comment & have a nice day @Voxman1972.
И вам хорошего дня!!!
Need something lome that for large crown moldings
Hope it can help you @anthonyeacheach1983. Have a nice day!
Amezing
Glad it can help @budiasakadek3342. Have a nice day.
Супер!!!
Спасибо за ваш комментарий, мой друг, и хорошего дня!
@@SawdustSociety и вам хорошего дня!!!
You need to talk to us!
I often do and I will in long form video @robertcharlton. Have a nice day!
Im so making this
I'm glad it can help you @presidentjoethudbrandon7074. Have a nice day!
60 yrs ago this would be great but we in 2023.. great tip.tho for those who don't kno
Hello @wilsonmaingrette715. Making jigs and tools is a timeless craft. While it's easy to buy most woodworking tools now, many enthusiasts still prefer to make their own for various reasons. For me, woodworking is a way to learn, create, and share. Thanks for your comment & have a nice day!
Better than a clamp
Thanks for taking the time to leave a comment @manueldasilva8794. Have a nice day!
Brilliant
Thanks for your comment @pixelarts5027. Have a nice day!
Seem like a lot of work for a simple nailing. Those finish nails aren’t gonna keep that square for long
@mummsthaword1111, the purpose of this demonstration was to showcase how the jig operates. Brads were only used to quickly illustrate the principle I intended to convey. Typically, I would reinforce this type of joint with glue and other methods. For instance, butt joints can be strengthened with dowels, cookies, or 45-degree angles. Although I acknowledge that butt joints are not the optimal solution for all woodworking projects, they can be advantageous in certain situations, such as constructing boxes or drawers. One of the benefits of woodworking is the abundance of techniques available, and it's always beneficial to have a variety of options at your disposal. Have a pleasant day!
@@SawdustSociety that makes more sense. Was going to say that the piece won’t stay at 90 until it’s completed or has some stronger joinery
Who needs clamps?
Nice
Thanks for taking the time to comment @152lb.mousehole2 & have a nice day!
@SawdustSociety no problem...you as well
Bagus 👍
Terima kasih atas komentar Anda dan semoga hari Anda menyenangkan @biawakaja1063
👍👍👍👍👍
Thanks for the feed-back @maleaneamasea4284.
when you tighten A, it pushes the board away from the other board.
Hello @x1000. Have you tried it? It works fine. Have a good day.
J'aurais mis les angles sans l'autre sens, pour créer un effet de serrage de l'assemblage.
Vous pouvez @babarsport276, mais assurez-vous d’avoir suffisamment de place pour clouer ou viser les pièces. Merci de votre commentaire et bonne journée.
Muito bom
Obrigado por seu comentário e tenha um bom dia @profetatb2008.
すばらしい😮👍😀
@mizutani51, コメントありがとう!
Just go to hardware store and buy one that takes 90% less space.
Nice ! But throw that gorilla glue in the trash. Titebond and elmers are over 2x as strong.
👍
Mądre rozwiazanie
@krzysztofnowy-ox9kd, dziękuję za komentarz i życzę miłego dnia!
@@SawdustSociety dziękuję
Holy hellfire, calm yer tits. That is not an unsafe cut. I’ve made over 200 cuts a day in the flooring trade for over 15 years and that little back snip he made has NEVER been an issue.
As someone who watches a lot of carpentry videos, and reads a lot of comments, there is way too much space given to safety. Why does every single video need to go over basic safety procedures or perform the maximum safe cut possible? In case someone with no skill tries it? So what, it’s not an unsafe cut. The one in a thousand chance that cut fails is because of improper attention to bowed or twisted material, in which case binding or bucking would be inevitable no matter which direction the blade passes over the material.
Also, an amateur who is conscientious will pick up on safety, and learn before using. If he’s not, he doesn’t give a shit no matter what you tell him and he’ll learn to respect his saw over time.
Completely agree with you@rickybaker42. I always try to be careful around anything that cuts but never had a problem with operating my miter saw. I also share your point of view regarding other fellow woodworkers. I respect their intelligence and trust that they will approach and use tools carefully. Thanks for your comment and have a nice day & best wishes for the coming holidays. Cheers!
Kickass
Thanks for your feed-back @plowman1266 & have a nice day!
How can you tell he is probably Canadian???
It's a bit dramatic 😅😅
Great, a well made clamp... for what? End nailing a box? which would be square anyway if your cuts are straight. The jig won't keep it straight after its removed if the cuts are off. Is it for making sure the boards are butted flush? Again, nifty but damn that's a lot of work unless you building like a bunch of them. But then I have a problem with butted nailed joints anyway. It is the weakest joint ever. so what is the point of this?
Thank you for sharing your thoughts @seanboate9960. I completely understand that butt joints may not be the ideal solution for every woodworking project. However, they can still be very useful in certain situations, such as building boxes or drawers. Additionally, they can be reinforced with other techniques like dowels, cookies, or 45-degree corners to increase their strength. One of the great things about woodworking is that there are many different techniques available, and it's always good to have a variety of options in your arsenal. Have a nice day!
Do we really need another video on corner making jigs..
Based on the large number of viewers of the video, it definitely appears to be the case. Have a great day @larry5948.