Nicely done. Another technique i like to do along with some of these is to lay a course thread screw on its side and hammer it in as you did the nail. It also gives off a cool look. And use a hatchet to make the hemmed look. But I like what you've done here just the same.
Hey Brady, I discovered by accident if you run a 7" sanding disc attachment with a really coarse disc in one continuous sweep, it'll mimic a sawmill cut. I also took a lag bolt, laid it flat, and drove it with a hammer. I then loaded it with black paint. Remove the excess and looks like you sawed through an old bolt hole.
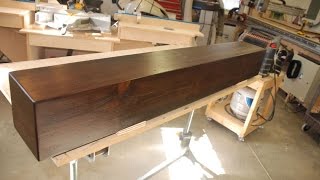
Your beam shelf looks like total crap. You did an excellent job!!!! Nicely done. I really like the lines from the screw driver, they look great. And I loved the picture of you dogs, their gorgeous.
Try taking a metal chain & hitting the surface of the wood in random patterns & directions, does wonders. Also, Gel Stain is amazing for these projects
Very cool! Clever approach to getting it square with the wood blocks and your clamps. I welcome your thoughts on creating the end caps. I am new to cutting bevels. What is the approach to measuring and cutting the bevels for the end caps?
Excellent job. I’ve watched a few other videos like this and the results at the end were laughable. This the first one I’ve seen where it genuinely looked like a beam at the end.
Some times after the Golden Oak, I put a couple of coats of Shellac…then distress and Sand lightly, then my English Chestnut, then seal and put the Water based poly on, then wax applied with steel wool.
Your last name is as the City of Homel in Belarus. Many ancestors that came from beautiful country of BELARUS had the last name Homel which then later was modified to Hommel, etc. Thanks for the video 🧡
Just built one today. My first... All in all, I'm pretty proud of it, but I can't quite wrap my head around the 45s! How do you know WHERE to cut on the board so that you don't cut off too much board? Any possibility of doing a follow up video on exactly this?? TY!!
@@BradyHommel Soft Woods (pine) are a porous and prone to blotching. I haven't seen any guys using it on faux beam mantles. Maybe it doesn't matter too much if the beam has the distressed look.
When a Biden commercial comes on. I turn off video and look elsewhere. Just lost a subscriber and viewer, Brady. Tell UA-cam NO to Biden and Obama commercials or lose viewers.-
Well as much as I'd really like not having his commercials on my channel as far as I know I have no way to control that. But anyone that even mentions his name or anything related to politics I don't want associated with my channel. so farewell


Going to make a table centerpiece..love this technique. Woodshop fresh class at my library. Going use steel wood and vinegar stain..
Awesome! Let me know how it turns out!
This would make a fantastic rustic ceiling beam also. Absolutely amazing final product, Brady.
Yes it sure would! Thanks so much!
I like the simplicity of the build yet the finish product looks as good as any high end project. Good job Brady.
Nicely done. Another technique i like to do along with some of these is to lay a course thread screw on its side and hammer it in as you did the nail. It also gives off a cool look. And use a hatchet to make the hemmed look. But I like what you've done here just the same.
Hey Brady, I discovered by accident if you run a 7" sanding disc attachment with a really coarse disc in one continuous sweep, it'll mimic a sawmill cut. I also took a lag bolt, laid it flat, and drove it with a hammer. I then loaded it with black paint. Remove the excess and looks like you sawed through an old bolt hole.
Your beam shelf looks like total crap. You did an excellent job!!!! Nicely done. I really like the lines from the screw driver, they look great. And I loved the picture of you dogs, their gorgeous.
Glad I watched this. Learned some nice aging/distressing techniques from you that I used on a prim reproduction table I built. Thank you!
Glad to hear that! thanks!
Try taking a metal chain & hitting the surface of the wood in random patterns & directions, does wonders. Also, Gel Stain is amazing for these projects
Great Tips!
I tried it on the old ladys back. It really does work. 😁
I'm doing one of these for a customer, so I've watched a lot of similar vids - this is one of the best.
Thanks, B.H. Subscribed!
Glad to hear that! Thank you!
love that embedded nail trick. I will be using this. Great video! Thank you
Glad you liked it. Thanks for watching!
you are artist. from spain
Thanks a lot!!
This was a great video. I really appreciate your work and keeping everything simple
Appreciate your comment. Thank you!
Very cool! Clever approach to getting it square with the wood blocks and your clamps. I welcome your thoughts on creating the end caps. I am new to cutting bevels. What is the approach to measuring and cutting the bevels for the end caps?
Thanks - that turned out great. Best video I've seen making new wood look like reclaimed barn wood.
Glad you liked it! Thanks a lot! Working on a real barn wood bathroom vanity right now
You did an excellent job! That final shot looks like a repurposed barn beam for sure!
Thanks for your comment! I appreciate it!
Well done! Very clear, informative and professionally presented. The finished product is very beautiful.
Thanks a lot! i appreciate that
Excellent job. I’ve watched a few other videos like this and the results at the end were laughable. This the first one I’ve seen where it genuinely looked like a beam at the end.
Thanks a lot! Glad you liked the video!
There’s a video by Matthew Peech where the end result is also badass
Wow best video ive ever seen on this topic. Thanks
Appreciate that. Thanks!
Looks great, think I'm going to try this for the fireplace. 🍻
Thanks a lot! Good luck on your build!
That is an awesome finish product!
Thanks!
Very cool looking. Thanks for sharing!
Thanks a lot!
Nice job looks beautiful .
Thank you!
Fantastic craftsmanship 👍
Next time I suggest using a cross section of the trunk to cover both sides, thank you
Came out wonderful good job
Thanks a lot Tommy!
Nice and lightweight.. i like massive ones but this is a superb solution for plasterboard walls
Awesome video with some good ideas for my project. Thank you!
Your welcome. Glad you liked it!
Man thats alot of work!
Really looks rustic and authentic. 👍🏻
Looks fantastic, I love watching these wood beam videos.
Appreciate that! Thank you!
Another good "aging" technique is using a clean chain and hitting the wood. Leaves deep, rustic, aged marks.
I really liked the nail trick. Awesome
My favorite! Glad you liked it!
Dang, that looks good!
Thanks a lot!
Great video. I really like all of your distressing techniques, .... the torch especially. Thanks
Hope you try them out! Thanks!
Great job! Really enjoyed watching it all come together.
Glad to hear that. Thanks for watching!
Ooh, a Jøtul fireplace all the way over in America ^^
Yes! I have since moved out of that house but that little wood stove was awesome!
Très belle job!
Recommendations on grit for sand paper? Don’t want to remove all texturing I did, but want to make sure it’s stain-ready
I use 220 for exactly that reason. It will keep the character and distressing but smooth it over enough to the touch. 👍
@@BradyHommel you are my hero, Sir! Thank you!
@@natepuplis3311 your welcome! Best of luck on your build!
Would the ends not be end grain? I see this done time and time again.
Very helpful video and awesome work!
Glad you it was helpful! Thanks!
Some times after the Golden Oak, I put a couple of coats of Shellac…then distress and Sand lightly, then my English Chestnut, then seal and put the Water based poly on, then wax applied with steel wool.
That sounds like a great process.
beautiful work mate
Just beautiful
Thanks so much!!
Great look man still don't know how it's mounted to the wall with the cleats
Thank you! Google or UA-cam french cleat
Thanks! Looks amazing
Thank you!
Nice clean job Bud. Just curious on the size of nail the gun nailer shoots out?
I am going to give this a go
Awesome!
great tip! maybe i will do this on a floor on a big widebeam barge i will hopefully bye!!
Wow, thats gorgeous work. Thank you!
Thank you very much!
That’s awesome!
Thanks!
Have you considered using log slice "cookies" for the ends so the grain looks realistic?
I did not think of that. That is a great idea tho!
Can I put this above a fireplace without concern, it would be 16in above a gas fireplace. Thank you
I would think it would be fine.
Your last name is as the City of Homel in Belarus. Many ancestors that came from beautiful country of BELARUS had the last name Homel which then later was modified to Hommel, etc.
Thanks for the video 🧡
That's pretty interesting. Thanks for letting me know and glad you liked the video! 😀
Just built one today. My first... All in all, I'm pretty proud of it, but I can't quite wrap my head around the 45s! How do you know WHERE to cut on the board so that you don't cut off too much board?
Any possibility of doing a follow up video on exactly this??
TY!!
Nice video and end result Brady. A year later - how are the seams?
All good! even with the wood stove going all winter. I have since moved out of this house 2 months ago but it was in great shape
Ok those are 1x6, so really .5 x 5.5, where did you set the fence for the long side 45? 5”?
I can’t seem to get this right?
THANK YOUUU! This video was very helpful and simple !
I'm relatively new to woodworking, but are you concerned about the end caps shrinking/cracking?
No, I moved out of that house so idc. Lol jk. It's been about 2 years since I've done it and ot was completely fine before I moved
Great video!
Thanks!
the 17 people that disliked this video just hate life
😂
Do you ever use wood conditioner on pine?
I have not. Do you recommend it?
@@BradyHommel Soft Woods (pine) are a porous and prone to blotching. I haven't seen any guys using it on faux beam mantles. Maybe it doesn't matter too much if the beam has the distressed look.
Great job! Don’t kill me, I am new to wood working but what wood putty did you use? It seemed too take the stain well.
Thanks Phil! After sanding the project I take the sawdust from that and mix it with wood glue. Works great and is just about free!
Awesome thank you!
awesome vid thank you
Your welcome glad you liked it!
Great video. Thanks
Glaf you liked it! 👍
That came out bad ass. Liked / subscribed:)
Awesome! glad you liked it. Thanks David!
How much do you spend on this?
Great technique I just subscribed also
Awesome, thank you!
Very nice Los Angeles
Fantastic! Thank you.
You got it 👍
I’d like to see someone properly emulate end grain on these projects.
Hmmmmm...
Brady Hommel - Exactly. The only think I can think of is to find a chunk of tree big enough, cut a slice off, and then cut it down to fit in the end.
👏👏
Lot of work, i'd just get a real beam after watching all this hah.
haha.
I tried that method but as you know, wood bends over time and the seams split. Much safer to use a routered edge specifically for 90 degree joints.
pleas to be essplaining more for us newbs. table saw the 45's and then use a router? or use a router instead to get the 45s?
Nice
Thanks!
Great videos don't need crappy music blaring in the background. Just saying.
Thank you!
you might want to wear some safety glasses at a minimum.
I Do wear safety glasses and a respirator most of the time now
bro your ears, wheres your PPE
What did you say? I can't hear you... lol jk I usually wear headphones now if I am using a loud piece of equipment
When a Biden commercial comes on. I turn off video and look elsewhere. Just lost a subscriber and viewer, Brady. Tell UA-cam NO to Biden and Obama commercials or lose viewers.-
Well as much as I'd really like not having his commercials on my channel as far as I know I have no way to control that. But anyone that even mentions his name or anything related to politics I don't want associated with my channel. so farewell
I will try to do it with WoodPrix plans.