ESP8266/32 (Home Assistant Switch) connected to PCF8574 controlling 8 AC relays

Вставка
- Опубліковано 7 лют 2025
- Home Assistant Switch for 8 Relays: PCF8574 can be used to extend the GPIO of ESP8266/32 and here we use 8 ports of PCF8574 to control 8 Relay module
Code/Parts/Schematic: github.com/deb...


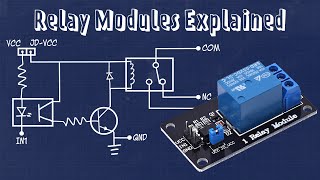


Nice Video Debashish, however You could most likely ommit the level shifter. Most of these relay boards do have a jumper "JD-VCC - VCC". If You open it, You can apply 5V to the "JD-VCC" pin which powers the secondary side of the optocouplers as well as the solenoids of the relays. And You can attach 3.3V to the other VCC pin (either one as they are connected to each other) for the logic part.
does it mean external 5V is unnecesarry? and it enough to power the system only from usb port only?
Excellent Debashish. Will try this and update. Thanks for the wonderful project. Keep up the good work.
Am watching cod. Very big one amazing your work
Wow thanks ... I was looking for something like this... I m making the project in Python..😀
why didn't you enter an example code?
Thanks for another great video
whether I can control this relay from another world. I appreciate your work.thank's for share..
Hello, I'm from Brazil, I would like to know how to customize the html that is encoded.
Solenoid relay's power build-up and release (thousands of watt) will be causing it to restart your esp8266.
@@debsahu7801 Have you tried using it in the real world? Unless you use snubber on the AC side, your mcu will reboot. You just don't know it!
Do you really need PCF8574 to control 8 relays? Doesn't ESP8266 have enough pins that are not used during boot-up process to be connected directly to relay module?
why are you using level shifter , is it necessary
In a reply to a comment here, you mentioned that the code has been converted to ESPHome. So does that mean I could follow the wiring in this video and it would run with the PCF8574 component on ESPHome?
@@debsahu7801 Excellent! I look forward to you posting the codes! I also looked online to try to order one of these chips, and what I found online mostly was a PCF8574 built to a board with dupont pins and it has a jumper for A0, A1, and A2 (to configure the address). Maybe you've seen one of those boards or maybe even used them. Is the ESPHome PCF8574 component compatible with those boards?
Hi do you have or thinking of making the same setup for a raspberry zero.
nice video
@@debsahu7801 A raspberry zero only cost $5. (esp32 cost more that a pi-zero) I have about 10 of them. I love to do a project like this on a Raspberry pi because of the Ethernet connection on the pi vs running too many project WIFI. if you don't know most router (well mines can only handle 32 2.4g and 32 5g devices) can only have 20 to 32 2.4g devices connected at once. (Am trying to get off wifi, I have $5 to buy raspberry zero) So making so many wifi devices will use up your router where you will have to get an AP to handle the WIFI load.
I think you do not need PCF8547 and voltage level shifter, since ESP has enough pins and you just have to remove JD-VCC jumper, connect 3.3 from esp to vcc and 5v to JD it will be optically isolated. From datasheet: It is sometimes possible to use this relay boards with 3.3V signals, if the JD-VCC (Relay Power) is provided from a +5V supply and the VCC to JD-VCC jumper is removed. That 5V relay supply could be totally isolated from the 3.3V device, or have a common ground if opto-isolation is not needed. If used with isolated 3.3V signals, VCC (To the input of the opto-isolator, next to the IN pins) should be connected to the 3.3V device's +3.3V supply.
Is there a way to add physical momentary bush button to toggle each relay using gpio or via i2c?
@@debsahu7801 thanks tried and it works. Do you encounter any relay is on during boot up coz i'm facing this issue even with i2c chip. I'm using esp32
Why do we need a 3.3V to 5V level shifter? I was reviewing the datasheet of the PCF and it says 2.5V to 6V
@@debsahu7801, You can simply open the JD-VCC - VCC jumper and connect 5V directly to the JD-VCC pin. See my more detailed reply
"This entity does not have a unique ID, therefore its settings cannot be managed from the UI." I get this error on home assistant. I fixed it by adding the text below in the configuration.yaml file and the device appeared. Hope this helps someone and thanks for your efforts in the project.
homeassistant:
customize: !include customize.yaml
Sir I need 32CH pls!
Thank you!
can you add the WiFi + MQTT manager to your code , so that its easy to configure it without entering the credentials during compile and upload
Can you spin up a simple project for 4 relays directly operated on the ESP8266 portpins and if possible with a local switch for controlling these relays , if WiFi fails.
@@debsahu7801 yes but for 4 Relay + 4 Switches you can juggle the pins according to their Boot State level and make one. I already have made one with TASMOTA firmware and it works well. But I want it with your code on it. If you could make/share
Hi, how to connect 16 relay ?
Hello, where is the yaml file for home assistant ?
please Make a project on "ARDUINO UNO with ESP8266 & 8 CHANNEL RELAYS" and program it..... 🙏🙏🙏🙏🙏
Sir, i wanna ask..... your schematic can used at Blynk ??
Debashish Sahu : yess sir, can i used with Blynk app?
Any new for esp32 to 74HC595D 16 channel relay with rainmaker code?
please make a “PROGRAMMING" video on “ARDUINO UNO with ESP8266 $ 8 CHANNEL RELAYS" and control by Android phone....🙏🙏🙏
Amigo. Me podrias hacer el favor de colaborarme con la integracion del esp8266 en home asistant. Instale el adons mqtt y la configuracion yaml y el programa en el esp. En el ide sale mqtt conectado pero no logro hacer
@@debsahu7801 gracias
Thanks for this great video , can you please fix links for components in github readme file
@@debsahu7801 thank you 😊
Bro, if any other DIY with 16 relay channel + PCF8575, please share bro ..
respect
@@debsahu7801 how to do it ? do you have schematic ?
Good
Ah se fossem esses os preços no Brasil...