(1) Angle custom abutment blank and exocad and the hyperdent in anterior prosthesis (English)

Вставка
- Опубліковано 9 лют 2025
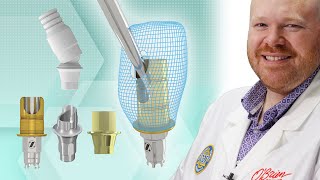
- We will look at anterior prosthesis using angled custom abutment blank and the hyperdent. We need a custom abutment blank with an angled screw channel. We can see that the angle driver fits into this screw hole. Then, the exocad is used to complete the design to look like this red abutment. After making the nc file using the CAM program then machining it with the milling machine, the angled hole abutment is produced as you can see below. We need three things. First the angled custom abutment. Second an implant library for the angled custom abutment. We can provide this implant library in a zip file and you can simply save it under the implant file. Then you need to restart the exocad in order to use the library to start designing. In the diagram below, there are two types of drivers. One is a hook- type gold driver that can bend up to 25 degrees, and the other is a silver driver that can bend up to 15 degrees. Both drivers can safely tighten up to 35 torque. The driver that can bend up to 25 degrees is more useful for prosthetics, but there is a slight vibration. Therefore the less-vibrating, smooth 15 degree driver is used more commonly. So having both types of drivers can be very useful. When you load the library in the exocad, select “custom abutment”. After executing order, the next step is scanning. Usually there is a hole on the side of the scan body. When putting the scan body onto the implant of the main model, this indentation on the scan body should be facing the lingual side to make things easier.If you select the angle from the implant library and save it under favourites only, it will be easier to select and use next time.For the type of the scan body I will select the 15 degree B. The 15 degreeB type has a screw hole that bends straight towards the indentation of the lingual scanbody. As you can see the angle is pointing towards the lingual. Let’s select another one. Type A. Type A has its hole bent towards the 17 in the maxilla and 37 in the mandible . Depending on the angle of rotation of the implant, different types will be used. For instance sometimes 15 AC is chosen. The AC type has a screw hole facing the 27 in the maxilla, and 47 in the mandible. Both type A and type AC has their hole facing towards a point, so the A type blank is used for milling in both cases. In this particular case, I will select the B type since it has a better angle driver accessibility from the lingual side. Next we will design the inferior structure of the margin.After designing the exterior prosthesis, the next step is designing the abutment. The most important point is to match the fixture axis of the implant and the insertion axis to be parallel, so that there will be more space left for the prosthesis on the buccal margin to create a thick esthetic buccal ceramic collar margin. In this case the insertion axis is parallel to the screw hole instead of the fixture axis, meaning it has a 15 degree angle, which is not very ideal, but still can be done without too much of a problem. This way the ceramic on the buccal margin will be thinner and the colour of the abutment can show through. Therefore it is ideal to make the axis parallel to leave more space on the buccal for a thicker and more esthetic ceramic margin. For the proximal, It is better to form an emergence profile instead of going too deep subgingivally, since that can make plaque management more difficult. We will lower the buccal side for a better colour and for the lingual, just enough to avoid discomfort. It is better to design the margin with an X-ray. Now that we are done with the inferior design, we will try and make the prosthesis in a one-step process. Select “attachment remove” to make a hole. If we make a hole more lingual than the original hole, we can use the 25 degree driver even though the abutment angle only provided up to 15 degrees. By adjusting the size and move rotation, make a slightly wider screw hole and select “allow any change” to make the hole. As we can see here we now have the angle hole custom abutment and an angle prosthesis on top. The screw channel is shown in yellow. The next step is milling. Inside the red abutment is curved like this. Here I used the 1.2 hex angle driver.The torx screw can be purchased individually and can used to give more angle. On Hyperdent it is easier to mill from registering the angle blank on the implant milling company’s library but it’s still possible to mill with the existing blank. Load “angle blank” on hyperdent. On the translucent angle hole of the angle blank, rotate and adjust the angle hole of the angle abutment stl file that we designed.Adjust the angle custom abutment on the milling zig and select adjust axis of screw channel, then rotate. The angles can be different depending on the equipment you own so it is important to check this by rotating and comparing with the milling zig.