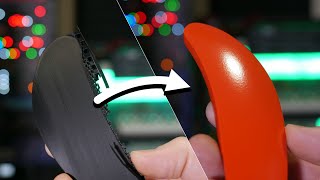
So can you spray paint them after applying the beeswax? That is what i'm most curious about. Since the wax add a thin layer on top of the print, i think it will be really smooth if you paint over them
Now that it's waxed and smooth, lets do a silicon mold of the mask or coffee scoop. The layer lines should me gone or very hard to see, and being able to cast a metal flake resin mask would be super cool. Oh btw, I have some jewelry casting cans that heat up to a prescribed temp, you then pressurize the can and it forces out the bubbles. This would be ideal for melting down scrap filament and casting parts.
It's basically a food safe finish instead of a chemical finish. Woodworkers who make cutting boards and butcher blocks have been using beeswax as a finish forever. It seals the pores in the wood to keep food particles from getting stuck in there and going rancid. Cool trick applying it to 3D printed objects especially kitchen gadgets. Also - I wonder if sanding (especially the higher grits) in a circular motion would help reduce the visibility of the scratches in the final product.
Another food safe finish that i have seen recommended for 3D printing is shellac. I have the tip from a Taiwanese UA-camr but i can't remember the name.
you should retry the melted beeswax idea with a heat gun set to low (to not melt the plastic) and a brush to work the wax into the part. this same trick is often used to wax clothing for waterproofing.
@@UncleJessy I hope it's not to late for me to say: I've never tried it on plastic, and I'm not sure you can get the heat gun high enough to melt wax but low enough to not melt pla. might be easier with abs?
I've seen it where you melt the wax in a metal vessel using the hot bed of your printer set to 70-75. If the print is small enough, or the vessel + wax is large enough, I've seen where the whole print is submerged in the liquid wax vs brushing it on.
I’m still using cura but I’m slowly convincing myself to give prusa slicer a try after some files I found weren’t compatible with Cura. I’ll have to give that setting a go!
I take all my cosplay tips from automotive body guys. I like to get around 320 before primer/filler. I think the general consensus is "pay me now, or pay me later" and sandpaper is cheaper than primer/filler. It's also important to note that you shouldn't sand with anything really above 400 grit before or during the primer/filler stage or you are asking for trouble so save those higher grits for late stage finishing touches if you plan on painting. As for the beeswax, I'm not sure what you could use this for outside this one specific thing. It's got an even lower melting temp than the PLA so keep it away from hot food and drinks. One thing resin and wood filler doesn't struggle with is heat resistance, and one thing 3D print enthusiasts probably have laying around anyway is resin. Personally, I don't mind the sanding, but if I had to pick one of the 3, I'd start with resin, and even then I'd pick wood filler before beeswax. 😅
Try using the bee's wax (or petroleum jelly) on clear resin prints (after they are cleaned) to get a cheep clear coating that makes them really transparent
Try using a slow-speed buffer with a large cotton wheel (6 to 8 inches). It should remove minor scratches and give you a glass-like finish. I am not sure if it will work on PLA, but I use it on plexiglass to get the cut edges to look clean and see-through. If you sand it smooth and then buff it, in theory, it should give you a glass-like finish.
I use that black from elegoo and I was a bit disappointed at first as it was really cheap but it's stringed like crazy so I dried it and tried again and zero stringing, so I always buy it as it prints amazing and is so cheap, you can print fast with it too.
@@UncleJessy Hi UncleJessy , its the standard black pla not the + or high speed that i use although it you can print it pretty qick and here in the uk i have to deal with crazy hi humidity in the autum and spring so i basicly just dry everything now even if its stored in a bag, mabe the humidy is not to bad where you live, happy printing dude and great vidio as always.
Honestly, I like the look of the Doom mask more without the wax treatment, it looked more consistent and if I am going to sink hours into sanding, I would expect a better overall consistency than what was shown. I think in the matter of cosplay, the “look” is more important than the “feel”. Smoother doesn’t translate into better if you still see scratches and layer lines. Just saying. Thanks for all the effort you put into your videos!
Maybe when u done with wet sanding, u can blow the surface with the torch to melt the litle plastic particles, and then adding the wax maybe this could help remove the print lines at the end of the process
I've had good results with just a rough sanding (120 grit) and then rubbing some candle wax on. Remove a tea light from the aluminum cup and you can just rub the edge directly on the print, working in any chunks that come off with your fingers. Then rinse off the excess with warm water.
Seconding. Micromesh cloth is amazing, especially when used with a foam block backing so it really conforms. And you can get the stuff in *SO* many form factors. There's even velcro backed disks!
I think the visibility of the lines and scratches is more due to beeswax being transparent than anything else there. Might be interesting to see if it works for casting a print there
Your scratchmarks are there trough inconsistent sanding. As you climb up the stairs in grit, you need to be sure the marks of the previous grids are gone. Say the 400 grid needs to remove all marks from 320. If the 320 marks still are there and you go on to 600 the wond disappear anymore (yes it can with abnormal amount of sanding). And if you are arrived at 1000 the whole item needs to be one u inform Matt surface. (What wasn’t in your case). So a little more elbow grease is needed next time. 😜
This method would definetly be amazing for wood filled filaments, because layer lines already adds to the look on the prints and this method compliments it more. I would like to see spray paint on them, since its clear you cant hide layer lines visually.
Thanks for the video, very interesting process. Now I'm wondering why no one has come up with a machine that could blast sand in a small cubic space to clean any object you place within. Or maybe this kind of machine already exists, but I can't wait for an automatic process to sand down 3D-printed pieces.
I use this technique for wood table tops, I use paste wax from the hardware store its for this purpose. If you get some heat going from rubbing it, it will melt and soften the wax a bit and work it into the micro surface of the print or wood. I also haven't tried it myself but I believe you can apply Rub N Buff on top of paste wax as it is a wax based product itself, I will try that out actually and let you know.
5:16 mhmm microplastics in the nature. OK in this instance it's just PLA which is a saccharide so that's OK. Except no it's also got EVA as a masterbatch binder and maybe poly glitter flake. I'm not convinced that i would be dumping that.
you can make 3d printed resin molds, leaning up the inside surface sucks (among other issues like sealing/mating surface). Typical mold release is very thin, but beeswax may help a few things and would be a fun test.
really cool video. but I would have liked you to spray it with primer to see if we could see the layer lines. then go back to it after a few months or weeks and see if it holds up. but I guess I'll try it and see what happens myself.
The beeswax is mostly just a filler to clean up some of the smaller scratches. If you do each grit a fair bit more (maybe two or three times as much sanding) that should get rid of the majority of layer lines and scratches. It is a lot more work though. And if you go too far, sometimes you can sand through the outermost wall and then the color consistency gets ruined lol
I have not tried it out yet, but as a amateur car detailer i know a little bit about coatings: you should try out a canauber wax or synthetic car wax! The principle is the same, but they are build to fill in those scratches a little bit better than bees wax. Also buffing with a car polish or even with a electrical buffer could make the surface more even. It will be not food save afterwards, but i bet it will shine like a mirror!
For the Elegoo Galaxy filament, I noticed with galaxy purple that layer height has a noticeable effect on how the glitter looks in the final print. At very low layer heights (0.1mm), the glitter gets flattened and the top and bottom will be much more shiny than the sides. It may be worth experimenting with different layer heights to see how it affects the final result.
As a 3D printer I know sanding is a big part of the process to get the best results. As a long time printer I am surprised that you still use paper based sanding tools. I moved over to foam backed sanding sheets many years ago, when they get clogged I just stretch them out under the tap to clean them up.
as i 3d print bitter wargames items but live in a smaller home sanding its a option, thankfully several tin coats of floor varnish means i will never need to sand again, but you just need a well ventalited room and about 5 coats for a .2 print
After I wet sand my prints I like to aply a little bit of wd 40 at my hights grit sandpaper and re sand it only with the wd 40 and the sandpaper. Usually I stop at 1500. It works like a pre polish and remove some scratch marks. It makes the print look evenly mat, not glossy but not rough like you've just sanded it
Hey Jessy, Awesome vid, as always! As a guy who has done his fair share of autobody sanding, with a soft material like plastic, I think you went a bit low grit to start off. It will gouge out those deeper lines, and you'll be stuck in a loop trying to remove them. I'd start at 400, yes it's a bit more work, but the results will be worth it. Keep up the awesome work dude. 🤙
Other than smooth on resin coat for 3D print trying to finish print that show off the filament used while sealing a projects has been hard. UV/2 part resins have also been used. I hot Polymaker CosPLA to make sanding easier for me. But My hope is that we can print the cool filament colour in the future and have that as the final piece colour and finish.
Have you tried Liquitex 8916 Professional Flexible Modeling Paste Medium mixed with IPA? Brush on two coats and then it should be easier to sand. Also the modelling paste is non-toxic unlike fillers.
@@UncleJessy I saw the technique first on a Darkwing Dad video "Using liquitex to finish 3D prints" - he tested various mixes in the video and by the end found that its best to add enough IPA for it to become self levelling
This dynamically reveals the unavoidable physical effect of different layers with different traversal/cooling times resulting in slightly different shades of the filament used. Transitioning from a detailed layer with lots of short lengths between the head changing direction look different from longer uninterrupted sweeps of larger flatter areas.
I want to know if it would work on the joints of 3D printed action figures allowing them to glide and move more freely. I'm thinking it would smooth out the layer lines allowing less friction and the friction that is there would just work the beeswax into the print even more keeping it smooth and moving freely.
Probably the print speed is different in the two areas. I assume it is slower at the overhangs? The faster the print the glossier matter it gets, the more it heats the glossier.
Cool video! Definitely want to try out the raw print sanding and then spray with a high gloss finish. By the way, I printed the same Doom mask in one of your FB posts.
Interesting idea but unfortunately when it comes to painting on top of it the wax would A) reject the paint b) the paint solvents would break the wax down & it would no longer look smooth but always cool to try new tricks, might be cool for silk prints!
Cool idea! This sounds like a great idea for those who don't want to mess with Bondo or other synthetic finishes or VOCs. I guess the one concern I have is the microplastics generated from the sanding, which is kinda unfortunate as smoothing PLA with a non-sanding method typically involves some really nasty solvents. Suggestions: 1. Let us know how these prints wind up after a month or two with some wear and tear. Do they need another coat of wax every now and then? 2. Always use a double boiler when melting wax so you avoid ignition (might be unlikely, but it is used for candles, so...). It would be interesting if you could _dip_ a print in melted wax finish... 3. I'd like to see this stuff on wood-filled filament if that's still a thing that companies sell.
I used to Bees wax on my Brogues! Heat up to melt into the leather which did a fantastic job prepping them for boot polish for that mirror shine, but as for durability they would often crack after marching in them for a day so i wouldn't use this for anything like cosplay which may get knocked about here and there!
not gonna lie.. the doom mask that you sanded down and bees wax. it gives off a brushed steel look that really pops.. and that was really fun to see and would be worth to compared that work Vs a resin print to see if you can get that smooth if not smoother then resin
Melt the entire can of wax in a double-boiler, then dip the part into the melted wax. Keeping the wax hot should prevent you from having to deal with a big thick layer.
Is the color difference on the black one from the speed change with the over hang? Like if you slice it and then look at the speed over lay is it much slower with those overhangs than the other side being a straight up and down wall with no overhangs.
Can you smooth 3D prints with Nacho cheese? Can you smooth 3D prints with the necronomicon? Can you smooth 3D prints with jazz? These are the answers we need.
Won't the beeswax simply melt out of the print over time or washing if some other coating/sealant isn't used over the print? It is only wax and NOT really a permanent coating/sealant.


An idea so crazy I had to try it out for myself. Make sure you stick around for the end 😂🤦♂️
@@UncleJessy stop click baiting
So can you spray paint them after applying the beeswax? That is what i'm most curious about. Since the wax add a thin layer on top of the print, i think it will be really smooth if you paint over them
@@s4rus4m4 You can paint over the beeswax, but you should let it dry for a few days at minimum, or the paint will have a hard time sticking to it.
kind sir how did you get .2 layers on the Dre doom mask ? :) thank you
Now that it's waxed and smooth, lets do a silicon mold of the mask or coffee scoop. The layer lines should me gone or very hard to see, and being able to cast a metal flake resin mask would be super cool.
Oh btw, I have some jewelry casting cans that heat up to a prescribed temp, you then pressurize the can and it forces out the bubbles. This would be ideal for melting down scrap filament and casting parts.
It's basically a food safe finish instead of a chemical finish. Woodworkers who make cutting boards and butcher blocks have been using beeswax as a finish forever. It seals the pores in the wood to keep food particles from getting stuck in there and going rancid. Cool trick applying it to 3D printed objects especially kitchen gadgets.
Also - I wonder if sanding (especially the higher grits) in a circular motion would help reduce the visibility of the scratches in the final product.
Another food safe finish that i have seen recommended for 3D printing is shellac. I have the tip from a Taiwanese UA-camr but i can't remember the name.
Does it need to be reapplied after a while?
you should retry the melted beeswax idea with a heat gun set to low (to not melt the plastic) and a brush to work the wax into the part. this same trick is often used to wax clothing for waterproofing.
Oh no way? Okay going to give that a try!
@@UncleJessy I hope it's not to late for me to say: I've never tried it on plastic, and I'm not sure you can get the heat gun high enough to melt wax but low enough to not melt pla. might be easier with abs?
I've seen it where you melt the wax in a metal vessel using the hot bed of your printer set to 70-75. If the print is small enough, or the vessel + wax is large enough, I've seen where the whole print is submerged in the liquid wax vs brushing it on.
@@matthewjbauer1990that’s really interesting using the bed to melt it!
You should look into scarf seams in orca slicer to further remove the "3D printed" look, well tuned they almost completely remove the vertical seam
I’m still using cura but I’m slowly convincing myself to give prusa slicer a try after some files I found weren’t compatible with Cura. I’ll have to give that setting a go!
Ummm... That last shot... Ummm...that's a...ah...different fandom...
I reckon the difference in color on the black is because the overhangs cooling. The difference got exaggerated by the sanding.
Thanks! That sounds logical and why I saw it on some of the others
@@UncleJessyI think it is similar to how when you print hot you get a glossier texture than when you print cold
I take all my cosplay tips from automotive body guys. I like to get around 320 before primer/filler. I think the general consensus is "pay me now, or pay me later" and sandpaper is cheaper than primer/filler. It's also important to note that you shouldn't sand with anything really above 400 grit before or during the primer/filler stage or you are asking for trouble so save those higher grits for late stage finishing touches if you plan on painting.
As for the beeswax, I'm not sure what you could use this for outside this one specific thing. It's got an even lower melting temp than the PLA so keep it away from hot food and drinks.
One thing resin and wood filler doesn't struggle with is heat resistance, and one thing 3D print enthusiasts probably have laying around anyway is resin. Personally, I don't mind the sanding, but if I had to pick one of the 3, I'd start with resin, and even then I'd pick wood filler before beeswax. 😅
Yeah, get something to smooth and you might have peeling issues rather than adhesion for a lot of paints and primers
Try using the bee's wax (or petroleum jelly) on clear resin prints (after they are cleaned) to get a cheep clear coating that makes them really transparent
Added to my growing test list
I bet this technique would look amazing on a transparent PETG print or -- better yet -- a transparent resin print.
Okay, taking notes for a followup 😂
Try using a slow-speed buffer with a large cotton wheel (6 to 8 inches). It should remove minor scratches and give you a glass-like finish. I am not sure if it will work on PLA, but I use it on plexiglass to get the cut edges to look clean and see-through. If you sand it smooth and then buff it, in theory, it should give you a glass-like finish.
I use that black from elegoo and I was a bit disappointed at first as it was really cheap but it's stringed like crazy so I dried it and tried again and zero stringing, so I always buy it as it prints amazing and is so cheap, you can print fast with it too.
Oh really? The black almost never strings for me. This was the regular black PLA as it’s a bit more matte. I do love the rapid black PLA though
@@UncleJessy Hi UncleJessy , its the standard black pla not the + or high speed that i use although it you can print it pretty qick and here in the uk i have to deal with crazy hi humidity in the autum and spring so i basicly just dry everything now even if its stored in a bag, mabe the humidy is not to bad where you live, happy printing dude and great vidio as always.
Honestly, I like the look of the Doom mask more without the wax treatment, it looked more consistent and if I am going to sink hours into sanding, I would expect a better overall consistency than what was shown. I think in the matter of cosplay, the “look” is more important than the “feel”. Smoother doesn’t translate into better if you still see scratches and layer lines. Just saying. Thanks for all the effort you put into your videos!
Maybe when u done with wet sanding, u can blow the surface with the torch to melt the litle plastic particles, and then adding the wax maybe this could help remove the print lines at the end of the process
Okay now that sounds cool! Added to my followup list!
I've had good results with just a rough sanding (120 grit) and then rubbing some candle wax on.
Remove a tea light from the aluminum cup and you can just rub the edge directly on the print, working in any chunks that come off with your fingers. Then rinse off the excess with warm water.
3:33 that's because different fan speed causing different layers to be at different temps.
But it’s only the front. So maybe because it was the overhang the fan was at a different speed?
micro mesh is my favourite for sanding prints
Seconding. Micromesh cloth is amazing, especially when used with a foam block backing so it really conforms. And you can get the stuff in *SO* many form factors. There's even velcro backed disks!
No idea what that is… off to Amazon to order some and find out
Just looked it up! Ordering some now 🤘 thanks!
@@Voidmonsterjust ordered some with foam pad!
basically same as guards using beeswax to polish boots. it fills in the imperfections in the leather pores and then polish shines to a mirror
Really glossy and smooth
I think the visibility of the lines and scratches is more due to beeswax being transparent than anything else there. Might be interesting to see if it works for casting a print there
Great idea. I did like the raw smooth print looks by step sanding. Lot of work but results look amazing with the bees' wax finish.
Sooo soo soo smooth
pretty cool. wonder what the 8 coats would be? In the Collision Repair world we have sandpapers up to 7,000 - 8,000 grit.. Super smooth!
I just ordered some micro mesh pads that go up really high in grit levels based on another comment and will be trying those out
Your scratchmarks are there trough inconsistent sanding. As you climb up the stairs in grit, you need to be sure the marks of the previous grids are gone. Say the 400 grid needs to remove all marks from 320. If the 320 marks still are there and you go on to 600 the wond disappear anymore (yes it can with abnormal amount of sanding). And if you are arrived at 1000 the whole item needs to be one u inform Matt surface. (What wasn’t in your case). So a little more elbow grease is needed next time. 😜
This method would definetly be amazing for wood filled filaments, because layer lines already adds to the look on the prints and this method compliments it more.
I would like to see spray paint on them, since its clear you cant hide layer lines visually.
Thanks for the video, very interesting process. Now I'm wondering why no one has come up with a machine that could blast sand in a small cubic space to clean any object you place within. Or maybe this kind of machine already exists, but I can't wait for an automatic process to sand down 3D-printed pieces.
Pretty sure it exists but it would definitely destroy the print it’s meant for metal
Dr HoloProps in the house! They do sell tumblers that kind of do that but not sure how well they’d work for 3D print smoothing
I use this technique for wood table tops, I use paste wax from the hardware store its for this purpose. If you get some heat going from rubbing it, it will melt and soften the wax a bit and work it into the micro surface of the print or wood. I also haven't tried it myself but I believe you can apply Rub N Buff on top of paste wax as it is a wax based product itself, I will try that out actually and let you know.
5:16 mhmm microplastics in the nature.
OK in this instance it's just PLA which is a saccharide so that's OK. Except no it's also got EVA as a masterbatch binder and maybe poly glitter flake. I'm not convinced that i would be dumping that.
you can make 3d printed resin molds, leaning up the inside surface sucks (among other issues like sealing/mating surface). Typical mold release is very thin, but beeswax may help a few things and would be a fun test.
really cool video. but I would have liked you to spray it with primer to see if we could see the layer lines. then go back to it after a few months or weeks and see if it holds up. but I guess I'll try it and see what happens myself.
Fantastic idea! Will add to my followup list!
@@UncleJessywhat do you think about synthetic car wax
The beeswax is mostly just a filler to clean up some of the smaller scratches. If you do each grit a fair bit more (maybe two or three times as much sanding) that should get rid of the majority of layer lines and scratches. It is a lot more work though. And if you go too far, sometimes you can sand through the outermost wall and then the color consistency gets ruined lol
I have not tried it out yet, but as a amateur car detailer i know a little bit about coatings: you should try out a canauber wax or synthetic car wax! The principle is the same, but they are build to fill in those scratches a little bit better than bees wax. Also buffing with a car polish or even with a electrical buffer could make the surface more even. It will be not food save afterwards, but i bet it will shine like a mirror!
Just ordered the Saturn 4 Ultra today with the Mercury XS bundle. Can't wait.
I will try this , as i am making a lightaber and the plan is to make a mold of it and then metal cast the pieces ,
The lightsaber will be inspired in calkestis survivor saber
Maybe ill put the stl files in thingiverse , as it is a work in progress still
Elegoo PLA+ for the WIN!!! I love not only their end result but their price on Amazon is almost always on sale and VERY affordable. $11.99 at times!!
Awesome , I love your content , thank you for the info
I love that burnt titanium filament. It looks soooo good. I need to buy some more.
For the Elegoo Galaxy filament, I noticed with galaxy purple that layer height has a noticeable effect on how the glitter looks in the final print. At very low layer heights (0.1mm), the glitter gets flattened and the top and bottom will be much more shiny than the sides. It may be worth experimenting with different layer heights to see how it affects the final result.
As a 3D printer I know sanding is a big part of the process to get the best results. As a long time printer I am surprised that you still use paper based sanding tools. I moved over to foam backed sanding sheets many years ago, when they get clogged I just stretch them out under the tap to clean them up.
"Can you smooth out 3D Prints with Beeswax?".... after I smooth them out with sandpaper first.
as i 3d print bitter wargames items but live in a smaller home sanding its a option, thankfully several tin coats of floor varnish means i will never need to sand again, but you just need a well ventalited room and about 5 coats for a .2 print
Alternatively, just print in ABS/ASA and get a simple vapor smoothing setup. Way faster, less hassle and perfectly even application.
After I wet sand my prints I like to aply a little bit of wd 40 at my hights grit sandpaper and re sand it only with the wd 40 and the sandpaper. Usually I stop at 1500. It works like a pre polish and remove some scratch marks. It makes the print look evenly mat, not glossy but not rough like you've just sanded it
Hey Jessy, Awesome vid, as always! As a guy who has done his fair share of autobody sanding, with a soft material like plastic, I think you went a bit low grit to start off. It will gouge out those deeper lines, and you'll be stuck in a loop trying to remove them. I'd start at 400, yes it's a bit more work, but the results will be worth it. Keep up the awesome work dude. 🤙
This is great! Thank you for this.
The colour change is due to speed the printer slows down and speeds up constantly so some areas become more shine glossy than others
Other than smooth on resin coat for 3D print trying to finish print that show off the filament used while sealing a projects has been hard. UV/2 part resins have also been used.
I hot Polymaker CosPLA to make sanding easier for me. But My hope is that we can print the cool filament colour in the future and have that as the final piece colour and finish.
Have you tried Liquitex 8916 Professional Flexible Modeling Paste Medium mixed with IPA? Brush on two coats and then it should be easier to sand.
Also the modelling paste is non-toxic unlike fillers.
I’ve never heard of that but going to check it out thanks!!
@@UncleJessy I saw the technique first on a Darkwing Dad video "Using liquitex to finish 3D prints" - he tested various mixes in the video and by the end found that its best to add enough IPA for it to become self levelling
This dynamically reveals the unavoidable physical effect of different layers with different traversal/cooling times resulting in slightly different shades of the filament used. Transitioning from a detailed layer with lots of short lengths between the head changing direction look different from longer uninterrupted sweeps of larger flatter areas.
Smooth prints,The best and only way is print at slowest settings and ad ironing it'll take a day or 2 depending on size and complexity.
I want to know if it would work on the joints of 3D printed action figures allowing them to glide and move more freely. I'm thinking it would smooth out the layer lines allowing less friction and the friction that is there would just work the beeswax into the print even more keeping it smooth and moving freely.
Ohhhh I love that idea and will try to test it out. It could add just enough friction to the joints
i wonder, at what temp does beeswax melt? if lower than PLA, could you melt the beeswax, then dunk the PLA print to go into all the crevices...
Ohhh love that idea! Will test that out
@@UncleJessy i hereby claim it my idea if it works, but also completely decry it if the PLA melts :P you know, normal stuff...
I'd be the best smelling iron man at the con with this smoothing technique
Probably the print speed is different in the two areas. I assume it is slower at the overhangs? The faster the print the glossier matter it gets, the more it heats the glossier.
Cool video! Definitely want to try out the raw print sanding and then spray with a high gloss finish. By the way, I printed the same Doom mask in one of your FB posts.
Heck yeah! You have to give the raw print sanding a go. I was honestly blown away at how smooth that got without any filler
Interesting idea but unfortunately when it comes to painting on top of it the wax would A) reject the paint b) the paint solvents would break the wax down & it would no longer look smooth but always cool to try new tricks, might be cool for silk prints!
Cool idea! This sounds like a great idea for those who don't want to mess with Bondo or other synthetic finishes or VOCs. I guess the one concern I have is the microplastics generated from the sanding, which is kinda unfortunate as smoothing PLA with a non-sanding method typically involves some really nasty solvents.
Suggestions:
1. Let us know how these prints wind up after a month or two with some wear and tear. Do they need another coat of wax every now and then?
2. Always use a double boiler when melting wax so you avoid ignition (might be unlikely, but it is used for candles, so...). It would be interesting if you could _dip_ a print in melted wax finish...
3. I'd like to see this stuff on wood-filled filament if that's still a thing that companies sell.
A benchtop buffer wheel with some polishing grit might get the job done faster.
You can do the apply a coat of wax then buff then repeat on unfinished wood to seal and shine to preference.
Now I want to see a print in white pla with no sanding and beewax applied
Noted!
I used to Bees wax on my Brogues!
Heat up to melt into the leather which did a fantastic job prepping them for boot polish for that mirror shine, but as for durability they would often crack after marching in them for a day so i wouldn't use this for anything like cosplay which may get knocked about here and there!
OH and the last few seconds with the dried wax?!?!?
👀👀👀👀😁😁😁😁
🙃
I wonder what would happen if you do the whole sandning process then spray paint it then finally add the bees wax?
not gonna lie.. the doom mask that you sanded down and bees wax. it gives off a brushed steel look that really pops.. and that was really fun to see and would be worth to compared that work Vs a resin print to see if you can get that smooth if not smoother then resin
The difference in color comes from different print line directions. The light bounces off in different directions.
could be the print temp maybe to low i recommend 215c first layer then main layer 220c
Someone mentioned it’s probably the fan speed changing for the overhang
I wonder if a heat gun on low to melt the beeswax into the print would do anything further. I'll have to mess around with this!
Thank god, you are usign good coffee!
That last shot, man... Dr. Doom meets Dr. Goon.
"No. You don't have to melt this...though that does sound cool..." *Glances back at thumbnail.* Nice. 😂
😂 was literally editing… heard that again - “time to do something dumb” 🤣😂
The title is misleading. You did a lot of sanding to get your print smooth. The beeswax is more of a buff.
i bet this would work amazing on wood filament...
Melt the entire can of wax in a double-boiler, then dip the part into the melted wax. Keeping the wax hot should prevent you from having to deal with a big thick layer.
Nice!
Does the beeswax change the texture of the prints after sanding? Or do the prints feel the same before and after the wax?
It feels a lot softer after sanded smooth & wax applied. The raw print with no sanding + wax also feels a lot softer and less like a typical print
What about dipping in bees wax? I know that's a lot of wax, but you'd likely get a much more even coat.
i wonder if this would work well for multicolor prints where your not painting already.
Oh man… I gotta test that out now 😂
Curious if the beeswax would make things look better after painting as well.
How did you not get a seam line on the exterior, kinda curious?
@@andymcb seam is on the very back and inside side of the bowl
Is the color difference on the black one from the speed change with the over hang? Like if you slice it and then look at the speed over lay is it much slower with those overhangs than the other side being a straight up and down wall with no overhangs.
Oh maybe that’s it
I think so. Typically with PETG that is the issue. You notice the color change much more with that filament
Can you smooth 3D prints with Nacho cheese? Can you smooth 3D prints with the necronomicon? Can you smooth 3D prints with jazz? These are the answers we need.
😂
We need to remove plastic straws because of micro plastics in the ocean…
5:16
ok
How is the resistance to scratch? fingerprints? the wax solidifies or still is pasty?
Sort of more of a shining & buffing with beeswax, rather than smoothing, isn’t it?
if you torch the print before applying the beeswas, do you think it would hide the scratch marks better?
Add heat after you rub the beeswax on. It'll soak into the seams.
The front looks different from dynamic overhang speed slowing the printer down ion those areas.
Another of topic crazy idea to try is turn a treadmill into a90 degree belt printer
How well can you then paint over the bee's wax?
Good for lining 3D-printed molds for casting...so I hear.
How many walls do you use when sanding things down to this level?
Won't the beeswax simply melt out of the print over time or washing if some other coating/sealant isn't used over the print?
It is only wax and NOT really a permanent coating/sealant.
The Dr Doom mask with beeswax kinda has a brushed metal look to it. It looks more like metal that it does plastic to me.
if you apply some heat again with you heat gun and bring the color back a lot of your micro scratches would disappear.
Try it on multicolored filament prints
I wonder how it would work with the fuzzy setting.
What about polishing with a 3D printed tumbler ?
how about printing it on resin and THEN doing the beeswax on it?
Do you have an estimate of roughly how long it took to sand? I may do this for some cookie cutters.
Where can we get that torch?
On the hacksmith website
Hacksmiths sells them on their site… it is glorious
Got some Dr Doom R34 at the end there eh?
The different colour is because of the overhang cooling
This method is good if you plan on making a mold of your print.
Coffee bean 🫘 doser, not scoop. You weigh into the doser and then pour into the coffee grinder.