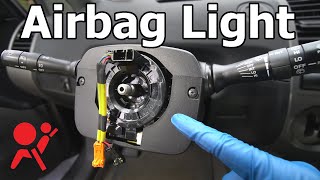
How to Replace Clock Spring 03-09 Toyota 4Runner

Вставка
- Опубліковано 17 чер 2024
- Need to learn how to replace your CLOCK SPRING on your 2003-2009 Toyota 4Runner? Well, then this video is for you. If I can do it...you can do it!
Just a heads up, I held the camera myself (i.e., no tripod) for a lot of the video. The tripod wouldn't fit, and I wanted to show many different views.
-The vehicle I worked on in this video was a 2004 Toyota 4Runner Limited V6
Clock Spring Directions:
1) Remove (2) philips head screws on left and right side of steering wheel and (1) philips head screw on bottom to remove bottom steering column shroud/cover
*Will need to turn steering wheel 90 degrees each direction to remove screws on the sides
*Screws are used to hold the bottom cover in place
2) Pry off top and bottom steering column shroud/cover
*Flat head screwdriver/plastic pry bar me be utilized
*Take caution not to damage the covers
3) Disconnect battery
*Wait several minutes before continuing
4) Remove covers directly behind steering wheel on left and right sides
*These cover plates are the ones around the cruise control lever on the right side and the equivalent area on the left side
5) Loosen screws holding airbag module using T30 but do not REMOVE
6) Disconnect ORANGE and BLACK electrical connectors by gently prying up on the top yellow tabs which allows you to pull off the electrical connectors from the actual airbag module, and remove GROUND (BLACK) wire from unit as well
7) Set aside airbag module and ensure steering wheel is centered
*Might be a good idea to mark position of steering wheel relative to attachment point to ensure steering wheel is centered upon reattachment
8) Remove 19 mm nut holding steering wheel in place
9) Remove steering wheel using steering wheel puller or by tapping on it
*Be careful you don't hit yourself in the face when pulling back
10) Take note of position of clock spring for later reference (including orange indicator on the left side)
11) Remove BLACK and YELLOW electrical connectors from clock spring using a small flat head screwdriver to push the tabs up and to the right
*This is a good time to inspect (and/or test) and clean the electrical connectors
12) Remove the (4) phillips head screws holding the clock spring in place
13) Remove clock spring and compare to new one
14) Put new clock spring in place, and reattach (4) phillips head screws
15) Reconnect BLACK & YELLOW electrical connectors at the bottom and remove ORANGE tab
16) Put steering wheel back in place and reattach 19 mm nut by hand, then ensure steering wheel is alligned
17) Once steering wheel is alligned, torque down nut to 37 Ft-lbs
18) Reconnect GROUND/BLACK wire to steering wheel, and ORANGE and BLACK electrical connectors to the airbag module
*Make sure to raise the YELLOW notches on the BLACK & ORANGE electrical connectors so they go into place with ease
19) Seat the airbag module in place and tighten the T30 screws on the sides of the steering wheel until they are tight (78 inch-pounds to be exact)
20) Reconnect the battery at this point
*You can wait, but it allows you to move the steering wheel to access some of the philips head screw positions
21) Replace covers directly behind steering wheel on left and right sides
*These cover plates are the ones around the cruise control lever on the right side and the equivalent area on the left side
22) Replace bottom and top steering column shrouds/covers
*There is (1) philips head screw on the bottom under the steering wheel and (2) philips head screw locations (where you need to rotate the wheel) to put back the screws holding the cover in place
Torque Specs (Feel free to verify for yourself):
-Steering Wheel Nut: 37 ft-lbs
-T30 Screws Holding Airbag Module in Place: 78 INCH-lbs
Helpful Links:
Clock Spring (I used): www.partsgeek.com/catalog/200...
-Dewalt Full Socket Set: amzn.to/3BUH4Ko
-Gearwrench Flexhead Ratchet Set: amzn.to/3ycTtqt
-Dewalt Impact Wrench (DCF892B): amzn.to/3OAJLJi
-Gearwrench 1/2" Deep/Short Impact Socket Set: amzn.to/3YdTKay
-Gearwrench Flex-Head Work Light (500 Lumen): amzn.to/3QifKPy
-Gearwrench Wing Light (1000 Lumen): amzn.to/44NKBYX
-Telescoping Rectangular Mirror: amzn.to/3rPwxQ2
-EPAuto 1/4" (20-200 inch-lbs) Torque Wrench: amzn.to/457NOCs
-Tekton 1/2" (10-150 ft-lbs) Torque Wrench: amzn.to/3YcAv18
-Gearwrench Flexhead Electronic Torque Wrench: amzn.to/3O94hzg
-Tekton Hex Key/Allen Wrench Set: amzn.to/3QjdyHx
-Maxxeon Green Magnetic Adjustable LED Light (720 Lumens): amzn.to/44SU4yg
-Tekton Pry Bar Set: amzn.to/455V6GD
-Neiko Trim Removal Tool Set: amzn.to/3OzthB3
-Klein Multi-Bit Screwdriver: amzn.to/3YgKbYk
-If I forgot something, just ask me below
-(As an Amazon Associate, I may receive a small commission for qualified purchases using the Amazon links above; it does NOT affect the price you pay in any manner) - Навчання та стиль


Thanks for this tutorial, the only thing I would have done at the end was show that it worked, tested the horn, volume controls etc..
Thank you for the feedback.
That's a good point. I didn't show the horn on purpose. The video was made to show how to replace it, and hopefully address the reasons one sought to replace it in the first place. In my specific situation the new clock spring did not fix my horn problem because the wire/connector at the horn itself was what caused my horn to fail. That was one reason the horns may not work. The clock spring was another, yet not applicable to my situation.
While I showed (I think) the buttons working in the beginning, you're right in that I should have showed them at the end too.
Great tutorial! You make me think I can replace mine myself (the most car thing I’ve even done was get gas so wish me luck😂)
Thank you for the feedback.
After doing some more serious repairs, this one is honestly pretty simple. It's also inside the car so rust shouldn't be an issue. Just be careful with wires and don't pull on the wires themselves. Pull on the connectors. Other than that, you saw how it goes. You got this!