I LOVE you man! When ever I search for a tutorial and your name comes up, a little girl sequels inside me. I'm off to buy stuff from you, JUST to give you some money! Whatever I get out of it is a bonus.
hai iam a insructre of revit but some times ur vidoes helped me alot when i stuck in somthin thank alot for ur awsome kind of vidos may allah bless uh in all the ways
Thank you so much for this tutorial! I have a problem lining up the views. Even If I click the button : "set curremt view as home", one view is more zoomed than the other.. What should I do?? Thank you!!
I always enjoy your view templates and/or visibilty graphis, seem to always have a clean sharp look to them, do you have your own all set up in your template? - love your blog/videos!
Liam Couper Liam. Thanks for the kind words! I have some very specific techniques for my presentation views, etc... I break down the exact techniques I use in BIM After Dark - Volume 1 if you are interested (www.bimafterdark.com) . Cheers!
Why would you use Photoshop for this type of editing? A better work flow would be PDF to Illustrator especially if you are creating and editing vectors / lines.
Hii..your presentation styles are really looking great..!! How did you prepared your view title name with different color ( Floor Plan (basement)? is it using view-port family or just custom text ?
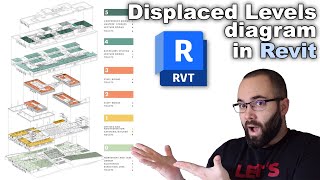
Good evening, thanks for your tutorial, it's very simple and aims to quickly give the right informations. I would like to ask if you know, or if you've haved deald with trying to do an exploded view using displacement elements, working on a LOCAL SAVED REVIT FILE!! I see that it's not possible cause it's an external reference project and not the main one. Do you know if there is a way yo solve this problem? Thanks in advance
That is a "Hidden Line" view using specific graphic/shading settings. I call it the 70/50/20 rule and I talk about it here >> ua-cam.com/video/7_GdDnt4L5s/v-deo.html
Hey TheRevitKid what a nice Tutorial i have a question hope you can help me, how is it possible to do a Section in 3D but manteining the values of the cutting plane in true magnitude? hope you can help me :D
You should start with REVIT 2017 a student version. First You need to make an Autodesk educational ID so that you can be benefited from all Autodesk's educational products and services.
@@ankitaswain774 The image itself is just a hidden line view so no modification needs to be made for black and white. Just hit the little cube on the bottom left of your view or press "HL" on your keyboard.
Turn on Background in Graphic Display Options and make it a solid color (use another color than you used in your project), save your view as PNG and remove background color in photoshop .... done.


I LOVE you man! When ever I search for a tutorial and your name comes up, a little girl sequels inside me.
I'm off to buy stuff from you, JUST to give you some money! Whatever I get out of it is a bonus.
Haha thanks man! I am so glad to help!! Cheers!
Now this is beautiful... Well done !
hai iam a insructre of revit but some times ur vidoes helped me alot when i stuck in somthin thank alot for ur awsome kind of vidos may allah bless uh in all the ways
Nice tutorial! I love that you give both the pure Revit way and the Photoshop alternative - both proved VERY useful! :D
Wow nice. Revit is way better than I thought.
Thank you so much for this video!! Saved my project :D
Thankyou!
THANKS MAN!!! SO NAILING CONSTRUCTION PRESENTATION TOMORROW!!!
Thank you so much, this was super helpful!
I am so glad it helped!
very perfect
Very clear explained and 100% usesful! Thank you
Thank you for the great tutorial. I'm always learning something new!
This is a amazing tutorial! Thanks 🙏
Subbed. I have been looking for this for forever
Thank you
Great tutorial!
Is really easy to follow you... Thank you for this tutorial. It was really helpfull.
Great tutorial! Thanks!
Muy bien explicado y didacta! Felicidades
Wow this is really cool. Really helps.
great
Glad you enjoyed!
DAMN! SUBSCRIBING NOW! JUST WHAT I NEEDED ON MY THESIS PRESENTATION! THANK YOU MAAAAAAN! YOU ROCK FROM HEAD TO TOE!
[Excelent] Tutorial!!! it's show a great quality in representation, really great...
i love you man!! you'r the best
your the best man
СПАСИБО ОГРОМНОЕ!
Thank you!
thanks for the vid. VERY helpful.
Awesome video. Thank you for sharing. Any tips on accurately lining up the views in Photoshop?
Great video thanks
Increible amigo !!!
Thanks...Video is very good for me :)
YOU ARE REALLY GREAT AMAZING AND WONDERFUL
Great one thanks alot
wow thank you !
TNX
Life saver 🙌
Thank you so much for this tutorial! I have a problem lining up the views. Even If I click the button : "set curremt view as home", one view is more zoomed than the other.. What should I do?? Thank you!!
This is NOT an axonometric view, it's isometric. However, great tutorial for creating an isometric view
I always enjoy your view templates and/or visibilty graphis, seem to always have a clean sharp look to them, do you have your own all set up in your template? - love your blog/videos!
Liam Couper Liam. Thanks for the kind words! I have some very specific techniques for my presentation views, etc... I break down the exact techniques I use in BIM After Dark - Volume 1 if you are interested (www.bimafterdark.com) . Cheers!
Couldn’t the second one be done in Revit too, just with 2 views on one sheet?
Thank you.. Do you know how to animate 3d displace exploded view?
You would need to do that outside of Revit … you can export “frames” but not animate
Why would you use Photoshop for this type of editing? A better work flow would be PDF to Illustrator especially if you are creating and editing vectors / lines.
How do you make your shadows look like that and are they true shadows?
Yes, check out this episode: therevitkid.blogspot.com/2020/07/4-steps-to-sexier-revit-episode-15.html
Hii..your presentation styles are really looking great..!!
How did you prepared your view title name with different color ( Floor Plan (basement)? is it using view-port family or just custom text ?
Good evening, thanks for your tutorial, it's very simple and aims to quickly give the right informations.
I would like to ask if you know, or if you've haved deald with trying to do an exploded view using displacement elements, working on a LOCAL SAVED REVIT FILE!! I see that it's not possible cause it's an external reference project and not the main one. Do you know if there is a way yo solve this problem?
Thanks in advance
Hey how to get this black and white mode like this?
That is a "Hidden Line" view using specific graphic/shading settings. I call it the 70/50/20 rule and I talk about it here >> ua-cam.com/video/7_GdDnt4L5s/v-deo.html
@@TheRevitKid aah ok thanks
When you exported the images, dod they get exported to scale?
No, they are exported to a speicific image size... (ie. 4000px by 4000px...
@@TheRevitKid Thanks for the reply :)
you can export to scale if you choose "Zoom to...100%" :)
Hi, great tutorial. How did you get the blur effect on those shadows?
Hello great Video, What version of revit is this ?
Hey TheRevitKid what a nice Tutorial i have a question hope you can help me, how is it possible to do a Section in 3D but manteining the values of the cutting plane in true magnitude? hope you can help me :D
Thank you
How do you make the contour typography with depth like a physical model?
hello., thank you for your amazing tutorial,, i am biginner so like biginner how can i start, wich version is better,,thank youuu
You should start with REVIT 2017 a student version. First You need to make an Autodesk educational ID so that you can be benefited from all Autodesk's educational products and services.
thank you,,ihave already autodesk,,, i use it soon
how did you made the site black and white... like the monochrome effect?
Ankita Swain it’s just a simple material change for the topography element.
@@TheRevitKid can you elaborate it or make a short video on it... it will be very helpful
@@ankitaswain774 The image itself is just a hidden line view so no modification needs to be made for black and white. Just hit the little cube on the bottom left of your view or press "HL" on your keyboard.
Hey, I tried to export the image to a png file but the background is still there ? Do you know how to solve this problem ?
can u gave me this project .plz
Hi Kid! How do you turn your topo into a 3D solid as it seems to be in your video? Thx
defunkt9000 Hey! There is a section box around the views... When the section box cuts a topo that is the look it creates. I hope that helps!
Hi! Do you know why my png image have background when I export it? Thanks!
I had the same problem! I tried very hard to export it without brackground and it didnt worked
Do you guys find a solution?
Hi! How can I export a png image without the background?
Turn on Background in Graphic Display Options and make it a solid color (use another color than you used in your project), save your view as PNG and remove background color in photoshop .... done.
hey bro can i ask what is ur graphic setting for this project?
If you find setting tell me plz 😂😂
@@archmajed1 i cant hahaha
And I tough that Auto-cad architecture was the shit