
- 119
- 133 071
ARTwithAndrews
United States
Приєднався 1 сер 2020
This channel is dedicated to those who search for art experiences. It involves processes in 3-dimensional design, ceramics, and drawing.
Snowy River Part 2
This video shows the second part of a sculpture I created using a variety of materials including resin, sculptomold, joint compound, hemp, wire, and trimming from trees. I wanted to create a relief showing a mountain snowy river. I used light within the sculpture to project upward and outward to illuminate the features in the dark.
Переглядів: 38
Відео


Snowy River Relief Sculpture
Переглядів 45Місяць тому
This video shows the first part of a sculpture I created using a variety of materials including resin, sculptomold, joint compound, hemp, wire, and trimming from trees. I wanted to create a relief showing a mountain snowy river. I used light within the sculpture to project upward and outward to illuminate in the features in the dark.

Painting Monsters
Переглядів 1332 місяці тому
An art collaboration between Kindergarteners at Birch Elementary and High School students at Ridgevue High School.

Making Monsters
Переглядів 2552 місяці тому
This video is one of two videos I will create to show a collaboration between Kindergarten students at a nearby Elementary School, and High School students at the high school I teach.
Freeform Plaster Carving
Переглядів 2,1 тис.3 місяці тому
This is a re-done video showing my process in creating a freeform sculpture from carving plaster.

Channel Trailer
Переглядів 1253 місяці тому
Please consider subscribing to join me in my discovery in art-making.

Earth Tone Vase
Переглядів 3943 місяці тому
This week I created a wheel-thrown vase inspired by Earth tones of green and blue using stained porcelain. I use non-traditional techniques when I marble that make it difficult to keep the clay centered but worth it to make the marbling climb vertically.

Marbled Vase from Recycled Trimmings
Переглядів 1,6 тис.4 місяці тому
This week I created a wheel-thrown vase using the trimmings from four other vases. The porcelain I use is expensive so I don’t want any waste. I use non-traditional techniques when I marble that make it difficult to keep the clay centered but worth it to make the marbling climb vertically.

Sky with clouds wheel thrown vase
Переглядів 354 місяці тому
I want to share with you my weekly art post showing my processes in creating anything from wheel thrown vessels to drawing and sculpting. I hope to inspire others to search for their creative outlet whatever that might be. This video shows my process in creating a vase inspired by the Earth’s blue sky. This is part of my investigation where I will create at least 10 works showing elements of Ea...
Water: A Wheel-Thrown Vase Inspired by Colors and Textures of Water
Переглядів 994 місяці тому
Water: A Wheel-Thrown Vase Inspired by Colors and Textures of Water
Ice: Vase Inspired by Ice Colors and Textures.
Переглядів 715 місяців тому
Ice: Vase Inspired by Ice Colors and Textures.
Crystal Alabaster Freeform Sculpture
Переглядів 3396 місяців тому
Crystal Alabaster Freeform Sculpture
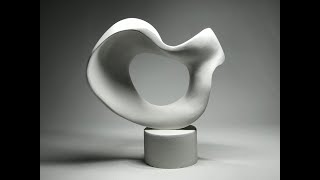
Really nice! I'm a big fan of Barbara Hepworth and Henry Moore. I've done some sculpture work with flat wire, polymer clay, and marble, but never plaster. (I'm pretty new to sculpture and still finding my medium.) Can you get a smoother or semi-polished final texture with plaster, or is it always going to be somewhat rough at the end? I've seen smooth, white, open freeform or ribbon-like sculptures and never know what the material is.
Yes! You can get a smooth matte or gloss finish with different clear acrylic spray paints. I am inspired by both those artists and love their work. Happy sculpting and thanks for tuning in!
How do you repurpose the plaster chippings?
Basically by smashing them into powder, screening the powder and then cooking the plaster to get all the water out at 250 degrees. It’s a lot of work but saves the plaster from the landfill.
@@artwithandrews7267 and then do you use as before?
Yes. So far I have found that it sets up well
Glorgeous 😍😍🥰❤l
Thank you!
Oh my gosh, that is so beautiful ❤ and it looks so real 😍.. love the video
Thanks so much nightmaremoonstudiio!
@@artwithandrews7267 your soooo welcome ..
What kind of sculptamold did you use for this?
Hey Kylee. I used Amaco brand sculptomold
I love it🤩
Thank you!
Very cool sculpture and good explanation
Thank you.
Wow, they all look sooooooo real and awesome ❤🎉 .. I love all the different colors and designs ! Something new for sure ... I don't think I could choose a favorite ... love the video ❤❤❤❤
❤❤❤
😀
Good work man 💯
Thanks and thanks for watching!
This is amazing ive never thought of smoke being used in art😮
😀💨
Beautiful color combination! I love the richness of your green.
Thank you!
Very creative!
Thank you! I appreciate the support!
This is beautiful 😍
Thank you so much and thanks for watching!
Awesome art ❤
Thank you so much and thanks for watching!
I’m sorry I think it’s the glass that creates the glow of the water 😊
👍
How did you get the water to illuminate like that?
Yes! I cut glass for this one and spray painted the inside white.
So cool work would love to see more lighted pieces if you have time ❤thank you
Hey Veronica! Ironically I am finishing a work with resin and light right now. I will upload the video in about a week to two weeks. Thanks for watching and supporting me!
my favorite youtuber posted!!
😊
❤
Thanks! And thank you for watching!
Woaw😮
🙂
Beautiful result . I have never seen this process and really interesting to watch . On the parts you sped up I would have added a couple of flames and maybe a little smoke to the vid. :O)
Thanks. I will have to consider the smoke and flames.
Do you high fire it? I see the colors turned a lot darker after the firing which tends to happen to stains at higher cone temps
Great question. I fired at cone 5 but yes the colors did turn darker or burn off color altogether.
Amazing
Thank you so much. I appreciate it!
Wow Spectacular
Thank you!
How durable is it? Will it crack and break easily? Love it!
Thanks. Well… if dropped probably no damage. If hammered lots of damage.
🐐
😀
you’re my favorite channel
Nice!
Awesome work sir
Thank you!
I hope you succeed in life please when you are famous 💕 make me in a vid your art is soo lovely 😍🌹
😀
Nice
😊
Creative ❤
Thank you!
Vorrei chiederti un consiglio... si potrebbe dopo messo il gesso ricoprire la scultura con l'argilla che asciuga all aria?
Yes. Although adding a little white glue helps it stick better when applying it.
Nicely done
Thank you!
A beautiful and innovative piece! ❤
Thank you!
Very clever!❤
Thank you for watching!
very nice ❤❤❤ new friend
Thank you so much and thanks for tuning in!
Thank you! This is an encouraging video! I will follow your youtubes. Hope to see more.
Thanks so much! I will be posting videos weekly. I appreciate you tuning in!
I went back to the beginning of the video to again see the finished artwork. A truly beautiful piece.
Thank you. I don’t know why the video stopped halfway through. I am uploading a new part two now. Thanks for watching and stay tuned!
I was enjoying this… is there a part 2?
Yes! I didn’t realize it had cut off.. It was all supposed to be one video. I am posting part two in a couple hours.thanks for watching!
Such great work, a masterpiece! May I ask what you did step by step at the end when you say in the video that you used plaster - for what? Did you go over the sculpture with a coat of plaster (why and with which kind of plaster) and then you painted the piece in gold?
Thank you! I actually only used plaster for the base to balance it vertically. For the sculpture I only sanded, fired it, sanded it again, hand painted and then spray painted to finish. Thanks for watching!
@@artwithandrews7267 Thank you, very much appreciated! Have a wonderful start in 2024 with lots of inspiration!
Wow, nicely done. At first, it looks like a bird head, and now you have reformed it into whale or some short of ocean creature.. love the video and Merry Christmas 🎉❤
😆
Thought I could learn something.....nope... just 20 minutes of a hand rubbing on a piece of drywall.....
🤔
Love this! I just bought everything I need to do this and am hoping to try this tomorrow! How dry does this need to be before starting the carving process? Thanks!
Great! Joint compound is like cake frosting when not fully dry but pretty hard when dry. I like to wait until it’s fully dry, then I add water to the surface to soften it a bit for carving.
Hi. I absolutely love your work and I feel very inspired 😊 How do you hang your unframed art? Is there something smart, that takes the weight, that you can attach to the drywall backside?
Great question! I didn’t really trust the strength vs weight of the drywall so a actually cut a custom frame as a housing for the drywall out of weathered wood. I attached two sturdy brackets on the top/back that attach to brackets set into the wall studs. The art is pretty heavy so I wanted to make double sure it was safely attached.
@@artwithandrews7267 Ah, thank you so much for the answer! That sounds very beautiful and safe 😊👍
Would you mind sharing what wood material this is on and if it needs to be coated with anything before putting the plaster on it?
Thanks for watching! I used particle board and I didn’t coat it with anything. I just applied the joint compound straight to the board.
I love seeing my old high school art teacher share his works with the world.
Josh! Good to hear from you!
Hi, thanks for your video. I have a question: In your video it seems the joint compound has the same color as the plaster. So what joint compound is it?
Yes! It is pure white like the plaster. I use USG all purpose joint compound. It has a green lid. This is pretty accessible at home improvement/ repair stores in the Northwest USA but I am not sure about other parts of the world.
Thanks for your answer. Unfortunately, the product cannot be purchased in hardware stores here in my country. . But basically it's just grout for grouting bathrooms and sanitary facilities, right?
@simon.587 Joint compound is a product we use to close the joints between drywall sheets. It is used to add texture to walls as well. It is primarily composed of gypsum so if you can find an alternative that is mostly composed of gypsum it should work.
@@artwithandrews7267I sought advice at a hardware store and was then recommended a product. Unfortunately, the exact ingredients are not specified. However, the packaging says that it is suitable for all mineral surfaces. Such as plaster, concrete, masonry, etc. The product is called universal crack filler. It is also coated with synthetic resin.
if you ever want to trade beyblades… I’m your guy😎. Also no cap the vase goes hard fr fr 💯🔥
Thank you!
Thank u. This is an awesome idea. Almost anything can be casted using this method. ❤
Yes! I have had students cast arms, torso, and feet for sculptures. Thank you!