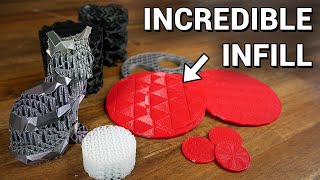
Not a bad method, but that infill pattern you created is rectilinear, not triangular. Also... rib feature works on simple parts, but Solidworks rib feature is generally very unstable in complex parts. I would avoid using it and just use a simple boss extrude in most cases.
@@kirkandersen either import a 2nd part as infill modifier on overlaps or just draw modifier cubes on the imported part within cura and select which printing parameters to modify. One of my favorite things to do is increase wall thickness or top/bottom thickness in specific regions where there will be clamping loads, corner stresses, etc. It's not perfect but still takes about 1/5th the time as this example...


Very good explanation. Clear and concise. I will subscribe.
Such a great video. Thank you
Grand, well done.
Nice video!!!!!
Not a bad method, but that infill pattern you created is rectilinear, not triangular. Also... rib feature works on simple parts, but Solidworks rib feature is generally very unstable in complex parts. I would avoid using it and just use a simple boss extrude in most cases.
Loved it
Awsome...:-)
They may have changed the settings in the rib function as it doesnt give me an option to select an object, only a contour? any thoughts?
in cura you can figure the same with less work ;-)
how?
@@kirkandersen either import a 2nd part as infill modifier on overlaps or just draw modifier cubes on the imported part within cura and select which printing parameters to modify. One of my favorite things to do is increase wall thickness or top/bottom thickness in specific regions where there will be clamping loads, corner stresses, etc. It's not perfect but still takes about 1/5th the time as this example...