2011 2015 Ford Explorer Passenger Blend Door Actuator Replacement - Heater Stuck on Hot or Cold Fix

Вставка
- Опубліковано 26 сер 2024
- Fixes problem where passenger heater vents are stuck at one temperature on a 2011, 2012, 2013, 2014 or 2015 Ford Explorer.
Also fixes problem where growling from behind the dash can be heard for a few seconds each time the vehicle is started, and when the passenger temperature is adjusted.
Video made on a 2013 XLT with dual climate controls.
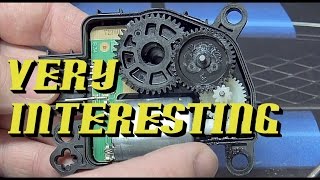
Right Hand Temperature Blend Door Actuator
AA5Z-19E616-C
YH-1779
DATC (Dual Automatic Temperature Control) systems have the following four actuators attached to the HVAC box under the dash:
1) Defrost/panel/floor mode door actuator (upper driver/left side of HVAC box)
2) Left hand temperature blend door actuator (lower driver/left side of HVAC box)
3) Right hand temperature blend door actuator (lower passenger/right side of HVAC box)
4) Air inlet mode (fresh/recirc) door actuator (far passenger/right side of HVAC box, directly behind glove box)
EMTC (Electronic Manual Temperature Control) systems have all of the same actuators, except there is no right hand temperature blend door actuator (the one shown in this video).
For anyone who is interested, here are the details for adding a glove compartment light to an XLT Explorer:
-Glove Compartment Lamp 8A5Z-14413-A
-Connector WPT314
-Connect one wire to a metal spot on the body (ground)
-Connect the other wire to the yellow/green wire that can be found in the cable that is running up the A-pillar just in front of the driver door (connector C317, pin 10, circuit CLN09, fuse F4). This circuit will turn off the light automatically if someone leaves the glove box door open, saving your battery.


Thanks for the great video. I watched it and decided I was going to take it to Groove Ford In Centennial CO and have them do it. I made the appointment and told them (on the phone) what appeared to be my problem. (passenger side climate control stuck on cold or outside air). They said its the Blend Actuator and with new parts and filter just under 400.00. I said ok. I took it there this morning and the guy tells me, he cant get my car back to me for 5 days! He then asked me who diagnosed this problem. I told him I did. I researched the issue on Google and UA-cam. He actually laughed at me and said its going to cost 194.00 to "properly" diagnose this and then we will call you next week with your ACTUAL COST! . Wow. I said the person on the phone said they would return my car to me the next day and the job was under 400.00. Then the guy says, Tell ya what I will have them replace that part and it wont be gauranteed if it does not fix your issue. I once again asked for a ball park figure on the job and he refused to tell me. He then asked me how many actuators were in the vehicle and I told him 4. He then said and IF we need to replace all of them your talking a couple thousand dollars. I said your nuts buddy the symptoms indicate its the passenger side actuator. He then said he did not like my attitude. I said your an asshole and left. WTF is going on with Ford Shops these days? So I am now very motivated to do the job on my own. I will let you know how it goes.
Wow...
Wow, I am a guy who had no business trying a repair like this, but your video helped me do it successfully. It saved us time, money, and made our Thanksgiving drives warmer than they would have been. Thanks for sharing!
For the back screw someone made comment 1/4 inch drive with buckle on it with extension, will add go from the top down can get more room for ratchet use 3 inch extension with the buckle on the socket end. Worked really well, this video spot on thanks!
The best video out here for this! Fixed my issue with the passenger side staying cold on the heat setting! HIGHLY RECOMMENDED to watch if you are having the same issue!
Awesome video. My wife’s 2014 explorer XLT was blowing hot air out of the passenger and cold air out of the driver. Called ford dealer and they estimated $400-$500 for replacement cost and labor. I decided to do it myself after watching this video. Very detailed and explained for non-mechanics like myself. 2nd bolt was extremely difficult to get to. Had to use finger tips with a socket to get tighten back. The box was somewhat hard to put back in. Took me a while to fit it up to reconnect and set in place. The box didn’t fit at first. Turned on the car and played with the AC temp and levels to get the gears to fit. All in all, this video saved me a lot of money. Thank you so much!
Hey myabryce, my wife has a 2014 sport. Her car is also blowing heat out the passenger even though the AC is on and cold out the the driver side as it should. From my research, there are 2 different actuators since the explorer is a dual climate system. Which actuator is the passenger one? I'm assuming it's the same one that the guy is working on in this video? Also, I found a few different part numbers , I wanna make sure I order the right part. Thanks for the help.
The back screw...pinch it with those long curved suture pliers...feed it in place and turn it up to start the first thread. Release it, then I used a short 5/16 socket (12 point) with a universal and a 6 inch extension to get the socket onto the head of the screw and used my fine tooth 1/4 ratchet...since you have minimal space the fine tooth ratchet makes quick work of it....cats meow! The hardest part was getting them chessy pins to hold the glovebox on! You are the man!
Great guide, was able to complete my repair. Biggest issue I ran into was putting the new actuator in. When I tried positioning the HVAC/gear socket up like in the video and I removed the old gear it would rotated about 45 degrees clockwise on its own over and over again. I ended up after about 15 mins of fiddling around with it being able to get the new actuator inserted slightly at the 45 degree angle and rotate it back to the vertical position, push it in the rest of the way and bolt it back in place. This and reconnecting the wire to it before that were the only hangups I had. Rest was smooth and fast fix. Thanks!
Great video, appreciate the absence of fluff, and I don’t know how you managed to get such great pictures while actually doing the repair in that tight space. The glove box light in my 2014 Explorer Limited actually disconnects a little further back, as the harness is attached to the glove box for a few inches. And now that I see where the cabin air filter is, changing that too. It was a mess! Thanks so much for posting!!!
I just did this today. Thanks for the step by step instructions. Hard part was getting the pull tabs for the glove box back in place. lol probably took me 90 mins to do the whole job. 30 of it on the pull tabs.
Thanks for posting. I had this same issue on my 2010 Lincoln MKT. I replaced the passenger blend door actuator behind the glove box only to find out that didn't fix my issue of no cold a/c on passenger side. I bought another motorcraft actuator from Amazon for $21 and got to work. That rear screw is a doozie. I used a small 1/4 socket wrench with the long socket to start the screw out, then used a 1/4 universal attachment to bring it out enough so I can use my hands to unscrew. Reverse the process to get it back in. Took about 1.5 hours and a trip to Menards to find a bunch of socket configurations but sure enough I HAVE COLD AIR BLOWING ON BOTH SIDES!! This helped me save $300 plus from any dealer. THANKS!
Dude, you are a lifesaver. I highly appreciate your effort making this video. However, that was the hardest task I've ever completed. My hands are not built for this job. This is a difficult task for thick handed people. Anyways, thank you.
Thanks for this informative video! Two things I would add...
1. After hooking up the door actuator to the power plug, run it by checking it, before putting it all back and SURPRISE!
2. I fount that the actuator power plug is a short cable that plugs into another cable. I disconnect the actuator cable from the other cable, pulled it down to where I could hook it to the actuator...then pulled it back up as I put the actuator in place...and hooking it to the other grey connector. Sure made it easy to hook the cable connector to the actuator.
Just my suggestion...nice video.
Julio Rodriguez
Hi this is José Luis I want to thank you for this video that you made it helped me a lot I saved money because I went to the Ford Dealer Ship and they want 125$ just to check but when I found your video. My wife’s suv had the same problem you had on your suv.Thank you because these people made a big old deal about a simple thing but honest people like you made it simple and easy.👍
I'm glad I was able to help
Thank you for the vid! Saved me $640 the dealership tried charging.
I fixed my 2013 Explorer Sport a year ago (see related comments below). I had to do it again yesterday. This video was incredibly helpful both times. Thank you for posting it.
The after market part I bought on Amazon broke on a cold morning a week ago - first night my car had been outside in below freezing temps since last year. I suspect the cold temps had something to do with it. The post or axle on the gear that drives the blend door cracked. So, a couple of lessons learned -
a) buy OEM parts. However, the factory installed one broke a year ago... so, who knows if I'll be doing this a third time in the future. I spent a few extra bucks this year for a Ford/Motorcraft part.
b) someone with smaller hands is way more capable to get that back screw out and back in. My daughter did it again!!! She's awesome.
c) having a couple different sockets and drivers in that 5/16" - 8mm range is helpful. I got lucky with a small tool set from a gift that had a pivoting head on the driver - that helped my daughter get the job done on that back screw. However, I had to use a different thin walled socket on the front one. So, try different tools.
d) we had trouble with the blend door moving out of position each time we tried to set it in place with the old post/axle. We found that we had to start the engine and leave it running to hold the blend door in the right spot to install the new actuator.
e) it's surprising how nasty the air cabin filter was after just a year.
Summary: Ford clearly has a problem with this actuator - now 197k views of this video. I've had two Explorers with this problem and one has broken twice. Buying parts on Amazon may be convenient and little cheaper, but you may be doing the work again if the aftermarket parts are shoddy. I'll try to find the exact part I bought on Amazon and write a review there too.
Thanks for posting this. It worked. Had cold on driver side and heat on passenger side when calling for a/c. Followed directions. Had to purchase a low profile Craftsman 1/4 inch socket driver for the hard to get 8mm fastener off and fortunately able to get it back on the newly installed part. Craftsman part # 44994 thin profile ratchet. $39.99. and Ford oem actuator for about $25.00. took me about 2.5 hours due to struggle with that hard to reach 8mm fastener. For $65.00. It was a total win. Thanks.
Thanks! Did mine today. Called the dealership. They wanted $600 for labor alone. Heat works perfect now!
Getting the gears lined up was a pain as resetting it like in the video didn't work as it just moved back to its spot when I pulled the gear out. I solved this by holding the actuator in place just in front of the spot it goes into and then hitting the start button of the vehicle 2x. This turns the heat/fans on but doesn't start the car. The gear on the actuator starts to slowly turn and with light pressure I waited till it came around to line up and was able to push it into its place. I then shut the car off and seated it properly and screwed the one screw in. 2 screws is probably better but I lost the other screw.
The 1/4" universal socket helped me get the back screw out. It seemed to be in there tight so I hope it's ok with only 1 screw holding it in.
As I struggle through my replacement actuator at the moment, I found solace in your comment and took a moment to laugh out loud. I too, hope that mine will be okay with one screw, Victor!
Mine failed the other day. It had been making noise and now doesn't work and I have to replace it again.
@@VictorVandertol Sorry to hear that, I think I bought my off of Amazon and haven't had any problems yet. Last year it broke around this time when the weather was going back and forth between warm and cold.
Great step by step video. I struggled to get the glove box hinge pins out. My right one had the hard rotated behind another piece of plastic.
Only other issue I had was getting shaft back into blend door. The door shaft naturally rotated slightly forward of straight up for the flat portion of the shaft. Turned on HVAC and cycled the passenger side heat to high and low, applied slight pressure to actuator, allowing actuator shaft to rotate. Once it was in the same orientation as the blend door the teeth engaged and slid into position up against the HVAC housing and could screw it in. .
Still amazed that this part is buried this far back in there. If the harness box wasn’t right in front of it it would’ve been much easier.
Also make sure to change cabin air filter at same time since it’s right there and the glove box is such a pain to remove.
Great instructions. I lost a little knuckle skin trying to get the plug back in. I ended up pulling the center dash section so I could see the plug and actuator socket to get them to line up. You have a clear line of sight to the top area where the plug is at when you do. I would highly recommend it unless you have very skinny, nimble fingers.
This worked great, as a former aircraft mechanic that back screw brought back a lot of memories mostly bad lol.. but I have the tools to make it easier. I will share this one tip, I used a 1/4 in drive 5/16th swivel socket on a 12 inch extension to get that screw out and back in, but when i was ready to put it back in i used black electrical tape and taped the screw on to the socket. Once you fiddle with it and get it started tighten it down and pull the socket off the screw. Hope this helps. it took me about an hour. Unplugging and plugging the actuator back in took a little time also
This video is AMAZING! Ford wanted TON of money to fix this and I started researching online and found your video!! Thank you so much for the super detailed, easy to follow instructions!!! Oh, and thank you for including socket sizes!! Saved me from digging through the entire toolbox! Thank you, thank you, THANK YOU!!!
Just did both actuators on my 2011 Explorer Limited. This video was awesome. The drivers side is done by removing the 2 screws on the bottom the the plastic cover by the OBD2 ports. Pull that straight towards you to take it off. Remove 4 screws that hold the metal plate under that plastic covering and look up to the right. Actuator is right there. Plug faces down and is slight easier to get to.
Mike Perez did you use the same actuator as the passenger side mike?
Mike Perez hey man could u tell me exactly where the driver side acurator is.not sure what your calling ob2 port...thanks
Excellent video. Replaced the actuator on my girlfriends 2014 explorer xlt. Took me about 2.5 hours. I had to turn on the heat in the car, while using the old actuator gear, to properly align the blend door. That second screw is a lesson in patience. Good luck!
I just installed a new actuator exactly as described here, but I'm getting the clicking sound and I can feel the actuator trying to move the door. I cannot figure out why this is happening. Did you not align the female shaft receptacle at top dead center as is mentioned here? Can you explain why you had to have the heat on while aligning the blend door?
@@rickwilliamsphotography I used the male end of the actuator to align the female gear of the blend door to top dead center, but the female gear would rotate out of position as soon as the old male gear was removed. Turning on the car with the air kept the female gear at top dead center even after the old gear was removed. This allowed me to keep the female gear at top dead center when I installed the new actuator.
@@rickwilliamsphotography My guess would be that the internal gears of the actuator are not fully engaging?
Thank you for the video I just completed this job, patience is needed is an understatement!
Talk about tight, holy smokes. I’m still in shock I got the electrical connection plugged back in. Great video! I’m sure you saved me a couple hundred bucks. Thank you!!!
2010 Ford Flex Limited. Worked for me. I would have never attempted this without this video. Thank you, thank you very much! The big black box/wiring harness was really in the way. The large wiring bundle coming in from the top and the smaller one coming into the box from the bottom are held on by electrical tape. I very carefully cut the tape with a sharp exacto razor then peeled the tape back which released the wires from the box enough to make a tad more room. I also snipped off the black plastic screw job going through the hole on the front of the box. I pried the clip off of the bottom of the box and pried the right side of the box back enough to get a little more room enough to get the actuator out and back in. I have heat again on the passenger side. I think I'm going to cut the bottom of that stupid black box off as suggested by another commenter. Why Ford didn't just zip tie those wires to something is beyond me. That black box is useless. Thanks for saving me hundreds and hundreds of dollars in labor. Took me 2-3 hours and a few choice words but with some perseverance I did it.
I find it easier to remove the back screw when you use a 1/4" universal ~ $4 and a wobble extension ~ $5. easier on the fingers too! Another tip, while you are waiting for the new part remove the unit and harvest the gear to manually move the diverter and tape the gear to area. If you just use a screwdriver to flip the door (counterclockwise ~45 deg for heat) the air and vibration tends to move the divertor door back to cold.
Once again, thank you for your help. I advise the use of a ratchet (socket wrench) with a swiveling head (3/8") and use the 1/4" adapter to step down to the smaller sockets. The swiveling head allowed more clearance so I wasn't restricted to one click at a time. I got it done much faster that way.. I used an 8mm socket(regular, not deep), used double sided tape to keep it on the adapter to avoid cursing moments, and it's also important to note that I wore rubber coated gloves for grip on the socket. I did not replace the back screw.
I bet that having one screw allowed for the new part to break sooner?
@@TheNfields260 You're absolutely correct, lol!
Really helpful. Guess I got big hands, took a few hrs to get out. Got my wife small hand to start the back screw. Works now.
Thank You for posting this. Changed mine today. What an amazing world we live in, info at your fingertips, thanks to people like you who share their knowledge.
He removed a lot of things that I don't see the point of but love the video. Glad people like him take the time to make such videos a big help to save us all money so we don't have to pay to get it fixed. I saw he replaced his cabin filter so I went ahead and bought that why not sense I am there.
Great video. Just a couple of comments because it was something I fought; the electrical connector for the actuator pushes in at a single point on the connector and using a 1/4" swivel attached directly to the M8 socket retaining the screw with electrical tape to the socket worked well. Thank you again for taking the time to put this together.
Thanks for posting! My actuator failed at the 75k mile mark and my wife and kids were freezing in the passenger seat. I swapped mine out and the heat is flowing again. I have a '13 Limited, so the 2nd screw was difficult to access and the wiring harness was extremely difficult to reconnect, due to the extra black electrical box (as others have mentioned below). After scraping some skin off my hands and a few choice words, I finally got it changed out. It took a little under 2 hours total. I only removed the glove box. Removing all the trim pieces seemed unnecessary to the repair. I also switched out the cabin filter, which was completely black. Total repair cost $30 on Amazon vs. hundreds at the Ford dealership.
Very well done. Didn't skip a single step. Extremely helpful!
Wow, what a bad design! May send me back to GM. My car had wiring attached to plastic in front of actuator I had to cutaway. Had to be really careful not to damage wires and then wrapped in elect tape. Had to have car running to keep spline in right position and also buy a universal angle socket adaptor to get rear screw in. Glad I had magnet to retrieve screw after numerous drops. Reattaching elect connector a bear due to short wires and doing it blind. Then after it was installed, and it did fix problem had to repair glove door plastic where clips are inserted since they broke at molded in knit line. One of the hardest repairs I ever did to a car, but thankful for you tube and I am sure dealer would have pulled entire dash and charged me a fortune!
Dodge the gears strip out on the doors.way harder fix.plastic bullshit on all of them.and u pay 60 grand for them.rediculous
Fantastic video hands down (I had the plastic box by the actuator that makes it harder as well)... My learnings/tips/2 cents are #1. Mandatory: get the shortest small profile socket wrench you can find if you don't have one. #2. I used a 8mm instead of a 5/16 only because the profile of the socket was much smaller compared to the typical 5/16 i could find at the store which gave me just a bit more space to work with on screw 2. #3. Be prepared for a couple/few knuckle hand nicks/scratches because i'm just not sure gloves will work when trying to get that last 2nd screw in/out of the actuator without being able to feel cleanly. #4. I found that my motor slid right in after I used the old plastic main gear to turn the door counter clockwise full(Not sure if all new motors always come in that position but mine did. #5. I dropped the difficult screw when trying to thread it... It typically drops into the flexible plastic pan underneath the blower motor/glovebox area... I found by flexing and tapping tray/pan it will roll around to where you can see and grab it without figuring out how to remove the tray/pan (Hopefully that doesn't happen to you). Unfortunately the tape screw to socket for threading just wouldn't work for me... That black box makes it so hard to work around and i could only get that screw threaded by feeling with using the tips of two fingers from both hands. #6. Do the repair when the car is cool or else that silver pipe running below the actuator is easy to burn yourself on... Overall: I have to say that was the absolute most confined area i've worked in to get a screw in/out for a auto repair... but overall full work time was probably 3 hours including running to the tool store to get the smallest socket wrench i could find (Repairs and tools total about $40 to $45 bucks but much better than the $600 i hear people talking about at the dealer. I also spent excessive time trying to figure out if i could remove that black box that obstructs clean access to the actuator ... but failed in seeing an easy way to do that or an easier way to do any part of this better than the video. The only other way to make it easy would be to remove the dash itself but NO THANK you on that... (Again great video. Thanks!!) - Tim
These are excellent tips. I would add 1) a flexible head stubby 1/4 socket wrench is helpful. 2) Someone in a comment stated they left the back screw out but I wouldn't advise this because you want the actuator flush with the blend door. 3) You can use a flat blade screwdriver to turn the socket and align the pin with the blend door socket prior to installing the new actuator. You don't have to take the old actuator apart although it is easy to do. 4) The black plastic box is also found on the Sport model and was a pain to move around. This will add time to your repair so be prepared.
And I am disappointed with Ford for having such poor reliability on this part. Based on some other model forums, other Ford products seem to experience the same premature failure with their blend door actuators as well. I purchased an upgraded aftermarket part from Amazon. Does appear to be more solid in construction.
Tim I used a box cutter and cut the box. I also couldn’t find anyway to remove it. I did notice in the video he had his removed and later it was back in place. I wish he would have shown how he removed it.
Great video and excellent tips. I just fixed my sister's 2014 explorer limited yesterday and it took me about 4 hours. One problem that I had and not mentioned in the video is about unpluging the actuator. The connector part is completed covered by the black box. I pushed it upwards as it is shown in the video and I found it still didn't give me enough place to unplug it. I tried to pull the actuator downwards to see if I can unplug it from the bottom of the black box but failed as the wire was too short. However, what I found is the wire was mounted at the top(a higher place). I removed that wire hook at the top and this allowed to unplug from the bottom of the black box with ease.
English is not my native. I hope I expressed myself clear enough. If not, feel free to leave me a message. BTW, I did get three nicks...
This has helped me immensely. It took me a while but I did without the knuckle joint on the far side screw and then I freaking dropped it. Oh and the metal pipe there burned me. I put it back together without the screw and it sits rock solid with only the frontside screw. The major problem was the spline shaft lining up. I turned the blend door with the gear and it would just flop back to full air con position so what I did was plug in the new actuator and messed with the temp settings until I could eye ball it and boom it went in at around 76 degrees I think. That was the hard part. Oh and putting back the pivot pins made me want to punch the car in the face. This is my first set repair on the car. My other repair was a water pump.
I just changed mine, watched the video a couple of times.
Still a pain in the a## !!
I rotated the door with the old sprocket it wouldn't stay in the right location. I finally had to to turn the temperature hot to cold to get the sprocket to line up correctly, putting the second screw in is a good time. Everything works now.
Thanks for the video helped a lot!
Took the car to a local Auto repair shop. NOT A FORD DEALER...Talked the issue over with them. They were very good guys and agreed the issue was more than likely blend actuator. That was the problem part and out the door with a new flitler and after market part was $325.00.. I have no idea why the Ford dealer became so agressive with me when I took the car in for them to look at the vehicle for that problem.
I just did it. Thanks a lot. The only issue I got was after the activator was installed. took me some time to connect the cable, but it was great when the job was competed. Thanks a lot.
Thank you so much. That 2nd screw is a huge pain in the ass and so is the black plastic box. The job is done for $20.
Thank you for the video! Ditto to what others said about getting the gears to align by turning ignition key etc and thx for all comments letting me know what a bear it would be. I am embarrassed to say how long it took me but I am a total rookie at car repair and the learning curve was steep with tools etc. But I did it! And I got the back screw back in! Plugging the connector was tough. I also cut away some of the plastic housing for more room. One other thing: who knew it would be so hard to get the pivot pens back in for the glovebox! And I did not even attempt to put back the glove box door damper, it must take a special tool. Thx again!
a do it yourselfer like me got it done . a few tips, I used a 8mm, 1/4 drive nut driver socket with a 1/4 ratchet driver to get the upper bolt out 1 click at a time but it worked. also, you have to line up the small groove in the white hinge pins with the groove in the glove box door to get them back in. Mine was jammed in on the side closest to the door. I broke the door hinge getting it out, but super glued it back together. Keep the tab on the hinge pins down when putting back in. They serve as a stop for the glove box door when you open it. Thanks for this video. It helped tremendously. $38.24 for the switch and a new cabin filter and done!
Thanks 100 times! Your video was not only awesomely done but it actually instilled confidence in me to go forward with the job. I’ve got the new motor in and I think I should test it before putting everything back together. That’s the only thing you might have put in there. I also very carefully cut away the plastic housing around the wire bundle that was in the way. That helped so much!.Great job!
a couple comments/observations. but first, MANY, MANY thanks for posting this video. What a great help.
My biggest issue was the glove box hinge/pivot pins. Whether they installed the wrong one on the right side or more likely something was assembled out of alignment. Regardless I had a horrible time getting the right one to slid out. Basically the hing assembly is much closer to the metal support and the large tab was forced past the end of the metal framing and could not be slid out. I had to do some serious prying and semi-mutilation to the plastic hinge to finally get it out. Reinstalling was even worse, so I finally decided I needed to cut about 1/2" off the end of the long tab. Now it can be removed/installed without tearing everything up. I also found taking 1/4" off the left one made reassembly easier as well. If I was starting over again and encountered this problem I would try reaching up in there with a pair of side cutters and nip the end off, thereby not having to mutilate the plastic hing assembly. I was really fortunate to not have broken something in the process.
Second happy issue. I did not have a new replacement actuator and decided to try swapping the actuator with the one for the fresh air/recycled air damper which is right there and easy to access. It worked perfectly when installed in the blender location. After confirming it was working, I plugged the defective one into the other plug and it ran in a continuous rotation which concerned me. But I reinstalled it anyway and it now works perfectly in the new location. I suspect something was preventing all of the contacts from completing a circuit and allowing it to run cleared it., (although probably temporary). Since I rarely select recycle I'll wait an see before purchasing a replacement. But with the modified hinge pins, it will be a piece of cake next time.
Same thing for me on that right hinge pin. It's actually still there and I accidentally broke the female dash part that the pin goes through. Need to super glue that and hope it works.
*Just a heads up for anyone replacing this.*
I replaced this back around December of 2020 and as of March 2021 it stopped working again. I bought the first replacement part at o’Reillys for around $14 if I remember. It worked fine and then it started making that clicking/knocking noise and I wondered if it was that part messing up. A couple of weeks later (March 2021) it stopped blowing cold on the passenger side, only heat. I bought the new part at Autozone this time and spent $29. Different brand than last time. The new part brand is Duralast. I am currently replacing it as I type this comment. I’m positive it will work once I get it in and I’m hoping that this new part from Autozone will be a better quality and last. I commented before and said I lost the back screw and just left it out. I hope that didn’t have anything to do with the old one going out. However when I took out the front screw, it was still tight in there so I don’t think anything came loose. I will reply to this comment once I get everything installed to see if it works right.
So Autozone gave me the wrong part. They gave me an air door actuator which is not the same as a blend door actuator. Had to go to o’Reillys and get the right part for $28. It’s installed and working good right now.
Thanks for making this video. I just got done completing this repair on my wife's Explorer. That back screw is a beast to get in and out though. If I have to do this again I'll probably fabricate a special tool.
This is exactly what I needed. Worked great. I didn't even know what the problem was until I googled it and found this video. It was exactly the same problem we had and I replaced it just as you suggested (although I'm sure my hand got cut up more than yours). It worked like a charm. Found the part for less than $20 on Amazon. The only thing I did differently was how to get the far screw in/out. I used a magnetic 5/16 nutdriver (the kind for a drill). The magnet held the screw well and I used a combo wrench to turn it. Thanks a lot.
You sir just saved me a trip to the dealership! Thanks a ton! For.the record, I didnt replace the 2nd screw.
Ryan Finesilver me neither I dropped it... and got lost somewhere in there.
Thanks man, this video helped a lot with my 2014 Explorer XLT. It was only blowing hot air on the passenger side. Dealer quoted $300 for this fix. Got it done for $20. Thanks. Took apart the old actuator and the splined shaft was broken off on the inside.
Car repairs here in Alaska are really expensive. Thanks for the detailed video and the all this extra cash in my pocket.
Amazing video man, unbelievable filming angles, don't know how you managed to do it. Replaced my actuator and fixed the issue. Kudos for you 🍻
Let me say thank you for your video. I have watched it several times before I tried it myself. For anyone who wants to try this, WARNING!!! DO NOT TRY THIS AT HOME!! Things went fairly well until I tried to remove the back screw. It took me and my wife two hours to remove the screw. I say both of us because one would try and get tired and then we would switch off. Secondly, when we tried to turn the actuator with the old gear, it automatically returned to its last position meaning that we could not install the new unit. Finally after using a pin to turn the inside part, quickly removing the pin and crammed the new actuator in place. After several attempts, I finally got it to fit. Then began the process of putting the back screw into place. Again working tag team, my wife finally dropped the screw (Yes we used tape, which didn't work well) in a place we could not retrieve. At this point in time four hours of continuous work had passed so we put the glove box back in place and said the hell with it! Trust me: whatever the mechanic wants to charge you, it has got to be worth it. My chiropractor bills alone will match the cost of the mechanics labor!!!!
Working on cars is not for everyone
Just did this job myself, great video. Just an update for anyone doing this in 2020, part number YH-1779 came to me with the correct gear. I did not need to reuse the old gear. It fit right in and tested and works great.
Edit: removing the gear is for positioning the door manually before install
Pulling the old gear out is just for positioning the door manually before installing the new actuator.
Ah got it. I saw another video of a guy who did the same job, but he must have had a non Motorsports part. His gear was different and didn't fit at all. I guess I got lucky with the door position
Just want to say that you made the Internet a better place - this was an awesome "how to" video, thanks for taking the time to help your fellow gear-heads. I had the same part break on my 2013 Sport - and my wife complained in exactly the same way. :-) I pulled it apart last night and took me less than 2 hours start to finish thanks to your video. Had I located my 1/4" drive u-joint and extensions earlier in the process to remove and replace that rear screw, I could have shaved a lot of time off the process. It came apart and went back together without issue...and I have heat again.
+Mike Herrmann
Thank you for your feedback. I added a note at 6:11 with your recommendation to use a u-joint and extension.
Thank you! My 2013 XLT just started having the cold passenger side problem at about 77,000 miles. I was able to knock this out in about an hour. My hands barely fit in those tight spaces, but the nicks in my skin are worth the savings to me!
I know this is a year later, but my 2013 with 77k just went out! Crazy, I am going to do this when I get home.
There is a 1/4 drive screwdriver that has a spring type shank that is flexible and makes reaching into the top screw and turning easier. I use this tool all the time when working on appliance repairs. Add it to your tool box.
For the right passenger BDA replacement, save your sanity and about 3 hours and simply cut out the black wiring harness protector that’s in the way. Easy job after that. Simply tape and Zip tie afterwards. Wow... I admire the folks here that did this job w/o removing that cover .... You also need to invest in a 1/4” micro ratchet and 1/4” universal joint socket.
Thanks for posting this!! I have a 2013 XLT as well, got stuck on hot while on a trip. Followed the instructions step by step and its working perfectly now! Took about 2 hours to replace... Don't even want to know what it would have cost at the dealer!
Helloooo PJ Moreland! Just wanted to let you know your video was a fantastic help in replacing the passenger blend door motor in my 2013 Explorer Sport. My son-in-law Russell and I were both amazed at the dexterity you showed by being able to shoot the video and manipulate the tools and parts! Add to that the full screen text graphics and you have a video that becomes extremely easy to navigate, too. Your production is incredible!!! Anyway, if there was a way to swing by your house with a case of beer as a thank you I'd be happy to do that! Thanks again for your wonderfully produced and edited video!!!
I'm glad my video helped you. When my blend door actuator failed, I was surprised there wasn't any information online about it.
Thanks for the tutorial! I definitely wouldn't have tried it without your help! Got it done and back together, but honestly one of the biggest PITA jobs I've attempted. As for the annoying "black box" I trimmed away the bottom 1/3 of it with a box cutter and that helped a lot!
I did the same but had to be careful not to cut the wires in the bundle. Nicked one but a little electrical tape solved that.
Thanks for an excellent tutorial. I'm a decent mechanic but when it comes to working behind the dash I typically avoid it. I followed your video and replaced the module with no problems other than the access you show. One thing I did is function tested it before I screwed it down and closed it up just to be sure I had it right. Good video!
Hey man .... I just now finished this job and I never would've been able to do it without your help and this video! Thanks so much.
Outstanding video! I used it to replace my actuator and the problem is fixed. Thank you very much. An fyi for others: I had to cut away part of a plastic cable-housing box to get at the second screw on the actuator and remove it. Feel around behind the box to make sure you don’t cut any wires. I also didn’t bother replacing the second screw. Couldn’t get to it. Thanks again!
Well i just finished after about 3 hours, the back screw didnt get put back in so wish me luck… i did the whole tape thing and got it half way screwed into something, then found out the something wasnt the hole. It works though so as long as my vehicle doesnt go boom then great success
Muy agradecido de este video. Seguí todos los pasos y logré cambiar el actuador. En mi caso tengo una ford explorer limited año 2012 y el problema era que el climatizador tiraba aire frío en el lado del copiloto y mi esposa sufría por eso. Ahora el problema está resuelto. Un dato interesante es que compre los actuadores en AliExpress. Saludos desde Chile.
Buenas noches, tienes algún link para los actuadores o como encontrarlos en aliexpress? Te lo agradecería muchísimo, en difor cobran 450.000 por todo el trámite, una estafa
This video is fantastic. It was very easy to get the hidden bolt out with a 1/4 universal joint socket and extension. However, when I used the old gear to line up the blend door, it kept moving on its own before I could get the new actuator in position.
Several people have commented below about that issue as well. The popular solution is to plug the electrical connector into the new actuator and then turn on the ignition and adjust the position of the actuator using the heater controls so the shaft is adjusted to match the current position of the blend door.
I have a 2014 Ford Explorer XLT and it also had the black plastic that made it really difficult. I had to disconnect the black plastic case to try and get access to the back screw. It took around 3.5 hours. Which includes time for driving to sears to get a magnet tool since I dropped the back screw. This was a great video. Thanks for the assist.
How did you disconnect the black box?
willi922 by forcing the white screw that held it from the front. It didn’t remove completely but it allowed me to push it up so I can get to the back screw.
Thank you for the video, was a big help doing this on my 2014 Explorer. A little tape on a deep socket made it easier starting the back screw. Once started did the initial tightening with regular socket, then back to deep socket to finish up.
Thank you very much! This helped get mine done on a 2014 Limited, took about an hour, without putting the rear screw back in.
Most excellent !! Awesome job on this video!! I agree with Brian below... my Explorer is 2013 and as of today there were 192+k views... most certainly appears to be a widespread problem to me!! Thanks again!
Thanks very much to people making videos about how to replace blend door actuator for Ford Explorer. Followed videos and did mine and worked perfectly.
Hi can I ask how you aligned the actuator shaft to the spline? I tried turning the ignition on but the shaft keeps rotating. Frustrating. Thanks
@@faddymcmartin5943 just unplug the power plug right before the position you want to set. Make sure it matches the broken one. With a couple times practice, you will get it. Shouldn’t be that hard.
Thanks for the quick reply!
Great thorough video. Got to the rear nut by using a very very long extension with a joint on the end. This provided lots of leverage to move the plastic wiring harness out of the way. So, rather than work in close with a little ratchet, try going big.
Great video! The plastic electrical box made a 1hr job 2.5 hours. Do take out the glove box completely as mentioned in the video. You be able to see the actuator and get the first screw out, but wont be able to get to the second without complete removal of the glove box.
This is the best video on this... and it’s not close!!! Thank you so much
Did it! The little black electrical box is set lower on my 2014 explorer and made it much more difficult to get my hands in there but it worked. Thank you very much for this video!!!
Great video, followed exactly and my repair worked perfectly. Took about 3 hrs. Thanks!
Thanks! 2011 Explorer Ltd, wouldn’t get very cold after AC compressor replacement and recharge. Air would also get quite warm after driving down the road a while. But stop and idle would get cooler (but not cold). Replacing this motor fixed the issue. By the way, if you tell yourself at the outset that it is going to be madly frustrating to get that rear screw in and to align the new shaft with the spline it will go a long way to easing your pain later ;-)
Solid video. Thanks for posting. We (with help from my daughter (way cool)) fixed my 2013 Explorer Sport for $30-40 and changed the cabin air filter while were there. Again, thanks for posting. Funny, my 1997 Explorer at one point lost heat... I paid something like $700 to get that fixed (pre-youtube!). Seems to me that Ford needs to improve the design and reliability of these actuators.... That's two generations of Explorers 16 model years apart with similar issues and now there are 117k views of this video.... Ford?
Great video, took me a while but couldn't have done it without this video. Thank you
Dang! TONS of great “pearls” in your video. Thanks bud!
Thank you so much. This was the perfect thing to show me how to fix this annoying problem. I was able to perform the operation in about two hours with the information in this video. The back screw was the hardest part but taping the screw to the socket did the trick. Thanks again for a great DIY video.
This video helped tremendously with my 2014 Ford Taurus Limited.
It did have that black bracket in front of it. I was able to reposition the harness and bracket/case with a little love and care.
Had to have the fan blowing to keep the receiving area in place after I reset it with the splined gear.
I also found it was easier to install the motor before connecting the plug. The harness was getting in the way because of the black bracket.
can't believe you did most of the work with one hand. I Highly recommend investing in a GoPro camera. You would have been done in 7 minutes 59 seconds. Thank you for posting this video.
Yeah, it was silly to do it that way
Thank you. 175k 2015 Explorer. Cold air again. Great video.
This was great! Saved me a lot of money; finished it myself in 1.5 hours.
Great video, thanks. Work very well for me. I was actually able to do it without removing the glove box housing, just the glove box. Was a little tighter but it worked for me. Thanks again!
This video is very, very explanatory. Well done and thank you for sharing.
The Limited is a pain with that black box in the way. I actually looped a rope around the wires going to the box and then around the passenger headrest. I used the powered seat to SLOWLY pull the bundle back away from the actuator (pulse the control to make small adjustments). I also used a universal joint with a 1/4" ratchet to access that back bolt (nearer the firewall). Without a universal, it will be very difficult as the space is just too confining to get it done.
Thank you! Thank you! Thank you! Thank you!
Just did it last week! I expect I saved $300 + by NOT going to the dealer, got part amazon, and used this tool: (U-Joint Socket Adapter) find at lowes for $12.
Also, I'm way too big to fit under the glove box so I borrowed a mirror and set on the passenger side floor with a lot of success... re-plugging the actuator was very tricky (blind) took me 25+ min... so be patient when doing it!
Thank you again! great video and love our community helping each other... P.S. did not buy the tool ... asked my neighbors and got a loaner for 30 min and done! ask yours!
i borrowed my skin friend ;)
Awesome Video.. Spot on with all the details necessary... You addressed every potential problem... Thank you for Posting this
Awesome video. A great way to build patience, and $$$ saved. Thanks so much!
Thank you a million times over. I'm stuck at the back screw, but maybe putting tape on the socket may work to have it stop slipping. 2010 Flex Limited. Didn't have to remove glove box btw. First actuator (in the front) took 5 minutes. This is really frustrating and I hate it, lol.
There are a number of comments below about better ways to get that back screw in. Some people just leave it out. Others buy a stubby little ratchet knob
@@pjmoreland Yeah I did see them. Going to post how I got it out way easier.
Thanks for the video. Worked great. Wasn’t as easy for me as you made it look but thankful nonetheless!
Thank you brother, you made this job way easier.
best video for explore blend door
Awesome job sir. I completed the steps you did and eveything worked perfectly. My AC works on both sides now.
Excellent. You're ready for summer 👍
This job would've been much more difficult without your video! Thank you for the detailed walkthrough!
Great vid. Just replaced ours today and it fixed the passenger side stuck on heat issue. I would not have attempted this fix if not for this vid...Thank you. For the tough to reach back bolt I used a 1/4 in. universal-joint with a small extension.