Nice job, I plan to do a similar floor in my van (once Ford will get around to build it). I agree that wood on the floor is not the best practice but on the other hand aluminum is one of the best heat transfer material, my plan is to use square fiberglass rods instead, 1 or 1.5 inch. Not only less heat transfer but also a way to route water pipes and electrical harness under the floor. Cheers, keep at it.
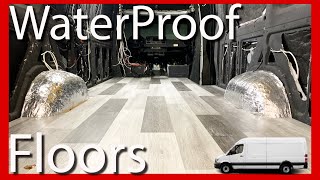
Hi Effie!! You bring up some fantastic points, and issues that I also gave hours and hours of thought to. In my estimation, using a large dollop of adhesive between the van floor and the aluminum rails will serve as a small thermal break. I've been planning on measuring the surface temperature of the flooring once I can reasonably try to heat the interior of the van, paying special attention to the areas directly above the aluminum rails to see if they are in fact acting as thermal bridges, and I'll for sure be making a future video showing the tests. Also, you totally hit on something I plan on addressing in part 2 of this video. Spoiler alert, if I could do it over again, the only real change I think I'd make is I would go up to 1.5" foam board and 1.5" aluminum rails. It's hard to say how critical that .5" is until I get the finished ceiling in, but I suspect at my height of 5'10", I'll probably care more about having warmer flooring. And finally, ***I would so, so strongly advise against running your plumbing through your flooring.*** George at Humble Road used to do exactly that and has moved completely away from the practice citing the risk should any of the plumbing components leak. You'd genuinely have to remove all of your interior build in order to gain full access to plumbing routed through the subfloor.
@@ErikJohnson2020 Depending on my van layout I may need to run plumbing under the floor. The plan is to run a PEX pipe inside a square fiberglass tube (aluminum is also an option) from one side of the van to the other, I’ll have an access point at each end (out of sight) so the pipe can be changed if necessary. There will be no fittings down there and my only (small) concern is movement of the pipe inside the tube, maybe some silicon can take care of this. I follow George and I admire the work he is doing but some things I will do different, not necessarily better, just using my knowledge and experience to make it work for me.
@@brianchetelat6601 That's what I thought, did some research and found some reasonable options, more expensive but not outrageously so. (can't write product name, my reply is not being posted ???)
I've been watching tons of subfloor videos to prep for the next project on my build (including some really painful ones that seemed to take tons of tries to get right). You've got the best method I've seen. So glad I found your channel! Thanks for making this.
Thank you!! I put a lot of thought into the design of the subfloor, in the efficiency of the layout, the overall strength, and longevity of the system. Time will tell, but it's been absolutely rock solid thus far.
Thank you. I appreciate the tidbit about cutting foam board - having not worked with it yet, it's a nice bit of commentary to help with getting cleaner cuts.
Nice work! I recently insulated and covered the floor of my Promaster City. It has about 1/3 the floor space of your van, so I was able to get away with one 4x8 sheet of plywood. I used 1x3 wooden slats instead of aluminum and coated them with that green wood preservative. Between the slats, I used 3/4 inch expanded polystyrene insulation. I then covered the floor with a vapour barrier before laying down the plywood sub floor.
You're much more comfortable in front of the camera now! Your personality is showing more. Great video! Super entertaining and informative. Keep it up! Also, how many times have you gone to Home Depot/hardware stores since you started your vanbuild? Lol, must be your second home, am I right?
Thank you Mary Anne!! 🥰🥰 And remarkably so far I think I've only gone to Home Depot/Lowes a total of 4 times? But I'm certain that once I get into the cabinetry and the and the finishing woodwork it'll be a very different story.
Hey Erik, really enjoying your videos! We had a great vacation to Scotland a few weeks ago where we rented a VW Transporter Campervan....Love it by the way...so much so that I reached out to VW Canada to see if they are available. Sadly no! I can look into Importing or maybe going your route with a Transit. I like the idea of readily available service anywhere in North America for sure and will continue watching your work to see what this will cost in the end. My hope is camping / travelling with my Wife and Off road Moto Trips with my Buddies.
Well I'm probably about 90-ish % finished with all of the materials acquisitions for the entire build, and including the cost of the vehicle itself the total cost of my conversion is $93,705.75 Hope that helps!
You are doing some good work. It's funny, I just got done renovating a house also and brought my new Transit home a few weeks ago. 350, SRW, HR, EXT, AWD, Ecoboost. Small world. My back of the napkin budget is about $25k for the conversion, so when I saw your budget number I got a little concerned, since I know you went into more detail coming up with your figure than I did. Every time you put something in your van that I am not, I subtract it from your number. We are getting closer to that $25k, lol All the little accessories and materials, like adhesives, hardware etc.... really adds up.
LOL! I love the "back of the napkin" math because I can 100% relate to that step. Yeah, the budget for van conversions has a remarkable ability to balloon. I'm already within spitting distance of matching the same budget of our entire 3bd 3ba remodel, and my van build is only something like 80 square feet. 😅 So just hitting the big categories, my budget is as follows: Electrical System: $8,629 Exterior Improvements: $3,905 Temperature Control: $2,920 Kitchen: $3,601 Water/Plumbing: $755 Bathroom/shower: $1,507 Insulation: $2,200 Windows & Flares: $3,210 Lighting: $128 Swivel Seats: $850 Cabinetry & 80/20 Rails: $3,748 Flooring: $504 Specialized Tools: $409 Unexpected/Misc: $3,018 Total: $35,384 So I'm no accountant, but basically my approach was to lump all the consumables or materials that might be used across multiple projects into the "misc" category, and just hope that my "10%" cushion covers it all.
I suspect it certainly transfers a little bit of heat/cold, but that's just one of the trade-offs I chose to ensure I had a rock-solid foundation that wouldn't rust or rot over the years. That said, I've also tried measuring the temperature at the surface of my subfloor to see if the areas directly above the aluminum ribs were noticeably colder than the areas with just foam, and at least with my laser thermal gun, there isn't any difference. Hope that helps!
Uh. I was really excited to get started on this in my Transit. So much so that I bought the required 11 aluminum tubes TWICE! So if anyone's watching this and wants a deal on the aluminum, hit me up.
Why bother putting insulation in when you put aluminum heat sinks in it to transfer the heat or cold directly to the sub floor from the van sheet metal floor? The only thing that should touching the van floor is insulation.
I also thought the metal would transfer heat, cold. What about the bed liner spray and epoxy self leveling floor. Water couldn't get in and maybe ok for insulation and quiet.
Hey hoping you'll see this but going to do the same thing here in the coming weeks, over time did you have any issues/floor movement because of no supports added perpenicular to your bars? Trying to figure out how much aluminum to get!
Interresting. That a lot of inchs you taken up no your floor. I used the 1/4 plywood that the manufactures used. double up on cork. No frame under. letting it breath. And LifeProof on top. Lets see what happens.
As I mentioned at the start of the video, there are a couple of reasons I didn't take that approach. 1) It would have required one more 4x8 sheet of plywood and rigid foam to allow you to trace out a full template. You can find hundreds of videos of other people doing exactly that. It's a waste of materials and honestly takes longer to do. 2) The padded flooring from the factory isn't actually an exact match to the van's floor. If you buy one, you'll see that it's actually just shy of 1" smaller in every dimension vs the van walls. So if you use the carpet for your template, you'd be losing nearly 2" of extremely valuable floor space when it's all said and done. Hope this helps!
I know that FarOutRide made that same recommendation to add a little more insulation to the floor system. However, George at Humble Road suggests, and I agree, that intentionally leaving those channels open allows for increased airflow to minimize the inevitable buildup of water (condensation) and resulting rust or mold growth. Sure it's less insulation, but the tradeoff is worth it in my mind.
Correct. For several reasons: 1) Rigidity. The entire build is going to sit on top of this foundation, and I want it to be as solid of a connection as possible, with zero room for compression/movement. 2) Mold/rot. Water is going to condense, and then collect on the floor of the van, and this is unavoidable. I didn't want any material near the floor of the van that can rot, mold, or break down over time. Even if the material is impervious, I don't want anything that might inhibit airflow for moisture evaporation. 3) It's not needed. All the insulation and plywood layers, plus the finished flooring and rugs all add to the noise absorption of the entire floor system. I promise you, the shit inside your van rattling around is 10x louder than any road noise.
@@ErikJohnson2020 very good explanation and just the elements I was pondering for mine. Your build is the best I’ve seen and made the most sense for the moisture issue. Thank you so much for sharing your wealth of knowledge and insight. Now that you’ve been using it for a couple years, how has it held up?
If you want to see the spec sheet for the R-tech extruded polystyrene rigid foam boards that I used (including their water resistant properties), you can find that info here: www.insulfoam.com/insulation-panels/
Trex would probably do just fine as a subframe material that's mold and water resistant, but I'm not sure the price savings would actually offset the additional time needed to mill/process the trex down to your exact size requirements. The big advantage to aluminum ready-tube is that you just cut it to length, and you're done. Plus the Hollow core of the aluminum tube probably means it'd be less weight vs the Trex.
Aluminum is significantly lighter weight, and is effectively mold/rot-proof. Wood is much less expensive, and is slightly more insulating (though, still isn't a good insulator), but with prolonged exposure to moisture will eventually rot. RVs probably have more in common with boats than they do with houses, so designing everything to be marine grade will almost assuredly save you future headaches. Hope this helps!
It is a big mistake to not make the floor removable, water flows in the direction of gravity ! The square aluminum tube is like why ? Because aluminum readily transfers the heat and cold up to the plywood flooring. Really need water drain holes in a floor designed like that.
You only need “styrofoam” adhesive if you are using “unfaced” panels. In this video he’s actually gluing the foil facing to metal, so styrofoam adhesive - which is designed to react with the foam - is *not* the best choice. Should have just used construction adhesive.🎉
Why didn't you just use the floor that you removed as the template? Seems like a lot of extra work to make your own cardboard template when one had already been factory made for you...
You could, but the mat was about 1" (2cm) smaller than the wheel wells, and I wanted a tighter fitting floorboard so I made the template. Hope that helps!
@@sonofrobert It's been 18 months, I've loaded thousands of pounds of tools onto my flooring numerous times, and the foam isn't compressing whatsoever. The entire point of the aluminum joists/studs spaced at 18" with a 3/4" thick plywood sub-floor is to distribute all the weight to the aluminum and not the foam.
Why not just bond the foam to the floor then bond a plywood floor to the underlying foam? Oh i see you've virtually that written on the van floor some 100x but then ignored it... 😫
If you don't want to have to rip it up in 4-5 years because it is rotting out from under you, than yes, it does. Sincerely, go look at videos of vanlifers who've been in their van for a few years, and the prevalence of mold and rot issues they have under their floors. Moisture + no air flow + wood = rot.
@@ErikJohnson2020 who the hell lives in a van for 5 years? Also, why is there water in the van in the first place? Good thing there is pressure treated plywood out there for those driving thru rivers.
🤦♂️I shouldn't, but I will attempt to explain. Anytime you create a temperature controlled environment, meaning the temperature inside your awesome adventure van is different from the temperature outside, you will create condensation. Think of the condensation that collects on the outside of a cold glass of water on a hot summer day. You will have that exact same condensation effect taking place on the metal walls, ceiling, floors, and even glass windows of your van, but because the total surface area in a van is about 1000x larger than a drinking glass, you're going to be creating about 1000x more condensation within your van. The only way to avoid this would be keeping the temperature inside your van the exact same as the temperature outside, and that sounds like a pretty shit idea on a cold winter night or a hot summer day. So, once you understand that you are going to be creating condensation within your van, and that gravity is going to pull ALL of that moisture to the bottom of your van, underneath your floors... Are you starting to understand the problem? Who wants to invest tens of thousands of dollars and countless hours of their time into building a van that is going to rot out from underneath them? But if that's your goal, by all means, knock yourself out.
@@ErikJohnson2020 yea you really shouldn’t have put in all that effort. I don’t even care to read all that, I’m building mine now, vapor barrier and 3/4 ply on top. Good enough for me. 🤷♂️
I am sorry, by what is the point of those aluminum bars?? You just ruined the whole point of your insulation here, creating a direct cold bridge from the metal floor! And you are calling THIS the best insulated subfloor??? What a f..ng joke, this subfloor is not insulated at all!
Oh Theo, my sweet Summer Child. While you're correct that some thermal bridging does take place through the aluminum tubes, it's not even remotely close to enough to negate the insulation of the entire subfloor system. I've measured the temperatures of my floor using a lazer thermometer, and the widest temperature swing is 2° between the fasteners and the dead center of the rigid foam boards. Now the part that actually matters, and what you seem incapable of comprehending, is that aluminum won't rot, mold, or rust. And given condensation inside a temperature controlled RV is absolutely unavoidable, any other material that you might choose for better "insulation" properties WILL ABSOLUTELY ROT out from under your entire RV build. Go look at old RV renovations and see how extensive rot damage is in every single one of them. Also, learn how to research an idea before you go vomit your ignorance onto someone else's comment section.
If you don't already know this small tip. You caulking gun has a tip snipper on it. The little circle on the side of the handle will cut the tip off when you clamp down. Fingers are important to keep. :)
Thanks Eric this is going to be good insulation aa well as a bit of noise-reduction too. Is that the longest van bed Ford offers...there's alot of room behind those wheel wells. Appreciate your sharing with us great job 🤓
Another UA-cam video of people not doing research before starting. They make an electric knife that’s hot just for this kind of thing you can change the blades on it.
I already have tens of thousands of dollars worth of tools. I sincerely do not want, or need, yet another tool that only serves one purpose, and would only be used once in my lifetime. Others might appreciate the input though.
I also thought the metal would transfer heat, cold. What about the bed liner spray and epoxy self leveling floor. Water couldn't get in and maybe ok for insulation and quiet.
I'm planning on waiting until I have the finished flooring installed, then drilling an access hole through all of the layers at the same time and then installing a removable metal cap to gain access on demand.
Also, the access key isn't covered with an aluminum rail. You can see at 18:38 timestamp that first rail is positioned next to, but not above the access key. The camera angle might make it confusing.


Nice job, I plan to do a similar floor in my van (once Ford will get around to build it). I agree that wood on the floor is not the best practice but on the other hand aluminum is one of the best heat transfer material, my plan is to use square fiberglass rods instead, 1 or 1.5 inch. Not only less heat transfer but also a way to route water pipes and electrical harness under the floor.
Cheers, keep at it.
Hi Effie!! You bring up some fantastic points, and issues that I also gave hours and hours of thought to. In my estimation, using a large dollop of adhesive between the van floor and the aluminum rails will serve as a small thermal break. I've been planning on measuring the surface temperature of the flooring once I can reasonably try to heat the interior of the van, paying special attention to the areas directly above the aluminum rails to see if they are in fact acting as thermal bridges, and I'll for sure be making a future video showing the tests.
Also, you totally hit on something I plan on addressing in part 2 of this video. Spoiler alert, if I could do it over again, the only real change I think I'd make is I would go up to 1.5" foam board and 1.5" aluminum rails. It's hard to say how critical that .5" is until I get the finished ceiling in, but I suspect at my height of 5'10", I'll probably care more about having warmer flooring.
And finally, ***I would so, so strongly advise against running your plumbing through your flooring.***
George at Humble Road used to do exactly that and has moved completely away from the practice citing the risk should any of the plumbing components leak. You'd genuinely have to remove all of your interior build in order to gain full access to plumbing routed through the subfloor.
Effie, I can appreciate the idea around fiberglass rods and heat transfer but wouldn't those be outrageously expensive?
@@ErikJohnson2020 Depending on my van layout I may need to run plumbing under the floor. The plan is to run a PEX pipe inside a square fiberglass tube (aluminum is also an option) from one side of the van to the other, I’ll have an access point at each end (out of sight) so the pipe can be changed if necessary. There will be no fittings down there and my only (small) concern is movement of the pipe inside the tube, maybe some silicon can take care of this.
I follow George and I admire the work he is doing but some things I will do different, not necessarily better, just using my knowledge and experience to make it work for me.
@@brianchetelat6601 That's what I thought, did some research and found some reasonable options, more expensive but not outrageously so. (can't write product name, my reply is not being posted ???)
@@effie2206 Understood.
Nice work, great video and editing. I really like the voiceover explanations and the tips you are learning as you go.... 10/10
Thank you!!! I really like your detailed feedback! 😉 Hope to see you in the comment section on future videos!
I've been watching tons of subfloor videos to prep for the next project on my build (including some really painful ones that seemed to take tons of tries to get right). You've got the best method I've seen. So glad I found your channel! Thanks for making this.
Thank you!! I put a lot of thought into the design of the subfloor, in the efficiency of the layout, the overall strength, and longevity of the system. Time will tell, but it's been absolutely rock solid thus far.
You are so knowledgeable and thorough. What a great resource! I’m learning so much! And nice cutting, Anna!!
Thanks De! 🥰
George from Humble Road did this technique also a while back. Great to see it again. And thanks for showing the pricing...that's a plus!
Thank you. I appreciate the tidbit about cutting foam board - having not worked with it yet, it's a nice bit of commentary to help with getting cleaner cuts.
This was one of the best floor videos I have found. Love the explanations as to why you did what. Thanks for sharing your goofs so I won't make them!
It interests me because I will be doing my van in a few months.
Wow this project looks DENSE. Loved seeing Anna pop in. When do I get to appear on your channel??
Great job Erik, still watching you closely and still waiting on Ford to start mine : )
Hey Brian! Glad to see you're still here!! 🥰
Any ETA on when your van is gonna be delivered?
@@ErikJohnson2020 Some time in February but I'm not holding my breath : )
Nice work! I recently insulated and covered the floor of my Promaster City. It has about 1/3 the floor space of your van, so I was able to get away with one 4x8 sheet of plywood. I used 1x3 wooden slats instead of aluminum and coated them with that green wood preservative. Between the slats, I used 3/4 inch expanded polystyrene insulation. I then covered the floor with a vapour barrier before laying down the plywood sub floor.
One plywood sheet!? Lol, I think I used something like 90% of the three sheets in my build.
You're much more comfortable in front of the camera now! Your personality is showing more. Great video! Super entertaining and informative. Keep it up!
Also, how many times have you gone to Home Depot/hardware stores since you started your vanbuild? Lol, must be your second home, am I right?
Thank you Mary Anne!! 🥰🥰
And remarkably so far I think I've only gone to Home Depot/Lowes a total of 4 times? But I'm certain that once I get into the cabinetry and the and the finishing woodwork it'll be a very different story.
Next time, use the black plastic wheel well covers to make your radiuses on your cardboard templates. Floor looks awesome, great job!
Hey Erik, really enjoying your videos! We had a great vacation to Scotland a few weeks ago where we rented a VW Transporter Campervan....Love it by the way...so much so that I reached out to VW Canada to see if they are available. Sadly no! I can look into Importing or maybe going your route with a Transit. I like the idea of readily available service anywhere in North America for sure and will continue watching your work to see what this will cost in the end. My hope is camping / travelling with my Wife and Off road Moto Trips with my Buddies.
Well I'm probably about 90-ish % finished with all of the materials acquisitions for the entire build, and including the cost of the vehicle itself the total cost of my conversion is $93,705.75
Hope that helps!
You are doing some good work.
It's funny, I just got done renovating a house also and brought my new Transit home a few weeks ago. 350, SRW, HR, EXT, AWD, Ecoboost.
Small world.
My back of the napkin budget is about $25k for the conversion, so when I saw your budget number I got a little concerned, since I know you went into more detail coming up with your figure than I did. Every time you put something in your van that I am not, I subtract it from your number. We are getting closer to that $25k, lol
All the little accessories and materials, like adhesives, hardware etc.... really adds up.
LOL! I love the "back of the napkin" math because I can 100% relate to that step. Yeah, the budget for van conversions has a remarkable ability to balloon. I'm already within spitting distance of matching the same budget of our entire 3bd 3ba remodel, and my van build is only something like 80 square feet. 😅
So just hitting the big categories, my budget is as follows:
Electrical System: $8,629
Exterior Improvements: $3,905
Temperature Control: $2,920
Kitchen: $3,601
Water/Plumbing: $755
Bathroom/shower: $1,507
Insulation: $2,200
Windows & Flares: $3,210
Lighting: $128
Swivel Seats: $850
Cabinetry & 80/20 Rails: $3,748
Flooring: $504
Specialized Tools: $409
Unexpected/Misc: $3,018
Total: $35,384
So I'm no accountant, but basically my approach was to lump all the consumables or materials that might be used across multiple projects into the "misc" category, and just hope that my "10%" cushion covers it all.
Isn’t that aluminum going to bring the cold through from the bottom of the van closer to the floor and bring down your insulation r value
I suspect it certainly transfers a little bit of heat/cold, but that's just one of the trade-offs I chose to ensure I had a rock-solid foundation that wouldn't rust or rot over the years. That said, I've also tried measuring the temperature at the surface of my subfloor to see if the areas directly above the aluminum ribs were noticeably colder than the areas with just foam, and at least with my laser thermal gun, there isn't any difference. Hope that helps!
Thanks for making these videos. I’m planning to convert an old transit Connect XLT, and didn’t have a clue
thanks for sharing your video for remodeling you Van.
I've used an electric carving knife - a little slow but a nice clean cut with almost zero dust.
Currently an electric carving knife is the forerunner of tools I'm planning on using when I get to cutting my custom fit mattress. 😅
Good job, thanks for the inspiration
Good job, watched it all
Looks great
Watched to the end 😇. Awesome job! Subbed.
Glad you liked it!
Uh. I was really excited to get started on this in my Transit. So much so that I bought the required 11 aluminum tubes TWICE! So if anyone's watching this and wants a deal on the aluminum, hit me up.
Why bother putting insulation in when you put aluminum heat sinks in it to transfer the heat or cold directly to the sub floor from the van sheet metal floor? The only thing that should touching the van floor is insulation.
I also thought the metal would transfer heat, cold.
What about the bed liner spray and epoxy self leveling floor.
Water couldn't get in and maybe ok for insulation and quiet.
Quit splitting hairs. It’s a van. It’s not like the aluminum completely negates the insulation.
And if you believe it does. … you’re the idiot.
I just became your 1,000th subscriber. 😊
!!!!Thanks Lauren!!!! I'm stoked that you left a comment so that I could know who you were too! 🥰 Hope you're enjoying the content!
How come there is a gap of aluminum on the sliding door foot step
Please explain why take all vinyl trim and not use some of it for lining floor, wheel wells, etc.
cant anchor the floor to vinyl
Subscribed. You are super duper.
Respectfully, Erik as well
Thank you!
Will adhesive bond long term if I painted the floor in a rust preventative?
Humble Road has used this technique
Hey hoping you'll see this but going to do the same thing here in the coming weeks, over time did you have any issues/floor movement because of no supports added perpenicular to your bars? Trying to figure out how much aluminum to get!
Interresting. That a lot of inchs you taken up no your floor. I used the 1/4 plywood that the manufactures used. double up on cork. No frame under. letting it breath. And LifeProof on top. Lets see what happens.
@ 11:09 Why not use the original flooring as a template? I don't know too much work for flooring but that just me ;-)
I am just curious why you didn't use the pre-existing carpet for a template to cut your floor insulation.
As I mentioned at the start of the video, there are a couple of reasons I didn't take that approach.
1) It would have required one more 4x8 sheet of plywood and rigid foam to allow you to trace out a full template. You can find hundreds of videos of other people doing exactly that. It's a waste of materials and honestly takes longer to do.
2) The padded flooring from the factory isn't actually an exact match to the van's floor. If you buy one, you'll see that it's actually just shy of 1" smaller in every dimension vs the van walls. So if you use the carpet for your template, you'd be losing nearly 2" of extremely valuable floor space when it's all said and done. Hope this helps!
@@ErikJohnson2020 I see. Thanks for the reply.
Hi Eric - Wondering how the Seal Bond 105 worked????? Any problems or were you satisfied with the results??? Thanks
Should insulate wheel bumps before templating floor?
I've seen where they use a dense rubber for all the low parts of the floor between the ribs. What are your thoughts.
I know that FarOutRide made that same recommendation to add a little more insulation to the floor system. However, George at Humble Road suggests, and I agree, that intentionally leaving those channels open allows for increased airflow to minimize the inevitable buildup of water (condensation) and resulting rust or mold growth.
Sure it's less insulation, but the tradeoff is worth it in my mind.
You didn’t put a sound or cushion layer down before the aluminum and wondered why?
Correct. For several reasons:
1) Rigidity. The entire build is going to sit on top of this foundation, and I want it to be as solid of a connection as possible, with zero room for compression/movement.
2) Mold/rot. Water is going to condense, and then collect on the floor of the van, and this is unavoidable. I didn't want any material near the floor of the van that can rot, mold, or break down over time. Even if the material is impervious, I don't want anything that might inhibit airflow for moisture evaporation.
3) It's not needed. All the insulation and plywood layers, plus the finished flooring and rugs all add to the noise absorption of the entire floor system. I promise you, the shit inside your van rattling around is 10x louder than any road noise.
@@ErikJohnson2020 very good explanation and just the elements I was pondering for mine. Your build is the best I’ve seen and made the most sense for the moisture issue. Thank you so much for sharing your wealth of knowledge and insight. Now that you’ve been using it for a couple years, how has it held up?
What did you end up finishing the floors with?
That insulation will absorb moisture
If you want to see the spec sheet for the R-tech extruded polystyrene rigid foam boards that I used (including their water resistant properties), you can find that info here: www.insulfoam.com/insulation-panels/
Oh Ya, oh ya!!!
Could you have saved $ by using less expensive plywood grade?
Just had an incredibly brilliant (or ridiculously stupid) idea...TREX for the flooring frame. Rip a bunch of 2x4s to size.
Thoughts?
Trex would probably do just fine as a subframe material that's mold and water resistant, but I'm not sure the price savings would actually offset the additional time needed to mill/process the trex down to your exact size requirements. The big advantage to aluminum ready-tube is that you just cut it to length, and you're done. Plus the Hollow core of the aluminum tube probably means it'd be less weight vs the Trex.
My plan....picked up 2x4 last night.
Wonder what do you gain with alum tube instead of wood?
Aluminum is significantly lighter weight, and is effectively mold/rot-proof. Wood is much less expensive, and is slightly more insulating (though, still isn't a good insulator), but with prolonged exposure to moisture will eventually rot. RVs probably have more in common with boats than they do with houses, so designing everything to be marine grade will almost assuredly save you future headaches. Hope this helps!
@@ErikJohnson2020 Typical DIY, overkilled, no engineering.
@@AZRockRunner Thanks for sharing :-(.
Any particular reason you didn't put Kilmat in the valleys to reduce the vibrations there?
I explain why at the end of part two, so if you haven't watched that yet, I'd recommend it. But the short answer is air flow.
@@ErikJohnson2020 Thank you!!! ❤️❤️❤️
It is a big mistake to not make the floor removable, water flows in the direction of gravity ! The square aluminum tube is like why ? Because aluminum readily transfers the heat and cold up to the plywood flooring. Really need water drain holes in a floor designed like that.
You only need “styrofoam” adhesive if you are using “unfaced” panels. In this video he’s actually gluing the foil facing to metal, so styrofoam adhesive - which is designed to react with the foam - is *not* the best choice. Should have just used construction adhesive.🎉
Why didn't you just use the floor that you removed as the template? Seems like a lot of extra work to make your own cardboard template when one had already been factory made for you...
he explained in the video and comments
Couldn’t trace the original mat for the wells?
You could, but the mat was about 1" (2cm) smaller than the wheel wells, and I wanted a tighter fitting floorboard so I made the template. Hope that helps!
What is the point of the aluminum framing on the floor?
Light weight, won't rot or rust, and extremely strong foundation for the entire van build.
The foam will collapse with weight.
@@sonofrobert It's been 18 months, I've loaded thousands of pounds of tools onto my flooring numerous times, and the foam isn't compressing whatsoever. The entire point of the aluminum joists/studs spaced at 18" with a 3/4" thick plywood sub-floor is to distribute all the weight to the aluminum and not the foam.
No kilmat??
Stuff is overused.
There is no real reason for it on the floor.
You covered up your spare tire access nut. You might want to correct that.
Correct, once the finished floor is installed, I plan to drill an access hole and install a removable metal cover for it. But good eye!
Why not just bond the foam to the floor then bond a plywood floor to the underlying foam?
Oh i see you've virtually that written on the van floor some 100x but then ignored it...
😫
I think foam is a mistake because you have to joist it and it still could sag.
Never understood this. The floor doesn’t need all this.
If you don't want to have to rip it up in 4-5 years because it is rotting out from under you, than yes, it does.
Sincerely, go look at videos of vanlifers who've been in their van for a few years, and the prevalence of mold and rot issues they have under their floors.
Moisture + no air flow + wood = rot.
@@ErikJohnson2020 who the hell lives in a van for 5 years? Also, why is there water in the van in the first place? Good thing there is pressure treated plywood out there for those driving thru rivers.
🤦♂️I shouldn't, but I will attempt to explain.
Anytime you create a temperature controlled environment, meaning the temperature inside your awesome adventure van is different from the temperature outside, you will create condensation. Think of the condensation that collects on the outside of a cold glass of water on a hot summer day. You will have that exact same condensation effect taking place on the metal walls, ceiling, floors, and even glass windows of your van, but because the total surface area in a van is about 1000x larger than a drinking glass, you're going to be creating about 1000x more condensation within your van.
The only way to avoid this would be keeping the temperature inside your van the exact same as the temperature outside, and that sounds like a pretty shit idea on a cold winter night or a hot summer day.
So, once you understand that you are going to be creating condensation within your van, and that gravity is going to pull ALL of that moisture to the bottom of your van, underneath your floors...
Are you starting to understand the problem?
Who wants to invest tens of thousands of dollars and countless hours of their time into building a van that is going to rot out from underneath them?
But if that's your goal, by all means, knock yourself out.
@@ErikJohnson2020 yea you really shouldn’t have put in all that effort. I don’t even care to read all that, I’m building mine now, vapor barrier and 3/4 ply on top. Good enough for me. 🤷♂️
I am sorry, by what is the point of those aluminum bars?? You just ruined the whole point of your insulation here, creating a direct cold bridge from the metal floor!
And you are calling THIS the best insulated subfloor??? What a f..ng joke, this subfloor is not insulated at all!
Oh Theo, my sweet Summer Child. While you're correct that some thermal bridging does take place through the aluminum tubes, it's not even remotely close to enough to negate the insulation of the entire subfloor system. I've measured the temperatures of my floor using a lazer thermometer, and the widest temperature swing is 2° between the fasteners and the dead center of the rigid foam boards.
Now the part that actually matters, and what you seem incapable of comprehending, is that aluminum won't rot, mold, or rust. And given condensation inside a temperature controlled RV is absolutely unavoidable, any other material that you might choose for better "insulation" properties WILL ABSOLUTELY ROT out from under your entire RV build.
Go look at old RV renovations and see how extensive rot damage is in every single one of them.
Also, learn how to research an idea before you go vomit your ignorance onto someone else's comment section.
Putting aluminum directly onto the metal negates everything.
How much thought did you put into this comment before posting? Obviously not much.
Jack ass
Jeez,your insulation a van subfloor!.you're not building a skyscraper!..total yawnfest.
Her mask is a unhealthy habit
Most boring first half van insulation video ever man
Do you not need to sound deaden the van floor before you put down the sub floor? I guess adhering the sub floor to the van floor cuts out the noise?
If you don't already know this small tip. You caulking gun has a tip snipper on it. The little circle on the side of the handle will cut the tip off when you clamp down. Fingers are important to keep. :)
Sadly, my cheap-o caulk gun's clipper does a horrible job of actually cutting. 😢
Thanks Eric this is going to be good insulation aa well as a bit of noise-reduction too. Is that the longest van bed Ford offers...there's alot of room behind those wheel wells. Appreciate your sharing with us great job 🤓
Thank you! 😊 And yes, this is the extended length version of the Ford Transit 350, with the single rear-wheel.
Another UA-cam video of people not doing research before starting. They make an electric knife that’s hot just for this kind of thing you can change the blades on it.
I already have tens of thousands of dollars worth of tools. I sincerely do not want, or need, yet another tool that only serves one purpose, and would only be used once in my lifetime.
Others might appreciate the input though.
I also thought the metal would transfer heat, cold.
What about the bed liner spray and epoxy self leveling floor.
Water couldn't get in and maybe ok for insulation and quiet.
I didn't see the razor blade utility knife tool in your Amazon store. What kind is it? Definitely not the Milwaukee one in the store. Awesome content!
good work
Posted on your part 2, but will ask here too... How do you plan to access the spare tire since you covered the access key hole with a bar?
I'm planning on waiting until I have the finished flooring installed, then drilling an access hole through all of the layers at the same time and then installing a removable metal cap to gain access on demand.
Also, the access key isn't covered with an aluminum rail. You can see at 18:38 timestamp that first rail is positioned next to, but not above the access key. The camera angle might make it confusing.
thank you for the through details and the cost summary 🌟
Glad it was helpful!