@27:18 Example 5 - OLED Display @32:55 Example 6 - Analog Input with Potentiometer @34:07 Example 7 - Sonar @36:42 Example 8 - Temperature Sensor @40:13 Example 9 - LDR sensor @43:12 Example 10 - Security Sensor - buzzer
Wow, great work Man, thanks a lot for this wonderful and knowledge based video and special thanks for covering 10 projects in one single video. Looking forward to view more videos on Pico , All the best Great Job 👍👍👍
Appreciate your professional, clear, and detailed info along this "course " . very impressed to me as great learning of MCU and Programming under your guided . I am working in Singapore as product F.A. team and think about project of automatic F.A tools develop. thanks . keep it up .Good luck
Nice work! Could you help me? Chinese calliper data reading pi pico micropyton is the few lines of code that do this! Unfortunately, I couldn't find a sample example of such a thing anywhere!
I took two my Pico's out of their bags. I took one and connected it to the MAC and pico. I did not get any response. Not sure what is going on. I took my MicroBit and connected it the same way and it show "directory" MicroBit". Do I need software on the pico? It looks like you just connected the pico and pressed the "BootSel" and it show the Rasp Pi. I can use your advice. Thanks!
Hello, I have a problem with my RPi Pico. After each unplug and replug, MicroPython needs to be installed every single time in order to work. Why is it happening? It seems like the Pico just forgets that it has already been installed
When you want to save the program on a pico, save it with the name called "main.py" If you save it as anything else, if only runs while it is plugged -in. I would of hope Raspberry would change this.


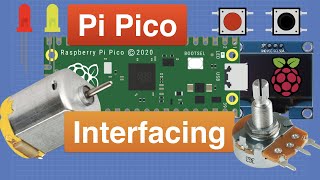


@27:18 Example 5 - OLED Display
@32:55 Example 6 - Analog Input with Potentiometer
@34:07 Example 7 - Sonar
@36:42 Example 8 - Temperature Sensor
@40:13 Example 9 - LDR sensor
@43:12 Example 10 - Security Sensor - buzzer
@15:54 Example 1 -Blink Internal LED
@19:40 Example 2 - Blink External LED
@21:54 Example 3 - Knight Rider lights
@24:46 Example 4 - Pushbutton
@25:47 the button is wired incorrectly, both wires should be on the same side of the button, one going to pin 14 and the other going to 3.3V
Wow, great work Man, thanks a lot for this wonderful and knowledge based video and special thanks for covering 10 projects in one single video.
Looking forward to view more videos on Pico ,
All the best
Great Job 👍👍👍
I am already working on some Raspberry Pi Pico based projects. I am sure you gonna like those projects.
In a class beyond Compare Gr8ly Explain.
a very good video for a beginner like myself. thankyou
Thank you for a great video to help prepare for my Black In Robotics workshop.
Appreciate your professional, clear, and detailed info along this "course " . very impressed to me as great learning of MCU and Programming under your guided .
I am working in Singapore as product F.A. team and think about project of automatic F.A tools develop. thanks . keep it up .Good luck
Just so people are aware, the rasberry pi pico w uses different uf2 files so watch out for that, and the led pin changes
Best video ever on RP...
Awesome video nice job
Excellent summary!
This is just I needed thankyou
Well done, Sir!
Awesome and entertaining !
Nice work! Could you help me? Chinese calliper data reading pi pico micropyton is the few lines of code that do this! Unfortunately,
I couldn't find a sample example of such a thing anywhere!
Fantastic, thank you.
great video thank you😊
i can't seem to find the ssd1306 micropython package on thonny, is it because i'm on a mac?
Amazing job!
Thank you!
does the RP2040 have a minimum system like atmega 328? if so what is the minimum circuit of the system?
Thanks for this nice tutorial
I took two my Pico's out of their bags. I took one and connected it to the MAC and pico. I did not get any response. Not sure what is going on. I took my MicroBit and connected it the same way and it show "directory" MicroBit". Do I need software on the pico? It looks like you just connected the pico and pressed the "BootSel" and it show the Rasp Pi. I can use your advice. Thanks!
Thank you
Sir pl. Say about rasberry pi pico complete course . I want to write own proggram in python like basic to object detection etc
I am using win7 os, after watching many videos but I am not start microphone, please solve my problem
Top vid, thanks!
Thank you.
could you tell me where did u get the potentiometer?
You can get it from almost every electronics shop, or you can salvage one from an old circuit.
It doesn't matter if you don't find the same exact pot, any pot will work.
You could save a lot of time ans just get into the examples instead of listing every detail first
Please cover UART & Timer as well to complete the tutorial.
Sure. I will.
8 minutes in and still no instructions on how to use MicroPython. Instead waste time explaining what is obvious.
👌👌👍👍
Dear please can you make a video on how to connect Mpu 6050 with pick please please
with pick? plz explain.
Hello, I have a problem with my RPi Pico. After each unplug and replug, MicroPython needs to be installed every single time in order to work. Why is it happening? It seems like the Pico just forgets that it has already been installed
When you want to save the program on a pico, save it with the name called "main.py" If you save it as anything else, if only runs while it is plugged -in.
I would of hope Raspberry would change this.
😊
ZX Spectrum 48K
Please upload ESP32 4th part. Please bro
what you want to learn?
@@ElectroniClinic Esp32 own program creating. I mean i write my own program
@@ElectroniClinic bro your are my inspiration
@@habib7240 i have uploaded so many tutorials on ESP32.
@@ElectroniClinic bro what I do completely learn ESP32
Traceback (most recent call last):
File "", line 1
IndentationError: unexpected indent
getting error again and again
Hello dear how can I getting your email
I want help me ❤️
So am I but I'm line 10, how did you resolve the issue?
Cool and simple samples
But TOO MUCH advertising in the video ! 🤬
How many times are you going to say "raspberry pi Pico"... Jesus
Thanks for sharing this video and information. De AA4SH