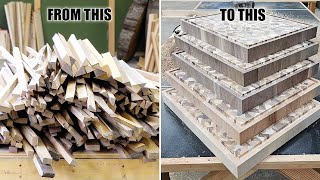
Make Money With These Simple Maple End Grain Cutting Boards

Вставка
- Опубліковано 28 вер 2024
- Support What We Do at The Katz-Moses Store lddy.no/stih
In This week’s woodworking build I show you how you can make these simple end grain cutting boards and make money to support your woodworking hobby or addiction. With only $42 in wood I made these cutting boards that go for hundreds of dollars on the open market. I really can’t wait to see what you create! Let me know what you’d like to see next. Thanks for watching! Please like, comment and subscribe. Cheers!
----
Support What We Do at The Katz-Moses Store- lddy.no/stih
Katz-Moses Goo- • Making the Katz-Moses ...
Table Saw Blades Video- • Selecting Table Saw Bl...
3D End Grain Cutting Board- • Building a 3D End Grai...
Bits and Bits router bits: bit.ly/BitsBits USE CODE JKATZMOSES15 for 15% off
Part #s Used:
½” Astra Coated Ball Nose Bit for Handles:
⅛ Astra Coated Roundover W-2000C
----
Buy the Katz-Moses Magnetic Dovetail Jig: lddy.no/stiz
The Katz-Moses Woodworking Apron: lddy.no/stir
Taytools is my favorite woodworking tool source: lddy.no/e90a
I have Walnut Slabs for sale lddy.no/stj0
Buy the Katz-Moses Stop Block: lddy.no/stiz
BitsBits is the BEST place to buy router bits: bit.ly/BitsBits USE CODE JKATZMOSES15 for 15% off
Total Boat Epoxy: bit.ly/2I3Q8m4 10% Discount code JKATZMO
----
Essential Woodworking Skills Playlist: • Essential Woodworking ...
----
Woodworking Routers Video Playlist: • DIY Router Table Build...
----
Woodworking Joint of the Week Playlist: • Woodworking Joint of t...
----
Tool Tune Up Thursday Playlist: • Tool Tune Up Thursday
----
Check me out on social media:
jkatzmoses
www.Facebook.com/katzmoseswoodworking
patreon.com/katzmoseswoodworking
/ katzmoseswoodworkingshop
----
Tools I love:
The Katz-Moses Woodworking Apron: lddy.no/stir
My Favorite Dozuki Saw: lddy.no/stit
My Favorite Ryoba Saw: lddy.no/stiv
Marking Gauge: amzn.to/2nlXLuQ
Marking Knife: amzn.to/2nm39Ok
NEW Suizan Flush Trim Saw: lddy.no/stix
Stanley Sweetheart Chisels: amzn.to/2mVMTkF
Knew Concepts Fret Saw: amzn.to/2FUDbYZ
Dewalt Planer Package: amzn.to/2thEf6O
Forrest 10” Combo Blade: amzn.to/2Fdaee3
Festool Tape Measure: amzn.to/2oS3cjD
Starrett 6” Combination Square: amzn.to/2oP3dVw
Woodstock 3 in 1 Shoulder Plane: amzn.to/2FgAS1A
Stanley Low Angle Jack Plane: amzn.to/2oV4I4O
Dewaxed Shellac Flakes: amzn.to/2FeqqYh
Abalone Inlay :amzn.to/2rjMTxe
Abalone Inlay Alternate: goo.gl/DHonFy
5 Minute Epoxy: amzn.to/2FijsSa
Triton 3 ¼ hp Router (with built in lift and edge guide incl): amzn.to/2LBw3Go
Kreg Router Plate: amzn.to/2A7oVNC
Triton Bushing Set: amzn.to/2A7pSpa
Bosch 1 HP Colt Router Set With Fixed and Plunge Base: amzn.to/2mHP1wY
Bosch Edge Guide: amzn.to/2uRRKs2
Bosch Bushings Set: amzn.to/2JUNRYb
Centering Cone: amzn.to/2OjgOAf
MY CNC MACHINES (I highly recommend both)
Bescutter Laser’s Website: bit.ly/bescutter
Avid CNCs of all shapes and sizes: bit.ly/3cdKdqA
----
Camera Gear:
Lumix GH5-s and main lens: amzn.to/2J49F7m
30mm Macro Lens: amzn.to/2GJXtTT
15mm Lens: amzn.to/2NafUox
50mm Lens I use for product shots: amzn.to/2mehs5y
Microphone: amzn.to/2IGjKIa
Lav Microphone: amzn.to/2Nb8SzY
Gimbal: amzn.to/2s9ZV0F
2nd CAMERA Canon 70d: amzn.to/2FiCEDq
Tripod: amzn.to/2HasNvK
Slider: amzn.to/2oNucSd
24MM Wide Angle/Macro Lens: amzn.to/2oSzzjh
50MM f/1.8 for those tight shots: amzn.to/2tpAoVm
10-18mm Lens for the wide shots: amzn.to/2FZrhNM
Musicbed SyncID:
MB019R06SAIEAGX


*Support What We Do at The Katz-Moses Store-* bit.ly/KMWstore20
*Katz-Moses Goo-* ua-cam.com/video/VivrbSKNyjY/v-deo.html
*Table Saw Blades Video-* ua-cam.com/video/Fcz_d1k_k8A/v-deo.html
*3D End Grain Cutting Board-* ua-cam.com/video/GGTh2O5qpQo/v-deo.html
*Bits and Bits router bits: **bit.ly/BitsBits** USE CODE JKATZMOSES15 for 15% off*
Part #s Used:
½” Astra Coated Ball Nose Bit for Handles:
⅛ Astra Coated Roundover W-2000C
*Tamar 3x3's new crosscut sled* ua-cam.com/video/McXJxYLXq-E/v-deo.html
Jonathan Katz-Moses what was the size of board you used to make the cutting boards
I love your dovetail jig. I’m currently waiting for your dovetail square jig and I cannot wait to use it once it comes in! Thanks for your videos!
Quick tip for you to make the endgrain pattern just a bit more interesting. On one strip at the end, make it half the width of the rest. Flip them end to end for the second glue-up and you have a neat brick pattern.
Great book for a beginner . ua-cam.com/users/postUgkxD-QRFQz730FJEh4f9BYSf-nkIMIC9hL_ this book really starts from the beginning, as in it explains what basic tools are and how to use them. But when it gets to the art of creating joints and how and when to use them this book really starts to teach you something. At least that was my experience.
Thousands of end-grain cutting board videos floating around on UA-cam and I’ve probably watched far more than my fair share of them but this was truly the best I’ve seen. Haven’t made one in awhile but when I can finally get back to normal life, definitely going to have to rack a few of those up to sell! Thanks for the video.
Thank you for putting this video up and actively encouraging people to use this to earn money.
This will be the first project I make to sell.
Thanks for the shout out! Love the Stop!
Of course Tamar! You're the best!
This is what I love about the woodworking community. Mutual respect and camaraderie. And giving credit where credit is due. Y'all are awesome.
When I had my woodworking business, end grain cutting boards just weren’t worth the extra time versus edge grain. Most customers I found were perfectly happy with edge grain, especially given that end grain costs more in labor. YMMV. Hope y’all can make money on em.
I sell a lot more edge grain than end grain cutting boards. Most people don't care to spend the extra money on them these days.
I've found the same thing. I'm a year into my woodworking business and my first ever few sales were end grain but they quickly stopped moving. Now I sell a couple of edge grain a week and my customers aren't the slightest bit interested in the spending the extra money nor me on spending the extra time on doing end grain. That said, all my my personal boards are end grain and obviously I'll still make and sell one by request.
It's true. The weight and price really turn a lot of people off. They are still amazing. But the weight and price are the restricting factors usually
Justin Bailey any chance I could ask you few questions over the email?
This is the first video I've seen you make. I picked it because I have some Zebra that I want to use for end grain. Nice job!!! You're informative, have excellent video and editing skills and control over the background music volume. I've done a few videos and I appreciate the care you take. Now on the the "Goo" video.
They look awesome. Thanks for posting.
That is one beast of a cutting board. Great info, thanks.
Your baby is so adorable!
Kitchen looks really nice
I seriously dislike end grain cutting boards. However if they sell well I will most definitely learn to love them.
Those looks great. Nice video and great tips.
Hey brother. I make a lot of end grain boards. Likely on your planer on the bottom rollers the edge of the wood was getting caught on that lip. That's what happens on mine. I actually take a ROS with 80g on it and put a 10 degree bevel super quick on the edges of the board to stop that when it's rough. Also you can do the same thing when it's turned end grain to stop tear out through a planer
I recently finished a new maple cutting board (3/4" thick) to replace the old one that was badly warped. I slathered it with mineral oil a couple of times to make sure it was well conditioned. I'll definitely try out pipe clamps, as using the F-clamp was a little challenging to keep it completely flat while gluing up.
Looking forward to the clamp video
Just noticed Nick Offerman in the background. What a man.
The manliness is palpable.
absolutely beautiful baby!
Put one of those CMT blades on my miter saw, worth every penny!
Wow I would have expected more of a Craftsman belt sander my Harbor
Freight one was probably cheeper and I sanded a coffee table top flat which took hours and it still works.
Thanks for this step by step guide! Gives me confidence to try one in my own shop. Question: What is the purpose of the tape when sizing on the table saw? For tear out?
My guess is to protect the newly sanded surface?
Don’t get a craftsman!!! Great comment..Thanks for the video, will be making one of these soon
Professional chef tip... take two pieces of paper towel get them wet and squeeze out extra water. Put those under your board and it won’t slide around. I won’t use a board without wet towel under it. Then you don’t need feet on the little board and you can use both sides. Great video and good looking boards.
Great tip! Thank you! I'll use that at home
Hey, get a Pentel .5mm Graphgear 1000 it rocks!!
in the glue up i use big trash plastic bags so the glue doesnt go to the clamps
Hi Jonathan, can you explain the reason why you tape the boards up (after the orbital, before you trim them down on the table saw) around 8:48? Thank you in advance.
Shouldn’t these be sprayed lightly with water first then sanded to knock the grain down?
Oh, you got the no joke plainer! All I see in videos are the DeWalt mini printers on plastic legs.
Must be nice to have a thickness planer. I did that step with a hand plane.
In determining the amount of wood you need. How are you doing that. If finish board is to be 12×24×1.25 how do you know what to mill your thickness to for the first glue up and how long to make your strips. Is the length in the first glue up the length of the finished board?
That craftsman is a rebrand of the old Black and Decker. $35 at the Homesless Despot. Works OK, I used it to sand an entire 400sqft deck but definitely not a fine tool. I was honestly surprised it lasted the whole deck
Lasted literally 3 minutes before smoking and the belt stopped spinning
@@katzmosestools Man Craftsman has gone so far down hill. You get what you pay for I guess
Regarding the glue: Titebond 3 is also food safe (don't eat it though! It only means it's safe to contact with the food)
You can also use planer to help with the final leveling, so you'll sand only as part of the finishing process. But you have to shave it off little by little and glue some sacrificial boards on the short ends, because without them planer will tear this endgrain out like it's getting paid for doing that.
And as for the feet - they help not only for moving, but for keeping the board away from the extra moisture on the tabletop and during drying, so consider this if you're planning to build one.
Maybe better done if you have a helical cutter on your planer--otherwise doing the final leveling on the planer can be pretty tough to get right (as you point out--*little* by little!). Sanding is far safer (for you, and the cutting board!).
Running end grain through my planer dulls the knife immediately it seems
@@kevinboas6607 I'm going about ¼-⅓ millimetre per pass, and I didn't notice it. But I haven't done it too much, so maybe that's why the blade wasn't damaged.
What were the starting lengths of maple boards you were working with?
Why are there white lines between some maple blocks, e.g., 12:11? Are those the glue lines?
@07:00 instead of flattening with a sander would it be easier to do the glue up into two pieces and joint/plane them flat then a final glue up of the two pieces?
I made some charcuterie board at 1/2" thick 9"x9" boards out of Walnut. I cut 1 in strips .and glued them up with Titebond 3. I want to keep them as flat as possible and I don't want to use breadboards. I was thinking of putting an inlay offset from the edges, so I would have a 7" Square Frame at 1/4 " wide and 3/8" Thick Edge side down centered, basically Splines. Would this work?
Why not use your drum sander? Just curious. I’m thinking of adding one and wondering.
Most people don't have one so I left it out. Drum sander is a great buy
Why didn’t you use your drum sander?
Hey Jon, what about using a router sled to do the bulk of the flattening, instead of the belt sander??
I think it would cause tear out on the edges
@@katzmosestools hmmm. maybe flatten first and then trim to final dimensions at the table saw? :) I think I`ll try it and find out !
JKM, where are you selling boards? I’ve made and sold a few, but haven’t really found a market, would love to figure that part out to get a little more side hustle money coming in while waiting for big Rona to blow over
This might be a stupid question but when ripping the board into strips and doing the first glue up, and I gluing the board back together or am I gluing the face grain together having the edge grain facing up?? Thanks man great video.
Hah, good thing Jonathan isn't sponsored by Craftsman... Looking at you, Woby.
What's the length of the medium cutting board strips before the 1st glue
Is there a way to make it without a planer? I have power hand planer and old school block planer.
A lot of sanding, or a hand planer would work.
Hi, I made an end grain style only maple cutting board by watching a video of him explaining each step. I gave a coat of Vaseline oil as synthetic one is not available from us. At the first wash only on the used side, everything is on board ... What advice do you give me? Thanks Nicola
Perhaps you could help me with a question. I used cherry and red oak for my end grain board. When oiling, the red Oak wicks the oil from the top to the bottom in a matter of seconds, right through the thickness of the cutting board. Will this stop after several oil treatments? (3 so far) Will it affect the use of the cutting board? Thank you for any help or info.
Do you know the brand of those Rubber Bumpers that are used for the feet?
Safety tip: do NOT flatten the end grain with a jointer or planer. Yea there are guys who say they do it with light cuts, etc., but it's definitely a "kids don't try this at home" maneuver.
Awesome video Jonathan! Would love to do this one day. Just need to get a planer thicknesser first. 😂
I am using this video for a school project and it would be great if someone could respond to me and tell me the measurements for the smaller cutting board. Thanks!
Nice job! Hey, what parallel clamps are those?
Ah yes, the Titebond 3 waterfall technique
Guessing this dude spends more on glue than I spend on wood.
You are like a way better Jimmy Kimmel. Way better. Love your channel.
Worse than the arbor nut falling to the bottom of the saw is when it falls into the dust collection hose!
Great video as usual, you mentioned a table saw sleep design that you really liked, can you leave a link to that please.
Its in the linked comment. Cheers
why can't you use the planner again to make it flat
First comment what's up!!!!
RetiredRookie7 👏👏
Is it normal that after 2 straight hours @ 60 grit on one side and still burns/pencil marks?? lol
My belt sander just gave out, I went to buy a new one on amazon and I found disc sanders, specifically makita disc sander, I was thinking about going that route instead of a new belt sander, any thoughts?
Will Fishing Personally I would have a belt sander on hand in addition to an orbital. If there is any considerable amount of sanding to do on the end grain, the belt will take it off so much quicker. Than orbital to fine finish. Just my opinion.
I bought a Wen belt sander because at the time I had very little $. I have been so impressed with this thing! It is a beast! If you are using 40-60 grit you better be prepared for a hell of an arm workout!
Of the three Titebond options, only Titebond 3 is food safe. 1&2 are not.
Do you recommend maple if I’m making one of these for outside? It’ll be for a grilling prep station.
I definitely don't reccomend end grain for outside but long grain maple will be awesome
Shout out to Tamar
Would this be possible to do this with just a mitre saw if you bought precisely machined par timber ?
*Assuming you have a sander and other miscellaneous stuff that all workshops have
If your miter saw cuts wide enough and you're prepared to do a lot of sanding.
@@katzmosestools
Thanks. It has alot of crosscut range so just gotta get to sanding
Heyoo!
Hello, excellent video and explanation, although my English is not very good, I would advise you to include videos with translations into Spanish on your channel, that would bring you a larger audience, look at the channel of your colleague called Wood Whisperer, I think it is a good example. Greetings from Argentina.
I have that belt sander. Mine has worked for more than 3 minutes, but is still a piece of garbage.
i bought a drum sander because i hated sanding end grain boards. lmao
Me too
As a wise man once said, "You know who has end grain cutting boards? Woodworkers and their families." xD
" If anything starts to rise, give it a good whack,..... Gentlemen"
😂💀
@@MJ-nb1qn
R.I.P.
ALSO, DON'T BE AFRAID OF YOUR PENCIL!
Me @ 6:51 "Ahh, he's got a Craftsman Handheld Belt Sander! That wasn't a dumb impulse purchase on my part!" Me @ 8:34 "Awww dammit"
$45 of wood, $45 of glue 😳😂
Maybe a lot more for the glue .... not judging but hope he scooped up that waste glue .....
@Ferd Dorst lets see your work :)
And sells for $45 on amazon it looks like to me. At least that's who you're competing with.
@Ferd Dorst attractive wood? What it's competing in a beauty pageant, is it!?
He's obviously saying Maple because you can get a good profit on it compared to other more available wood types!
Just FYI, I watched a video on America’s Test Kitchen where they compared cutting boards and they determined that end grain cutting boards do not make your knives last longer and because the have more glue joints they are more likely to split over time.
Sean Keehn Yes...a teak long grain board won for the second time in ten years.
They did call out that it was mass-produced boards being tested and hand made boards can be made more durable.
I’ve been thinking of easy Christmas gifts to make. I had no idea endgrain cutting boards went for so much. I just thought it was an aesthetics thing. Another awesome video. You’re a cool Kat(z)!
i heard they are considering renaming their company to bits bits
Shoutout to the guy heckling you on Instagram and you just fired a “👍” at him 😂😂😂 legendary move. Keep up the great work!!
People out here binge watching Netflix meanwhile I'm binge watching JKM, I can't get enough!!!! I can't wait to apply some of these techniques in my shop!
Andrei Rînea you really don’t 😜
That hit close to home 😂
My daughter and I bought some beeswax and mineral oil and made some "Goo" last week. I love it! So much easier to use than the Lowe's block conditioner.
***General rule of thumb... don't buy anything Craftsman that has an electrical cord attached.
I bought some CMT blades through your video when you just made it on the first day. I used it today for the first time and now I'm hitting myself for not putting that thing in when I first bought it.
OMG. Up till now i thought cleaning glue off was for the blades health BUT wow, its actually it will tilt your board through the planner. THNX, it just only took hundreds of vids for me to land on this gem 😁
They look really good! I just think that what you said about sanding was not quite right - if you use pencil, the parts where the pencil remains must be the LOW areas - so, you need to sand the WHOLE area down to those low parts. Yes??
Great video. This is a project that I mistakenly thought would be easy, but you’ve given some great tips and tricks and proven me wrong. Definitely giving this a try at some point, but I only have hand tools, so this should be fun, especially using my no.62 and sand paper 😣
Also, I’d like to put a hand up for the clamp video you mentioned you may do. Again, it’s something that seems so simple, but having looked into it, there’s a hell of a lot of choice. I’d also like to know why, how and where to put them during glue ups. Cheers 👍
"Upcoming clamp video" lay that Taylor Toolworks promocode on me dawg. Those new Taylor clamps are good nice.
Their parallel clamps are SO NICE! They can actually move back and forth easy. There's a lever on them that actually works. Unlike any parallel clamps I've used before.
Needs more glue. Rule of thumb: 1 qt of glue for every 6 sq in of surface area.
Thank you so much for this video, I have made some boards before watching this and it’s nice to learn what I did wrong👍
I use a cutting board almost everyday for vegetables so when I saw this video I thought to myself “I’ve got to make one of these”! Thanks for ALL the great videos Jonathan.
Just ordered the DOZUKI saw to go with my dovetail jig, looking forward to cutting my first dovetails soon.
P.s. for all you Europeans, CMT blades cost about as much as the diablos.
You should retitle your video to "Make a MARGINAL PROFIT with these........". Seems like you made these boards just before the huge surge in wood prices.
Just curious what the blue tape was for that you laid across the seems before trimming the board down was for. Haven't been wood with wood in 20 years and have decided to start my own little shop. Used to do cabinetry.
When he says "maple cutting board" does it mean hard or soft maple?
Totally loved the shout out to Tamar (@3x3Custom) cross-cut sled video at ua-cam.com/video/qscLKSQ_oCU/v-deo.html
I make end- grain boards, and in my experience the titebond 3 is hard as hell when it dries. The hardened glue makes the planing, sanding, and finishing a bit more difficult. The titebond 2 is more than sufficient for a board, since you're not ever going to submerge the finished product.
How do you know how much to charge? Have a 16x19x2 edge grain maple with 2 walnut strips. Also have a maple end grain with walnut strips 16x19x1
I consider myself an expert in using a belt sander. Been using a good one for 50 years. But I just got a Bosch 6 inch geared orbital sander with turbo mode. Made 4 end grain cutting boards with hard maple and walnut. After the last glue up, did all of the sanding with it. Started at 60 or 80 grit. Worked fantastic. Will probably never use the belt sander again. Thanks for all of the great videos that you do. Keep it up.
I used blue tape on my bar clamps and bound up and could hardy adjust the clamps. Make sure the tape is on tight. Just fyi. I've seen people use paraffin wax
What were the strips of Blue painter's tape for during the last cut up?
I like watching a guy play the accordion well, like anyone, but isn't this just a little much for a chopping block? The nice big piece of clear 8/4 hard maple you started out with looked just fine as it was! Just oil it up with the right kind of safe mineral spirits, and it is good to go, with minimal maintenance. Anyhow, impressive work, but a lot for a cutting board
Can't wait for the clamp video! I have pipe clamps but don't want to get stuff that I won't use and I do need more...lots more..!! haha
What’s a good platform you’d advise selling mid to high end boards on? Local community is kinda cheap😢
Let's be serious; there is no money left to be made with cutting boards, unless you do something completely out of the ordinary and then you need to see if it pays off... Lumber costs an arm and a leg, while stores like Marshall's sell boards out of India for next to nothing...