Build specs for this guide (note links listed here include affiliate links which may earn me a commission) Motherboard - MSI MAG Z790 Edge TI Max Wifi ua-cam.com/video/R7fBupUTXNI/v-deo.html CPU - Intel Core i9-13900K CPU amzn.to/3Ry7UAl RAM - Corsair Vengeance RGB DDR5 16GB x 2 6200MHz (go.corsair.com/eKAL3Z) NVMe - Corsair MP600 Elite NVMe - ua-cam.com/video/gI-vDRepE4s/v-deo.html Case - DeepCool CH560 Digital CPU cooler - Noctua NH-U12A Chromax Black PSU - Kolink Regulator 1000W PSU (ua-cam.com/video/sjEJrl294mI/v-deo.html) Fans - Lian Li TL120 and TL LCD ua-cam.com/video/fL4uYmJvnzc/v-deo.html GPU - Gigabyte RTX 3090 OC Vision amzn.to/49wqlg7 SSDs - Crucial MX500 2TB and Crucial BX500 2TB ua-cam.com/video/IOJNybKZ4wk/v-deo.html
I've come across a lot of computer assembly videos. For the first time, a content creator explained it like they're explaining it to a layman. I appreciate it :D
Amazing review - I am decisding between this and the micro atx version. I don't want to mess with rewiring the fan cables. Is it okay to have 3 into one motherboard fan header? or would you recommend the front 2 into the motherboard and the exhaust into another? thanks! - did you happen to do all 4 into one header?
Hello, I got this case and mounted all the parts, but the backfan flickers like pulsating light, especially in colors just white stays stable. I checked AND RECHECKED, all cables from behind and mounted on board. all other fans are ok just that one in particular. Any idea?
10 днів тому
it is possible to install 360 AIO on the top and left the rear fan there too - you just need to place AIO facing the tubes to other side (going to the front side instead of rear) and put the rear fan a bit lower (depending on the AIO radiator and fan size I think). there is not enough room to insert it there at first in this way, but it is possible via the front when you take off the front panel and fans (and return them later ofc).
Can you please do a video comparing gpu temps on vertical vs horizontal mount, there is currently no video anywhere related to this. Maybe you can do this video on ch360 so it will a new video. Anyway thanks for these beginner guides, I recently build my first pc in ch360.
Hi, just wanted to thank you for the detailed video especially regarding the cables connectivity. Just made a new build with this case and bought extra rgb fans and I was confused how to connect everything..but your video save slot of time and headaches. Thank you again!
Hello I bought the same case but for some reason the cpu and gpu reader on the front of the case doesn’t work for my build could I need to update my motherboard ?
Hello my friend, I have a Gigabyte X670 GAMING X AX V2 board, but I could not figure out the connection of your digital side screen in the heat of the processor and also the temperature of the graphics card can you help me connect it and show it Note that I connected it to the USB port but it did not work
I wanted to add 3 fans to the exististing 4 fans for a total of 7 fans with the rgb dependant on the motherboard rather than the controller. Is it possible to daisy chain all the RGB together while having the fan power going to different headers to avoid the concern you mentioned with 4 fans on one SYS_FAN? Example: RGB connections - all daisy chained to JARGB_V2_1 3 front intake fans - SYS_FAN1 1 back and 1 top exhaust fans - SYS_FAN2 2 bottom - intake fans - SYS_FAN3 Appreciate the input. P.S. If I seem naive it's because I am. This will be my first PC build.
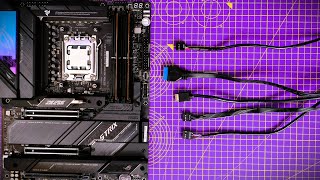
Hi when your connecting cpu cables to the motherboard would it be easier to uninstall the power supply and plug in all the cables to the motherboard. I’m having some trouble installing the cpu cables to the motherboard and I had to take off the cpu fan just to reach it.
When you plug in the 5v rgb connector to the motherboard, the plug should cover the white part on the motherboard. Otherwise the plug can come loose. It is a tight fit, so give it a good push.
Love it. What an excellent video the way you explain everything and demonstrate everything so even new pc builders can build there own pc. This video definitely deserve a like and comment and a sub Great work my man👍
I also purchased this case and before any of my builds, I do an inventory check. The manual says there is a screw for the tempered glass side panel, but mine never came with the screw. Did yours come with the screw for the side panel?
Question? What do you think of having bottom, front and rear fans as intake while the upper as one and only exhaust? Is the air cooling better or worst, when set on neutral or upper having faster rpm than the rest?
My only concern here would be the CPU cooler, naturally it lines up with the back fan and if it is running as intake you would clash too closely with the cpu cooler. If you reverse the direction seems much better but still clash somewhat with the front intake.
I just want to personally thank you for showing a in depth up close and personal tutorial on how to sync the rgb to the motherboard clearly and fast thank you again you saved me the trouble !


![КОРПУС с ГРАДУСНИКОМ за фуллпрайс [ DEEPCOOL CH560 DIGITAL ]](http://i.ytimg.com/vi/WmHrrcixNaI/mqdefault.jpg)


Build specs for this guide (note links listed here include affiliate links which may earn me a commission)
Motherboard - MSI MAG Z790 Edge TI Max Wifi ua-cam.com/video/R7fBupUTXNI/v-deo.html
CPU - Intel Core i9-13900K CPU amzn.to/3Ry7UAl
RAM - Corsair Vengeance RGB DDR5 16GB x 2 6200MHz (go.corsair.com/eKAL3Z)
NVMe - Corsair MP600 Elite NVMe - ua-cam.com/video/gI-vDRepE4s/v-deo.html
Case - DeepCool CH560 Digital
CPU cooler - Noctua NH-U12A Chromax Black
PSU - Kolink Regulator 1000W PSU (ua-cam.com/video/sjEJrl294mI/v-deo.html)
Fans - Lian Li TL120 and TL LCD ua-cam.com/video/fL4uYmJvnzc/v-deo.html
GPU - Gigabyte RTX 3090 OC Vision amzn.to/49wqlg7
SSDs - Crucial MX500 2TB and Crucial BX500 2TB ua-cam.com/video/IOJNybKZ4wk/v-deo.html
I've come across a lot of computer assembly videos. For the first time, a content creator explained it like they're explaining it to a layman. I appreciate it :D
Thanks. That's how I try to do things. Sub for more of it! :)
I love your laid back approach to describing products and your builds. So relaxing after a long day at work.
Thanks! Appreciate it. My style isn't for everyone but glad that you like it.
@@TheProvokedPrawnI forgot to ask. Why didn't you use the little temp monitor in the bottom right hand corner?
@@Aggressive_Splooge there's an issue with the USB connection I need to sort out before I do the review video later this coming week
Amazing review - I am decisding between this and the micro atx version. I don't want to mess with rewiring the fan cables. Is it okay to have 3 into one motherboard fan header? or would you recommend the front 2 into the motherboard and the exhaust into another? thanks! - did you happen to do all 4 into one header?
How come you don't show the temps, both vertically mounted and horizontally?
I am a failure i guess.
CH 560 is compatible with 360 AIO, but normal AIO like LS720 or LT720. No problem with rear fan. Ps. Problem is when use 14 cm rear fan and 360 AIO.
Hello, I got this case and mounted all the parts, but the backfan flickers like pulsating light, especially in colors just white stays stable. I checked AND RECHECKED, all cables from behind and mounted on board. all other fans are ok just that one in particular. Any idea?
it is possible to install 360 AIO on the top and left the rear fan there too - you just need to place AIO facing the tubes to other side (going to the front side instead of rear) and put the rear fan a bit lower (depending on the AIO radiator and fan size I think). there is not enough room to insert it there at first in this way, but it is possible via the front when you take off the front panel and fans (and return them later ofc).
Can you please do a video comparing gpu temps on vertical vs horizontal mount, there is currently no video anywhere related to this. Maybe you can do this video on ch360 so it will a new video.
Anyway thanks for these beginner guides, I recently build my first pc in ch360.
I added all fans on this case my cpu is hotter how its possible 3 front 1 exh back 2x140mm top exh
2 x 120mm bottom ...
Hi, just wanted to thank you for the detailed video especially regarding the cables connectivity. Just made a new build with this case and bought extra rgb fans and I was confused how to connect everything..but your video save slot of time and headaches. Thank you again!
Glad to be of assistance. Hope you appreciated enough to subscribe 🦐
mr prawn why not try a SFF 120 mm fan or a low profile fan on the back will it work? greetings from mexico.
Hello I bought the same case but for some reason the cpu and gpu reader on the front of the case doesn’t work for my build could I need to update my motherboard ?
Hello my friend, I have a Gigabyte X670 GAMING X AX V2 board, but I could not figure out the connection of your digital side screen in the heat of the processor and also the temperature of the graphics card
can you help me connect it and show it
Note that I connected it to the USB port but it did not work
I wanted to add 3 fans to the exististing 4 fans for a total of 7 fans with the rgb dependant on the motherboard rather than the controller. Is it possible to daisy chain all the RGB together while having the fan power going to different headers to avoid the concern you mentioned with 4 fans on one SYS_FAN?
Example:
RGB connections - all daisy chained to JARGB_V2_1
3 front intake fans - SYS_FAN1
1 back and 1 top exhaust fans - SYS_FAN2
2 bottom - intake fans - SYS_FAN3
Appreciate the input.
P.S. If I seem naive it's because I am. This will be my first PC build.
Did u build this? I added the top bottom fans i have more heat inside
Having the same issue with my screen, it’s simply not working
Hi sir! Will the Liquid freezer II 360mm fit in this case? Top mount?
Thanks mate !
I used my PC for one month not even knowing the fans got RGB
how to connect the led button to change colors ? please
Hi when your connecting cpu cables to the motherboard would it be easier to uninstall the power supply and plug in all the cables to the motherboard. I’m having some trouble installing the cpu cables to the motherboard and I had to take off the cpu fan just to reach it.
How do you remove the front panel?
It doesn't make sense that there is a shroud around where the meshed area is, since the shroud blocks the airflow from the mesh to the bottom fans.
When you plug in the 5v rgb connector to the motherboard, the plug should cover the white part on the motherboard. Otherwise the plug can come loose. It is a tight fit, so give it a good push.
🎉
My digital display doesn't work as well. Coincidence or we are both doing something wrong?
I broke mine. So that was my fault.
@@TheProvokedPrawn I saw somewhere that I actually need to download a driver from Deepcool. Will report what happens. Thx.
Love it. What an excellent video the way you explain everything and demonstrate everything so even new pc builders can build there own pc. This video definitely deserve a like and comment and a sub Great work my man👍
Much appreciated!
I also purchased this case and before any of my builds, I do an inventory check. The manual says there is a screw for the tempered glass side panel, but mine never came with the screw. Did yours come with the screw for the side panel?
You know I didn't check properly.
first of all the portrate of Leonardo di Caprio caught me of guard
Question? What do you think of having bottom, front and rear fans as intake while the upper as one and only exhaust? Is the air cooling better or worst, when set on neutral or upper having faster rpm than the rest?
My only concern here would be the CPU cooler, naturally it lines up with the back fan and if it is running as intake you would clash too closely with the cpu cooler. If you reverse the direction seems much better but still clash somewhat with the front intake.
I just want to personally thank you for showing a in depth up close and personal tutorial on how to sync the rgb to the motherboard clearly and fast thank you again you saved me the trouble !
Glad it was helpful!
Thank you for helping me build my first PC
Glad I could help! Hope you enjoy it
Whered you get the leonardo portrait?
Displate
So sick!
Keep up the good videos
Thanks! Will do!
New Subscriber , You save lives out here lol!
Not sure about that but I do try to help.
@@TheProvokedPrawn uk what I mean lol but yea I just really appreciate ur work
@@brandonramsaran8312 and I appreciate you watching and the kind words
@@TheProvokedPrawn sounds good brother ,Have a good rest of your day 😊
No dust filter?
There's mesh built into the front, a magnetic one on top and a small one under the PSU
@@TheProvokedPrawn niice! ty
Your voice makes me wanna sleep, come on show some enthusiasm man. Great video though!
Just have a nap
decent case albeit a little bit generic
most useful
Glad you thought so