Very nice kit from Airfix and you put it nice together. I remember from 30 years ago I needed to avoid brands like Revell, Matchbox and Airfix because of the bad fit and lack of detail but this looks very nice, especially for a 1/72 kit.
Really like this kit, it practically builds itself. I've built most of the new airfix kits, and I rate this up there with the Stuka as one of the best. I've built this twice and also have the "first and last" boxing with the GR1 and GR9, also a Sword T4, and look to get a Shar and AV8B+, want the whole family really.
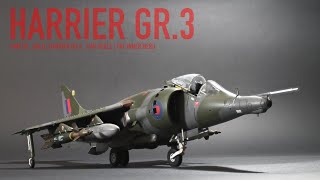
Fantastic result. All the postshading came out wonderfully and blended in well. And I think that olive drab on the leading edge of the tail is a dielectric section for some kinda avionics.
A well made model of the harrier GR.1 aswell as the Jaguar GR.1A would make a great gift for my tech teacher since he worked on parts for both aircraft back when he served for the royal airforce
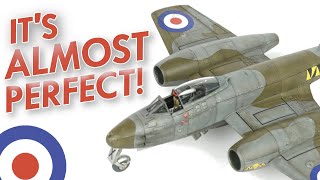
Great build and a great look. Just one point, the outboard trailing edge "flap" are not flaps they are ailerons and should be in the neutral position or with one slightly up and the opposite one slightly down as they are primary flight controls to control aircraft roll.
Your airbrushing skill is amazing 👏🏾 i use blu tack for soft-edge camo and draw a patter and use masking tape for hard-edge camo because im a lazy scale modeller 😂 Also, great build. Definitely subbing 👍🏾
Um trabalho magnífico, simplesmente uma obra de arte em um avião muito bonito. Infelizmente a Marinha do Brasil não introduziu esse belo avião.um abraço do Brasil.
@@ModellingWeekly I thought RAF uses light ocean and dark sea ocean grey and RAF dark green as the overall color schemes which tamiya has in their rangle.
@@ModellingWeekly When you buy today's model kits , their instruction has exact paint schemes compared to the 70/80s just use common dark green etc.. for RAF ,German tanks etc..
@@amuxpatch2798 Did you not hear what I just said? I used what I had, that matched the closest. This is also an Airfix kit, so there are no colour callouts for tamiya.
Looks great, Airfix have upped their game as seemed to fit together really well, great tip on using superglue with wheels...why haven't I thought of that !!
For future builders of the Harrier, the front exhausts only put out cold air so exhaust stains are minimal there. Not a criticism of your work at all. Finished with a lovely well used GR.3 giving air defence somewhere over West Germany 😊 Édit: to make a serious technical correction as pointed out by Lockspike below! Thanks, Ian
@@lockspike thanks for the correction, I got it the wrong way around and I bloody worked with the things. Thanks again, I will edit it but acknowledge you. Ian
The green panel on the fin fillet is a dielectric panel associated with radio/radar avionics. Usually it's in GRP, sometimes left in the natural resin colour, sometimes overpainted with whatever is handy.
Wondering when someone would have an answer! Thanks very much Paul! I thought it would be something to do with avionics, similar to the panel on the bottom of the buccaneer.
Great job on the Mk 9 Ejection seat, however, they did not have face curtain handles. The seat was initiated with the lower ejection handle between the legs.
Great vid...I'm just in the process of starting my GR1 Revell 1/32 scale Harrier so looking for techniques and inspiration...Lovely build...Unfortunately I was looking for something on the vents too which you missed out of this build vid...In reality I have seen them everything from gun metal, ,aluminium, pale beige to rusty and burnt on google images so still not sure where to go with mine for the best look...
Thanks man, your build sounds like a lot of fun! If you wanna play safe, best bet for the vents is aluminium I'd say, though the best option would probably be to find some sources that show the vents on real life aircraft
A very cool plane! I have the same but made by Mistercraft. Some of their kits are nice but they are very old, the particular kit was designed in 1969 and the fit is so bad that i have no idea how to fit wings geometry. Would you give Any advice how to fix this problem?
First time I've watched a video like this and I have to say I am staggered by the results, I would never have believed a lowly 1:72nd Airfix kit could look so stunning, I am very impressed by you're patience and skill ................... really irritating background music though 🙂
That Sir, is a excellent build, if you promise to post on a regular timeline I will subscribe, ok I will subscribe any how,, take care and keep safe and well in this crazy world, best regards from Australia.
I was brought an Airfix harrier model as a present It was all in a sea grey colour with highlights (tips of the missiles) in slightly darker grey. Also almost no decals. No roundels nor tail markings. Airfix chose a squadron which flew the most uninteresting aircraft it was possible to find. Bad parts fit and just a grey blob. Needless to say it was never displayed and sits in the garage tool store. It may be smashed up to be in a crash diorama. This example looks great. What they actually used colours apart from grey????
@@robertclare8496 thanks - I do admit they were a bit of a mess during the filming of this video...but then again, at least shoddy nails distract from any mistakes I make 😂


Very nice kit from Airfix and you put it nice together.
I remember from 30 years ago I needed to avoid brands like Revell, Matchbox and Airfix because of the bad fit and lack of detail but this looks very nice, especially for a 1/72 kit.
Absolutely beautiful finished model with great narration and camera perspective thanks for sharing 👏👏👏👏
Beautiful Harrier .. Great finish .
Thanks mate!
Really like this kit, it practically builds itself. I've built most of the new airfix kits, and I rate this up there with the Stuka as one of the best. I've built this twice and also have the "first and last" boxing with the GR1 and GR9, also a Sword T4, and look to get a Shar and AV8B+, want the whole family really.
Definitely the best from Airfix I've built. You're right in saying that it basically falls together, the fit was truly impressive.
Fantastic result. All the postshading came out wonderfully and blended in well. And I think that olive drab on the leading edge of the tail is a dielectric section for some kinda avionics.
Many thanks mate, very glad you liked it! I believe you're correct, it is some sort of avionics panel!
Really cool build, harriers are my favourite jet . I’m gonna need that tutorial 😂
Thanks Hamish :D It should be released soon enough lol
@@ModellingWeekly gran trabajo 👌✈️🇨🇱 a mí también me encanta el aeromodelismo ✈️
@@josealejandroalvaradobotei8584 😃😃 Muchas gracias!
Nice! Look forward to seeing your video on the camouflage!
Haha, thanks man! Vid will be out in about a weeks time now!
Excellent job!
@@OscarMcD. Thank you!
A well made model of the harrier GR.1 aswell as the Jaguar GR.1A would make a great gift for my tech teacher since he worked on parts for both aircraft back when he served for the royal airforce
It’s a GR 3
The ejection seat on GR.3 did not have a face screen handle, the primary ejection handle was in the seat pan.
Nice job. This was a fun kit and its sibling the SHAR FRS1 was just a fun.
For sure :D
Yes, I've had barely anytime for modelling recently because of school work :( Great Video. I'm working on airfix's wellington bomber!
Many thanks! Yeah, it's just that annoying time of the year! Enjoy your kit!
Hello mate!
@@juststuff8742 Hello mate
What now
@@juststuff8742 hi mate
Great build and a great look. Just one point, the outboard trailing edge "flap" are not flaps they are ailerons and should be in the neutral position or with one slightly up and the opposite one slightly down as they are primary flight controls to control aircraft roll.
Thanks for the info!
Excelente video 👌 abrazo desde 🇨🇱 a mí también me encanta el aeromodelismo ✈️
Your airbrushing skill is amazing 👏🏾 i use blu tack for soft-edge camo and draw a patter and use masking tape for hard-edge camo because im a lazy scale modeller 😂
Also, great build. Definitely subbing 👍🏾
😂 Many thanks man! I always like doing the soft edged camo, has a really cool effect to it! Glad you like it!
Um trabalho magnífico, simplesmente uma obra de arte em um avião muito bonito. Infelizmente a Marinha do Brasil não introduziu esse belo avião.um abraço do Brasil.
Excellent build as always. I sure miss this kit. It is a very fun build but it has not been available here in the states for a while.
Thanks 😁 That's a real shame, its a lovely little kit!
Nice!...I have an Airfix 1/48 GR3 we have a GR3 Harrier in a museum here in NZ .. thanks mate✈️🇳🇿
Great build there mate, looks ace!!
May have to get one myself now after that build.
Thanks!! It's a great kit, had loads of fun 👍 definitely worth picking up.
@@ModellingWeekly I thought RAF uses light ocean and dark sea ocean grey and RAF dark green as the overall color schemes which tamiya has in their rangle.
@@amuxpatch2798 yeah they do, I just don't have all the tamiya paints. Working with what I have. UA-cam pay is crap! 😂😂
@@ModellingWeekly When you buy today's model kits , their instruction has exact paint schemes compared to the 70/80s just use common dark green etc.. for RAF ,German tanks etc..
@@amuxpatch2798 Did you not hear what I just said? I used what I had, that matched the closest. This is also an Airfix kit, so there are no colour callouts for tamiya.
Awesome looking model
I appreciate it!
Looks great, Airfix have upped their game as seemed to fit together really well, great tip on using superglue with wheels...why haven't I thought of that !!
They have, some of their kits are pretty damn nice. Glad you appreciated that tip!
For future builders of the Harrier, the front exhausts only put out cold air so exhaust stains are minimal there.
Not a criticism of your work at all. Finished with a lovely well used GR.3 giving air defence somewhere over West Germany 😊
Édit: to make a serious technical correction as pointed out by Lockspike below!
Thanks, Ian
Thanks so much for the info :D
@@ModellingWeekly I got some great modelling tips from your video too😊
Sorry but it’s the rear nozzles that exhaust the hot air the fronts are cold
@@lockspike thanks for the correction, I got it the wrong way around and I bloody worked with the things.
Thanks again, I will edit it but acknowledge you.
Ian
Fantastic Harrier mate 🥇😊👍
Glad you like it!
I think it looks really good.
The green panel on the fin fillet is a dielectric panel associated with radio/radar avionics. Usually it's in GRP, sometimes left in the natural resin colour, sometimes overpainted with whatever is handy.
Wondering when someone would have an answer! Thanks very much Paul! I thought it would be something to do with avionics, similar to the panel on the bottom of the buccaneer.
Very effective, nice one 👍
:D Many thanks peter!
Great job on the Mk 9 Ejection seat, however, they did not have face curtain handles. The seat was initiated with the lower ejection handle between the legs.
Thanks for the info, but I think id still keep them on cause they look sick lol 😅
Great vid...I'm just in the process of starting my GR1 Revell 1/32 scale Harrier so looking for techniques and inspiration...Lovely build...Unfortunately I was looking for something on the vents too which you missed out of this build vid...In reality I have seen them everything from gun metal, ,aluminium, pale beige to rusty and burnt on google images so still not sure where to go with mine for the best look...
Thanks man, your build sounds like a lot of fun! If you wanna play safe, best bet for the vents is aluminium I'd say, though the best option would probably be to find some sources that show the vents on real life aircraft
Great job!
Thanks! 😄
Beautiful work!
Many thanks!
great job, thanks!! i got two waiting in me!!
A very cool plane! I have the same but made by Mistercraft. Some of their kits are nice but they are very old, the particular kit was designed in 1969 and the fit is so bad that i have no idea how to fit wings geometry. Would you give Any advice how to fix this problem?
Nice result 👍
😄😄
Very nicely done :)
Many thanks Matt! 😄
First time I've watched a video like this and I have to say I am staggered by the results, I would never have believed a lowly 1:72nd Airfix kit could look so stunning, I am very impressed by you're patience and skill ................... really irritating background music though 🙂
Glad you liked it overall :) yeah, the music in some of these older videos is a bit heavy lol, I now use a more peaceful track
I never worked on Harrier, but my guess would be that the "olive drab" panel was an aerial of some description.
More than likely!
MB Mk9 seat on the Gr3 did not have the ejection handles in the headrest.
Good to know, but it looks cool so I wouldn't have changed it :)
Good job! My grandad flew used to fly harriers, they are one my favourite jets.
What airbrush do you use?
That's awesome! I use an HS Infinity :)
@@ModellingWeekly thanks!
Great build, just a little picky point, the GR3 only had a seat pan firing handle, no face screen on the MK9 seat.
Thanks! And I appreciate the info, cheers mate
Well tidy Harrier, well tidy indeed.
haha thanks! :D
That Sir, is a excellent build, if you promise to post on a regular timeline I will subscribe, ok I will subscribe any how,, take care and keep safe and well in this crazy world, best regards from Australia.
😂 Thanks very much man! Glad to have you around :D
Is there a technic to put both wingtips-wheels on the ground?
Not really, I think it's just a design fault with the kit
With all or most harrier kits you need to put the main gear in last which then allows you too adjust up or down giving you all 4 points contact
Maybe you could do a tutorial on postshading?
Not a bad idea, might do that some time. I believe I covered it a little in my camouflage tutorial, though not in much depth
I was brought an Airfix harrier model as a present It was all in a sea grey colour with highlights (tips of the missiles) in slightly darker grey. Also almost no decals. No roundels nor tail markings. Airfix chose a squadron which flew the most uninteresting aircraft it was possible to find. Bad parts fit and just a grey blob. Needless to say it was never displayed and sits in the garage tool store. It may be smashed up to be in a crash diorama. This example looks great. What they actually used colours apart from grey????
That's a real shame!!! I have to say Airfix don't often choose the best schemes haha. Oh well, good luck with your future builds!
Dude, why didn't you get rid of seam lines?
I did...got rid of all of them...Where do you mean?
What glue are you using in this build?
CA glue for moe fragile parts, tamiya extra thin cement for the majority of it
@@ModellingWeekly Thanks, I've enjoyed watching your videos 👍 Just getting into scale modelling myself..
@@tail_lamp7538 no problem! And many thanks, glad you like the content 😊 if you ever need any advice feel free to ask
Is it ok for a beginner?, I want to get this as a gift
Yeah, it was a very easy build! Best in mind that it doesn't have glue or paint though
Never parked with nozzles down
Unfortunately at the 7 minute mark you've set both ailerons down and the flaps up. Should be the other way round. Wouldn't fly too well like that.
My bad. I intended to have the flaps and ailerons in a "parked" position after looking at reference pictures, but I suppose I cocked that up a bit lol
@@ModellingWeekly Thanks for the reply, still an excellent video.
Is this live?
Yep!
Now the real question is
When tomcat 😳😳😳😳
😮😮 Probably when I have got through Stash Towers first....
Nice work but this is the movies. Get a manicure 😃
@@robertclare8496 thanks - I do admit they were a bit of a mess during the filming of this video...but then again, at least shoddy nails distract from any mistakes I make 😂