I orders some vaneer from Etsy then started looking for videos how to apply to complex bodies and found this jem. Then I realized you're the same guy I ordered the vaneer from🤯! A+ keep up the good work
I hope the Curly Maple meets your needs. Etsy is only a small amount of my veneer inventory. I have over 1600 listings of veneer on Ebay as seller Thinwoodandoldtools.
I’ve used thick styrofoam to clamp veneers on the backs of guitar headstocks (back strap) after the volute/transition was curved. Glad to see someone else doing something similar.
This is great! I first built a vacuum bag, because my venner was a two piece flame maple, and i had to vacuum and sand the veneer pieces a few times to get a seamless centerline. But since my valve was not good enough (letting air in) I built this clamp also, and did a combination of gluing and vacuuming (to align and hold the veneer) while i install the clamp... worked like a charm 🤟🏻
Glad you enjoyed it. If it inspires you to try the process for your own project please send me some image of the completed project. I love to see what my customers make with the veneers I offer.
Tom, thanks for your video. I followed your technique for a new veneer on my LP, except I used 7/8" plywood because that's what I had on hand. I thought the foam would compress to fit the body but didn't realize compression was minimal and it needed to bend all around the outside edge, as well. The thick plywood didn't allow for that much bending. It pressed the raised center and top section nicely. I just need to add heat and moisture around the edges to reactivate the glue for a second press. I cut the center section out of the foam for a second pass at the press.
Thanks for letting us know the plywood thickness of the plattens are a concern. To thick and and you don't get the foam to compress around the contours completely.
I just bought a pommele sapele veneer from you yesterday. I will use it to trim a flat panel in my car. I appreciate your videos. This will be my first time doing any sort of decorative woodwork.
I'm glad it inspired you to attempt the project. A bit of advice, practice the entire process but don't open the glue bottle or use veneer. Practice with poster paper. Practice enough that you are comfortable with the clamping process. Clamping is the key to this and all veneer projects. Poster paper will flex around the curves similar to wood veneer. You have about 15 minutes of open time with PVA glues so you better know your clamping process well. Always good to have a second pair of hands and eyes around. Let me know how the project turned out.
Thank you for taking the time to make this tutorial. I was wondering if small sand bags can be used to fill the gaps before tightening it all down? Also, would there be any benefit to using a wood softener on the veneer?
This jig will work fine on a Strat body. Note the lack of an edge binding will leave a visible glue line. You can minimize it under your burst color. If possible, practice with scraps of veneer the sanding to a feather edge. Get your method down pat. You don't want to mess up a perfectly bonded veneer and ruin it with a sand thru.
Really cool video. Never thought about using rigid foam. I have a project coming up soon but I am using a bookmatched walnut burl veneer and I am not sure if this method would work as it might pull apart the two halves of the bookmatched veneer.
If you join the book match pair first and treat as a single sheet. You can even apply a smidge of adhesive on the glue side first and let dry. This will create a barrier to adhesive squeeze thru at the join line. Be sure you mark center on the guitar body and use it to align to center.
Great video! I hope to try your techniques and veneer to replace a cracked and badly stained one on a cheap LP clone guitar I have. Are there certain veneers that are most forgiving for a newbie trying to do this job? Do you have lightly flamed maple or similar wood in a size that would do the job? Also, I don't see any mention of veneer softeners, but is that something you routinely use for this process? Thanks!
Could you brief if the same method shll be used on two piece maple? Is it going to be one time press for both of the pieces or one at a time, to get a good center line joint thanks a lot.
You can 'join' the two pieces with veneer tape to make one large panel. Veneer tape is a similar to old fashion postage stamps where you wet the glue and placed over the join line. When dried it makes a rigid glue joint. It is then removed by wetting it after you bond the veneer to the guitar.
Thanks for the information, didn’t see you using a veneer softener could you advise some home use available will appreciate it a lot. ( or if there is even need for one.) Thanks🎉
Hello, thx for video it's pretty good and i got a question please... At the bottom of the guitar (right side) i can see a part of veneer has gonne, it's a small part but it is noticable... How do you deal with that?
Glad you like the video. That missing spot was caused by me. In a rush I snagged cloth on a bit of veneer that was overhanging that area. The veneer simply was pried off the body. A piece that small can be patched in with Super glue.
What method would you use to cut the veneer on existing pickup holes? Is a router okay to use to cut the veneer on the outside of the body and in the existing pickup holes without damaging the veneer once its glued to the body?
For the existing holes I would use a #11 Xacto blade. Make shearing cuts using the hole sides as your guide. Only push down to sever the wood fibers. This way you won’t pull up any fibers at the edge. A flush trim router bit can work. But you risk pulling off some of the wood fibers leaving a jagged edge. I like the control I have with hand trimming. Figured veneers like curly maple have short fibers and tend to crumble if enough pressure is applied.
Providing adequate clamping pressure to the veneer at the point where the neck joins the body is the key. A shim ( proud of the fretboard) of rigid foam placed over the veneer in that area prior will allow the top layer rigid foam to push down over that area with out having to conform to the shape of the body and neck.
Sorry, but the original conundrum was how to do it on a Les Paul with a glued neck. In your demo it was a bolt on - in which case, of course, use the vacuum.
The guitar that was the inspiration for the video was already returned to the owner. The body I used in this video was a spare I had laying around. I agree vacuum pressing is the superior method of bonding veneers to a flat or complex curved substrate. Most of my customers are single project luthiers and investing in a vacuum press kit may seem too expensive.
This is the issue I’ve faced vacuum pressing. A Flying V with a fixed neck. How would you even do that!? 😂 I used the method in this video and so far so good. That said, it’s my first time using TB cold press glue, and it’s crept a little and didn’t allow much alignment time. The Ash Burl veneer began puckering almost immediately! Scary. Glad I did a dry run first as recommended here.
This is a wonderful explanation! I I've never done veneer work before...I had fantasised this could be a good strategy, but I was afraid the veneer would crack or wrinkle when pressed against a curved 3D surface. I assume at that thinness the veneer is elastic enough to adapt? Anybody minds to explain? 🙏
Many wood veneers are flexible enough to bend over gentle curves as found in a guitar body. Burls even more so. If you have questions I'm happy to advise anytime.
@@volpewoodworks9286 Thanks for your reply! Would you say a veneered top could have a multi colour/multi-layered staining applied to it? I've seen this method of colouring with one colour then sanding; colouring again and sanding etc.
@@juanpabloyanez5350 Yes, wood veneers will accept a dye or stain like solid wood. Two things to consider first. Check for glue squeeze thru. Especially at a joint or seam. Nothing kills the look of a figured wood like an area where the stain was not absorbed properly. The second thing is the amount of sanding. Sanding thru the veneer is heartbreaking. If you have the opportunity it's best to get your dye/stain process perfected on a test veneer first. So save your cut offs.
Great video! I’m getting ready to tackle a veneer project on an old soloist style body. Mostly flat except for the for arm contour. Would you recommend this method for the fore arm contour?
Yes you will have no problem getting the foam to flex over the contour. Just make sure you make a few dry runs to so you know where to place the clamps.


I orders some vaneer from Etsy then started looking for videos how to apply to complex bodies and found this jem. Then I realized you're the same guy I ordered the vaneer from🤯! A+ keep up the good work
I hope the Curly Maple meets your needs. Etsy is only a small amount of my veneer inventory. I have over 1600 listings of veneer on Ebay as seller Thinwoodandoldtools.
I would have thought this would have been a lot more difficult. Thanks for the video!
You are welcome
I’ve used thick styrofoam to clamp veneers on the backs of guitar headstocks (back strap) after the volute/transition was curved. Glad to see someone else doing something similar.
Thank you, Tom! I appreciate this. You made this a lot simpler than I was expecting. Thanks again and I’ll send you those pictures soon.
Yes please send me some images of the completed project.
This is great! I first built a vacuum bag, because my venner was a two piece flame maple, and i had to vacuum and sand the veneer pieces a few times to get a seamless centerline. But since my valve was not good enough (letting air in) I built this clamp also, and did a combination of gluing and vacuuming (to align and hold the veneer) while i install the clamp... worked like a charm 🤟🏻
A vacuum press is the superior method of bonding veneers. This jig is will get you by until you want to invest in a vacuum press setup.
Wow this is the best video on UA-cam for this technique. Lots of great information. Thank you for posting!
Glad you enjoyed it. If it inspires you to try the process for your own project please send me some image of the completed project. I love to see what my customers make with the veneers I offer.
Tom, thanks for your video. I followed your technique for a new veneer on my LP, except I used 7/8" plywood because that's what I had on hand. I thought the foam would compress to fit the body but didn't realize compression was minimal and it needed to bend all around the outside edge, as well. The thick plywood didn't allow for that much bending. It pressed the raised center and top section nicely. I just need to add heat and moisture around the edges to reactivate the glue for a second press. I cut the center section out of the foam for a second pass at the press.
Thanks for letting us know the plywood thickness of the plattens are a concern. To thick and and you don't get the foam to compress around the contours completely.
@@volpewoodworks9286 so no thicker than 3/8” on the plattens? Would 1/4” be too thin?
@@garyglasscock9217 my plywood was BB. 1/4” CDX may flex to the point of destruction. Make a dry run with two layers of 1/4.
I just bought a pommele sapele veneer from you yesterday. I will use it to trim a flat panel in my car. I appreciate your videos. This will be my first time doing any sort of decorative woodwork.
great video! you learn something everyday you just save me Sir! for not buying a vacuum veneer machine now I'm subscriber thank you for posting this.
Glad to know you like the video. I would love to see some images your completed project.
Valuable information, perfectly illustrated, thanks Tom.
I thank you for the compliment.
Exactly what I was looking for thanks. About to attempt my first veneer on an old bass guitar
I'm glad it inspired you to attempt the project. A bit of advice, practice the entire process but don't open the glue bottle or use veneer. Practice with poster paper. Practice enough that you are comfortable with the clamping process. Clamping is the key to this and all veneer projects. Poster paper will flex around the curves similar to wood veneer. You have about 15 minutes of open time with PVA glues so you better know your clamping process well. Always good to have a second pair of hands and eyes around. Let me know how the project turned out.
Thanks Tom! Great information for adding veneer without a vacuum bag!
Thanks , that is awesome will be trying this method in near future. Very helpful
Let me know how it turns out for you.
Thanks, Paul - I just purchased some pomelle sapele from you. Looking forward to doing my own veneer jobs.
Great video, thanks for sharing your experience and knowledge Tom
Glad it was helpful!
That looks fantastic. Well done!
Thank you.
This is a great help and saves me tons of $$$. Thank you.
Lovely! Thanks for the very good suggestion !!!
Thanks Tom! I’m going to give it a shot!
Just shipped your veneer. I added a few scraps so you can practice with.
Thank you for taking the time to make this tutorial. I was wondering if small sand bags can be used to fill the gaps before tightening it all down?
Also, would there be any benefit to using a wood softener on the veneer?
I can see sandbags working just fine. Yes a veneer softener will improve your chances of the veneer flexing over the tight radiuses.
Great job buddy would like to try this on a Stratocaster guitar and then spray a sunburst finish to blend the edges
This jig will work fine on a Strat body. Note the lack of an edge binding will leave a visible glue line. You can minimize it under your burst color. If possible, practice with scraps of veneer the sanding to a feather edge. Get your method down pat. You don't want to mess up a perfectly bonded veneer and ruin it with a sand thru.
Really cool video. Never thought about using rigid foam. I have a project coming up soon but I am using a bookmatched walnut burl veneer and I am not sure if this method would work as it might pull apart the two halves of the bookmatched veneer.
A book matched pair is a good subject for a future video.
Very helpful! Thanks so much.👍🏼✌🏼
Thank you for the tip
I have used a domestic vacuum cloths bag that works well...How do would you adhere a center seam book matched maple veneer ??
If you join the book match pair first and treat as a single sheet. You can even apply a smidge of adhesive on the glue side first and let dry. This will create a barrier to adhesive squeeze thru at the join line. Be sure you mark center on the guitar body and use it to align to center.
Great video! I hope to try your techniques and veneer to replace a cracked and badly stained one on a cheap LP clone guitar I have. Are there certain veneers that are most forgiving for a newbie trying to do this job? Do you have lightly flamed maple or similar wood in a size that would do the job? Also, I don't see any mention of veneer softeners, but is that something you routinely use for this process? Thanks!
Could you brief if the same method shll be used on two piece maple? Is it going to be one time press for both of the pieces or one at a time, to get a good center line joint thanks a lot.
You can 'join' the two pieces with veneer tape to make one large panel. Veneer tape is a similar to old fashion postage stamps where you wet the glue and placed over the join line. When dried it makes a rigid glue joint. It is then removed by wetting it after you bond the veneer to the guitar.
Thanks for the information, didn’t see you using a veneer softener could you advise some home use available will appreciate it a lot. ( or if there is even need for one.) Thanks🎉
Hello, thx for video it's pretty good and i got a question please... At the bottom of the guitar (right side) i can see a part of veneer has gonne, it's a small part but it is noticable... How do you deal with that?
Glad you like the video. That missing spot was caused by me. In a rush I snagged cloth on a bit of veneer that was overhanging that area. The veneer simply was pried off the body. A piece that small can be patched in with Super glue.
What method would you use to cut the veneer on existing pickup holes? Is a router okay to use to cut the veneer on the outside of the body and in the existing pickup holes without damaging the veneer once its glued to the body?
For the existing holes I would use a #11 Xacto blade. Make shearing cuts using the hole sides as your guide. Only push down to sever the wood fibers. This way you won’t pull up any fibers at the edge.
A flush trim router bit can work. But you risk pulling off some of the wood fibers leaving a jagged edge. I like the control I have with hand trimming. Figured veneers like curly maple have short fibers and tend to crumble if enough pressure is applied.
Great video! I'll be trying this method on my new guitar project. Any tips on doing this with a book-matched top?
Yes, I'm happy to advise. Please reach out to me via email. tom@volpewoodworks.com
How would you do this to a set neck contoured top?
Thank you
Providing adequate clamping pressure to the veneer at the point where the neck joins the body is the key. A shim ( proud of the fretboard) of rigid foam placed over the veneer in that area prior will allow the top layer rigid foam to push down over that area with out having to conform to the shape of the body and neck.
Thank you!
How much would you charge to "reveneer" my Ibanez Les Paul if I provide the spalted maple veneer?
Sorry, but the original conundrum was how to do it on a Les Paul with a glued neck. In your demo it was a bolt on - in which case, of course, use the vacuum.
The guitar that was the inspiration for the video was already returned to the owner. The body I used in this video was a spare I had laying around. I agree vacuum pressing is the superior method of bonding veneers to a flat or complex curved substrate. Most of my customers are single project luthiers and investing in a vacuum press kit may seem too expensive.
This is the issue I’ve faced vacuum pressing. A Flying V with a fixed neck. How would you even do that!? 😂 I used the method in this video and so far so good.
That said, it’s my first time using TB cold press glue, and it’s crept a little and didn’t allow much alignment time.
The Ash Burl veneer began puckering almost immediately! Scary. Glad I did a dry run first as recommended here.
Cut a notch for the end of the fretboard.
Absolutely.
This is a wonderful explanation! I I've never done veneer work before...I had fantasised this could be a good strategy, but I was afraid the veneer would crack or wrinkle when pressed against a curved 3D surface. I assume at that thinness the veneer is elastic enough to adapt? Anybody minds to explain? 🙏
Many wood veneers are flexible enough to bend over gentle curves as found in a guitar body. Burls even more so. If you have questions I'm happy to advise anytime.
@@volpewoodworks9286 Thanks for your reply! Would you say a veneered top could have a multi colour/multi-layered staining applied to it? I've seen this method of colouring with one colour then sanding; colouring again and sanding etc.
@@juanpabloyanez5350 Yes, wood veneers will accept a dye or stain like solid wood. Two things to consider first. Check for glue squeeze thru. Especially at a joint or seam. Nothing kills the look of a figured wood like an area where the stain was not absorbed properly. The second thing is the amount of sanding. Sanding thru the veneer is heartbreaking. If you have the opportunity it's best to get your dye/stain process perfected on a test veneer first. So save your cut offs.
Great video! I’m getting ready to tackle a veneer project on an old soloist style body. Mostly flat except for the for arm contour. Would you recommend this method for the fore arm contour?
Yes you will have no problem getting the foam to flex over the contour. Just make sure you make a few dry runs to so you know where to place the clamps.
How did you cut the pickup cavities out?
It was a pre cut body fully routed and bound. I simply added the veneer.
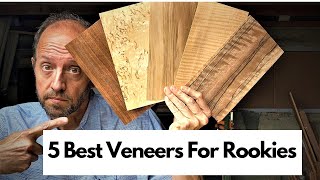
Where did you get the vaneer from
I have a limited supply of Pommelle Sapele in my eBay store Thinwoodandoldtools. I have over 1200 lots of various veneers listed.
Neat!
Glad you like it.