How To Use An RTC (Real Time Clock) With Arduino Uno R3 | Make an Accurate Clock!

Вставка
- Опубліковано 8 лип 2024
- First a simple example using only an Arduino Uno R3 and a DFRobot DS1307 RTC Module - then incorporating an LCD Display + three buttons to make a Functional, Accurate, Digital Clock.
The Full Article with Code and Libraries - core-electronics.com.au/tutor...
Related Information
Arduino IDE Download - www.arduino.cc/en/software
Arduino Workshop - core-electronics.com.au/tutor...
Arduino IDE Overview - core-electronics.com.au/tutor...
Arduino Boards Compared - core-electronics.com.au/tutor...
Info on Breadboards - core-electronics.com.au/tutor...
Heaps of Projects for Inspiration - core-electronics.com.au/projects
I Remixed the Code to Work with Nixie Tubes - / cs0jciitu2o
Today I will show you the Hello World equivalent usage of a RTC (real time clock) and demonstrate how to create an accurate clock with three functional buttons that will still keep the time even when you pull the plug. I'll show exactly how to use a RTC, how to bread-board and how to make three components, a DFRobot Gravity: I2C DS1307 RTC Module, a DFRobot Gravity: I2C LCD1602 Arduino LCD Display Module and the Italian micro-controller stallion that is the Arduino Uno R3 work in harmony. The Arduino Uno R3 is perfect for a job like this as we can tell it exactly what to do and it will perform that job every time and the instant it turns on. It also has great support for all kinds of maker hardware so you can use it for this project then pull it out, re-flash the code and throw it into a whole different setup doing a completely different task. The DFRobot Gravity RTC clock used here will function for 5 years from when the button battery is inserted providing accurate time for that whole length of time. This has the new version DS1307 RTC module which adopts a high precision crystal oscillator. Testing conducted shows the time error is only about 1 second in 24 hours (for comparison the average time error of Mechanical Watches is about 20s). For this setup here I used a DFRobot Gravity LCD Display. This one is neat because the contrast is automatically done (no fiddling with a potentiometer required) and it comes backlit out of the box. I explain all the code, how to set up Arduino IDE and provide schematics. With all the code already downloaded to the Arduino, this would make for a very fun bread-boarding experiment with a very rewarding conclusion. It is very tactile and would consistently tell the correct time even when powered down. I can see it being implemented as a school lesson over a double period. I also see this as a great springboard to create your own clock creations with the Arduino being used with other exotic display methods (like Nixie Tubes) or improving the code to creating new features (such as multiple clocks running for different locations in the world).
If you have any questions about this content or want to share a project you're working on head over to our maker forum, we are full time makers and here to help - coreelec.io/forum
Core Electronics is located in the heart of Newcastle, Australia. We're powered by makers, for makers. Drop by if you are looking for:
Arduino Uno R3: core-electronics.com.au/catal...
DFRobot Gravity: I2C DS1307 RTC Module: core-electronics.com.au/catal...
DFRobot Gravity: I2C LCD1602 Arduino LCD Display Module: core-electronics.com.au/catal...
A to B Peripheral Cable: core-electronics.com.au/catal...
Jumper Wires: core-electronics.com.au/catal...
Breadboard: core-electronics.com.au/catal...
330 Olm Resistors: core-electronics.com.au/catal...
Sweet Buttons: core-electronics.com.au/catal...
0:00 Intro
0:13 Real Time Clock Overview
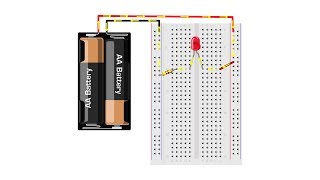
0:44 Simple Connecting RTC to Arduino
1:27 Simple Schematic
1:31 Button Battery into RTC
1:41 Connect Set-Up to a Computer
2:00 Arduino IDE Set-Up and Flash Code
2:53 Establish Communication with RTC!
3:22 Quick Look at the Code
4:06 Lets make an Accurate Arduino Clock with LCD Display
4:16 Time-lapse
4:26 Schematic of Accurate Clock
4:31 Overview of Accurate Clock
6:47 Flash the New Code to the Arduino
7:30 Let Me Show You Its Features
8:06 Outro


Such a good explanation for an Arduino circuit. So easy to follow even though these projects can be so confusing and intimidating. Thanks for the great video!
Clear explanation, clear sound, clear English, not too loud or too quiet, no annoying background music...
Thank you for making a professional video!
👍🏻
Wow impressive! I've never seen buttons to set the time. Good job! 👍
Well explained, thank you for the video
Thanks for showing how to program time without using the PC time, haven't found that anywhere else.
Nice little RTC tutorial! :)
Nice video, thanks!
Bro, that intro beat got me to subscribe.
thank you miss
I have a similar RTC clock running on an Uno with an LCD display, seems to me the code I used loaded the time from the computer used to program the Uno so I didn't have to set the initial time. The only problem is if/when the time becomes inaccurate or daylight savings comes around, I have to upload the code again. It would be simpler to do it your way. As I have the same components except for the buttons, I will add them next time I need to adjust it. Thank you, really learn a lot from your channel.
awesome video :)
Good job
Hi thanks for the vid! How can i add alarm to the clock with a button to turn off the alarm?
great thx !!!
awesome!
This is a great tutorial, thank you so much.
I only have a regular lcd 16x2 that comes in the mega2560 kit. Is there much difference in coding or libraries to use this one instead? I have my project set up and the lcd is working. Any help is greatly appreciated
I’m still learning and have a long way to go.
Wanting to build a clock with dual time zones (Local and UTC) Date for local, even current temp of my ham shack (or possibly monitoring my Battery temp) can this be done with one Mega or R3 and the large LCD display.
Can we add alarm mode in this..if yes can you give me some tips?
If there's is only one Sda and scl and are connected to RTC and LCD how to differ communication between the two from arduino... Becoz there's only two wires (SDA &SCL) for two components that require seperate sda and scl right... How did you do that ?
i have to admit this is the best Arduino video I've ever seen, please assist with something,can i set multiple "times" let's say i want to use it for watering my garden but I want it to do it at different time intervals, how must i go about writing the code? thanks in advance
Thank you kindly mate, come make a forum post (link in description) on your idea and then we can give you a much better hand than I can here 😊
Great video! One question though. Is it possible to switch the DS1307 with a DS3231 instead? I know a different library is required, but will the final code (the one with the LCD and DFRobot library) work the same?
There will be some Arduino code changes that you will need to make. Here are some great examples of using it with Arduino IDE - lastminuteengineers.com/ds3231-rtc-arduino-tutorial/
@@Core-Electronics thank you so much for the response! Though I've decided to go for a different model for my clock, the website definitely helps a lot!
Nice video, can I use this for controlling water spray schedule for my garden? is the clock accurate?
Cheers mate and you definitely could set up a system to do that with this. The DS1307 RTC used here makes the clock very accurate with a time error of only about 1 second in 24 hours.
@@Core-Electronics thats pretty cool for this price range, I guess it will be robust for 1 year usage. several minutes error should be ok for scheduling in garden
how about lunar calendarr sir, can u teach me????
Hello, any tips on how to make it so I press a button and it displays the time in the serial monitor?
Definitely possible mate, check out this guide to give you a feel of what to do - www.letsstartcoding.com/chp-3-serial-print-button-press. If you still run into issues come pop me a message on our forum 🙂 that way we can get our whole team to help you.
@@Core-Electronics I was trying to do it with interrupts but for some reason I couldnt do it, I then tried with the help of your website and it finally works. Thank you very much.
Does the type of RTC you are using matter?
how to SET RTC and How to SET ALARM ? any viode ?
How can I add an alarm to the code?
i followed this to the letter but the buttons do nothing and display just scrolls through options as if button stuck on tried different buttons but same
Heyya mate, triple check your wiring. It seems to me some power is leaking through producing false positives causing the screen to flick through the display UI. If you continue running into problems write up a post here with some pictures and I'll get your system up and running 😊 forum.core-electronics.com.au/
There are a lot of errors in the text file for the clock that has "Include" with no file names and other things so it won't compile! Should have tested this first before publishing it!
gabi néni technika órát tart...
not working
audio out of sync
Are you sure? When does it do that?
U are teaching POWER line or RTC... ?? CONFUSED?😂