How did you rotate the image? At 2:53 in the video, you are able to grab the image and move it around. I am only able to spin the image around on one axis, not flip/rotate to look at it from every angle.
Hi Jasen. It is done by holding the middle mouse button down and then moving it to rotate. Here is a video explaining all of the controls in the 3D view - learn.carveco.com/getting-started/3d-view-controls/
Hi, is it possible to export the 3D work done in Carveco for 3D printing, for example? Technically speaking, the question is whether it is possible to export the model in .STL format.
I think our brains are connected because I’ve been going down a rabbit hole for this exact purpose since 30 minutes ago… I’ll reply back if I find any leads lol
@@jontaylor4007 i have days finding a answer to that , honestly i bought this software just for that tool, but can't find now a way to export in stl files
@@xxcabritaxx7919 it looks like once you create the triangle mesh, a selection appears above the “create” button so you can export it. If you’re on windows, it seems like you click the drop down where it says file type and select .STL
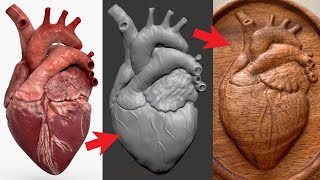
It appears that with this image, the profile is above the surface of the wood. Or, is it the the surface outside the image would be machined down and then the detail of the image be done?
How are you able to move your model around for different views? Nothing I do will let me grab and move. Is there a list of commands? I'm incredibly new to this stuff.
Hi Thomas, If you're looking to get different views on your model have a look at this short video: learn.carveco.com/getting-started/3d-view-controls/ For positioning relief artwork, the main rule is that anything gold is 'pasted down' and anything blue is 'floating'. When it's floating, you'll be able to position, transform the size, change the z-height, rotate it etc... These kind of operations can't be performed when relief models are pasted down. Here's a few useful resources for additional help and documentation: learn.carveco.com/tips-and-tricks/accessing-inline-help/ learn.carveco.com/tips-and-tricks/accessing-reference-help-documentation/ facebook.com/groups/carveco Hope that helps
This was a long time ago! I'm guessing it was a jpg. Carveco can import jpg, bmp, gif, png, tif. Pretty much any standard picture format. If you still cant open it, send it over to our support team - support@carveco.com and they will be able to tell you why it wont import.
@@mfmageiwatch you can export grayscale images from blender. you can either import flies in or create 3d object in blender and export them for perfect use in 3d printing ect
thanks for the amazing program and videos, i have a question , the effect on the Pegasus no matter which picture i use i cant get that effect i only get like you had with the boy's picture can you advice please it was the main purpose of subscribing to the program actually , watched almost all of the videos many times and still couldn't figure it out , Using Carveco Maker.
Hi Mohd, the Pegasus picture is a greyscale image that has been saved from a 3D relief, it is not a standard greyscale picture. If you type in google "greyscale relief image" you should see lots of pictures like it show up. When these are imported, they will import like the Pegasus in the video. If you are still having problems then please send support@carveco.com a message and they will be happy to help.
@@Carveco thanks for the replay , i had it figured it out after hour of searching , for a totally newbie like me i guess it wont hurt if you've mentioned it in the video :) thanks again.
I am having issues where everything I make has a ton of bumps and low spots where it should be smooth. I'm sure it's because of different colors in the image. It would be helpful if you actually used the image you imported to finish the demonstration. Going to the point where it is opened, then using a clean modeled stl doesn't help us relief carve an image. Please can you show the rest of the process and how to deal with issues like dark colored clothing or fur. In the video, we can see the boys shirt is a series of tall rectangles and his face is pushed back instead of coming forward.
Hi, you may want to email support@carveco.com to get a more detailed response. But, normally using the smooth tool will smooth out those sharp area's and if you want to flip the relief then use the "Invert Relief" tool which will give you the opposite to what is being shown.
Thanks Chad, I will be sure to pass on the feedback. This is a video explaining how to create reliefs from images. If you want to rotate, then I would suggest watching this video, although you can only rotate when the relief is blue - learn.carveco.com/3d-design-reliefs-and-models/copying-relief-clipart/
@@Carveco did you watch the video. He put the image on a yellow background. He rotate it and then raised and lowered the depth of the picture. He did not explain how to do that. So, how does that help me if i dont know how to do it. His screen had a yellow background and the picture on it. He flipped it and moved it.
@@chade74 Yes, I have watched the video. There is a section at 2.30 that talks about adjusting the height where it states that you can use either the red arrow to adjust the height or input the size into the z area of the transform tool. It shows this on screen.
@@chade74 Apologies Chad, but I am not sure what it is that you want to actually do. I would contact support@carveco.com, illustrating exactly what you are trying to do. Please feel free to include screenshots from the video of the parts that you are stuck with.


This is a solid feature for Maker, thanks for the tut.
How on earth do you remember all this, great content and so well explained.
Why does this come in as a neg z? Example of 10:10? What if you wanted the image as a dome or a pos z
How did you rotate the image? At 2:53 in the video, you are able to grab the image and move it around. I am only able to spin the image around on one axis, not flip/rotate to look at it from every angle.
Hi Jasen. It is done by holding the middle mouse button down and then moving it to rotate. Here is a video explaining all of the controls in the 3D view - learn.carveco.com/getting-started/3d-view-controls/
Hi, is it possible to export the 3D work done in Carveco for 3D printing, for example? Technically speaking, the question is whether it is possible to export the model in .STL format.
I think our brains are connected because I’ve been going down a rabbit hole for this exact purpose since 30 minutes ago… I’ll reply back if I find any leads lol
@xxcabritaxx7919 Looks like there is and they have videos linked on their site under their 3d design, reliefs, and models section.
@@jontaylor4007 i have days finding a answer to that , honestly i bought this software just for that tool, but can't find now a way to export in stl files
@@xxcabritaxx7919 it looks like once you create the triangle mesh, a selection appears above the “create” button so you can export it. If you’re on windows, it seems like you click the drop down where it says file type and select .STL
@@jontaylor4007 yeahhhh just i found it jajaja we are thinking the same as you said ejejej..!!!
It appears that with this image, the profile is above the surface of the wood. Or, is it the the surface outside the image would be machined down and then the detail of the image be done?
In new version craveco maker i cannot find lights and material tab on the top.
How are you able to move your model around for different views? Nothing I do will let me grab and move. Is there a list of commands? I'm incredibly new to this stuff.
Hi Thomas,
If you're looking to get different views on your model have a look at this short video: learn.carveco.com/getting-started/3d-view-controls/
For positioning relief artwork, the main rule is that anything gold is 'pasted down' and anything blue is 'floating'. When it's floating, you'll be able to position, transform the size, change the z-height, rotate it etc... These kind of operations can't be performed when relief models are pasted down.
Here's a few useful resources for additional help and documentation:
learn.carveco.com/tips-and-tricks/accessing-inline-help/
learn.carveco.com/tips-and-tricks/accessing-reference-help-documentation/
facebook.com/groups/carveco
Hope that helps
Thank you
what format is the picture? wasn't mentioned, is it a jpeg or what? I've tried this and it tells me wrong format.
This was a long time ago! I'm guessing it was a jpg. Carveco can import jpg, bmp, gif, png, tif. Pretty much any standard picture format. If you still cant open it, send it over to our support team - support@carveco.com and they will be able to tell you why it wont import.
can you export a grayscale image from the relief you generated?
Did you ever find out?
@@mfmageiwatch you can export grayscale images from blender. you can either import flies in or create 3d object in blender and export them for perfect use in 3d printing ect
Hello, i have question. I wanna know how can i prepare a image for Carveco or tell me your pegasus in which program it is made ?
Hi Ignat, it is a greyscale image exported from a 3D Relief. It could come from any modeller that can export out as a greyscale tif.
The reliefs were done in Maker and not Maker + ?
Hi James, this video is all Carveco Maker. You can create reliefs from images in just Maker.
Well done.
I am unable to change the relief height. Every time I enter a higher vale and click apply it returns to 0 mm…. Can you advise?
I would contact our support team support@carveco.com and they will be able to help you out.
thanks for the amazing program and videos, i have a question , the effect on the Pegasus no matter which picture i use i cant get that effect i only get like you had with the boy's picture can you advice please it was the main purpose of subscribing to the program actually , watched almost all of the videos many times and still couldn't figure it out , Using Carveco Maker.
meh thanks for not replying , figured it out , it only works with Grayscaled images xD
Hi Mohd, the Pegasus picture is a greyscale image that has been saved from a 3D relief, it is not a standard greyscale picture. If you type in google "greyscale relief image" you should see lots of pictures like it show up. When these are imported, they will import like the Pegasus in the video. If you are still having problems then please send support@carveco.com a message and they will be happy to help.
@@Carveco thanks for the replay , i had it figured it out after hour of searching , for a totally newbie like me i guess it wont hurt if you've mentioned it in the video :)
thanks again.
@@mnr3d Not a problem. At 3.50 it is explained that a greyscale has been exported out from a 3D piece.
@@mnr3d Sounds like you didn't pay enough attention to the video.
How you save it as a 3d model or 3d stl
Have a look at this video Chad - learn.carveco.com/3d-design-reliefs-and-models/creating-and-exporting-a-triangle-mesh/
Do you have videos on carving real 3D objects? I'm trying to carve a F-150 without the wheels going all the way through.
Hi Clear Cut, something like this? learn.carveco.com/carveco-projects/maker-projects/importing-and-machining-3d-models/
where is the video on how to get rid of the roughness around the edges of the image?
Here you go Michael - learn.carveco.com/3d-design-reliefs-and-models/smoothing-reliefs/
I am having issues where everything I make has a ton of bumps and low spots where it should be smooth. I'm sure it's because of different colors in the image. It would be helpful if you actually used the image you imported to finish the demonstration. Going to the point where it is opened, then using a clean modeled stl doesn't help us relief carve an image. Please can you show the rest of the process and how to deal with issues like dark colored clothing or fur. In the video, we can see the boys shirt is a series of tall rectangles and his face is pushed back instead of coming forward.
Hi, you may want to email support@carveco.com to get a more detailed response. But, normally using the smooth tool will smooth out those sharp area's and if you want to flip the relief then use the "Invert Relief" tool which will give you the opposite to what is being shown.
Спасибо, я смотрю
Hello
This video stinks. How do you rotate the relief. The video person never said
Thanks Chad, I will be sure to pass on the feedback. This is a video explaining how to create reliefs from images. If you want to rotate, then I would suggest watching this video, although you can only rotate when the relief is blue - learn.carveco.com/3d-design-reliefs-and-models/copying-relief-clipart/
@@Carveco did you watch the video. He put the image on a yellow background. He rotate it and then raised and lowered the depth of the picture. He did not explain how to do that. So, how does that help me if i dont know how to do it. His screen had a yellow background and the picture on it. He flipped it and moved it.
@@chade74 Yes, I have watched the video. There is a section at 2.30 that talks about adjusting the height where it states that you can use either the red arrow to adjust the height or input the size into the z area of the transform tool. It shows this on screen.
@@Carveco so, i grab the area he did and it becomes separate from the yellow background. He does not explain how that is done.
@@chade74 Apologies Chad, but I am not sure what it is that you want to actually do. I would contact support@carveco.com, illustrating exactly what you are trying to do. Please feel free to include screenshots from the video of the parts that you are stuck with.