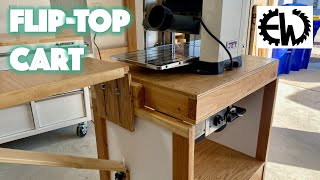
Flip top tool cart with bearings, Auto locking for flip table, mitre saw and planner thicknesser.

Вставка
- Опубліковано 28 вер 2024
- Moveable flip cart built to double up as support for the mitre saw and also providing in and out feed support for a planner.


May be the best flip cart I've seen on UA-cam
Wow thanks mate.
“Using my stomach as a third hand” is now a permanent phrase I use to give directions
Very good, thanks for watching.
Stomach leverage and tip toes are a necessity when you are a little shrimp like me. Now that I am 70, even more so.
"Like a budgie I could watch this swing around for the rest of the day". Absolutely loved that and the other comments you had in there.
Mate, after watching this I'm now re-planning on my work bench plans to leave out the compound mitre saw and make this instead. Thanks for putting this out there for us all.
Awesome , glad it helped out.
.
First one to use ball bearings on the swivel.
Top man.
Has anyone designed a swivel arrangement which rotates 2 horizontal tables. ?
Like the big wheel at a fairground or a rotating arm with a self levelling platform each end which keeps the tool upright and can still be double stacked.
Next is the dust extraction.
I think the bearings keep it way more accurate and give it a way more positive location. Dust extraction on my chop saw has been a challenge.
I just searched flip top miter station, and yours was the only one to pop up. This is the exact idea i had. Great job!
Thanks mate.
I was really surprised how much cutting power (and torque) this saw had out of the box. I've used other (10" saws) previously and was pretty surprised with the speed and cutting ability of this Dewalt saw.I have bolted mine to a table to minimize movement which I highly recommend.This is a Great saw ua-cam.com/users/postUgkxPeGkHOMe05FySypTOvYumxMn-xi39oRe with a light to see your cutting line (not a laser line).I'd recommend this saw fro anyone looking to upgrade from a 10" miter saw.
First I thought the bent bar for the locking mechanism was needless aesthetics, till I saw how it worked: genius! Nice work. I have a sliding miter saw that sticks out everywhere, so other designs won't work. I think your cart design will handle all the lanky stick-out pieces. Thanks for this!
Glad it may help, Thanks.
Love the build, and really love the subtle humor. Great job!
Glad you enjoyed it!
Wow, you did an excellent job. Great build, video quality, and humor. Keep it up.
Thanks champ.
You are. A world class engineer at this level.
You are to kind, thankyou.
Very nice build. I’m looking to build one for my planer and miter saw. I will definitely incorporate ideas from your build. Great job.
Thanks mate.
This is the most well-thought-out design I have seen. This positively earned a subscribe and like! Thanks for this!
No no, thanks you.
Nicely done! I like the bearing and pipe idea with the planner going in the same directions as the foldable wings. Can't wait to try this on my own!
Nice, let us know how it turns out. Thanks for watching.
Probably the best one I’ve seen well done
Thanks mate.
Very nice - I am studying videos and looking to make a flip cart for my drill press and miter saw. I watched another that had a sliding surface so that the flip cart (table) could be wall mounted. I am going to combine that with a lot of features from your design. You have inspired me to get started! On your cart, I really like the self locking feature, your use of bearings rather than pipe on wood friction fit, and the stop blocks for the rotation (great ideas).
You also held my interest for your entire video (I find myself skipping ahead on most videos) so your content was perfect.
Thanks heaps for that comment, means a lot. Let us know how your build turns out.
I didn't want to build one of these before I watched your video, but now I do. Great work and nice shop!
If you go ahead let us know how the build turns out. Thanks for jumping on board.
Absolutely love the design. So many of the ideas I've had, but actually put in place. You have definitely saved me some headaches in the future. Also, I love the humor and hope that your channel blows up!
Oh thanks so very much, just hope that whatever I do helps in some sort of way. Cheers bro.
Thank you for a Super Fantastic idea!!!!! Just what I was dreaming about..!!!! Keep up the good work
Cape Town
South Africa
Thanks mate.
Hey, I am collecting alot of build videos to pick and choose for my new shop (first one) and would love to hear you say that there are plans for this beautiful work of art. The video was fantastic and very understandable. Many on the Tube aren't always as clear as yours. Great job. Keep putting the videos out.
Thanks so very much. If I could do plans I would and they would be free. Just want others to enjoy.
Very well done.
Thanks mate.
Great locking,catch
Thanks heaps, and thanks for watching.
I paid $15 for an average flip top cart plans and this is 10x better than that. Please make some plans for this one. This is exactly what I need.
Thanks mate, if I knew how to do decent plans I would.
Very well designed piece of kit... it's now on my list of things to do... great job 👍👍👍
Awesome, let us know how it turns out.
That is a awesome build
Thanks
Well done!
Thanks champ.
Awesome build mate top stuff !!
Thanks bud, glad you enjoyed.
Bravo! Come mai hai così pochi iscritti? Bravo veramente.
Thankyou, only just starting out.
Brilliant! Great job, great commentary. Just subscribed 👍
Thanks champ.
good job Mate
Thanks champ.
You literally thought of everything i did and executed... wow i hope i can build this one day
Can you share more detail about your supports, what it looks like when it touches the wing?
Also, why do you need a bearing and the connector piece, couldnt you just use a long rod with the different plywood bracing that you had?
The latch is simply called a spring loaded catch bolt, I used bearings so that the flip will always lands in a positive position so the saw and thicknesser line up with the wings. Thanks for watching.
@@RJsShedShop Thank you!
Can you share more detail about your supports, what it looks like when it touches the wing?
Also, why do you need a bearing and the connector piece, couldnt you just use a long rod with the different plywood bracing that you had?
I sure wish you had plans available.
I wish I had the ability to do a plan. Thanks for watching.
Hi there, congratulations with the build, it's the best I've seen so far. One question, why do you split the pipe tube in two? Wouldn't be easier just to use one single pipe tube all the way through? Thanks!
Thanks mate, I use a T connection in the middle as to feed the cabling through as it is convenient. You could however drill a hole to feed the cables through if you wish.
Hi @@RJsShedShop ok I understand, so that's the only reason, I thought there may be other reasons. Thanks a lot for getting back.
Nicely done. Thanks for the inspiration. I have just purchased the Sherwood thicknesser and a Sherwood sander, both way too heavy to be dragging around. Your flip cart might just be the shot. I'm worried about the thicknesser hanging upside down.
Thanks bud. I was initially worried myself at first. Using 19mm marine ply and adding those extra blocks where the thicknesser bolts down gives you nearly 40mm of material. Now I flip my cart over daily and don't even think about it. Good luck on ya build, let me know how it turns out.
Nice work mate.
Cheers bud, thanks.
For me, I think I'd rather have the plugs outside where I can get to them. Sometimes I need to take my saw or planer to location. I wouldn't want to disassemble the table to do that. Great build though. Really nice.
Fair call thanks for watching.
Very nice super, genius .
Thanks heaps.
Cool build man !
Thanks, glad you enjoyed it.
bloody ripper mate with comical narrative chucked in ha ha well done
Thanks champ, glad you enjoyed it.
Beautiful and clever build! Do you have plans for this build?
Sorry champ, not smart enough for drawings. Thanks for watching.
This is amazing!!! Can you explain how you calculated the height & location of the flip top to get it to be level with the wings? I get stuck trying to figure that bit out when planning my own!
Thanks, I will do my best. The easiest way I found was to place the saw on the flip table as this has the highest bed height compared to the thicknesser. Place a straight edge across the saw , clamped if needed then clamp the extension wings then mark where to cut the sides. Tip would be to make the saw a little lower than needed then you can shim it up to suit the wings, same for the thicknesser . Hope that helps and best of luck. let us know how it turns out or if you need anymore advice.
Thank you for this great video. I already own a flip stand for my thickness planner and Oscillating Belt/Spindle Sander but your combo makes a lot more sense as both your tools benefit from the extension wings. I'm considering doing something like yours but worried about how heavy my mitre saw (Dewalt DW780) and thickness planner (Dewalt DW703) are. How heavy are your tools? (if you are not sure providing the models would be good enough so I can look them up). Also, wondering if you have have had any issues with the mitre saw calibration after a year of use?.
Thanks bud, no issues with the saw. Weight issue not a problem using the bearings and 25 mm ply for the base and sides.
Did you just start building or did you have a plan and cut list? If so would you mind sharing?
Started building with some very basic sketching as I went.
Can i ask the water pipe you uses was thar 1/2 inch or 3/4inch pipe?
3/4 champ, thanks for watching.
I was working on a cart of my own and was stuck on the in & out-feed table design. You solved it!
Did you use locking casters? How stable is it when you’re pushing material through?
Yep I used locking casters and it is very stable. Glad it helped and thanks for watching.
Very clever design RJ, did you get the materials (pipe, bearings, hinges) from Bunnings? I’m wondering if you could be interested in creating a CAD plan to offer for sale.
Thanks bud. Bearings from a wholesaler, dirt cheap. the rest is all available at Bunnings. Just starting out and I would not have a clue how to do a CAD plan.
@@RJsShedShop thanks RJ, any suggestion on where to get the bearings?
@@alessandrosuppini943 Bearing wholesalers in Bayswater. You should be able to order on line.
Do you have plans on how to
Do you have dimentions of it by chance was thinking of building one and the bearing idea I’ve been thinking of for quite some time now
Sorry for the late response, I hope you have started your build by now.
Great build… most of all I like the automatic latching system for the flip top! I’m about to improve my workbench which includes a flip top mitre saw station, and I’ll definitely be copying that 😊😊
Nice, hope it all works out for you.
I'm just about to build mine, so I've been glued to UA-cam. This is by far the best build I've seen. You've fixed all the flaws I've noted in other plans: locking mechanism, stop blocks, in/outfeeds, bearings ... Thanks from a fellow colonial!
Thanks , let us know how your build goes.
agree 100%!
Why are bearings necessary? I'd like to build this one day but wouldn't a rod do the same thing without the bearings?
This is a great video; your instructions are clear and all processes are well-shot. I really like your approach to this project too and appreciate the grinder-turning in lieu of using a lathe. A small criticism though: avoid the passive voice in your narration. YOU did all these things and you can afford to be proud of it!
Thanks so very much, I am know researching what a passive voice is, haha. Thanks heaps.
I quit. That is the best flip cart I have ever seen. I made one but now I have to start all over. Damnit anyway! You could sell plans for this for $99.95 each. I quit.
Thanks mate
Some extra ideas here. Thanks- I can watch UA-cam vids all night long so appreciate your short & sweet approach 😅
Thanks heaps.
"i had some marine grade laying around..." Lol. I wish i had some fantastic ply like that just sitting with no purpose. Some guys have all the luck.
Thanks for watching.
Nice build!! You gave me some inspiration to start building my own. Going to use it for my miter saw fold away and nothing on the other side. Dont have that many machines yet and could use it as an extension table when its all flat at the top. :)
Haha, was just about to ask if you had shares in a screw manufacturing company, when you noted yourself you drilled way too many holes :)
Love the Jorgeson clamps btw.. Here in Netherlands I could only buy the maller 300/50mm ones. Hope the larger ones will be available one day. Very good and practicle clamps!
So glad it helped out. let us know how your build turns out.
Came for the build therapy, subscribed for the deadpan humor
Thanks mate.
effettivamente un progetto utilissimo e ben fatto... quasi quasi provo a farlo... molto utile visto il sempre poco spazio a disposizione..
Thankyou, much appreciated.
Really enjoyed your video.
Did you produce a 3D drawing for this or just improvised it?
Please keep them coming.
Thanks champ, improvised.
Like how every one has leftovers plywood laying around. With the price of plywood being so high it’s hard to buy it.
Its not cheap at all. Thanks for watching.
There is only one thing missing on this stand. And that is a place to store that stop block. I know that I would end up loosing it within minutes of switching over to planer mode. Just need a short section of t-track to put it on that is out of the way. Thanks for all the ideas.
Yes it has since been addressed. Thanks .
Like a budgy I can watch these thing go round and round……..😂😂😂😂
Things that spin crab my attention, thanks for watching.
Well, so much for the excuse of a mitre station taking up so much space!
Thanks for watching.
Nice work but too demanding for me as a beginner, with all the metal work :)
Thanks mate, you will be fine, just take your time and give it a go. I am learning as I go.
Have you got plans for this mate? Every other video is in inches and it does my head in trying to convert their stupid measurements
Sorry champ, I wish I was that clever.
truly excellent build. curious if you would be willing to sell plans?
Thanks, I no clue how to do plans.
This is the 1st auto locking flip top I've seen, so simple and practical, beautiful!
Other details like the stops and bearings make this video (and the cart itself) stand out in a "crowd" of DIY flip top videos.
The folding "wings" are also a nice addition for a space saving cart, although in my experience with folding tables, this design starts to "play" a little after a while. Since you've posted the video more than 6 months ago, I'd be happy to hear how it's been working for you.
Thank you for this video.
Cheers bro, my table has been used quite a lot and I am more than happy with the way it has stood up. Good quality heavy duty piano hinge seems to have work nicely .
Hey RJ,
Wondering where you got off too! Very nice flip top, the auto lock mechanism is clever and strong. As usual we'll done.
Of course your shop is too clean (I've got that same kinda OCD) and my back still aches from watching you wrestle that planer into place. ouch.
OCD in a workshop is a great advantage. My little stomach comes in handy when lifting a heavy load. Thanks for watching.
Nice work. I really like some of the little things that you've added to raise this cart up a notch from others. - Chris
Thanks, always trying to make it as user friendly as possible.
Looks great but no measurements or plans
Sorry not that smart, Thanks for watching.
It's a nice idea. A year later, did it hold up or did it wobble to much? Even with the gussets it seems a little jittery with a hundred pounds resting on a pipe.
It has been great, maybe be better if I used
thicker ply for the base for an uneven floor, however I am super happy.
@@RJsShedShop thanks for the response.
Very impressive! 🥇
Thanks mate.
😊very good design.
Thanks mate.
Awesome, I love it.
Thanks for watching .
Nice work.
Thank you! Cheers!
Bro! Not brom
Brom can be our thing, no one has to know brom.
Well done!
Well thankyou kindly.
Well done!
Thanks
This is the flip cart I was looking for. The orientation of the planer to also use the feed supports along with the saw is what nailed it for me. Please, PLEASE, for everyone here (but mostly me), can you post in a single comment here, at least the dimensions of the main big pieces? Inches or cm, either way, but anything at all would be helpful. I'm probably wrong here, but guessing close to 92x76 cm (~ 36x30 inches) for the platform and sides. But just the big parts would be very helpful. Thanks for a great idea and build video!
I will get back to you soon with some dimensions soon. Thanks for watching.
Turn Table HxLxW 120 x 730 x 600 , Carcass 760 x 900 x 600 , Wings 100 x 730 x 500 mm. That is without the castors. good luck bro.
Thank you very much, sir! (Heh, from all of us, I think) @@RJsShedShop
Very nicely done, and a great video! I will steal the locking mechanism. Thank you for investing the time to make this video, it really helped me to design my own flip table. I will start building it this weekend.
Awesome, thanks for watching, let us know how it turns out, all the best.
Absolutely fabulous cart. Stands out above the rest. Brilliant job!!
I happen to have exactly the same mitre saw and similar thicknesser so definitely going to give this a go.
Big question:
Do you have a set of plans to make my life a hell of a lot easier???????😮
Wish I did have plans, not enough grey matter for that. Ask at anytime during your build happy to help out.
@@RJsShedShop haha! You’ve plenty of grey matter! Really appreciate it, I Amy just do that. Keep up the good work. Look forward to watching and learning more from you
Hi there wondering if you have some dimentions of it would be appreciated thanks
So inspirational such a good idea
Thanks heaps
Beauty. I was wondering how I could use pillow bearings with water pipe. Thanks for the short and sweet vid.
No probs, enjoy.
Best flip cart video ever. That thing is super clean and looks absolutely amazing! Can't wait to start on mine soon!
OH Thanks, let us know how it turns out, good luck.
Very inspirational, I have a small, shared workspace and being economical with space is extremely important. Thanks for sharing.
Thanks for watching.
Awsome build! Well done. Its been a year...any feedback having been able to use it for a while? The only I saw might be adding a ruler (sticker or recessed thin metal) by the stop block to help with the miter saw use.
Thanks mate, if I had my time again maybe double up on the ply thickness for the base, otherwise I am super happy. Bearings are great.
"Using my stomach as a third hand..."😄
"Then I procrastinated for half-a-day deciding whether to install on inside or outside of the frame..." You're so relatable!
Thanks for these great ideas. It's clear that your final product is not only beautiful but also fit to last. I love the idea of using bearings and also like the built-in stops you created. I was tempted to rewind and quote every funny quip you made, but I decided to take your instruction and stop procrastinating. Thank you - for the guidance and the laughs!
Glad it may help and glad you had a laugh, thanks for watching. Sounds like your about to build your own, let us know how it goes.
Awesome cart! Having you had any subsequent structural issues as you've used it over the last year & a bit? Cheers
Been great maybe I should have doubled up on the ply thickness for the base.
I was thinking, I’d love to be a fly on the wall in your shop, there’s so much I could learn! Then I thought, the next best thing would be to subscribe! So that’s what I did.
Thanks mate, let us know if there is a video or build I can try for you.
I'm getting ready to build one of these. I'll need to remember to use the snotty goop!! :) Well done!!
Thanks .All great craftsman use good quality snotty goop.
Great build. I’ve been looking all over YT for a design that uses the wings for both a miter saw and a planer/jointer. I’ve got a benchtop jointer and really want wings to function as an extended infeed/outfeed bed on longer pieces. It’s good to actually see one built to help with my design. The flipstop locks are next-level and I’ll be trying to work those into my design. I also enjoyed the quick glimpse of your stop blocks on your miter sled. Very slick! Are you still happy with the cart? Anything you’d modify now that your piece is a year old? Thanks for posting your video!
Thanks champ. No I am very happy, for me the cart worked out great. You could possibly double the ply thickness on the base just to help out on uneven floors.
Great vid. Loved the commentary,especially the comment about using your gut as a third hand! I can relate. Cheers brom
Thanks champ.
Great job. I’ve had a miter saw and just bought a planer. I really like this idea for my small garage shop. You’ve got a new subscriber.
Thank you very much!
I like your genius idea....
Thanks champ
A great build, makes my flip cart look very shabby ,thanks for posting from Garry in the UK
Thankyou, as long as your cart works and your creating all is good.
This is 150% what I was looking for! Just bought a planer and saw a DIY on how to build a planer stand. Then I thought, "what about a flip stand", then, "what about a flip stand for a mitre AND planer", then I thought, "what about a flip stand with feeder table for mitre and planer".... the algorithms read my mind.
That's so good, I glad this may help. If I had my time again I would double up on the thickness of the two side panels, that's only a minor improvement. good luck bro.
Great build, superb detail.
Love the procrastinating for half a day for internal or external. We have all been there. 😊
Its all part of the deal, thanks for watching.
A couple of quick questions.
1. Could you give us the overall dimensions (LxWxD wings not included) to help us plan it for ourselves
2. Where did you get the bearings from?
Cheers & thanks again for such an awesome build video
I love this and may attempt something similar. I say similar because I often take my mitersaw to remote job sites, so I will make a base that is similar to the bosch stand it sits on for quick changes.
Thanks, great idea to have it interchangeable.
So glad to see another one of your videos. Great to see your shop finally taking shape. Well done
Glad you enjoyed it, more to come, thanks.
Very nice job on the flip cart.
Thanks bud.
Just found this video, brilliant build mate! It's good to see a new and creative flip top design, now I need to rethink how I want to build mine.
I hope it turns out great.