How to do EXPOSURE BLENDING in Photoshop

Вставка
- Опубліковано 3 лип 2024
- Learn how to blend different exposures with the apply mask tool in Photoshop!
You can follow along this Photoshop Tutorial by downloading the raw files here:
drive.google.com/drive/folder...
▬▬▬▬▬▬▬▬▬▬▬▬▬▬▬▬▬
Thank you for watching my video!
► www.the-phlog.com
► Patreon: / phlog
► Instagram: / thephlog
▬▬▬▬▬▬▬▬▬▬▬▬▬▬▬▬▬
0:00 Intro
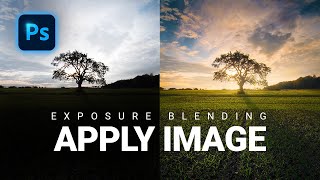
For this shot I wanted to have all the details in the highlights and shadows available. Since the contrast of the scene was quite heavy with dark shadows and super bright highlights, getting all the details from a single photo doesn’t make much sense. To counter that I did some basic exposure blending with Photoshops Apply Mask tool. Before that however, I first worked on the raw adjustments.
0:50 1. Basic Adjustments
For this image I had three different exposures (one for the shadows, one for the highlights and a “base” exposure). I started the raw adjustments o the base exposure and later synchronized the settings with the other two raw files.
I started by changing the profile to Adobe Landscape for a bit more saturation. Then, I adjusted the white balance making the image slightly colder. Since I’m going to blend different images, I don’t bother changing the exposure settings. However, I did add some texture, clarity and vibrance to get a sharp, saturated look.
1:48 2. Masking
I used a simply radial gradient over the boardwalk to add some more texture and clarity
2:13 3. Color Grading
I brought down the yellow saturation, while increasing green and blue. Then, in the calibration panel, I brought down the blue primary hue and raised the saturation.
3:08 4. Exposure Blending
To do the exposure blending, I placed the brightest photo at the bottom, then the base exposure and then the darkest shot for the shadows on top. For this you want to disable the top two layers and add a layer mask on both of them. Starting with the base exposure, I selected the layer mask, then went to the image menu (at the very top) and chose apply image. Without adjusting the settings just hit ok and enable the base-layer again. This way, you can easily blend different exposures, however you might need to further adjust the layer mask to get the desired look in the end!
To finish this, I added a bit of Orthon glow just over the highlights, and then some more contrast using a levels adjustment layer.
#photoshoptutorial #photoshop #photoshopediting - Фільми й анімація


I was impressed with the solid editing. Very clever use of Apply Image to create masks!! I believe this is a technique with a lot of potential.
Super! all your tutorials 👌👌
Great tutorial many thanks looking forward to trying these techniques to improve my images
Thank you!
i love this image a lot!
Vielen Dank für dieses tolle Erklärungsvideo Christian TOP!!!!
Danke dir! :-)
Great tutorial, thanks :)
Many thanks Christian !
I was waiting for you to use apply image cos it's faster than the way you used to earlier. To complete that way, it's better to keep the original mask "in case of" and to group with a mask as you did at the end of this tutorial. Thx👍👍
Just realized I've watched like 11 of your videos and hadn't subscribed yet. It was time.
Thank you so much!
Thank you for this, very interesting. Hope I'm not being too petty, but the whole time I was put off with the jetty being a little crooked.
Thanks for the comment! Dont worry, it drove me crazy as well haha
After following this tutorial my Pictures got so exposed that i got reported for sexual harassment
Thanks for the tutorial. Just a question, why don't you update to the latest TK plugin and keep using a quite dated one?
Thanks for commenting! Honestly, thats just lazyness on my part haha, should probably upgrade the plug in :-)
Could you clarify the difference between HDR merge in lightroom and Exposure blending in PHSP. My assumption is HDR merge is useful for single image editing DR while the multiple brackets are best for exposure blending in PHSP. When I try 3/5/9 shots in a HDR merge in LR - the resultant DNG is exactly the same if using just 3 shots (-4,0,+4 or 9 shots 1 EV apart), so no benefit using more than 3 shots over the same range of stops.
HDR merge is a looot more easier compared to manually blending in Photoshop, to be honest at the moment I rarely do the blending manually, I just rely on Lightroom merging the HDR!
I recently switched from 3 shots to 5 bracketed photos since it assures an even higher dynamic range at the cost of some more hard drive space. Of course this will be overkill for like 95% of scenes, but I encountered quite a few photos the past few months that benefited from the 5 bracketed HDR!
When I open the files they don't show as layers :( each image is on its own tab. When I use the script "Load Files into stack" they show as layers. but Camera Raw is skipped. How do you do that ?
start in lightroom or capture one and then export/open in photoshop.
Open them from Bridge (Adobe Bridge is the way to access Camera Raw in Photoshop from scratch)
In what world in 'after pic' better than 'before'?
Is there a way to target the highlights without additional plugins?
You could go back to ACR or Lr and use the Luminosity range mask.
@@dktraveller8364 would I be able to get that mask into Photoshop though like he did with that plugin
You could try the CTRL+ALT+2 shortcut to target the highlights, or like DK Traveller mentioned luminosity range mask in the ACR editor :-)
@@ThePhlogPhotography thank you for the tip.
you can use the masks from the channels panel to create luminosity masks from scratch.
ρɾσɱσʂɱ
I am new to your channel, so I am not sure this is on purpose or your style - but your voice audio is missing and it seems like you're explaining something with your cursor.
Thanks for pointing that out, can you say at which specific time that happened? I could find it when looking over it real quick
Seems to have been a UA-cam app glitch, when I was watching the beginning of the video everything was fine this time. Sorry for the false flag and thanks for the video!